
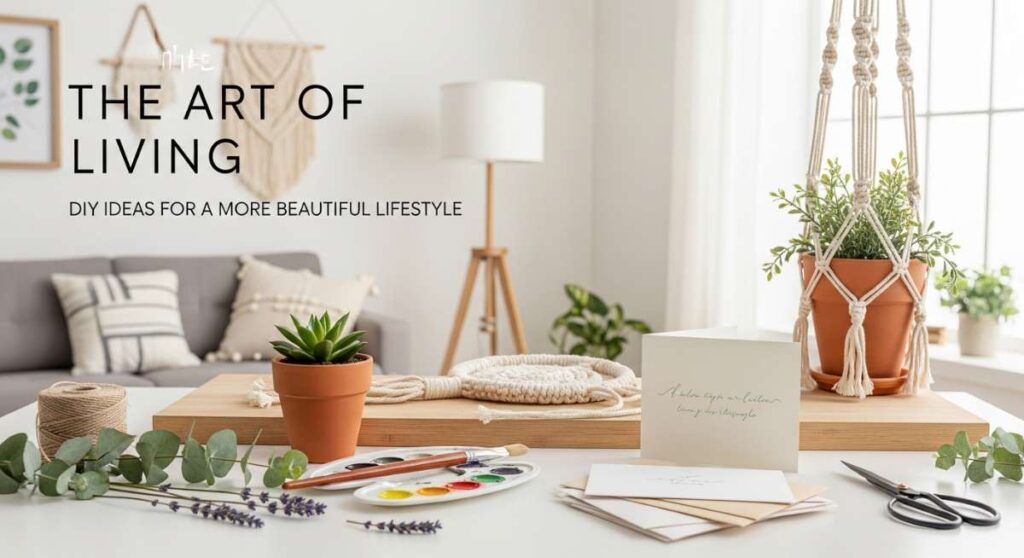
The Art of Living: DIY Ideas for a More Beautiful Lifestyle
There is a profound, quiet magic in the act of creation. It is the moment when a house stops being just a structure of wood and glass and begins to breathe with the rhythm of your own soul. We often think of a ‘beautiful lifestyle’ as something we buy in a store or curate from a catalog, but the truth is far more intimate. It is found in the dirt under our fingernails after planting a rosebush, the smell of fresh cedar as we build a sanctuary for our backyard animals, and the vibrant splash of paint that transforms a dull shed into a work of art.
In this guide, we are exploring the intersections of utility and beauty. Whether you are looking to revamp your outdoor space for summer hosting or organize a creative sanctuary for the little ones, these DIY projects are designed to spark joy and foster a deeper connection to your surroundings. Let’s reclaim the art of living, one thoughtful project at a time, and turn the everyday into something extraordinary.
How to Design Flower Beds in Front of House for Instant Curb Appeal
Why we love this
There is nothing quite like the sensory explosion of a well-tended flower bed greeting you as you pull into the driveway. Imagine the sweet, heavy scent of gardenias wafting through the air on a humid afternoon, or the sight of vibrant purple salvia swaying against the crisp white trim of your home. It creates an immediate sense of welcome, a soft transition from the hectic world outside to the sanctuary of your home. The texture of soft mulch underfoot and the visual depth of layered heights make your entryway feel established, lush, and intentional.
Essential Elements:
- A mix of perennials (Hostas, Coneflowers) and annuals (Petunias, Marigolds)
- High-quality organic topsoil and cedar mulch
- Natural stone or brick edging
- Landscaping fabric for weed suppression
- Hand trowel and gardening gloves
How to make it
- Begin by sketching a curved line for your bed using a garden hose to visualize the shape; soft curves feel more organic and high-end than harsh straight lines.
- Remove all grass and weeds within the perimeter using a flat spade, ensuring you dig deep enough to remove the roots.
- Incorporate several inches of compost and organic matter into the soil, tilling it to a depth of at least 8 inches to ensure a nutrient-rich environment for new roots.
- Place your plants while they are still in their pots to test the arrangement; put the tallest plants in the back (closest to the house) and taper down to shorter groundcovers at the front.
- Dig holes twice as wide as the root ball, tease the roots gently if they are pot-bound, and plant at the same depth they were in the container.
- Install your edging material, then spread a 2-3 inch layer of mulch over the entire bed, keeping it an inch away from the stems of the plants to prevent rot.
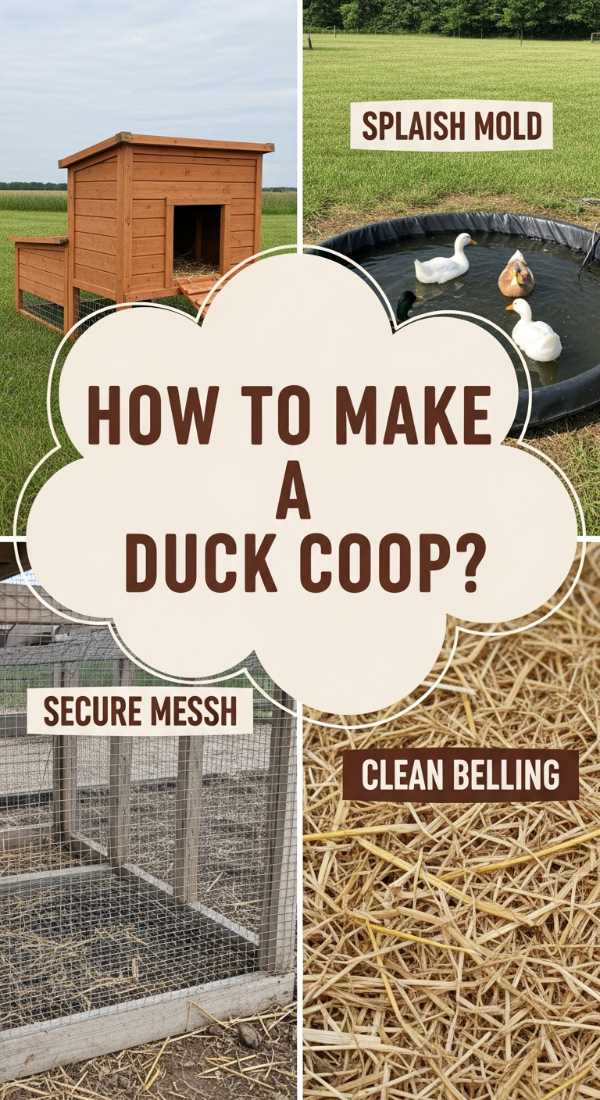
How to Build a DIY Duck Enclosure for a Happy Backyard Flock

Why we love this
Ducks bring a whimsical, rhythmic energy to a backyard that is impossible not to love. There is a deep satisfaction in watching them splash in clean water, their feathers glistening under the sun, and hearing the soft ‘quack-quack’ as they forage. A custom enclosure provides more than just safety; it provides a curated ecosystem where your flock can thrive. The smell of fresh straw, the sight of a sturdy wooden structure nestled among the trees, and the peaceful feeling of knowing your feathered friends are tucked in safely for the night makes backyard farming a true lifestyle upgrade.
Essential Elements:
- Pressure-treated lumber for the frame
- Hardware cloth (not chicken wire) for predator protection
- Corrugated roofing panels
- Deep bedding (straw or wood shavings)
- A secure, predator-proof latching system
How to make it
- Frame out a 4×8 foot footprint using 2×4 pressure-treated lumber, ensuring the structure is tall enough for you to comfortably enter for cleaning.
- Attach hardware cloth to the exterior using heavy-duty staples; bury the bottom 6-12 inches of the wire into the ground or create a ‘skirt’ to prevent digging predators like foxes from entering.
- Install a sloped roof using corrugated panels to allow for rain runoff, ensuring there is a slight overhang to keep the interior dry.
- Construct a raised ‘house’ section inside the run with solid wooden walls to protect the ducks from wind and extreme cold; ducks need plenty of ventilation, so leave a gap at the very top of the walls.
- Build a wide ramp with small wooden cleats every 4 inches to help the ducks navigate into their house without slipping.
- Add a thick 6-inch layer of pine shavings or straw on the floor, and install a sturdy lock that requires two steps to open (raccoons are incredibly clever with simple latches).
How to Organize Elementary Art Rooms for Maximum Creative Spark

Why we love this
A perfectly organized art room feels like a playground for the imagination. When colors are grouped in rainbows and supplies are within easy reach, the anxiety of ‘where is the glue?’ disappears, replaced by the pure joy of creation. We love the tactile satisfaction of rows of smooth ceramic jars filled with brushes, the visual pop of organized construction paper, and the clean, bright atmosphere that encourages little hands to get messy in the best way possible. It turns a utility space into a vibrant laboratory of dreams.
Essential Elements:
- Clear acrylic bins for visibility
- Rolling carts for mobile project stations
- Wall-mounted drying racks
- Label maker or chalkboard labels
- Pegboards for hanging scissors and tools
How to make it
- De-clutter the entire space first, testing every marker and discarding dried-out supplies to ensure only functional tools remain.
- Group supplies by medium (e.g., all watercolors together, all clay tools together) and store them in clear bins so children can see exactly what is inside without rummaging.
- Install a large pegboard at kid-height; outline each tool (like scissors or rulers) with a marker so students know exactly where each item belongs when they are finished.
- Dedicate a ‘project in progress’ shelf where wet or unfinished work can sit safely without taking up table space.
- Label every bin with both words and a small icon or picture to accommodate pre-readers and ensure the system is easy to maintain.
- Set up a designated ‘scraps’ bin for paper remnants, encouraging sustainable art practices and giving kids a starting point for collage work.
How to Craft a DIY Grill Station for the Best Summer Cookouts
Why we love this
The grill station is the heart of the summer home. It is where the sizzle of searing steak meets the aroma of charred rosemary and woodsmoke, creating an atmosphere of celebration. A dedicated station elevates the cooking experience from a chore to a performance. We love the rugged texture of stained wood, the cool touch of a stone countertop, and the convenience of having every spice and tool at your fingertips while the sun sets and the fireflies begin to dance. It is the ultimate fusion of function and leisure.
Essential Elements:
- Cedar or redwood lumber (rot-resistant)
- Concrete or granite countertop remnant
- Stainless steel hooks for utensils
- Built-in bottle opener
- Locking caster wheels for mobility
How to make it
- Build a sturdy rectangular frame using 4×4 posts for the legs and 2x4s for the shelving supports, ensuring the height is comfortable (usually 36 inches).
- Sand the wood thoroughly to prevent splinters and apply a high-quality outdoor sealant or stain to protect against grease and weather.
- Install a heat-resistant top; if using wood, cover the area directly under the grill with a metal or stone slab to prevent scorching.
- Add a lower shelf for heavy items like charcoal bags or propane tanks, and a middle shelf for frequently used items like plates and seasonings.
- Screw stainless steel hooks into the side of the frame to hold tongs, spatulas, and grill brushes within easy reach.
- Attach heavy-duty locking casters to the bottom of the legs so you can move the station out for cooking and tuck it away against the house for storage.
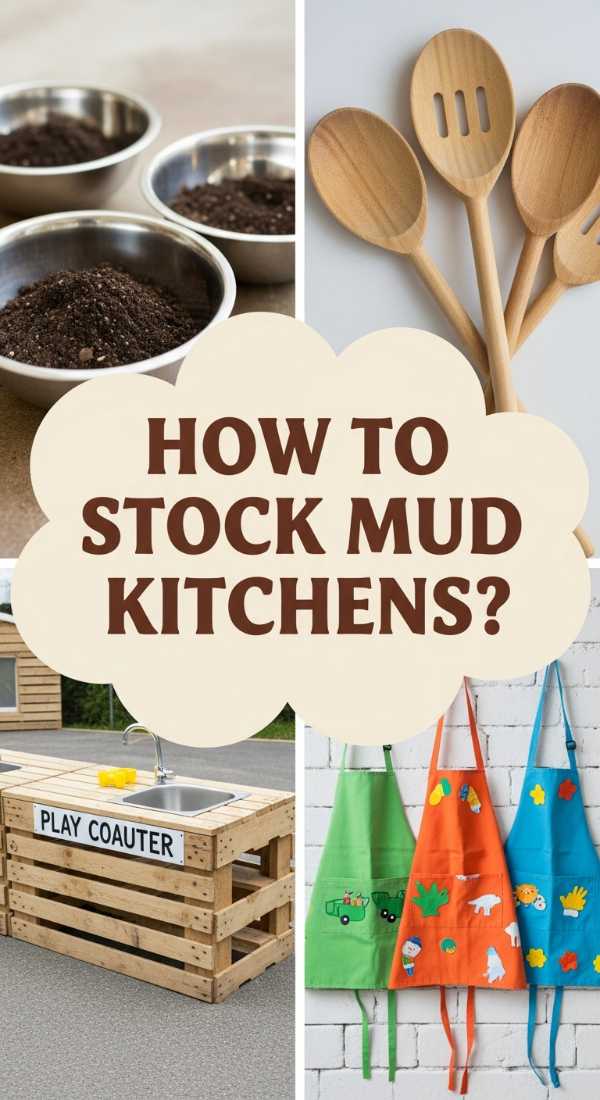
How to Select Mud Kitchen Accessories for Endless Sensory Play
Why we love this
There is a primitive, joyful magic in mud. A mud kitchen is a place where ‘soil soup’ and ‘leaf lattes’ are the finest delicacies on the menu. We love the squelch of wet earth between fingers, the clink of old metal spoons against battered pots, and the earthy, fresh smell of a garden after the rain. It is a space that honors the messy, unbridled curiosity of childhood, providing a sensory-rich environment that encourages imaginative play and a deep love for the natural world.
Essential Elements:
- Stainless steel bowls and old pots
- Wooden spoons and whisks
- Funnels and measuring cups
- Natural ‘ingredients’ (pinecones, pebbles, flower petals)
- A water source (a simple drink dispenser works wonders)
How to make it
- Scour thrift stores for real kitchen items; stainless steel and cast iron are far more durable and provide a better sensory experience (sound and weight) than plastic toys.
- Set up a ‘spice rack’ using small jars filled with dried lavender, sand, and crushed leaves to add texture and scent to their concoctions.
- Provide a variety of pouring vessels—teapots, pitchers, and measuring cups—to help children develop fine motor skills and an understanding of volume.
- Include ‘mashing’ tools like a potato masher or a mortar and pestle for grinding up chalk or berries.
- Ensure there is a large, flat surface at waist-height for ‘prep work’ and a lower area for heavy mixing.
- Add a chalkboard nearby so the ‘chef’ can write out the daily menu, merging literacy with sensory play.
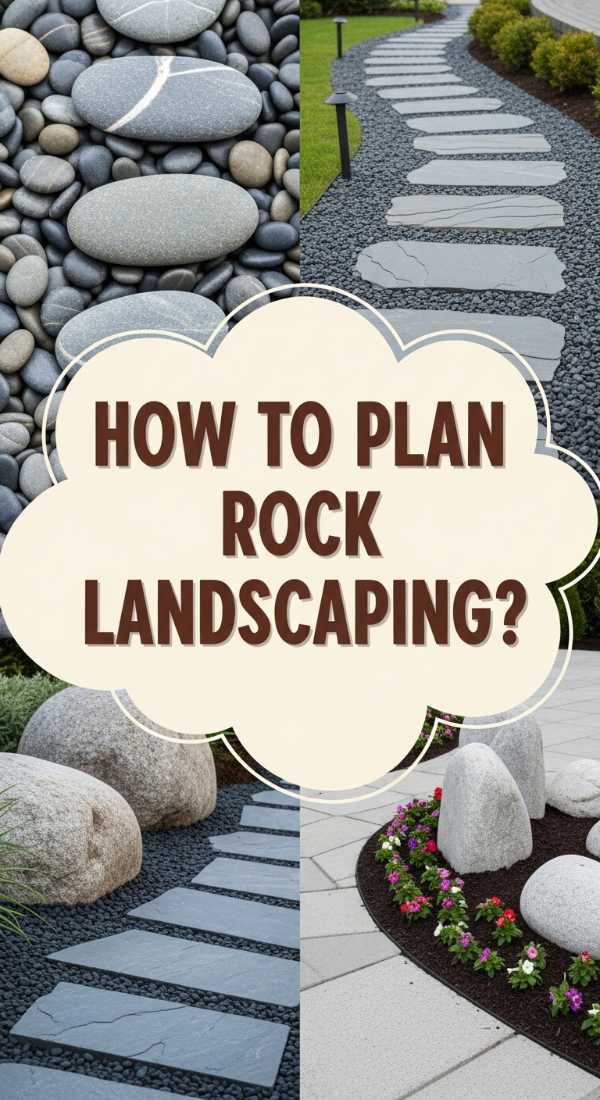
How to Arrange Rock Landscaping Ideas for a Sleek Modern Yard

Why we love this
Rock landscaping brings a sense of permanence and architectural stillness to a yard. The contrast between the rugged, matte texture of grey river rocks and the soft, vibrant green of ornamental grasses is breathtakingly modern. We love the low-maintenance aspect—no mowing, no watering—and the way the stones catch the light and change color when wet. It feels grounded, clean, and incredibly sophisticated, turning a standard backyard into a minimalist retreat that feels like a high-end spa.
Essential Elements:
- River rocks, lava rocks, or Mexican beach pebbles
- Weed barrier fabric (industrial grade)
- Steel or plastic landscape edging
- Focal point boulders
- Architectural plants (Agave, Blue Fescue, Boxwoods)
How to make it
- Excavate the area to a depth of 3-4 inches and install a high-quality weed barrier, securing it with landscape staples to prevent shifting.
- Install metal edging along the perimeter to create sharp, clean lines that separate the rock area from the lawn or pathways.
- Position your largest focal point boulders first; bury the bottom third of the boulder in the ground so it looks like a natural outcropping rather than just sitting on top.
- Plant your greenery through the fabric by cutting an ‘X’ in the material, ensuring you choose plants with interesting silhouettes that stand out against the stones.
- Pour your smaller decorative rocks around the plants and boulders, smoothing them out to a depth of at least 2 inches to ensure full coverage.
- Hose down the rocks thoroughly to remove dust and reveal their true colors and textures.
How to Style a Teen Room for the Ultimate Retro Aesthetic
Why we love this
The retro aesthetic is all about nostalgia, warmth, and self-expression. It’s the soft glow of a neon sign reflecting off a velvet pillow, the crackle of a vinyl record, and the funky mix of mustard yellows and burnt oranges. We love how this style allows a teen’s personality to shine through a collection of ‘old-soul’ treasures. It creates a space that feels lived-in and cozy, yet vibrantly cool—a sanctuary where they can retreat from the digital world into a tactile, analog-inspired haven.
Essential Elements:
- Record player and vinyl storage
- Lava lamps or neon wall art
- Macrame wall hangings
- Vintage-inspired posters and art prints
- Patterned throw rugs (shag or geometric)
How to make it
- Start with a neutral base on the walls but bring in a ‘pop’ color like terracotta or sage green through bedding and curtains.
- Create a ‘music corner’ with a dedicated table for a turntable and crates for record storage; this serves as a focal point and an activity hub.
- Layer textures by placing a plush shag rug over hardwood floors and adding velvet and corduroy pillows to the bed or a papasan chair.
- Use ‘warm’ lighting—string lights, Edison bulbs, and sunset lamps—to create that hazy, nostalgic evening vibe.
- Hang a gallery wall using a mix of vinyl covers, film photography, and retro pennants, using command strips to keep it flexible for changing tastes.
- Incorporate a few real or high-quality faux plants, like a Monstera or a Snake Plant, in ceramic pots to add life and that classic 70s earthy feel.
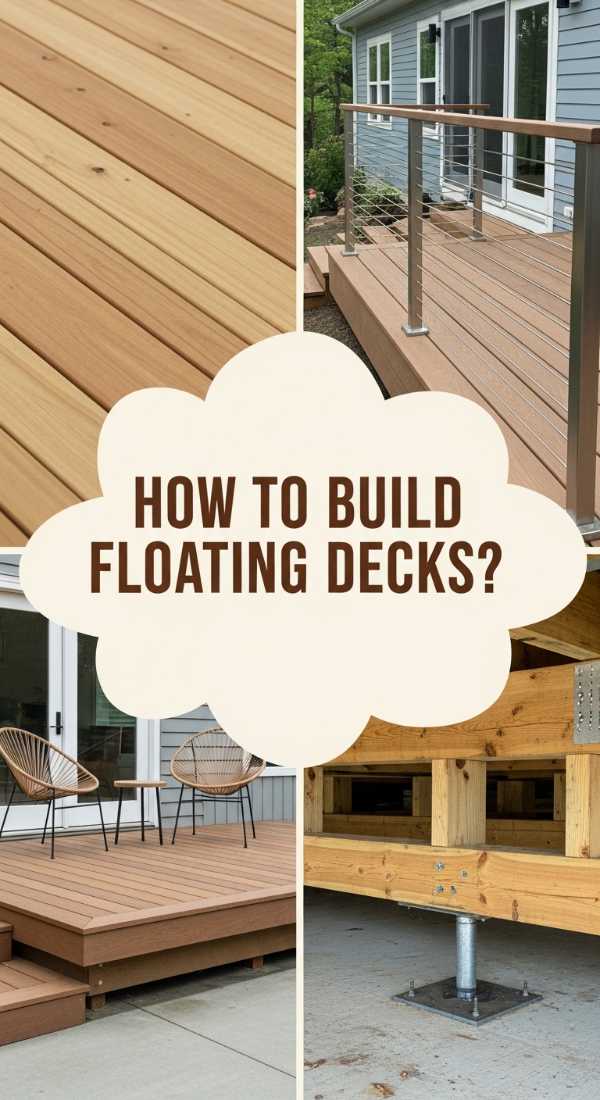
How to Construct a Floating Deck for an Elevated Outdoor Retreat

Why we love this
A floating deck is the ultimate ‘room without walls.’ There is something inherently relaxing about being slightly elevated off the ground, closer to the breeze and the rustling leaves. We love the clean, horizontal lines of the decking boards and the way the wood warms up under the afternoon sun. It creates a defined stage for morning coffees or late-night stargazing, providing a flat, stable surface that feels like a luxury extension of your indoor living space right in the middle of nature.
Essential Elements:
- Pressure-treated 2×6 boards for the frame
- Decking boards (Cedar, Pine, or Composite)
- Concrete deck blocks
- Galvanized deck screws
- Level and chalk line
How to make it
- Clear the ground where the deck will sit and level it as much as possible, then lay down landscape fabric and gravel to prevent weeds and improve drainage.
- Set your concrete deck blocks in a grid pattern; for a standard 8×10 deck, you’ll want blocks every 4-5 feet to ensure the frame doesn’t sag.
- Construct the outer frame using 2×6 pressure-treated lumber, checking for square by measuring the diagonals (they should be identical).
- Install interior joists every 16 inches on center, securing them with joist hangers for maximum structural integrity.
- Lay your decking boards across the joists, using a spacer (like a carpenter’s pencil) to ensure even gaps for drainage and wood expansion.
- Trim the edges of the boards with a circular saw for a perfectly flush finish, then sand the edges and apply a UV-resistant sealer to protect the wood from greying.
How to Use Dollar Tree Solar Lights for Enchanted Garden Nights
Why we love this
Enchantment shouldn’t have to cost a fortune. There is a whimsical, fairy-tale quality to a garden that glows softly after dark. We love the way simple solar lights can transform a dark path into a glittering runway or turn a potted plant into a glowing centerpiece. The gentle, cool blue or warm white light reflecting off dewy grass creates a sense of mystery and peace, inviting you to step outside and breathe in the cool night air long after the sun has set.
Essential Elements:
- Stake-style solar lights
- Glass jars or lanterns
- Clear fishing line (for ‘floating’ effects)
- Outdoor-safe adhesive
- Decorative shepherd’s hooks
How to make it
- Remove the plastic tabs from the batteries and let the lights charge in direct sunlight for a full 24 hours before installing.
- For a high-end look, remove the stakes from the solar tops and glue the light units to the lids of upside-down mason jars filled with glass pebbles; the pebbles will catch and refract the light.
- Line pathways by staggering the lights rather than placing them in a straight line; this creates a more natural, ‘twinkling’ effect.
- Hang stake lights from shepherd’s hooks tucked into hanging flower baskets to illuminate your blooms from above.
- Paint the plastic stems of the lights with metallic spray paint (like hammered bronze or copper) to make them look like expensive metal fixtures.
- Cluster several lights together at the base of a tree to create an ‘up-lighting’ effect that highlights the texture of the bark and the canopy above.
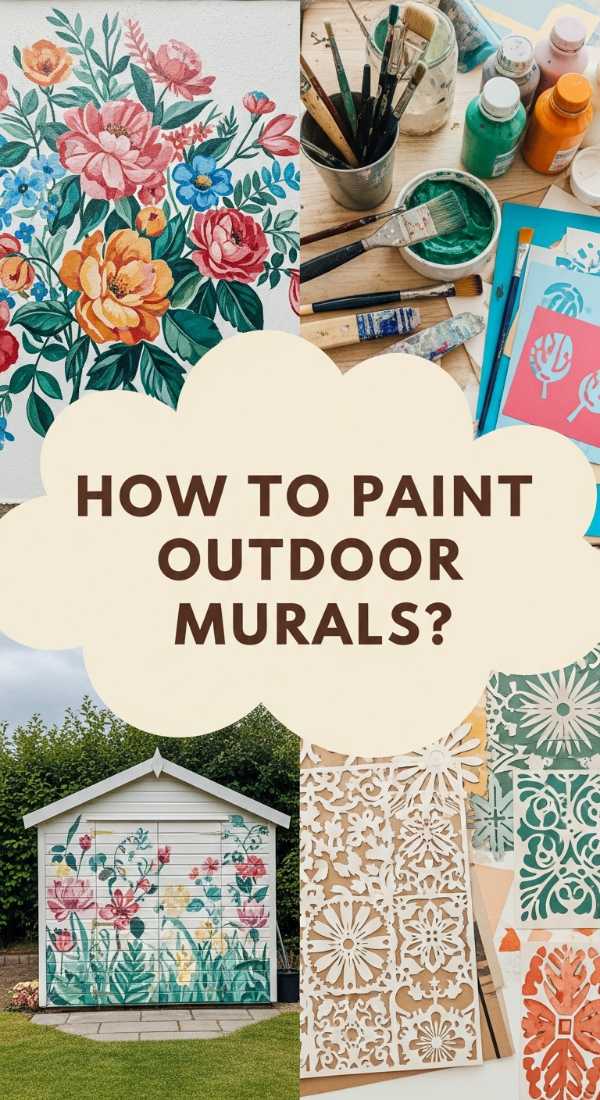
How to Design Shed Murals for a Bold Outdoor Statement
[IMAGE_10]
Why we love this
A shed mural is a love letter to your garden. It takes a purely functional, often weathered structure and turns it into a giant canvas for joy. We love the way a burst of painted flowers or a geometric pattern can bridge the gap between the house and the yard. It’s a bold, unapologetic expression of creativity that makes every glance out the window feel like a trip to an art gallery. The vibrant colors against the natural greens of the garden create a stunning visual rhythm that is both energizing and deeply personal.
Essential Elements:
- Exterior-grade primer and paint
- A variety of brushes and rollers
- Painter’s tape for crisp lines
- Doodles or a grid for scaling your design
- Clear exterior sealant (topcoat)
How to make it
- Power-wash the shed to remove dirt and peeling paint, then sand any rough spots to create a smooth surface for the mural.
- Apply a high-quality exterior primer; this is crucial for ensuring your colors stay vibrant and don’t soak into the wood.
- Sketch your design lightly with a pencil or chalk; if it’s a complex image, use the ‘grid method’ to ensure the proportions are correct across the large surface.
- Start by painting the large background shapes first using a roller, then move to smaller brushes for the detailed foreground elements.
- Use high-pigment exterior house paints or specialized mural paints that are formulated to resist UV fading and moisture.
- Once the paint is completely dry, apply two coats of a clear, non-yellowing exterior sealer to protect your masterpiece from the elements for years to come.
Conclusion
Creating a beautiful lifestyle isn’t about perfection; it’s about the intention we pour into our surroundings. Each of these projects, from the simplest solar light hack to the construction of a floating deck, is an opportunity to touch the world around us and leave it a little brighter, a little more ‘us.’ As you embark on these DIY journeys, remember to enjoy the process—the feel of the tools, the smell of the garden, and the satisfaction of a job well done. Your home is your canvas; go forth and make it beautiful.