
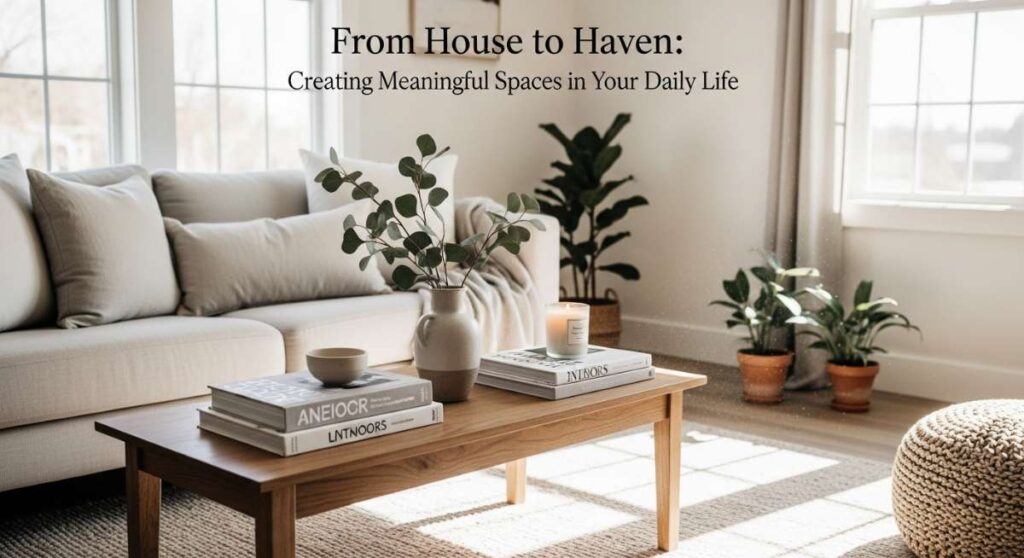
From House to Haven: Creating Meaningful Spaces in Your Daily Life
There is a profound, soul-deep difference between a house where you simply store your belongings and a haven where your spirit actually exhales. We spend so much of our lives rushing through the motions, often overlooking the very walls that hold our memories. But what if your environment could actually fuel your happiness? I’ve found that the secret isn’t in the square footage or the price tag; it’s in the intentionality we bring to every corner, from the texture of a rug to the way light hits a backyard retreat.
Creating a haven is about more than just aesthetics; it’s about a feeling. It’s that soft sigh of relief when you walk through the door after a long day and feel instantly held. In this post, we’re diving deep into the art of making your space work for you—whether you’re transforming a compact singlewide into a modern sanctuary, curating a vendor booth that tells a story, or turning a simple stock tank into a private oasis. Let’s explore how to infuse beauty and function into every aspect of your lifestyle.
How to Style a Poly Stock Tank Pool for a Backyard Oasis
Why we love this
The poly stock tank pool is the ultimate underdog of backyard design, offering a chic, utilitarian aesthetic that feels both nostalgic and incredibly modern. We love the way the matte grey or deep blue plastic plays against the natural greens of a lush lawn, providing a cool, refreshing sanctuary on those sweltering summer afternoons. There is something deeply satisfying about the tactile sensation of the smooth, curved edges and the gentle ripple of water against the durable resin, creating a sensory experience that rivals any high-end custom pool.
Essential Elements:
- Poly stock tank (8-foot diameter recommended)
- Sand or pea gravel for leveling
- Exterior-grade waterproof paint (optional)
- Floating solar lights
- Weather-resistant lumbar pillows
- Cedar wood decking or a circular rug
How to make it
- Ground Preparation: Start by selecting a perfectly flat area. Clear all debris and grass, then excavate about 2 inches of soil. Fill this with leveling sand, using a long 2×4 board and a level to ensure a perfectly flat foundation; this prevents the plastic from warping under the weight of the water.
- Tank Reinforcement: Before filling, check the drainage plug. Wrap the threads with Teflon tape to ensure a watertight seal. If you want to paint the exterior, scuff the plastic with 220-grit sandpaper first, apply a plastic-bonding primer, and then use a high-quality exterior latex paint in a matte finish.
- Plumbing Installation: If adding a pump, use a 1-inch hole saw to carefully drill intake and return holes. Install through-wall plungers and connect your filter pump. Ensure all gaskets are seated flush against the poly walls to prevent slow leaks.
- Styling and Surrounds: Surround the tank with a mix of textures. I recommend building a semi-circular cedar bench on one side to hide the pump and provide a place for drinks. Add a large outdoor umbrella for shade and toss in several oversized floating pillows to create an inviting, lounge-heavy atmosphere.
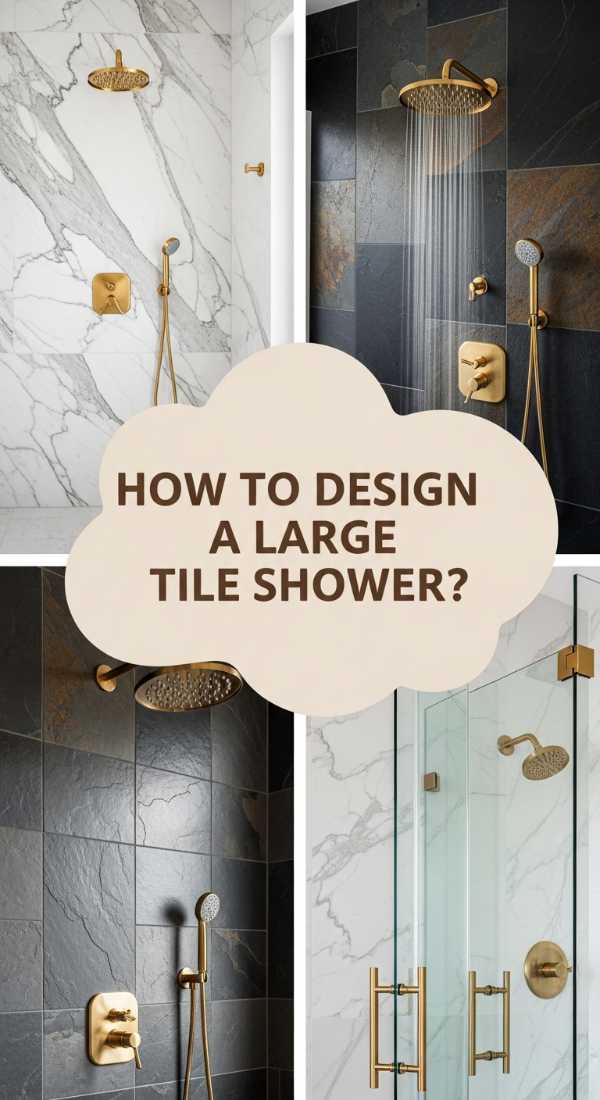
How to Choose Big Tile in Shower Areas for a Sleek Look

Why we love this
Large-format tiles are the secret weapon for creating a high-end, spa-like atmosphere in even the smallest bathrooms. By minimizing grout lines, these expansive slabs create a seamless, continuous visual flow that makes the walls feel like they are receding, giving the illusion of infinite space. We adore the cold, smooth touch of polished porcelain underfoot and the way the subtle veining of a large marble-look tile can catch the morning light, turning a simple morning shower into a meditative ritual of luxury and calm.
Essential Elements:
- Large-format porcelain or ceramic tiles (minimum 12×24 or 24×48)
- High-bond thin-set mortar
- Leveling clip system
- Diamond-blade wet saw
- Epoxy or high-performance grout
- Waterproofing membrane (like Schluter-Kerdi)
How to make it
- Substrate Preparation: Because large tiles are unforgiving, your walls must be perfectly plumb. Install a cement backer board and check for any bowing. Use a straight edge to find high spots and sand them down, or use thin-set to fill low spots until the surface is flat within 1/8 inch over 10 feet.
- Layout Strategy: Plan your cuts so that you avoid small slivers at the corners. Find the center point of the main wall and dry-lay your tiles outward. Aim for balance; the goal is to have the same width of tile on both the left and right edges for a professional, symmetrical appearance.
- Mortar Application: Use a 1/2-inch x 1/2-inch square-notched trowel. Apply the thin-set to the wall and “back-butter” the entire back of the tile with a thin layer of mortar. This ensures 100% coverage, which is critical to prevent the large tiles from cracking under pressure or temperature changes.
- Setting and Leveling: Press the tile into place and use a leveling clip system at every corner and every 12 inches along the edges. These clips pull the tiles into the same plane, eliminating “lippage” (one edge being higher than another). Let the mortar cure for 24 hours before removing clips and grouting.
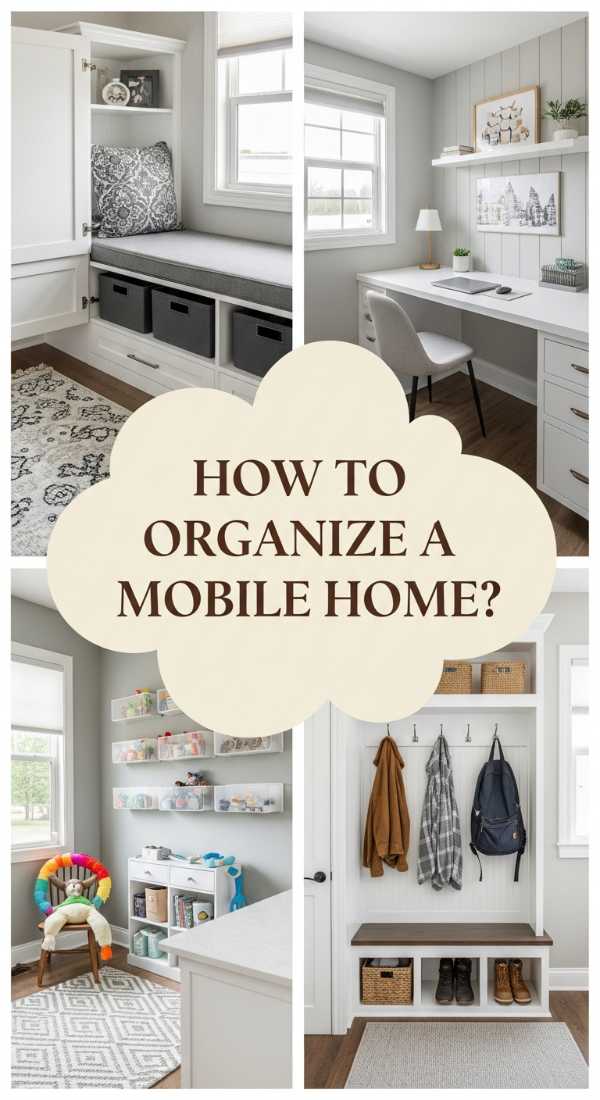
How to Personalize Singlewide Mobile Home Ideas for Modern Comfort

Why we love this
Personalizing a singlewide is about reclaiming the narrative and proving that style isn’t dictated by the structure of the house. We love the challenge of taking a linear, narrow space and infusing it with layers of personality—think rich wood tones, velvet textiles, and bold gallery walls. There is a unique warmth in a well-styled mobile home; it feels intimate and curated, where every square inch is used with purpose, resulting in a homey, cozy atmosphere that feels like a warm hug the moment you step inside.
Essential Elements:
- Removable wallpaper or textured paint
- Updated cabinet hardware (brass or matte black)
- Laminate or luxury vinyl plank flooring
- Custom window treatments (linen or bamboo)
- Area rugs to define zones
- Floating shelves for vertical storage
How to make it
- Update the Walls: Most singlewides have VOG (vinyl over gypsum) panels with strips. Remove the strips, fill the gaps with joint compound, sand smooth, and prime with a high-adhesion primer. Apply a warm, neutral paint color like “Swiss Coffee” to brighten the space and make it feel more like a traditional stick-built home.
- Upgrade the Lighting: Replace the standard dome lights with statement fixtures. In the kitchen, swap a basic light for a modern pendant with a dimmable Edison bulb. This changes the entire “mood” of the home from clinical to artisanal.
- Enhance the Trim: Install wider baseboards and crown molding. In a mobile home, the standard trim is often thin; adding 4-inch baseboards provides a visual weight that anchors the rooms and adds an immediate sense of “custom” quality.
- Textural Layering: Since the layout is linear, use rugs to break up the “hallway” feel. Place a large 8×10 rug in the living area and a long, woven runner in the kitchen. Layering different textures—like a wool rug over vinyl flooring—adds depth and hides the long, straight lines of the floorplan.
How to Arrange Vendor Booth Ideas for Better Sales

Why we love this
A perfectly arranged vendor booth is a masterclass in visual storytelling. We love how a thoughtful layout can guide a customer on a journey, from the initial “wow” moment at the entrance to the tactile discovery of individual products. There is an electric energy in a booth that uses height and light effectively; it smells like fresh wood or scented candles and feels like stepping into a tiny, curated boutique rather than a temporary stall, making the shopping experience feel exclusive and intentional.
Essential Elements:
- Multi-level display risers
- Branded tablecloths or floor coverings
- Battery-operated clip lights
- Clear, consistent signage
- Mirror (if selling wearables)
- Comfortable flooring (anti-fatigue mats under a rug)
How to make it
- The “Z” Pattern Flow: Arrange your main focal points in a “Z” pattern. Start with a tall, eye-catching display on the front left to draw people in, place a mid-level display in the center-right, and the checkout area at the back left. This naturally encourages the customer to walk through the entire space.
- Vary the Heights: Never leave products flat on a table. Use crates, acrylic risers, or even vintage suitcases to create “peaks and valleys.” Eye-level is buy-level; place your best-selling or highest-margin items exactly 5 feet from the ground to ensure they are the first things a customer sees.
- Lighting Strategy: Markets can be dim. Use warm-toned LED spotlights to highlight specific collections. Position the lights at a 45-degree angle to the product to reduce harsh shadows and make the colors pop. Ensure no bulbs are pointing directly into the customer’s eyes.
- The “Touch” Factor: Leave enough space for people to comfortably pick things up. Group items in odd numbers (the rule of three) and leave “white space” between groups. If a booth is too cluttered, people are afraid to touch things for fear of knocking them over; if it’s open, they engage more deeply.
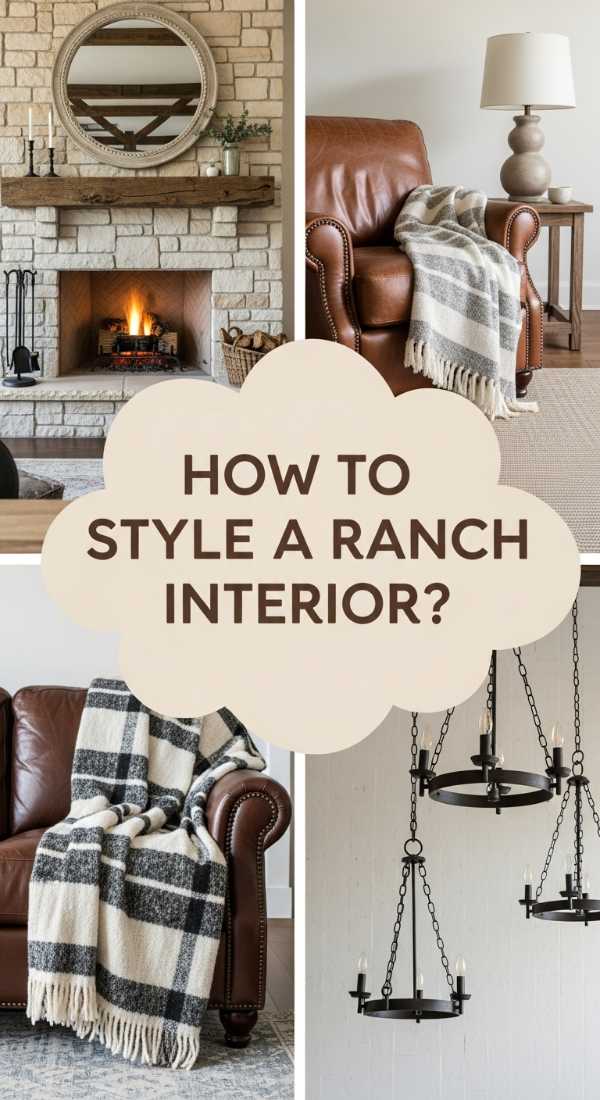
How to Recreate Casas Estilo Rancho for Rustic Elegance
Why we love this
The Casas Estilo Rancho aesthetic is a beautiful marriage of rugged endurance and soft, welcoming comfort. We are obsessed with the raw, honest materials—the scent of sun-warmed leather, the cool touch of terracotta tiles, and the rough-hewn texture of exposed wooden beams. It’s a style that celebrates the land and a slower pace of life, creating a home that feels grounded and timeless. Walking into a ranch-style space feels like a breath of fresh air; it’s open, airy, and deeply connected to the natural world.
Essential Elements:
- Terracotta or saltillo floor tiles
- Exposed wooden ceiling beams
- Wrought iron light fixtures
- Neutral, earthy color palette (terracotta, sage, cream)
- Hand-woven textiles and rugs
- Natural stone accents (fireplace or backsplash)
How to make it
- Establish the Foundation: If you don’t have saltillo tile, use a large-format porcelain tile in a warm clay hue with wide, sandy grout lines. This provides that earthy, grounded base that defines the ranch look.
- Add Architectural Weight: Install faux wood beams made of lightweight polyurethane or hollowed-out cedar. Stain them in a medium oak or dark walnut. Place them across the highest point of your ceiling to draw the eye upward and mimic the structural integrity of historic ranch houses.
- Integrate Ironwork: Swap out modern chrome or nickel hardware for hand-forged wrought iron. This includes door handles, cabinet pulls, and curtain rods. The dark, heavy metal provides a necessary contrast to the soft white plaster walls typical of the style.
- Soften with Textiles: Use heavy-weight linen curtains that puddle slightly on the floor. Add a large jute or sisal rug, and layer a smaller, colorful southwestern-patterned wool rug on top. This layering adds the “cozy” factor to the otherwise hard surfaces of the ranch aesthetic.
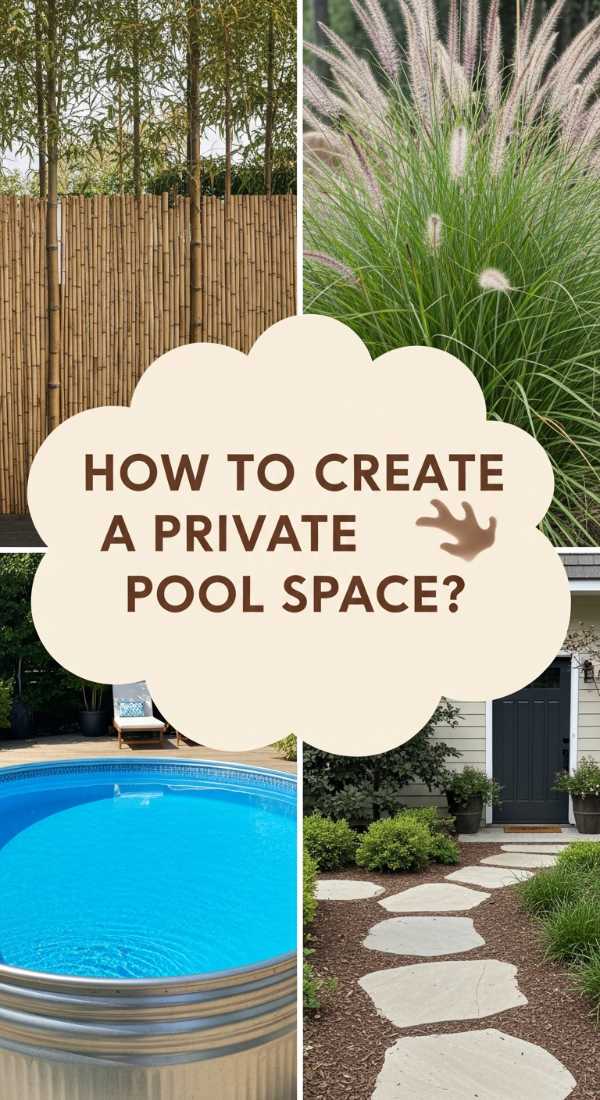
How to Landcape Your Poly Stock Tank Pool for Maximum Privacy
Why we love this
Privacy is the ultimate luxury, and landscaping around your stock tank pool turns a functional water feature into a secret garden. We love the contrast of the industrial tank against soft, swaying ornamental grasses and the way a wall of greenery can muffle the sounds of the neighborhood. There’s a magical feeling when you’re floating in the water, surrounded by the scent of jasmine and the rustle of bamboo, feeling completely hidden from the world in your own private sanctuary.
Essential Elements:
- Tall ornamental grasses (like Maiden Grass or Pampas)
- Cedar lattice panels or trellises
- Evergreen shrubs (like Arborvitae or Boxwood)
- Climbing vines (Star Jasmine or Clematis)
- Mulch or river rock for weed control
- Landscape lighting (uplights for trees)
How to make it
- Layered Planting Heights: Don’t just plant a single row. Start with tall evergreens like ‘Green Giant’ Arborvitae 5 feet back from the pool for a year-round green wall. In front of those, plant mid-height ornamental grasses that provide movement and sound in the wind.
- Install Living Screens: Place two or three 6-foot cedar trellises on the side of the pool facing your neighbors. Plant fast-growing climbing vines at the base. Within one season, these will create a dense, flowering wall of privacy that smells incredible and looks intentional.
- Create a Buffer Zone: Use a 3-foot border of river rock or pea gravel immediately around the tank. This prevents dirt and mulch from splashing into the pool and provides a clean, dry area to step out onto. Use metal landscape edging to keep the rocks contained.
- Nighttime Ambience: Place low-voltage LED uplights at the base of your privacy trees. This not only makes the space usable at night but also creates a “wall of light” that further enhances the feeling of being enclosed in a private, high-end resort.
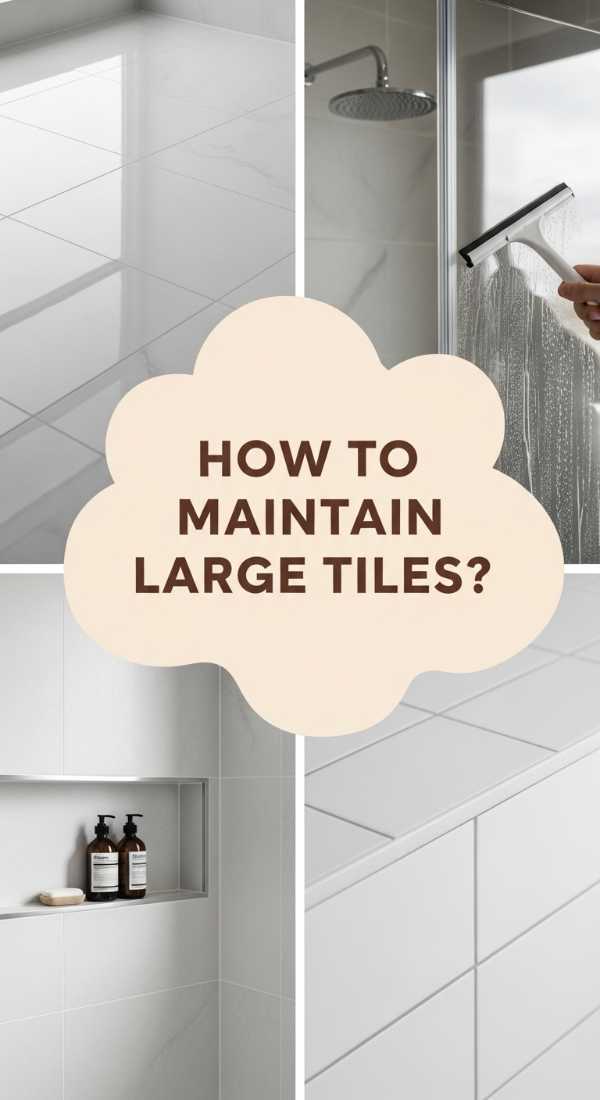
How to Clean Big Tile in Shower Areas for Lasting Shine
Why we love this
There is nothing quite as satisfying as the pristine, mirror-like finish of a freshly cleaned large-tile shower. We love the way the light bounces off the expansive surfaces when they are free of water spots and soap scum, making the entire bathroom feel hygienic and bright. Because there are fewer grout lines to scrub, the cleaning process feels less like a chore and more like a quick polish, allowing the natural beauty of the tile’s pattern—whether it’s a sleek slate or a bright marble—to truly shine.
Essential Elements:
- Squeegee with a silicone blade
- Microfiber cloths
- Non-abrasive pH-neutral cleaner
- White vinegar and water solution (for hard water)
- Steam cleaner (optional for deep cleaning)
- Soft-bristle grout brush
How to make it
- Daily Maintenance: The most important step is the “30-second rule.” After every shower, use a high-quality squeegee to wipe down the large tiles. Start from the top and pull downward in long, overlapping strokes. This prevents minerals in the water from drying on the surface and forming “etching.”
- Weekly Gentle Clean: Mix a solution of 1 part white vinegar to 3 parts water with a drop of dawn dish soap. Spray the tiles generously. Let it sit for 5 minutes (don’t let it dry) to break down soap scum. Wipe with a damp microfiber cloth using circular motions to buff the surface.
- Grout Detail: Even though big tiles have less grout, the lines that *are* there need attention. Use a pH-neutral stone cleaner and a soft brush. Gently scrub the lines in a back-and-forth motion—never use a wire brush, as this can scratch the glaze of the large tiles.
- Final Polish: For a streak-free finish, use a dry, clean microfiber cloth to buff the tiles once they are dry. If you have polished porcelain, a tiny bit of glass cleaner on the cloth will give it that “showroom” shine that lasts for days.
How to Maximize Space in Singlewide Mobile Home Ideas for Families

Why we love this
Families in singlewides are the masters of creative living, and we love the ingenuity required to make a compact space feel expansive. It’s about finding the hidden potential in every corner—turning a hallway into a library or a closet into a bunk nook. There is a beautiful sense of closeness that comes from a well-organized small home; it forces a decluttered lifestyle where only the most meaningful items remain, creating a peaceful, streamlined environment where the focus shifts from “stuff” to shared experiences.
Essential Elements:
- Multi-functional furniture (storage ottomans, sofa beds)
- Wall-mounted desks and tables
- Over-the-door organizers
- Uniform storage bins and baskets
- Vertical shelving units
- Light-colored paint and mirrors
How to make it
- Utilize Vertical Real Estate: In a family home, the floor is for playing. Install floor-to-ceiling shelving units in the living room and bedrooms. Use the top shelves for items not used daily (like seasonal clothes in matching bins) and the lower shelves for toys and books that children can reach.
- The “Floating” Concept: Use wall-mounted furniture to keep the floor visible, which tricks the eye into thinking the room is larger. A floating TV console or a fold-down “murphy” desk in the hallway creates a workspace without taking up permanent square footage.
- Zoned Organization: Give every family member a dedicated “drop zone.” Use a bench with cubbies near the door for shoes and bags. In the kitchen, use clear acrylic bins in the pantry so everyone can see exactly where things go, reducing the “clutter creep” that happens in small spaces.
- Mirror Magic: Hang a large, floor-length mirror opposite the main window. This reflects the outdoor view and doubles the amount of natural light, making a narrow 14-foot wide room feel significantly more open and airy for a busy family.
How to Brand Your Vendor Booth Ideas for Instant Recognition
Why we love this
Branding a vendor booth is where business meets art. We love how a cohesive brand identity—through color, font, and “vibe”—can make a customer feel an immediate connection to your story before they even see your prices. It’s about creating a recognizable beacon in a sea of tents. A well-branded booth feels professional, trustworthy, and polished; it’s the difference between being a “hobbyist” and a “brand,” and that confidence translates directly into customer loyalty and sales.
Essential Elements:
- Large, high-resolution logo banner
- Coordinated color palette (3 main colors)
- Branded packaging (bags, tissue paper, stickers)
- Business cards and a “sign-up” sheet
- Consistent font for all pricing and signage
- Themed decor (e.g., modern, vintage, bohemian)
How to make it
- Define Your Visual Language: Choose three colors that represent your brand (e.g., Sage Green, Cream, and Gold). Ensure everything in your booth—from the tablecloth to the price tags—falls within this palette. Consistency is the key to memory; when customers see those colors again, they will think of you.
- Invest in Quality Signage: Your main banner should be readable from 20 feet away. Use a clean, sans-serif font for the name and a simple tagline. Avoid “busy” backgrounds on signs; high contrast (like black text on a white background) is the easiest for the human eye to process in a crowded market.
- Sensory Branding: Go beyond visuals. If your brand is “rustic,” use a cedar-scented diffuser. If it’s “modern,” play low-fi beats on a small Bluetooth speaker. These subtle cues create an emotional “anchor” for the customer, making your booth a memorable destination rather than just another stop.
- Cohesive Packaging: The brand experience shouldn’t end at the sale. Use custom-stamped paper bags or a specific color of ribbon. When other people at the event see your unique packaging being carried around, it acts as a walking advertisement, driving more traffic back to your booth.
How to Decorate Casas Estilo Rancho for a Cozy Winter
[IMAGE_10]
Why we love this
Winter in a ranch-style home is all about the “cuddle factor.” We love how the rugged elements of the architecture—the stone and wood—become a backdrop for ultimate softness. There is nothing more evocative than the flickering light of a fireplace reflecting off heavy wool blankets and the scent of cinnamon and pine filling the air. It transforms the wide-open feel of the ranch into a warm, protective cocoon, making it the perfect setting for slow mornings and long, dark evenings spent by the hearth.
Essential Elements:
- Chunky knit wool throws
- Faux fur pillows and rugs
- Fragrant greenery (pine, cedar, eucalyptus)
- Warm-toned LED candles (varying heights)
- Copper or brass accents (mugs, trays)
- Firewood stacks as decor
How to make it
- Layer the Lighting: Winter days are short, so lighting is key. Avoid overhead lights; instead, place warm-toned lamps in every corner. Use battery-operated candles inside the fireplace (if not in use) or on the mantle to create a flicker that mimics a real flame without the heat.
- Swap Your Textiles: Replace light summer linens with heavy-duty textures. Toss a faux-cowhide rug over your main rug for extra warmth. Drape thick, oversized wool blankets over the back of leather chairs—the combination of smooth leather and rough wool is quintessential ranch winter style.
- Natural Winter Greenery: Bring the outside in, but keep it rustic. Instead of bright floral arrangements, use large branches of dried eucalyptus or fresh pine in oversized stoneware crocks. The muted greens and woody textures fit the ranch aesthetic perfectly while providing a fresh winter scent.
- Create a Cocoa Station: Use a large copper tray on a wooden sideboard. Group together handmade ceramic mugs, a bowl of cinnamon sticks, and a jar of cocoa. This adds a functional, cozy focal point that encourages family gathering and celebrates the slower pace of the season.
Conclusion: Your Haven Awaits
Transforming a house into a haven is a journey of a thousand small, intentional choices. Whether you’re scrubbing the grout of a large-tile shower or carefully selecting the lighting for your vendor booth, you are claiming your space and infusing it with your unique energy. Remember, the most beautiful homes aren’t the ones that look like a catalog, but the ones that reflect the hearts of the people living inside them. Start today—pick one corner, one project, and turn it into something that makes you smile. Your haven is waiting to be created.