
Have you ever walked into a space and felt an immediate sense of calm wash over you? Not just because it was clean, but because every corner felt intentional, curated, and lived-in with style? That’s the magic of ‘Cultivating Chic.’ For years, I thought a premium-feeling home required a designer budget, but I’ve learned that the most beautiful spaces are born from thoughtful DIYs and small, impactful changes that elevate the everyday.
Today, we’re diving deep into the art of the ‘Elevated DIY.’ Whether it’s the way the light hits a perfectly organized pantry or the satisfying crunch of a new rock river bed underfoot, these projects are about more than just aesthetics—they’re about creating a sanctuary that reflects your best self. Grab your tool belt (and maybe a glass of iced tea), because we’re about to transform your home and garden into a high-end retreat.
How to Design Low Maintenance Flower Beds for Effortless Curb Appeal

Why we love this
There is nothing quite like pulling into your driveway and being greeted by a lush, vibrant garden that looks professionally manicured without requiring hours of weekend toil. This approach creates a serene, structured look where the deep green of hostas meets the silvery whisper of lavender, all grounded by the rich, earthy scent of fresh cedar mulch. It feels like a permanent vacation for your eyes, providing a sophisticated backdrop that evolves beautifully with the seasons while leaving you plenty of time to actually enjoy the view from your porch.
Essential Elements:
- Native perennial plants (like Coneflowers or Black-eyed Susans)
- High-quality landscape fabric or cardboard for weed suppression
- Heavy-duty steel or stone edging
- Cedar or hemlock mulch
- Soaker hoses for hidden irrigation
- Slow-release organic fertilizer
How to make it
- Begin by mapping out your bed with a garden hose to create soft, organic curves that lead the eye; avoid rigid straight lines for a more premium look.
- Remove all existing grass and weeds using a spade, ensuring you dig deep enough to remove root systems, then level the soil with a heavy rake.
- Lay down a layer of cardboard or professional-grade landscape fabric to act as a permanent weed barrier, overlapping the edges by at least 6 inches.
- Group your plants in ‘drifts’ of three or five—odd numbers create a more natural, designer feel. Place taller shrubs in the back and shorter groundcovers in the front.
- Cut ‘X’ shapes into your barrier to plant your perennials, ensuring the crown of the plant is level with the soil surface to prevent rot.
- Install your edging deep into the ground to create a crisp, clean line between the lawn and the bed.
- Apply a 3-inch thick layer of mulch, keeping it a few inches away from the stems of the plants to allow for air circulation.
How to Build a DIY Grill Station for the Ultimate Backyard Cookout

Why we love this
Imagine the sizzle of premium steaks hitting the grate while you stand at a custom-built station that feels like a professional outdoor kitchen. The cool touch of a stone countertop against the warmth of the evening sun creates a sensory experience that defines luxury living. It’s the ultimate social hub where the aroma of charred rosemary and woodsmoke mingles with laughter, turning a simple backyard cookout into a curated culinary event that anchors your entire outdoor living space.
Essential Elements:
- Pressure-treated 4×4 posts and 2×4 framing
- Stone or quartz countertop remnants
- Fiber cement board for siding
- Stone veneer or cedar slat cladding
- Stainless steel drop-in grill or a space for a freestanding unit
- Weatherproof cabinetry hardware
How to make it
- Construct a sturdy rectangular frame using pressure-treated lumber, ensuring all corners are perfectly square using a speed square and level.
- Incorporate a central opening specifically measured to fit your grill model, allowing for at least 2 inches of clearance on all sides for heat expansion.
- Sheath the frame in fiber cement board, which provides a fire-resistant and waterproof substrate for your finishing materials.
- Apply a high-quality stone veneer using outdoor-rated thin-set mortar, or install cedar slats with a 1/2-inch gap for a modern, ‘spa-like’ aesthetic.
- Secure your countertop; if using stone, apply a generous bead of construction adhesive to the top of the frame and carefully lower the slab into place.
- Install outdoor-rated hooks for utensils and a hidden magnetic strip for knives to keep your workspace clutter-free and professional.
- Seal all wood surfaces with a marine-grade varnish and the stone with a penetrating sealer to protect against grease and UV damage.
How to Curate Mud Kitchen Accessories for Creative Outdoor Play
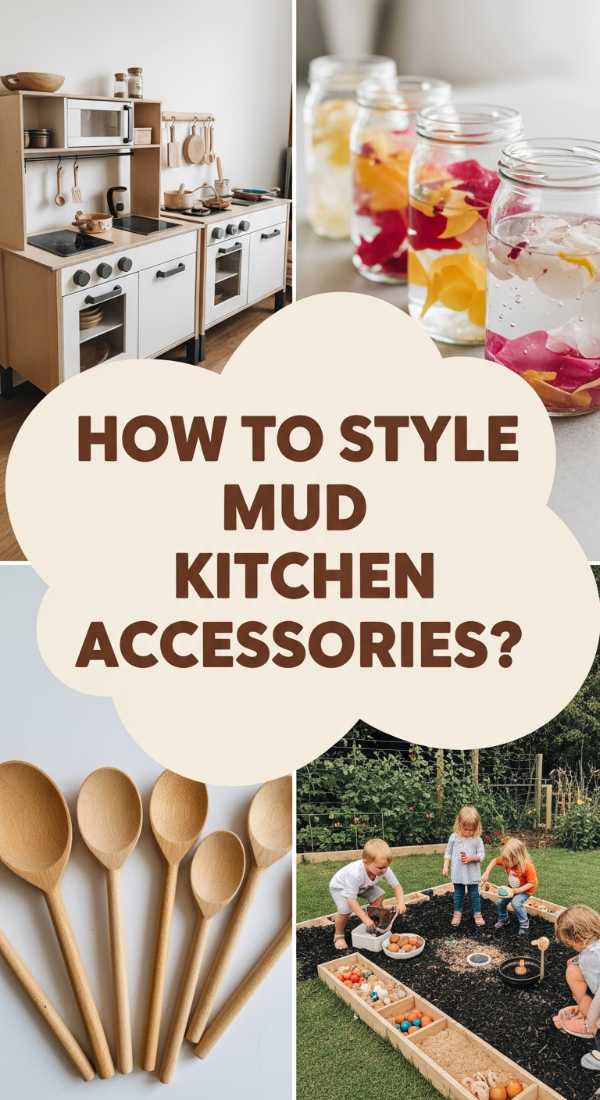
Why we love this
A mud kitchen doesn’t have to be an eyesore; when curated with ‘chic’ in mind, it becomes a beautiful, tactile wonderland for little ones. We love the clinking sound of vintage stainless steel ladles against wooden bowls and the earthy, damp smell of ‘flower soup’ made with marigold petals and rainwater. It’s a space that encourages slow, imaginative play while fitting seamlessly into a high-end garden aesthetic, looking more like a rustic potting bench than a plastic toy.
Essential Elements:
- Stainless steel mixing bowls and colanders
- Wooden spoons, whisks, and spatulas
- Copper or brass measuring cups
- Glass jars for storing ‘nature treasures’ (seeds, petals, stones)
- A functional water dispenser or vintage pitcher
- Small cast iron pans
How to make it
- Source accessories from thrift stores focusing on natural materials like metal, wood, and stone; avoid bright plastics to maintain a sophisticated palette.
- Install a series of small brass hooks along the backboard of the mud kitchen to hang utensils neatly, teaching children the art of organization.
- Use a large, shallow galvanized tub as the ‘sink’ to provide a sturdy and easy-to-clean basin for muddy concoctions.
- Arrange ingredients in clear glass or heavy-duty acrylic jars—think dried lavender, pinecones, and smooth river rocks—to make the space look like a whimsical apothecary.
- Add a chalkboard menu to the side, framed in reclaimed wood, to encourage literacy and artistic expression during play.
- Place a weather-resistant outdoor rug underneath the station to define the zone and catch any major spills before they reach the grass.
How to Install a Rock River Bed Landscape Design for Natural Beauty
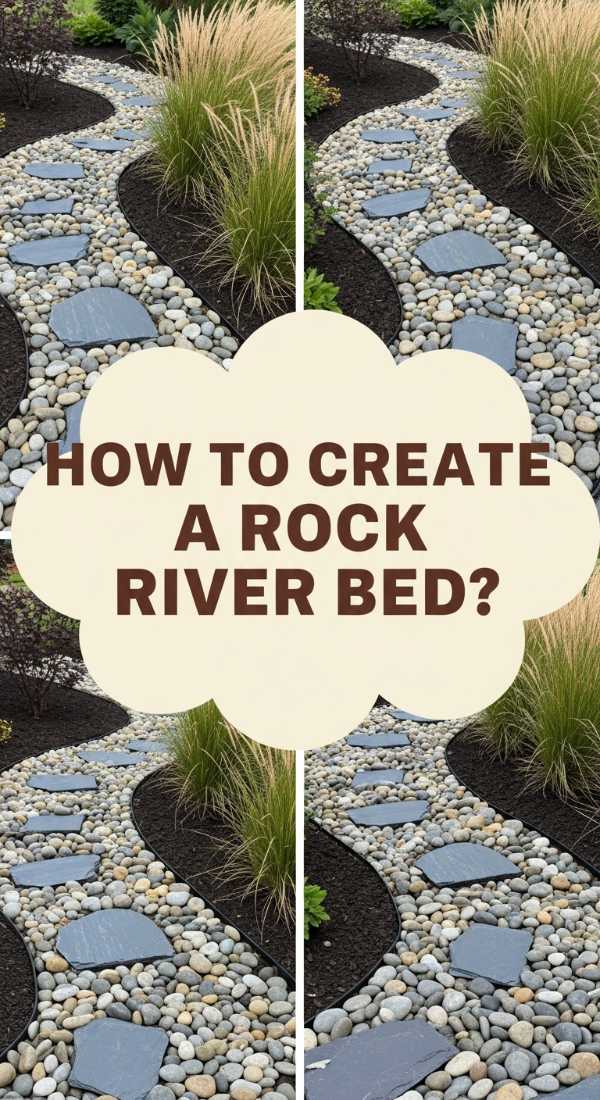
Why we love this
There is a profound sense of tranquility in the sight of a dry creek bed winding through a garden, mimicking the effortless beauty of a mountain stream. We love the contrast between the smooth, cool surfaces of river rocks and the soft, feathery textures of surrounding ornamental grasses. As the sun sets, the rocks hold the day’s heat, and the visual ‘flow’ provides a structural elegance that solves drainage issues while looking like a deliberate piece of landscape art.
Essential Elements:
- Varying sizes of river rock (from pea gravel to large boulders)
- Heavy-duty landscape fabric
- Trenching shovel
- Landscaping pins
- Epoxy-coated pebbles for a ‘wet’ look (optional)
- Drought-tolerant plants for the ‘banks’
How to make it
- Mark out a meandering path that follows the natural slope of your yard; a slight ‘S’ curve looks much more organic and premium than a straight line.
- Excavate a trench about 6 to 12 inches deep, making it wider at the ‘bends’ to mimic how a real river erodes the earth.
- Line the entire trench with heavy-duty landscape fabric, securing it firmly with landscaping pins to ensure no soil or weeds contaminate your rock layers.
- Place your largest ‘anchor’ boulders first at the curves and edges to create a sense of scale and permanence.
- Fill the base with medium-sized river rocks, then use smaller pea gravel to fill the gaps and create a layered, naturalistic floor.
- Incorporate different colors of stone—grays, tans, and blues—to add depth and mimic the variety found in nature.
- Tuck small succulents or grasses into the edges of the rock bed to soften the transition from stone to lawn.
How to Achieve Realistic Pantry Organization for a Stress Free Kitchen

Why we love this
Walking into a perfectly organized pantry feels like exhaling a breath you didn’t know you were holding. We love the visual harmony of uniform glass jars filled with artisanal grains and the clean, rhythmic look of woven baskets hiding the ‘chaos’ of snack bags. It turns the mundane task of meal prep into a sensory delight, where the soft click of an airtight lid and the sight of a fully stocked, labeled shelf makes you feel like the most together person in the world.
Essential Elements:
- Airtight glass canisters in multiple sizes
- Uniform woven or wire baskets
- Turntables (Lazy Susans) for oils and vinegars
- Tiered shelving for canned goods
- Custom labels with a consistent font
- Over-the-door rack for spices or wraps
How to make it
- Empty the entire pantry and group items by category (baking, breakfast, snacks, dinner prep) to see exactly how much space you need for each.
- Decant ‘ugly’ packaging like flour, sugar, and pasta into glass jars; this not only looks premium but also keeps food fresher for longer.
- Measure your shelf depth and height before buying baskets to ensure a ‘flush’ fit that maximizes every inch of space without leaving awkward gaps.
- Use turntables in corners or deep shelves to prevent jars from getting lost in the ‘black hole’ of the pantry back.
- Apply labels at eye level using a consistent style—minimalist black-and-white labels provide a modern, high-end boutique feel.
- Store frequently used items at chest level and reserve the highest and lowest shelves for occasional use items like holiday platters or bulk paper goods.
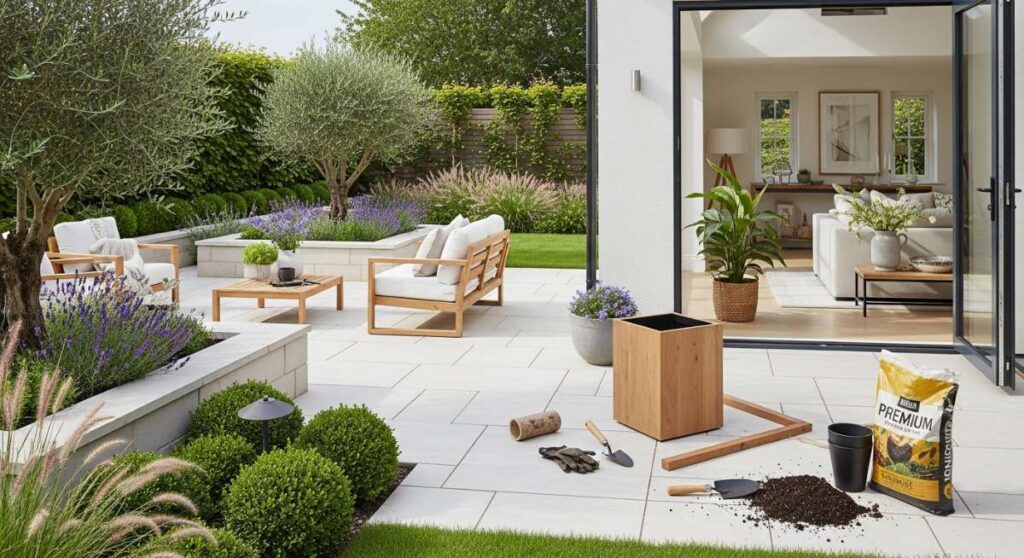
How to Master Building a Floating Deck for High End Outdoor Lounging
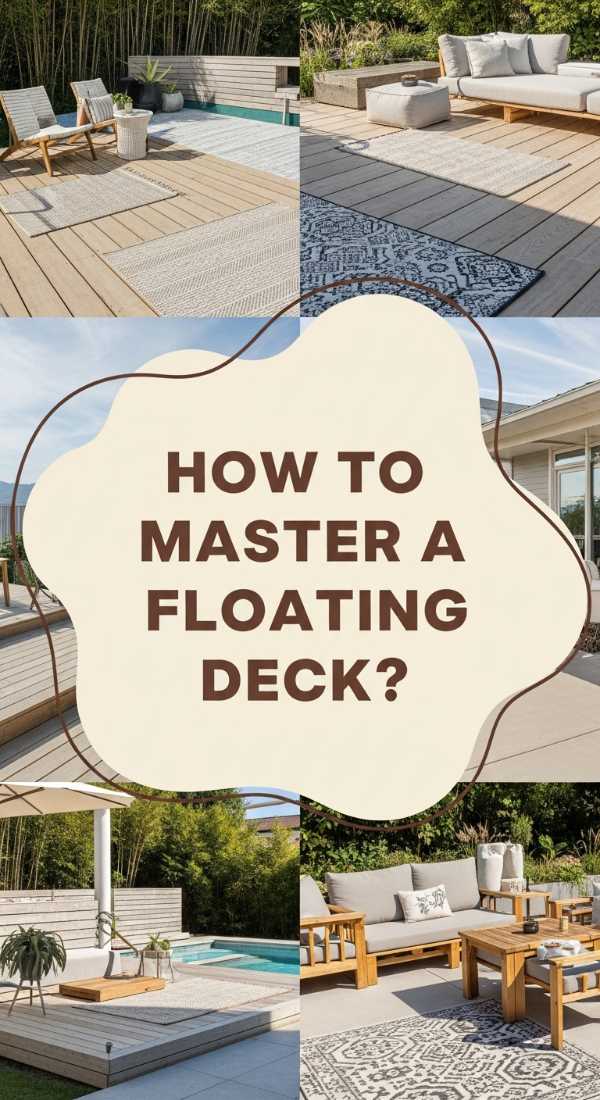
Why we love this
A floating deck is the ultimate ‘chic’ garden upgrade, creating a defined island of relaxation that feels lighter and more modern than a traditional attached deck. We love the way the wood stays cool underfoot during a warm afternoon and the architectural beauty of the clean, horizontal lines against the softness of the lawn. It’s the perfect stage for a plush outdoor sofa and a fire pit, offering an elevated vantage point to watch the stars while feeling completely grounded in nature.
Essential Elements:
- Pressure-treated 2×6 joists
- Concrete deck blocks
- Premium decking boards (Capped composite or Cedar)
- Stainless steel hidden fasteners
- Landscape fabric and gravel for the base
- Joist tape for longevity
How to make it
- Clear the area and lay down landscape fabric topped with 2 inches of gravel to prevent weeds and provide a stable, well-draining base for the deck blocks.
- Position concrete deck blocks in a grid pattern, ensuring they are perfectly level with one another using a long straight-edge and a 4-foot level.
- Build the outer frame of the deck using pressure-treated lumber, then install internal joists every 12 or 16 inches on center for maximum structural integrity.
- Apply joist tape to the top of all framing members; this professional trick prevents water from sitting on the wood and doubles the life of your deck frame.
- Layout your decking boards, using hidden fasteners rather than top-screws to achieve a sleek, high-end ‘hotel’ look without visible hardware.
- Leave a 1/8-inch gap between boards for drainage and expansion, using a spacer for perfect consistency across the entire surface.
- Finish by trimming the edges with a fascia board for a crisp, picture-frame effect that hides the raw ends of the decking.
How to Recreate a Y2K Teen Room for Pure Retro Vibes

Why we love this
There is a joyful, electric energy in the Y2K aesthetic that feels both nostalgic and incredibly fresh. We love the playful clash of textures—from fuzzy faux-fur pillows to the slick, glossy finish of inflatable furniture. It’s a sensory explosion of neon glows, beaded curtains that chime when you walk through them, and a palette of candy-pinks and icy-blues that makes the room feel like a futuristic time capsule where the only rule is to have fun.
Essential Elements:
- Inflatable chairs or velvet bean bags
- Beaded door curtains
- Neon signs or ‘lava’ lamps
- Butterfly clips (as decor or curtain ties)
- Metallic or iridescent bedding
- Collage wall with magazine clippings and CD backings
How to make it
- Choose a bold base color like lavender or mint green and lean into ‘maximalism’—this style is about more being more.
- Create a ‘glam station’ featuring a vanity with a tinsel fringe and a chunky acrylic organizer for colorful makeup and hair accessories.
- Hang a beaded curtain in a doorway to create a physical and auditory transition into the space; choose iridescent beads for that signature ‘liquid’ look.
- Install a color-changing LED strip around the ceiling perimeter to allow for different ‘vibes’ ranging from high-energy pink to chilled-out blue.
- Curate a gallery wall using 4×6 prints of pop-culture icons, glitter stickers, and old CD-ROMs hung with mounting putty for a non-permanent retro look.
- Layer textures on the bed—start with a metallic comforter and add layers of ‘popcorn’ knit blankets and plush heart-shaped pillows.
How to Use Dollar Tree Solar Light Ideas for a Magical Evening Glow

Why we love this
True luxury is often about the atmosphere, and nothing creates a more magical ‘chic’ vibe than soft, twinkling lights scattered throughout a twilight garden. We love the way simple solar stakes can be transformed into high-end lanterns that cast intricate shadows across the patio. It’s a sustainable, budget-friendly way to bathe your outdoor space in a warm, amber glow that makes every evening feel like a celebration at a boutique resort.
Essential Elements:
- Basic Dollar Tree solar path lights
- Glass mason jars or decorative vases
- Spray paint (Matte black or Metallic gold)
- Frosted glass spray paint
- Jute twine or wire for hanging
- River rocks or clear marbles
How to make it
- Remove the plastic stakes from the solar lights, keeping only the top solar puck and the light housing.
- Spray paint the black plastic components with a high-quality metallic gold or oil-rubbed bronze paint to immediately elevate the look from ‘plastic’ to ‘custom metal.’
- Apply a light coat of frosted glass spray to the inside of a mason jar to diffuse the light, creating a soft, expensive-looking glow rather than a harsh beam.
- Place the solar puck on top of the jar; if it’s too small, use a bead of clear silicone to secure it to the rim.
- Fill the bottom of the jar with clear glass marbles to weigh it down and catch the light, making the entire jar look like it’s filled with captive fireflies.
- For hanging lanterns, wrap the neck of the jar in jute twine, creating a sturdy handle, and hang them from tree branches at varying heights.
How to Apply Concrete Stencil Outdoor for a Sophisticated Patio Refresh
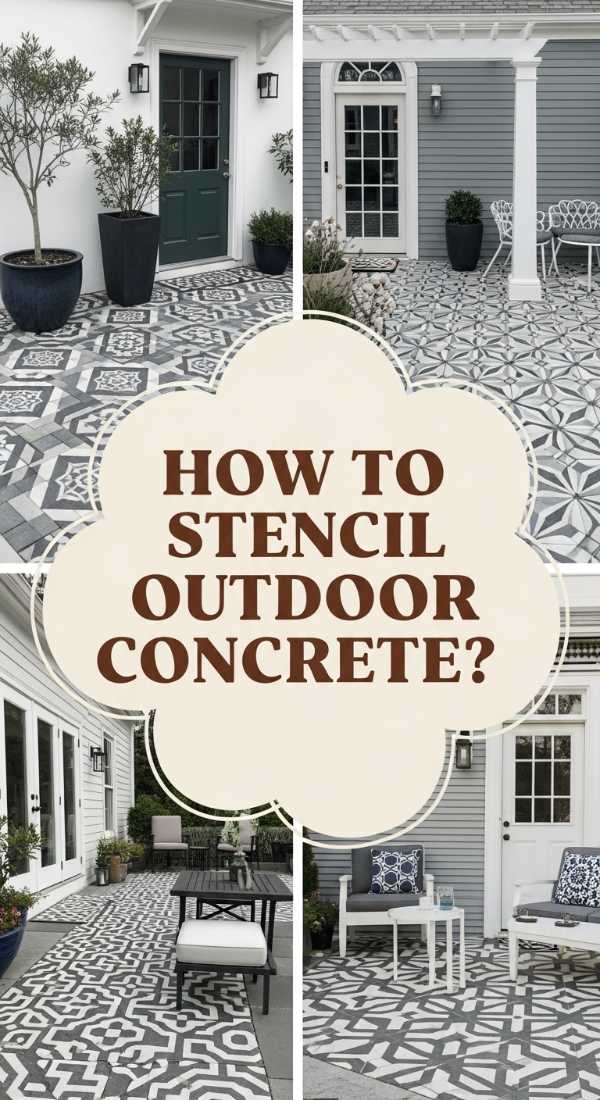
Why we love this
A plain concrete slab can feel cold and industrial, but with a stencil, it becomes a sophisticated ‘outdoor rug’ that anchors your furniture. We love the transformative power of a Moroccan or herringbone pattern rendered in shades of slate and charcoal. The result is a tactile, visual feast that feels soft underfoot and looks like expensive custom tiling, providing a designer foundation for your outdoor dining set and potted palms.
Essential Elements:
- Large-format floor stencil
- Concrete-grade paint or stain (two contrasting colors)
- Long-handled roller and high-density foam rollers
- Painter’s tape and stencil adhesive
- Concrete cleaner and degreaser
- Clear outdoor concrete sealer
How to make it
- Power wash the concrete surface thoroughly and use a degreaser to ensure every bit of oil and dirt is gone; paint will not adhere to a dirty surface.
- Apply two coats of your ‘base’ color (usually the lighter shade) using a long-handled roller, allowing for 24 hours of drying time between coats.
- Secure your stencil in the center of the patio using repositionable spray adhesive and painter’s tape to prevent any ‘bleeding’ under the edges.
- Use a ‘dry brush’ technique with your second color—load the foam roller and then roll most of the paint off onto a piece of cardboard before touching the stencil.
- Lift the stencil carefully and realign it using the registration marks, continuing the pattern across the entire surface.
- Touch up any minor imperfections with a small artist’s brush to ensure the lines look crisp and professional.
- Once fully dry, apply two coats of clear, non-slip concrete sealer to protect your ‘chic’ new floor from the elements and foot traffic.
How to Plan DIY Duck Enclosure Ideas for a Sustainable Backyard Haven
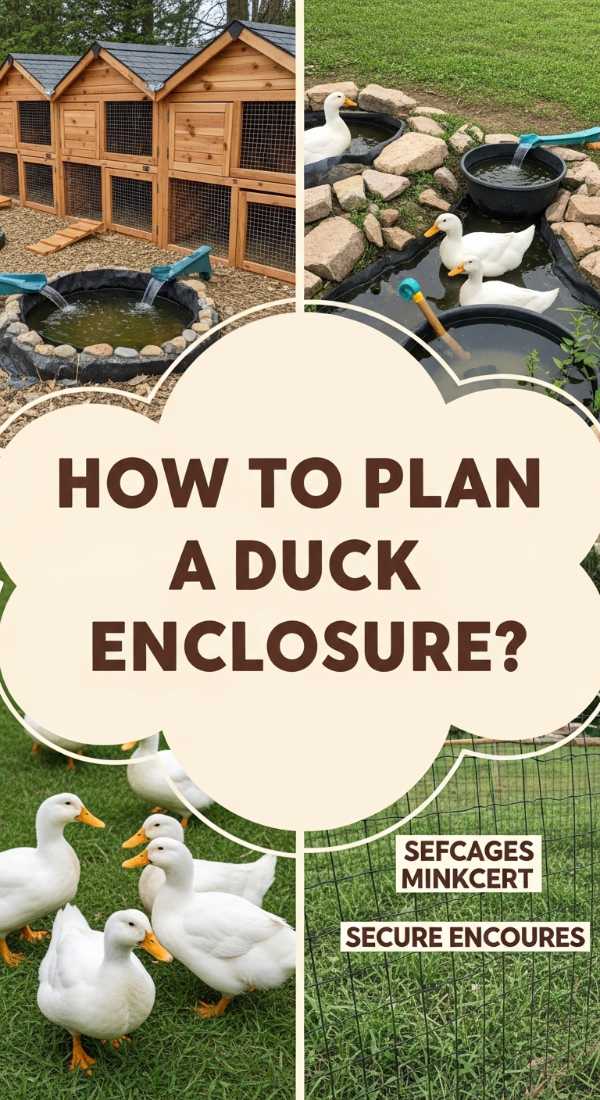
Why we love this
There is something deeply grounding and ‘cottagecore-chic’ about a sustainable duck enclosure that feels like a natural extension of the garden. We love the gentle sound of splashing water and the soft ‘quacks’ that fill the air as ducks roam in a safe, beautifully designed space. It’s a project that combines rustic charm with modern sustainability, featuring weathered wood and hardware cloth that keeps your feathered friends safe while providing fresh eggs and organic fertilizer for your flower beds.
Essential Elements:
- Cedar or redwood lumber for the frame
- 1/2 inch hardware cloth (predator-proof wire)
- Corrugated metal or asphalt shingles for the roof
- A pre-formed pond liner or large galvanized tub
- Straw or hemp bedding
- Heavy-duty latches and predator-proof locks
How to make it
- Frame a ‘house’ section that is raised at least 12 inches off the ground to prevent dampness and discourage predators from tunneling underneath.
- Install 1/2 inch hardware cloth around the ‘run’ area, burying the wire 6 inches deep into the ground to create an impenetrable barrier against foxes and raccoons.
- Build a sloped roof to ensure rain runoff, using corrugated metal for a ‘modern farmhouse’ look that sounds wonderful during a summer storm.
- Incorporate a large access door for easy cleaning and a smaller ‘duck-sized’ ramp with cross-slats for traction.
- Sunken a galvanized tub into the ground to serve as a pond, ensuring you have a plan for easy drainage—ducks need clean water daily to stay healthy.
- Place the enclosure near your garden beds so you can easily transport the ‘duck gold’ (manure-rich bedding) to your plants.
- Add a window with a sturdy shutter to provide ventilation during hot months while keeping the enclosure cozy and secure during the winter.
Conclusion
Elevating your home and garden isn’t about how much you spend; it’s about the care and intention you pour into every project. Whether you’re stenciling a patio or organizing a pantry, these ‘chic’ improvements create a ripple effect of beauty and order in your daily life. Remember, a premium feel comes from the details—the crisp edges of a flower bed, the shimmer of a well-placed light, and the warmth of a space that truly feels like you. Happy DIYing!
FAQ
Q: How do I make my DIY projects look professional and not ‘homemade’?
A: The secret is in the prep work and the finishing touches. Always sand your wood, use levels to ensure straight lines, and don’t skip the sealer or paint primer. High-quality hardware (like brass handles or stainless steel screws) also makes a huge difference.
Q: What is the best way to maintain low-maintenance gardens?
A: Focus on perennials that are native to your area. Once established, they require much less water and care. Mulching heavily is also key to suppressing weeds and retaining moisture.
Q: Are solar lights bright enough for security?
A: Solar lights are best for ‘mood’ and path lighting. If you need security, look for high-lumen solar floodlights with motion sensors, but for a ‘chic’ look, stick to the soft, warm glow of decorative lanterns.