

There is a specific kind of magic that happens when you decide to stop seeing your home as a list of chores and start seeing it as a canvas for comfort. I remember sitting on my back porch last summer, looking at a bare corner of the yard and realizing that ‘cozy’ isn’t something you buy off a shelf—it’s something you curate with your own two hands. It’s the smell of fresh cedar, the cool touch of damp garden soil, and the way a soft glow hits your favorite reading chair at dusk.
Today, I’m sharing the projects that turned my house into a sanctuary. These aren’t just home improvements; they are sensory upgrades designed to make your daily life feel a little more like a retreat. From the quack of a happy duck to the sight of wildflowers dancing on a dinner table, let’s dive into the art of making your space truly dreamy this weekend.
How to Build a DIY Planter Light Post for the Perfect Evening Glow

Why we love this
As the sun begins its slow descent, there is nothing more enchanting than a soft, amber glow reflecting off the vibrant petals of your favorite flowers. This project creates a stunning vertical element in your garden, combining the structural beauty of a wooden post with the organic softness of a blooming base. The aroma of evening primrose or jasmine wafting up from the planter, paired with the gentle, flickering light from above, transforms a simple backyard into a romantic getaway. It’s about creating a focal point that feels both sturdy and ethereal, grounding your outdoor space while lifting your gaze toward the stars.
Essential Elements:
- Large heavy-duty ceramic or plastic planter
- 4×4 pressure-treated wooden post (6-8 feet)
- Quick-set concrete mix and water
- Solar-powered or wired outdoor lantern
- Level and drill
- Potting soil and seasonal flowers
- Decorative gravel or mulch
How to make it
- Prepare your ‘Base Layer’: Select a sturdy planter and place it exactly where you want the light to live, as it will be very heavy once ‘cooked.’
- Mix the ‘Batter’: In a separate bucket, combine your concrete mix with water, stirring until it reaches the consistency of thick, creamy oatmeal; this is the visual cue that it’s ready for the mold.
- Set the ‘Skewer’: Place your 4×4 post into the center of the planter and pour the wet concrete around it, using a level to ensure it is perfectly vertical—think of this as the spine of your dish.
- Allow to ‘Rest’: Let the concrete cure for at least 4 hours (or according to package directions) until it is rock hard and no longer ‘tacky’ to the touch.
- Add the ‘Garnish’: Drill drainage holes just above the concrete line, then layer in your potting soil and a vibrant mix of ‘thriller, filler, and spiller’ plants for a lush finish.
- The Final Sear: Secure your lantern to the top of the post using exterior-grade screws, ensuring a tight fit so it withstands the elements.
How to Choose Spring Flowers Wallpaper for a Fresh Seasonal Vibe

Why we love this
Walking into a room adorned with delicate floral patterns feels like a literal breath of fresh air, even on the gloomiest of days. The visual texture of watercolor petals and spindly green stems creates a sense of movement and life on your walls that paint simply cannot replicate. We love this upgrade because it allows you to ‘bloom’ indoors, surrounding yourself with the soft pastels of lilac and the cheerful yellows of daffodils year-round. It changes the entire temperature of a room, making a sterile space feel warm, inhabited, and deeply connected to the natural world outside your window.
Essential Elements:
- Peel-and-stick floral wallpaper rolls
- Utility knife with fresh blades
- Plastic smoother or squeegee
- Level and measuring tape
- Microfiber cloth and rubbing alcohol
- Ladder
How to make it
- Prep the ‘Surface’: Clean your walls thoroughly with a damp cloth and a bit of alcohol to remove any oils; a clean ‘pan’ ensures the wallpaper sticks perfectly.
- Measure the ‘Portions’: Measure the height of your wall and add 2-3 inches of ‘overhang’ for trimming, ensuring you account for the pattern repeat so the flowers align.
- The First ‘Slice’: Peel back about 6 inches of the backing and align the top edge with the ceiling, using a level to ensure the ‘crust’ is perfectly straight.
- Smooth the ‘Dough’: Slowly pull the backing downward while using your squeegee to push air bubbles from the center out to the edges, maintaining a steady ‘medium heat’ pressure.
- Trim the ‘Edges’: Once the panel is down, use a razor-sharp utility knife to trim the excess at the baseboards and ceiling for a professional, ‘clean-plated’ look.
- Repeat and Align: For the next panel, focus on matching the ‘ingredients’ (the floral pattern) exactly at eye level before pressing the adhesive down.
How to Design Low Retaining Wall Ideas for a Tiered Garden Oasis

Why we love this
There is a profound sense of order and elegance that comes with a well-designed retaining wall, turning a flat or sloped yard into a sophisticated, multi-dimensional masterpiece. The tactile coolness of stacked stone combined with the sight of trailing ivy spilling over the edges creates a timeless, ‘secret garden’ aesthetic. It’s about more than just holding back soil; it’s about creating ‘rooms’ in your garden where the earth itself feels curated and intentional. Sitting on the edge of a low stone wall with the sun on your back and the scent of damp mulch in the air is one of life’s simplest, most grounding pleasures.
Essential Elements:
- Retaining wall blocks or natural flat stones
- Leveling sand and crushed gravel
- Landscape fabric
- Shovel and tamper
- Level and rubber mallet
- Drainage pipe (optional for higher walls)
How to make it
- Dig the ‘Trench’: Excavate a path about 6 inches deep; this is your ‘foundation’ and must be as level as a chilled marble slab.
- Layer the ‘Base’: Fill the trench with 3 inches of crushed gravel and tamp it down until it is incredibly firm; this prevents the ‘dish’ from shifting over time.
- The First ‘Course’: Lay your first row of blocks, using a rubber mallet to ‘sear’ them into the sand and checking with a level constantly to ensure a flat ‘sear.’
- Stacking the ‘Ingredients’: Lay subsequent rows, staggering the vertical joints (like a brick pattern) to ensure structural integrity and a pleasing ‘texture.’
- Backfill for ‘Flavor’: Place landscape fabric behind the wall and fill the gap with gravel to allow for drainage, preventing water from ‘overcooking’ your soil and pushing the wall out.
- The Top ‘Crust’: Finish with ‘capstones’ and a bead of exterior construction adhesive to lock everything in place for a permanent, polished finish.
How to Style a Cute Campsite Setup for the Ultimate Glamping Experience

Why we love this
Glamping is the ultimate fusion of wild adventure and luxurious comfort, where the crisp night air meets the warmth of a plush faux-fur throw. Imagine the crackle of a campfire paired with the soft glow of fairy lights draped over a canvas tent, creating a pocket of magic in the woods or even your own backyard. This setup is all about the ‘feel’—the softness of outdoor rugs underfoot, the weight of heavy blankets, and the aroma of cedarwood smoke and roasted marshmallows. It turns a standard camping trip into a curated sensory experience that feels deeply indulgent and restorative.
Essential Elements:
- Canvas bell tent or high-quality teepee
- Outdoor rugs and floor cushions
- String lights and battery-operated lanterns
- Portable fire pit
- Folding wooden chairs and a side table
- Heavy wool blankets and throw pillows
- Enamelware mugs and a French press
How to make it
- Prep the ‘Platter’: Clear a flat, debris-free area and lay down a heavy tarp; think of this as the clean plate on which you’ll build your ‘feast.’
- Pitch the ‘Main Dish’: Erect your tent, ensuring the tension is high so the fabric looks ‘crisp’ and professional rather than ‘soggy’ or wrinkled.
- Layer the ‘Textiles’: Cover the floor with rugs to provide insulation and ‘flavor’; layering different patterns adds a ‘chef’s kiss’ of bohemian style.
- Set the ‘Mood Lighting’: Drape warm-toned string lights around the entrance and interior, using ‘low heat’ (soft lumens) to create a cozy, amber ambiance.
- Arrange the ‘Furniture’: Create a seating area with floor pillows and low chairs centered around a small table for your morning coffee or evening ‘nightcap.’
- Final ‘Garnish’: Add a basket of firewood and a stack of blankets near the entrance to invite guests into the warm, ‘cooked’ comfort of the space.
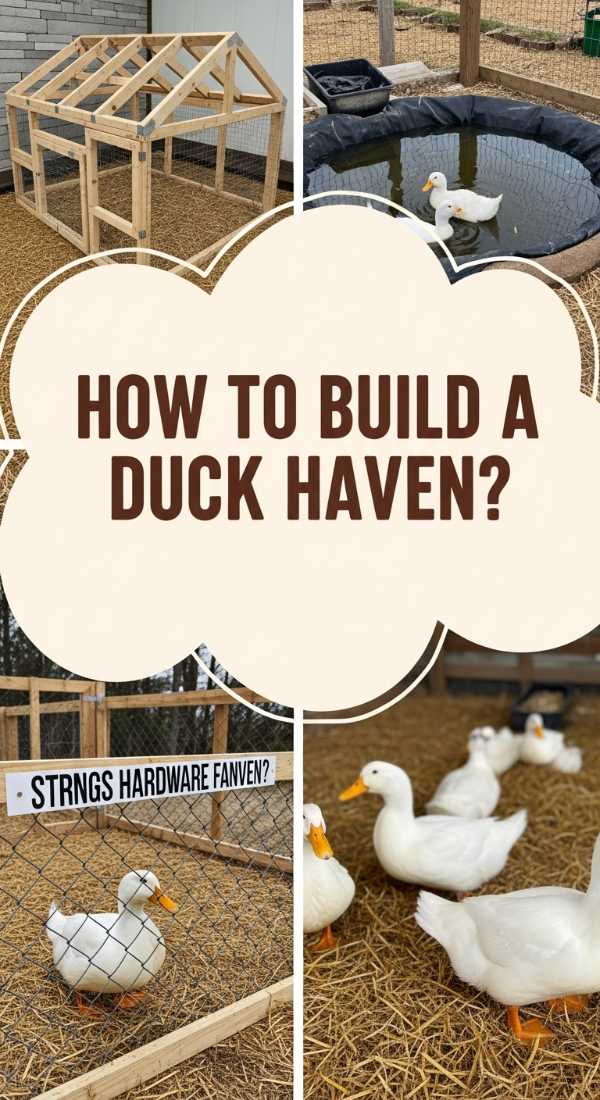
How to Construct DIY Duck Enclosure Ideas for a Happy Feathered Family
Why we love this
There is a whimsical, pastoral joy in hearing the gentle ‘quacks’ of happy ducks as they splash in a clean pond. Building a beautiful enclosure is about creating a sanctuary that looks as good as it functions, blending rustic wood textures with the functional gleam of hardware cloth. We love this because it brings a piece of farm-style serenity to your life, offering a tactile connection to animals and the cycle of nature. The sight of ducks waddling through fresh straw and the peaceful sound of water being filtered through a small pond creates a living, breathing landscape that is endlessly entertaining and heart-warming.
Essential Elements:
- Pressure-treated lumber for framing
- 1/2 inch hardware cloth (not chicken wire)
- Corrugated roofing panels
- Pre-formed plastic pond or large tub
- Heavy-duty latches and hinges
- Straw or wood shavings
- Level and impact driver
How to make it
- Frame the ‘Structure’: Build your rectangular wall frames using 2x4s; ensure the ‘bones’ are square and strong to withstand ‘high pressure’ from wind or predators.
- Wrap with ‘Skin’: Attach the hardware cloth to the exterior using poultry staples; ensure no ‘raw’ edges are exposed to keep the ducks’ delicate feet safe.
- Install the ‘Lid’: Attach the corrugated roofing at a slight angle so rain ‘reduces’ and runs off rather than pooling in the center of the enclosure.
- Prepare the ‘Bath’: Dig a hole for the plastic pond, ensuring the rim is level with the ground for easy ‘dipping’ by your feathered friends.
- The ‘Bedding’ Layer: Spread a thick, 4-inch layer of clean straw or pine shavings across the floor to provide a ‘fluffy’ and dry ‘nest’ for the nights.
- Check the ‘Seal’: Test your latches and doors multiple times to ensure a ‘tight sear’ against any nighttime predators, keeping the inhabitants ‘safe and warm.’
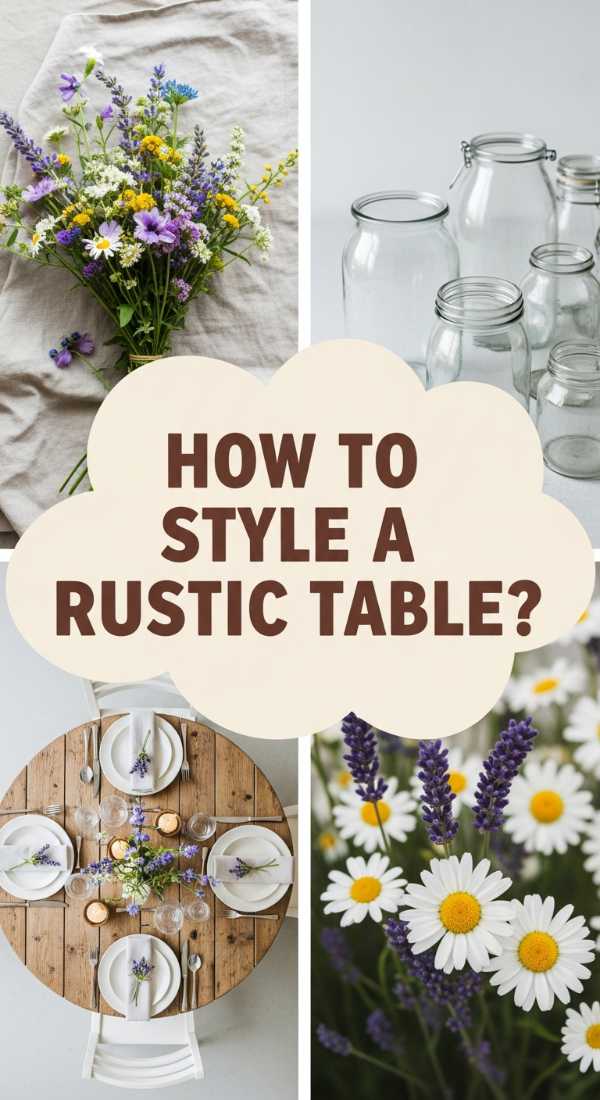
How to Arrange Wildflower Centerpieces for a Whimsical Round Table Dinner
Why we love this
A wildflower arrangement is like a summer meadow captured in a glass, full of untamed beauty and unexpected pops of color. The scent of sweet clover and earthiness of wild yarrow creates an immediate sense of casual, unpretentious elegance at any dinner table. We love how the varying heights and ‘leggy’ stems create a sense of movement, as if the flowers are dancing in a gentle breeze right before your eyes. It’s a sensory delight that encourages guests to lean in closer, offering a tactile and fragrant centerpiece that feels gathered rather than manufactured.
Essential Elements:
- An assortment of wildflowers (Cosmos, Queen Anne’s Lace, Zinnias)
- Vase or vintage ceramic pitcher
- Floral ‘frogs’ or waterproof tape
- Sharp floral shears
- Fresh, cool water with flower food
How to make it
- ‘Clean’ the Greens: Remove all leaves that will sit below the water line; rotting leaves ‘spoil the broth’ by introducing bacteria to the stems.
- Create the ‘Grid’: Use waterproof tape to create a cross-hatch pattern over the mouth of the vase, which acts as a ‘scaffold’ for your ingredients.
- Add the ‘Base Note’: Start with your sturdiest greenery or ‘filler’ flowers to build a wide, ‘hearty’ foundation that spills over the edges.
- The ‘Main Protein’: Insert your focal flowers (the largest blooms) at varying ‘depths’ to create visual interest and a ‘3D’ effect.
- Layer the ‘Accents’: Add the delicate, ‘wispy’ flowers like Queen Anne’s Lace last, letting them stand taller than the rest for a ‘whimsical’ and light finish.
- The ‘Cool Down’: Place the arrangement in a cool spot out of direct sunlight to keep the ‘flavors’ fresh and the petals from ‘wilting’ prematurely.
How to Install DIY Outdoor Shower Ideas for the Most Refreshing Summer Rinse

Why we love this
There is nothing quite as invigorating as a cool rinse under an open sky, with the sun warming your shoulders and the scent of cedar rising from the wet wooden floor. An outdoor shower turns a simple utilitarian task into a spa-like ritual, connecting you to the elements in the most refreshing way possible. The sound of water splashing against stone and the feel of a gentle breeze while you wash away the day’s sand or garden soil is pure bliss. It’s an architectural ‘deep breath’ for your home, offering a sense of freedom and luxury that feels like a permanent vacation.
Essential Elements:
- Cedar or redwood planks for privacy walls
- Shower fixture kit (hose-connected or plumbed)
- Gravel and drainage stones
- Pressure-treated 4×4 posts
- Concrete mix for post setting
- Exterior-grade sealant
How to make it
- Set the ‘Foundation’: Dig holes for your corner posts and set them in concrete, ensuring they are ‘well-done’ (fully cured) before adding any weight.
- Build the ‘Floor Grate’: Construct a slatted floor using cedar over a bed of drainage gravel; this ensures the water ‘strains’ away quickly and doesn’t get ‘soggy.’
- The ‘Wrapping’: Attach your privacy planks to the posts, leaving small gaps for ‘ventilation’ while maintaining enough ‘coverage’ for comfort.
- Install the ‘Plumbing’: Connect your outdoor-rated shower head to a heavy-duty garden hose or a permanent copper line for a ‘high-pressure’ rinse.
- ‘Seal’ the Flavor: Apply a clear, waterproof sealant to the wood to prevent it from ‘graying’ or warping under the constant ‘steam’ of the sun and water.
- The Final ‘Zest’: Hang a few hooks for towels and add a small cedar bench to complete the ‘recipe’ for a perfect backyard spa.
How to Curate Front Door Baskets with Flowers for a Welcoming Entryway

Why we love this
The front door is the first ‘handshake’ of your home, and a woven basket overflowing with blooms is the warmest greeting imaginable. Unlike a flat wreath, a basket offers a lush, three-dimensional explosion of texture and color that says ‘welcome’ in the most charming way. We love the way the natural fibers of a wicker basket contrast with the delicate, velvety petals of pansies or the trailing ‘spiller’ of ivy. It’s a sensory ‘appetizer’ for your home, filling the entryway with a light, floral fragrance and a visual softness that makes every homecoming feel special.
Essential Elements:
- Flat-backed wicker or rattan basket
- Plastic liner or heavy-duty freezer bag
- Potting soil with moisture crystals
- Assorted seasonal flowers
- Floral foam (if using cut flowers)
- Wreath hanger or heavy-duty hook
How to make it
- ‘Line’ the Pan: Place a plastic liner inside the basket to prevent the wicker from getting ‘soggy’ and rotting from the moisture of the soil.
- The ‘Filling’: Pack the bottom of the basket with potting soil or ‘soaked’ floral foam, ensuring it’s firm enough to hold the ‘stems’ upright.
- Add the ‘Thriller’: Place your tallest, most vibrant plant in the center-back of the basket to act as the ‘main attraction’ of your display.
- The ‘Fillers’: Surround the center with medium-height blooms to create ‘volume’ and ensure there are no ’empty bites’ in your arrangement.
- The ‘Spiller’: Tuck trailing plants like creeping jenny or ivy along the front edge so they ‘drip’ over the side like a perfect glaze.
- The ‘Plating’: Hang the basket on your door and give it a ‘light drizzle’ of water, ensuring the ‘ingredients’ stay vibrant and hydrated in the sun.
How to Select Pool Stone and Tile Ideas for a Luxury Backyard Retreat

Why we love this
The right stone and tile can transform a basic pool into a shimmering, high-end lagoon that rivals any five-star resort. We love the way natural travertine stays cool underfoot even in the ‘high heat’ of summer, providing a smooth, velvety texture for bare feet. When the sunlight hits iridescent glass tiles, it creates a dancing, prismatic effect on the water that is hypnotic and serene. This is about choosing materials that feel ancient and permanent, grounding the fluid movement of the water with the solid, cooling presence of earth-toned stone.
Essential Elements:
- Travertine or Slate pavers for the deck
- Glass or ceramic pool waterline tiles
- Waterproof thin-set mortar
- Waterproof grout
- Wet saw for precision cuts
- Stone sealer
How to make it
- ‘Prep’ the Surface: Ensure the concrete shell is clean and etched; a ‘rough’ surface allows the mortar to ‘bite’ better for a permanent bond.
- The ‘Dry Run’: Lay out your stone pavers without adhesive to check the ‘blend’ of colors; you want a balanced ‘mix’ of tones throughout the ‘dish.’
- The ‘Searing’ Process: Apply thin-set mortar with a notched trowel and press the tiles or stones firmly into place, checking for ‘evenness’ like a flat stovetop.
- The ‘Grout’ Glaze: Once the mortar is set (usually 24 hours), spread grout over the tiles to fill the gaps, wiping away the ‘haze’ with a damp sponge before it ‘overcooks.’
- ‘Sealing’ in the Juices: Apply a high-quality stone sealer to the pavers to protect them from chlorine and sun, keeping the ‘finish’ looking fresh and ‘unblemished.’
- The ‘Garnish’: Finish the edges with matching coping stones to create a smooth, ’rounded’ transition from the deck to the water.
How to Use Concrete Molds DIY for Custom Garden Paths and Accents

Why we love this
There is something incredibly satisfying about ‘stamping’ your own personality onto the earth with custom concrete paths. Using molds allows you to mimic the look of expensive cobblestone or slate with a fraction of the cost, creating a tactile journey through your garden. We love the way a winding path invites exploration, guiding your feet over smooth, geometric shapes while moss or thyme grows in the ‘seasoned’ cracks between stones. It’s a project that combines the rugged durability of stone with the artistic freedom of a DIYer, making your backyard feel like a thoughtfully designed estate.
Essential Elements:
- Plastic walkway molds (cobblestone or geometric patterns)
- High-strength concrete mix
- Concrete pigment or dye (optional)
- Large mixing tub and hoe
- Trowel and stiff brush
- Cooking spray (to coat the mold)
How to make it
- ‘Preheat’ the Ground: Clear the path of grass and level the dirt; a ‘flat pan’ is essential for a path that doesn’t ‘crack’ under pressure.
- Mix the ‘Dough’: Combine concrete and water until it’s the consistency of thick ‘pudding’; if it’s too ‘runny,’ it won’t hold the ‘shape’ of the mold.
- The ‘Non-Stick’ Coating: Spray the mold with cooking spray or oil to ensure the ‘cake’ slides out cleanly without ‘tearing’ the edges.
- Filling the ‘Mold’: Set the mold on the ground and shovel in the concrete, using a trowel to ‘smooth’ the surface and ensure all the ‘corners’ are filled.
- The ‘Release’: Let the concrete sit for 10-15 minutes until it begins to ‘firm up’ (visual cue: it loses its glossy sheen), then gently lift the mold.
- The ‘Seasoning’: After the path has ‘cured’ for 24 hours, brush sand or plant small ‘herbs’ like moss into the gaps for a weathered, ‘homestyle’ look.
Bringing the Cozy Home
As we wrap up this weekend of upgrades, remember that the goal isn’t perfection—it’s presence. Whether you’re feeling the grit of the concrete as you build a new path or smelling the fresh lavender in your front door basket, these projects are designed to ground you in your home. By taking the time to ‘cook’ these DIYs with care, you’ve turned your living space into a sensory-rich sanctuary that will nourish your soul for seasons to come. Now, pour yourself a drink, turn on those new planter lights, and enjoy the ‘art of cozy’ you’ve created.