
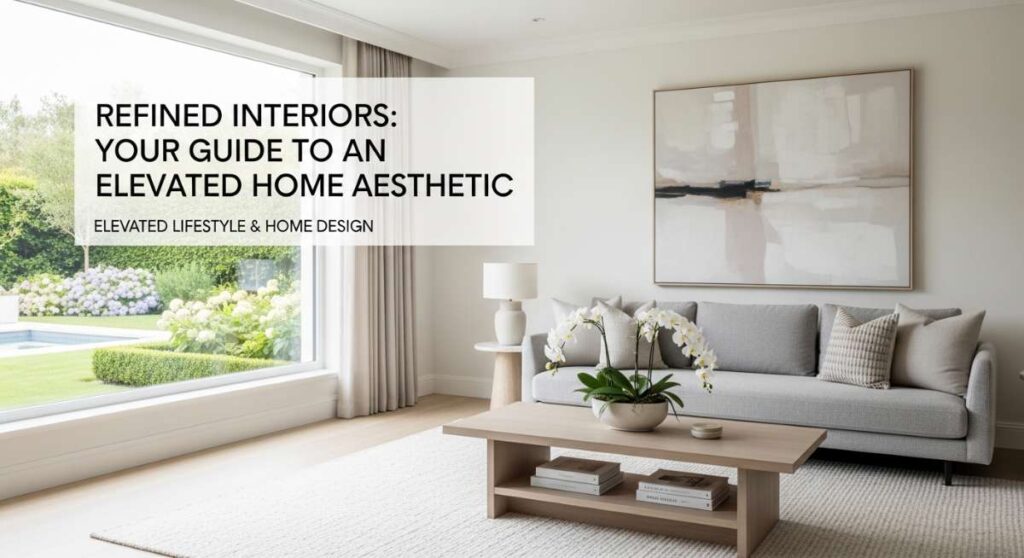
There is a profound, almost magical shift that happens when we stop viewing our homes as mere shelters and start treating them as sanctuaries for the soul. I remember the first time I realized that my living space was a direct reflection of my inner peace; I had spent years living among ‘temporary’ furniture and uninspiring walls, always waiting for a ‘real’ house to arrive. But refinement isn’t about the price tag or the square footage; it’s about the intentionality you pour into every corner, the way the morning light hits a specific texture, and the quiet joy of a well-placed object.
In this guide, I want to take you on a journey through the art of elevated living. We aren’t just talking about decor; we are talking about a lifestyle that celebrates beauty, comfort, and the sophisticated details that make every day feel like a curated experience. Whether you’re reclaiming a backyard or reimagining a singlewide layout, the goal is the same: to create a home that feels like a deep, refreshing breath every time you walk through the door.
How to Create a Backyard Oasis for Refreshing Summer Afternoons
Why we love this
There is nothing quite like the sensory symphony of a perfect backyard retreat: the cooling touch of a breeze filtered through swaying ornamental grasses, the soft clinking of ice in a tall glass, and the earthy fragrance of damp jasmine as the sun begins to set. It transforms your outdoor space into an extension of your living room, offering a private escape from the digital noise where you can truly reconnect with nature. The combination of dappled shade and plush textiles creates an inviting atmosphere that makes every afternoon feel like a luxury vacation right in your own zip code.
Essential Elements:
- Weather-resistant sectional sofa or deep-seated armchairs
- Outdoor rug with a natural jute or sisal texture
- String lighting or solar-powered lanterns for ambiance
- A variety of potted plants (ferns, palms, and lavender)
- A central fire pit or a sleek water feature
- Privacy screening (trellises or tall hedges)
How to make it
- Begin by defining your ‘zones’; use a large outdoor rug to anchor your main seating area, ensuring it is positioned to catch the best afternoon shade.
- Install overhead string lights in a ‘zigzag’ pattern across the space, using sturdy poles or existing structures to keep them at least 8 feet high for a canopy effect.
- Layer your greenery by placing larger potted palms in the corners to create height and ‘walls,’ then fill in gaps with smaller flowering plants at eye level.
- Add comfort layers like UV-resistant throw pillows and a lightweight cotton throw for when the temperature dips in the evening.
- Incorporate a focal point, such as a fountain or a modern fire table, ensuring it is placed at a safe distance from flammable materials but close enough to serve as a gathering spot.
How to Install Large Format Tiles for a Sophisticated Spa Experience

Why we love this
Walking into a bathroom clad in large format tiles feels like entering a high-end European spa; the minimal grout lines create a seamless, expansive look that tricks the eye into seeing a much larger space. There is a tactile luxury to the smooth, cool surface of oversized porcelain or stone that immediately elevates the morning routine from a chore to a ritual. The sheer scale of the tiles brings a sense of architectural permanence and clean-lined sophistication that smaller tiles simply cannot replicate, offering a serene backdrop for your most relaxing moments.
Essential Elements:
- Large format porcelain tiles (at least 12×24 inches or larger)
- High-quality thin-set mortar specifically for large tiles
- Leveling spacers and wedges
- Notched trowel (1/2 inch)
- Diamond-blade wet saw for precision cuts
- Neutral, non-sanded grout
How to make it
- Prep your subfloor meticulously; large tiles are unforgiving, so the surface must be perfectly level and free of debris before you begin.
- Dry-lay your tiles to plan the layout, aiming to avoid thin ‘slivers’ at the edges of the room; center the layout for a balanced, professional look.
- Apply the thin-set mortar using a 1/2-inch notched trowel, back-buttering each tile (applying a thin layer of mortar to the back of the tile itself) to ensure 100% coverage.
- Place the tile and use a leveling system—inserting clips and wedges—to ensure there is zero ‘lippage’ between the edges of the tiles.
- Allow the mortar to cure for 24-48 hours before removing the leveling clips and applying a color-matched grout with a rubber float, wiping away excess with a damp sponge.
How to Elevate a Singlewide Home for a High End Living Feel
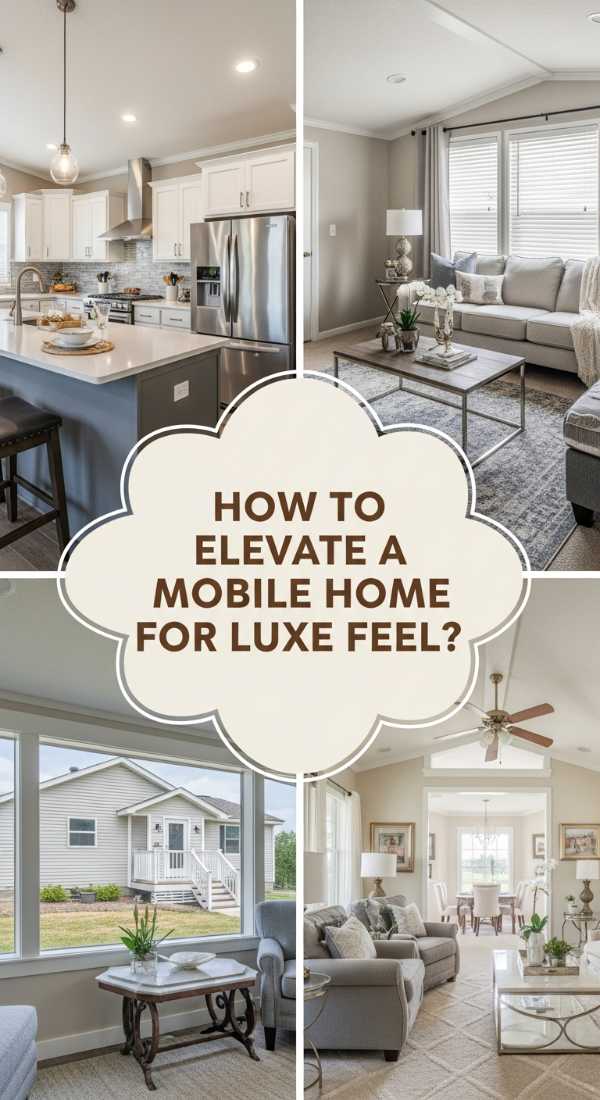
Why we love this
There is a unique satisfaction in taking a modest space and infusing it with ‘quiet luxury’ through smart design choices and high-quality finishes. Elevating a singlewide home is all about breaking the mold of standard manufactured housing by introducing textures and architectural details that feel custom-built and permanent. When you replace generic fixtures with brass or matte black hardware and swap out hollow doors for solid wood, the entire acoustic and visual weight of the home shifts toward a sophisticated, grounded aesthetic that rivals any traditional build.
Essential Elements:
- Custom crown molding and baseboards
- High-end cabinet hardware and door handles
- Premium paint in a muted, sophisticated palette
- Statement light fixtures (chandeliers or modern pendants)
- Floor-to-ceiling linen drapery
How to make it
- Start by painting the walls and ceiling in the same light, warm neutral shade to blur the boundaries and make the rooms feel taller and more expansive.
- Remove standard plastic or thin wood trim and replace it with substantial, 5-inch baseboards and 4-inch crown molding to create a custom, ‘built-in’ appearance.
- Upgrade every light fixture in the home; replace standard globe lights with designer pendants or recessed LED lighting to improve the quality of light.
- Swap out basic kitchen and bathroom hardware for heavy-duty, designer-style pulls and knobs in a consistent finish like brushed gold or oil-rubbed bronze.
- Hang heavy linen curtains as high as possible—ideally right below the ceiling line—and let them pool slightly on the floor to add a sense of grandeur and softness.
How to Style a Vendor Booth for Maximum Customer Interest

Why we love this
A beautifully styled vendor booth is more than just a place to sell; it is a curated world that tells a story the moment a customer glimpses it from across the room. We love the way a well-organized display uses height, light, and texture to guide the eye and create an emotional connection with the products. It’s about creating an ‘experience’ where the customer feels invited to touch, smell, and explore, turning a simple transaction into a memorable interaction that builds brand loyalty and leaves a lasting impression of professionalism.
Essential Elements:
- Consistent color palette for all displays and branding
- Vertical shelving and tiered risers
- Proper accent lighting (clamped spotlights or battery-operated LEDs)
- Professional signage and clear pricing labels
- Tactile props (wooden crates, velvet cloths, or fresh flowers)
How to make it
- Design your layout with a clear ‘entry’ and ‘flow,’ placing your most eye-catching ‘hero’ products at eye level on the outer edge of the booth.
- Utilize vertical space by using tall shelving units or hanging displays, which prevents the booth from looking flat and allows you to be seen from a distance.
- Group products in ‘stories’ or sets of three, varying the heights within each group using risers to create visual interest and movement.
- Incorporate warm-toned lighting to highlight specific products, ensuring there are no dark corners that might hide your inventory.
- Keep the branding consistent by using a high-quality tablecloth that hides storage underneath and clear, elegant signage that communicates your brand’s voice.
How to Decorate Ranch Style Homes for Timeless Rustic Beauty

Why we love this
Ranch style homes offer a sprawling, grounded canvas that perfectly suits a blend of rugged textures and modern comforts. We adore the way this aesthetic celebrates the ‘honest’ materials of the earth—think sun-bleached wood, supple leather, and woven wool—creating a home that feels both sturdy and incredibly cozy. It’s a design language that honors the heritage of the American West while staying firmly rooted in the present, offering a timeless beauty that ages gracefully and always feels welcoming after a long day.
Essential Elements:
- Natural wood beams (reclaimed or faux)
- Distressed leather furniture in warm cognac or chocolate tones
- Natural stone accents (for fireplaces or backsplashes)
- Woven textiles like Navajo-patterned rugs or chunky wool throws
- Antique or hand-forged iron hardware
How to make it
- Focus on the fireplace as the heart of the home; if it’s currently dated, consider resurfacing it with natural stack-stone or adding a heavy reclaimed wood mantel.
- Introduce ceiling beams in the main living area to draw the eye upward and add architectural character that defines the ‘ranch’ aesthetic.
- Choose a neutral, earth-toned color palette (think sage green, warm cream, and terracotta) to keep the space feeling airy and connected to the outdoors.
- Layer your textures by placing a large, neutral jute rug on the floor and topping it with a smaller, patterned wool rug for a cozy, ‘collected over time’ feel.
- Mix modern clean-lined furniture with one or two ‘statement’ antiques, like a primitive wooden bench or a vintage leather trunk, to provide historical depth.
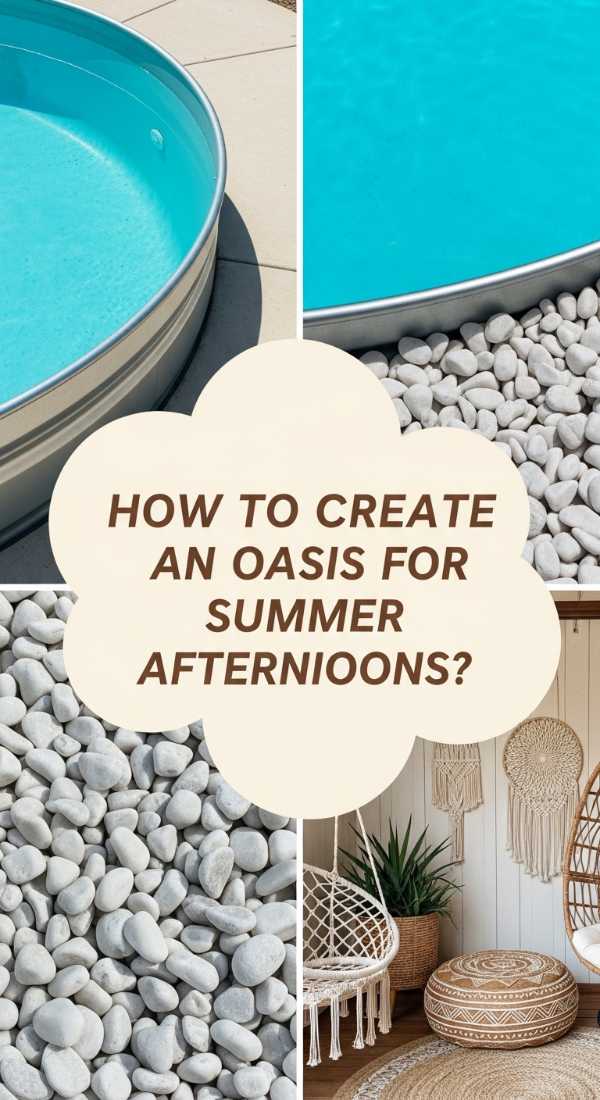
How to Landscape a Stock Tank Pool for a Dreamy Garden Aesthetic

Why we love this
The stock tank pool is the ultimate symbol of high-low design, bringing a chic, industrial-cool vibe to the garden without the permanence or cost of a traditional pool. There is something deeply nostalgic and ‘country-club-meets-cabin’ about the silver gleam of galvanized steel surrounded by lush, swaying ornamental grasses and white gravel. It’s an intimate, stylish way to cool off that feels curated rather than clunky, especially when it’s tucked into a thoughtfully landscaped corner of the yard where the water reflects the sky.
Essential Elements:
- Galvanized steel stock tank (typically 8 feet in diameter)
- Above-ground pool pump and filter system
- Pea gravel or river rock for the base and surrounding area
- Potted grasses and perennial shrubs for privacy
- A small cedar or composite wood deck for seating and access
How to make it
- Excavate a flat, level circle slightly larger than the tank and fill it with 3 inches of leveled sand or fine pea gravel to prevent the metal from shifting or rusting.
- Set the tank in place and carefully drill holes for the inlet and outlet suction fittings, connecting them to a high-quality sand filter pump to keep the water crystal clear.
- Surround the base of the tank with a 2-foot border of white river rocks or pea gravel, which serves as both a drainage solution and a clean aesthetic frame.
- Build a simple, semi-circular wooden deck on one side of the tank to provide a place for towels and a step for easy entry and exit.
- Plant tall, airy grasses like Miscanthus or Feather Reed around the perimeter to soften the metal edges and create a sense of ‘hidden’ seclusion.
How to Choose Oversized Shower Tiling for an Urban Modern Look
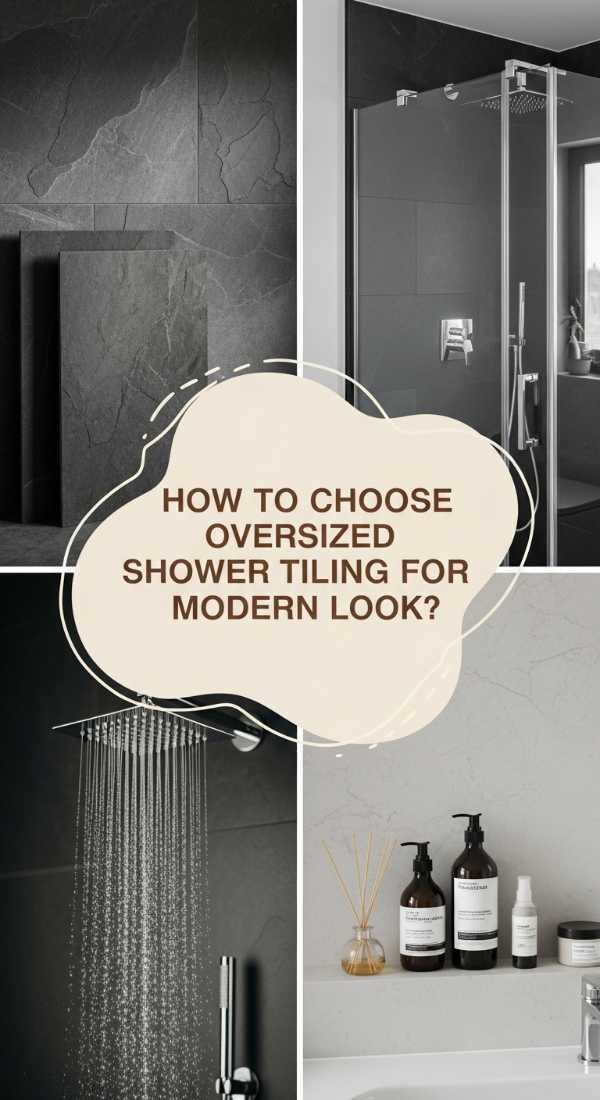
Why we love this
In an urban modern bathroom, scale is everything. Oversized shower tiling creates a bold, graphic statement that feels architectural and intentional, reminiscent of a boutique hotel in Soho or Tokyo. We love how the large-format slabs minimize visual clutter, making even a small walk-in shower feel like a grand, monolithic feature of the room. The clean lines and monochromatic possibilities allow the shower to disappear into the walls or stand out as a piece of functional art, depending on the finish you choose.
Essential Elements:
- Oversized tiles (24×48 inches or larger slabs)
- Matte finish porcelain or slate-look tiles
- Slim, linear shower drain in a matching finish
- High-performance, epoxy-based grout in a matching color
- Minimalist glass shower enclosure
How to make it
- Select a tile with a matte finish and very straight (rectified) edges to allow for the thinnest possible grout lines, which is key to the ‘urban’ look.
- Use a waterproofing membrane (like Schluter-Kerdi) over the entire shower area, as large tiles require a perfectly flat and waterproofed substrate.
- Plan the tile placement so that the most prominent wall features full slabs with no horizontal cuts, keeping the vertical lines continuous from floor to ceiling.
- Install a linear drain along the back wall, which allows for a single-slope floor that accommodates large tiles without the need for complex ‘envelope’ cuts.
- Finish the look with a frameless glass door and minimalist black or chrome fixtures to ensure the focus remains on the sweeping expanse of the tile.
How to Remodel Singlewide Interiors for a Spacious Open Layout

Why we love this
Remodeling a singlewide to create an open layout is like breathing new life into a confined space; it’s the ultimate transformation from ‘boxy’ to ‘breathable.’ We love the way removing non-load-bearing walls opens up the sightlines from the kitchen to the living room, allowing natural light to flood through the entire home. It creates a sense of flow and modern functionality that makes the home feel twice its actual size, turning a modest footprint into a sophisticated environment perfect for hosting or simply enjoying the luxury of space.
Essential Elements:
- Recessed LED ‘can’ lights to maintain ceiling height
- Consistent flooring throughout the entire open area
- Kitchen island with a waterfall edge or breakfast bar
- New drywall to replace standard paneled walls
- Light, monochromatic paint scheme
How to make it
- Consult with a structural professional to identify which interior walls can be safely removed (most interior walls in modern singlewides are non-load-bearing).
- After wall removal, install new drywall throughout the open area, opting for a smooth finish to replace the old-fashioned ‘batten strip’ panels common in older units.
- Lay a single type of flooring—such as wide-plank luxury vinyl or engineered hardwood—across the entire living, dining, and kitchen area to create a seamless visual plane.
- Reconfigure the kitchen into a ‘U’ or ‘L’ shape and add a central island, which provides a functional boundary between the kitchen and living room without blocking the view.
- Install recessed lighting across the new open ceiling to ensure even brightness, making sure to place pendants only over the island or dining table for focused task lighting.
How to Create Professional Vendor Displays for Craft Fair Success

Why we love this
The difference between a hobbyist and a professional often comes down to the display. We love professional vendor displays because they treat the product with the respect it deserves, elevating the entire brand through thoughtful curation. A professional display doesn’t just show what you’re selling; it communicates value, quality, and a cohesive vision. It’s about creating a ‘mini-boutique’ feel that makes customers feel confident in their purchase and excited to share their find with others, turning a simple fair into a major business milestone.
Essential Elements:
- Custom-branded tablecloths and banners
- Modular shelving units that are easy to assemble and transport
- Professional-grade lighting (LED strips or spotlights)
- Clear, branded price tags and business card holders
- A ‘signature’ decorative element (a specific scent, plant, or prop)
How to make it
- Invest in a custom-printed tablecloth that features your logo prominently on the front, ensuring it reaches all the way to the floor to hide your stock boxes.
- Use a ‘rule of three’ for your main product groups, placing them on varying levels using sleek acrylic or wooden risers to keep the eye moving.
- Ensure every single item is clearly priced with a professionally printed tag; customers are often too shy to ask for prices and will walk away if they aren’t visible.
- Place a small ‘interaction station’ where customers can try a sample, smell a fragrance, or flip through a lookbook, encouraging them to linger in your space.
- Use a battery-powered LED spotlight to highlight your ‘best seller,’ ensuring it is the brightest and most visible item in your display.
How to Achieve Authentic Ranch Living with Modern Comfort

Why we love this
Authentic ranch living is all about the balance between the ‘wild’ and the ‘refined.’ We love this aesthetic because it celebrates a life well-lived—one where you can come in from the garden or the barn and immediately sink into a high-thread-count linen sofa. It’s a marriage of durability and decadence, where the warmth of a stone fireplace meets the sleek efficiency of a chef’s kitchen. This style of living feels grounded, honest, and incredibly comfortable, providing a sanctuary that is as practical as it is beautiful.
Essential Elements:
- Natural, reclaimed wood flooring
- A large, stone-clad fireplace as the central anchor
- High-quality, oversized linen sofas and chairs
- Modern, high-end kitchen appliances in a rustic setting
- Large windows or glass doors that connect to the landscape
How to make it
- Start with the floors; choose a wide-plank oak or reclaimed timber with a matte finish that can handle the ‘wear and tear’ of ranch life while looking sophisticated.
- Incorporate ‘living’ finishes like unlacquered brass or soapstone countertops that will develop a beautiful patina over time, telling the story of the home.
- Focus on ‘soft’ comfort by layering thick wool rugs over the wood floors and choosing upholstery in natural, breathable fabrics like linen and cotton.
- Integrate modern technology discreetly; use ‘hidden’ appliances with cabinet fronts and smart lighting that can be dimmed to mimic the warmth of candlelight.
- Keep the decor minimal and meaningful; choose a few large-scale pieces of art or photography that celebrate the local landscape rather than cluttering surfaces with small trinkets.
The Art of Living Elevated
Refining your home aesthetic is an ongoing journey of discovery and editing. It is the practice of choosing quality over quantity, and intentionality over impulse. Whether you are laying a single tile or reimagining your entire backyard, remember that the most ‘elevated’ homes are the ones that reflect the unique spirit and peace of the people who live within them. May your home always be a place of beauty, comfort, and deep inspiration.