
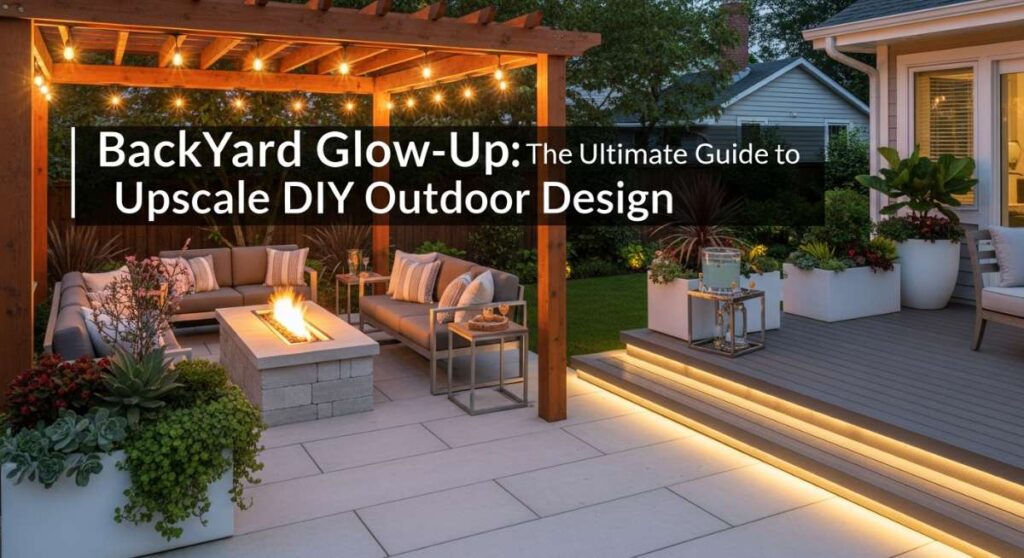
Remember that first evening when the sun lingers just a bit longer, the air turns sweet with the scent of blooming jasmine, and you suddenly realize your backyard is your favorite place on earth? There is something truly transformative about stepping out into a space that feels less like a patch of grass and more like a high-end boutique hotel retreat. We’ve all scrolled through those dreamy Pinterest boards, but the real secret to an upscale outdoor glow-up isn’t a massive renovation budget—it’s the personal, soulful DIY touches that add character and luxury to every square inch of your home.
Creating a sanctuary is about more than just aesthetics; it’s about the memories you’ll make under the soft glow of fairy lights or the laughter shared over a handmade farmhouse table. Whether you are looking to boost your curb appeal or create a secluded nook for morning coffee, these projects are designed to elevate your lifestyle from the ground up. Let’s roll up our sleeves and turn those backyard dreams into a breathtaking reality that you’ll never want to leave.
How to Design Dreamy Flower Beds for Instant Curb Appeal
Why we love this
There is nothing quite like the visual symphony of a perfectly curated flower bed to make a home feel established and loved. We adore the way textures play against each other—the soft, silvery leaves of lamb’s ear contrasting with the deep, architectural greens of boxwoods, all punctuated by the vibrant pops of seasonal blooms. Walking up to a home framed by these lush layers creates an immediate sense of peace and pride, inviting you to slow down and appreciate the fragrance of lavender and the gentle hum of pollinators visiting your garden sanctuary.
Essential Elements:
- High-quality organic compost and topsoil blend
- Hardwood mulch (dark brown or black for a high-end look)
- A mix of perennials (Hostas, Lavender, Hydrangeas) and annuals
- Professional-grade landscape edging
- Garden spade and hand trowel
How to make it
- Begin by outlining your bed’s shape using a garden hose or spray paint; soft, organic curves generally look more upscale than harsh straight lines.
- Remove any existing grass or weeds within the outline, ensuring you dig deep enough to remove root systems completely.
- Aerate the soil to a depth of about 12 inches using a garden fork, then mix in a 3-inch layer of organic compost to provide a nutrient-rich foundation.
- Position your plants while they are still in their nursery pots to test the layout; place taller shrubs in the back and shorter, spreading varieties toward the front.
- Dig holes that are twice as wide as the root ball and exactly the same depth; tease the roots gently before placing them in the ground to encourage outward growth.
- Backfill the holes, tamping the soil down firmly but gently to eliminate air pockets, and water immediately at the base of the plant.
- Apply a 2-3 inch layer of mulch across the entire bed, keeping it an inch away from the stems of the plants to prevent rot and ensure proper drainage.
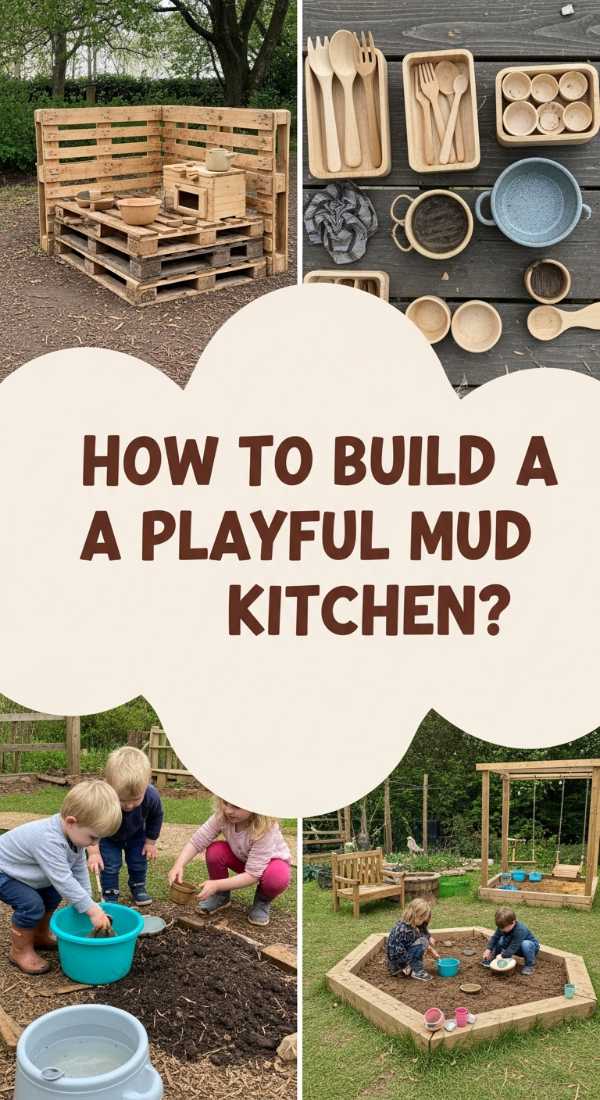
How to Build a Playful Mud Kitchen for Creative Outdoor Fun
Why we love this
A mud kitchen is the ultimate marriage of childhood whimsy and sophisticated garden design, offering a dedicated space for sensory exploration that doesn’t clutter your indoor living areas. We love the rustic charm of weathered wood paired with the tactile joy of stainless steel bowls and smooth river stones. It’s a place where ‘nature soup’ is always on the menu, encouraging little ones to engage with the earth while parents enjoy a moment of tranquility nearby, watching the messy, beautiful process of imaginative play unfold in the fresh air.
Essential Elements:
- Untreated Cedar or pressure-treated lumber
- Stainless steel mixing bowls (to serve as sinks)
- Outdoor-rated wood screws
- Assorted hooks and a small hand-pump faucet
- Upcycled kitchen utensils (whisks, spoons, pots)
How to make it
- Cut your lumber to size to create a sturdy frame; a standard height of 24 inches for the countertop is usually ideal for toddlers and young children.
- Assemble the base frame using two rectangular boxes connected by four vertical legs, ensuring all joints are square and secured with outdoor-rated screws.
- Install the countertop boards, leaving a 1/8-inch gap between them for water drainage, then measure and cut circular holes using a jigsaw to fit your stainless steel bowls.
- Build a vertical backboard using leftover slats; this provides a place to install hooks for hanging utensils and a small shelf for ‘spice’ jars filled with sand or petals.
- Sand all surfaces thoroughly with 120-grit sandpaper followed by 220-grit to ensure there are no splinters or rough edges for small hands.
- Apply a clear, non-toxic outdoor sealant or wood oil to protect the cedar from the elements while maintaining its natural, upscale aesthetic.
- Position the kitchen in a shaded area and stock it with sensory materials like water, potting soil, and wooden discs for endless creative sessions.
How to Craft a Stylish Patio Table for Summer Evening Gatherings
Why we love this
The centerpiece of any outdoor living space is a table that beckons friends and family to gather round for long, candlelit dinners. We love the substantial, grounding presence of a thick-topped wooden table, which brings the warmth of an indoor dining room out into the open air. The feel of smooth, grain-heavy wood under your palms and the way the surface catches the golden hour light makes every meal feel like a special occasion, turning a simple Tuesday night dinner into a curated al fresco experience.
Essential Elements:
- 4×4 Cedar posts for legs
- 2×6 or 2×8 Cedar planks for the tabletop
- Kreg Jig and pocket hole screws
- Exterior wood glue
- Outdoor polyurethane or teak oil
How to make it
- Cut your 4×4 posts to a standard dining height of 29 inches and your tabletop planks to your desired length (usually 72 to 96 inches).
- Build the apron (the frame under the tabletop) by connecting the legs with 2×4 supports using pocket hole screws and exterior glue for a rock-solid bond.
- Lay your tabletop planks side-by-side, selecting the most beautiful grain patterns for the top side, and join them together using pocket holes every 12 inches.
- Center the leg assembly on the underside of the tabletop and secure it using Z-clips or pocket screws, allowing for natural wood expansion and contraction.
- Sand the entire table starting with 80-grit and working your way up to a buttery-smooth 220-grit finish, paying extra attention to the corners.
- Wipe the table clean with a tack cloth and apply three coats of outdoor-rated sealer, lightly sanding with 320-grit between coats for a professional-grade sheen.
- Add felt pads to the bottom of the legs to protect your patio surface and prevent moisture from wicking up into the wood.
How to Create a Zen Rock River Bed for Elegant Drainage Solutions

Why we love this
A dry creek bed is the perfect intersection of form and function, solving drainage issues while introducing a calming, Japanese-inspired aesthetic to your yard. We love the way smooth Mexican beach pebbles or variegated river rocks catch the light when wet, mimicking the movement of a flowing stream. It adds a sophisticated architectural element to the landscape, creating a sense of movement and tranquility that guides the eye through the garden and provides a textured backdrop for ornamental grasses and ferns.
Essential Elements:
- Heavy-duty landscape fabric
- Assorted river rocks (small gravel to large boulders)
- Landscape pins
- Shovel and pickaxe
- Large decorative accent stones
How to make it
- Map out a natural, meandering path where water naturally pools or flows during rain, ensuring the path leads away from your home’s foundation.
- Excavate a trench about 12-18 inches wide and 6 inches deep, creating a slight “V” or “U” shape to channel water effectively.
- Line the entire trench with professional-grade landscape fabric, securing it tightly with landscape pins every 12 inches to prevent weed growth and soil erosion.
- Place your largest boulders first at the curves or “bends” of your river to act as natural anchors and visual focal points.
- Fill the bottom of the trench with a base layer of medium-sized river rocks (2-3 inches in diameter) to cover the fabric completely.
- Layer in smaller pebbles and gravel to fill the gaps, creating a natural-looking gradient that mimics a real stream bed.
- Finish by planting drought-tolerant grasses like Blue Fescue or Liriope along the edges to soften the rock and blend the feature into the surrounding garden.
How to Master Realistic Pantry Organization for a Stress Free Kitchen

Why we love this
While often hidden behind closed doors, a beautifully organized pantry is the engine room of a peaceful home, especially when preparing for outdoor entertaining. We love the rhythmic visual of matching glass jars, the earthy texture of woven wicker baskets, and the instant clarity of seeing exactly what ingredients you have on hand. It turns a chore like meal prep into a sensory delight, where the scent of dried herbs and the clean lines of a labeled system create a high-end, “boutique grocer” feel right in your own kitchen.
Essential Elements:
- Airtight glass or BPA-free plastic canisters
- Uniform woven or wire baskets
- Tiered spice racks or lazy Susans
- A label maker or custom vinyl decals
- Over-the-door rack or shelf risers
How to make it
- Empty your entire pantry completely; this is the crucial “reset” phase where you check expiration dates and donate items you won’t use.
- Group like items together on your counter: baking supplies, snacks, canned goods, grains, and breakfast items to determine how much space each category needs.
- Decant dry goods like flour, sugar, pasta, and cereal into airtight containers to maintain freshness and eliminate the visual “noise” of mismatched packaging.
- Utilize baskets for awkward items like chip bags or potato sacks, keeping these on lower shelves for easy access.
- Install tiered shelving for canned goods so you can see the back row, and use lazy Susans in corners for oils, vinegars, or honey jars.
- Label every container and basket with a consistent font style; this ensures that every member of the household knows exactly where things belong.
- Establish a “first-in, first-out” system by placing newer items behind older ones, and leave a small amount of “breathing room” on each shelf to avoid overcrowding.
How to Install a Chic Floating Deck for the Perfect Backyard Retreat

Why we love this
A floating deck provides an immediate sense of intention and luxury, creating a defined “island” for relaxation without the complexity of a traditional attached structure. We love the low-profile, modern look that sits just inches above the ground, offering a smooth transition from the lawn to a comfortable seating area. The warm, toasted tones of stained wood against the cool greens of the grass create a sophisticated color palette that feels both grounded and incredibly upscale, perfect for lounging with a book or hosting a summer cocktail hour.
Essential Elements:
- Pressure-treated 2×6 joists
- Decking boards (Cedar, Redwood, or Composite)
- Concrete deck blocks
- Level and chalk line
- Hidden deck fasteners or deck screws
How to make it
- Clear the area and level the ground, then lay down landscape fabric and a thin layer of gravel to prevent weed growth and assist with drainage under the deck.
- Position concrete deck blocks at the corners and every 4-5 feet to act as the foundation; use a long straight board and a level to ensure every block is perfectly even.
- Construct the outer frame using 2×6 pressure-treated lumber, checking for square by measuring the diagonals (they should be equal).
- Install interior joists every 16 inches on center, securing them to the frame with joist hangers for maximum structural integrity.
- Lay your first decking board perfectly flush with the edge of the frame, then use spacers to ensure a consistent 1/8-inch gap between all subsequent boards.
- Secure the boards using hidden fasteners for a high-end, screw-free look, or pre-drill and countersink your deck screws for a traditional finish.
- Trim any overhanging board edges with a circular saw for a crisp line, then apply a high-quality outdoor stain or sealer to protect the wood and enhance the grain.
How to Use Whimsical Solar Lights for an Enchanting Garden Glow

Why we love this
As the sun dips below the horizon, the right lighting transforms a backyard from a simple yard into a magical, ethereal wonderland. We love the soft, amber flicker of solar-powered lanterns and the delicate sparkle of fairy lights woven through tree branches. Solar lighting is the ultimate DIY luxury because it requires no wiring, yet it provides a sophisticated layered lighting effect that highlights architectural plants and creates a warm, inviting atmosphere that beckons you to stay outside long after dark.
Essential Elements:
- Solar-powered path lights (warm white LEDs)
- String “Edison” style solar lights
- Decorative solar lanterns (metal or woven)
- Small spotlights for “up-lighting” trees
- Shepherd’s hooks
How to make it
- Walk through your yard at dusk to identify “dark zones” and architectural features like large trees or stone walls that deserve to be highlighted.
- Place path lights along walkways, staggering them on either side rather than in a straight line to create a more natural, upscale look.
- Hang string lights overhead by securing them to fence posts or using sturdy poles; ensure they have enough tension to avoid excessive sagging but enough “drape” to feel relaxed.
- Position small solar spotlights at the base of your favorite trees, angling the light upward into the canopy to create dramatic shadows and depth.
- Cluster decorative lanterns on patio tables or along the steps of a deck to provide “task lighting” and a cozy, candle-like ambiance.
- Ensure all solar panels are angled toward the southern sky or the area with the most direct daily sunlight to ensure maximum evening brightness.
- Clean the solar panels once a month with a damp cloth to remove dust and pollen, which ensures the batteries charge fully every day.
How to Style a Nostalgic Teen Room for Ultimate Retro Vibes
Why we love this
Design doesn’t stop at the patio door, and creating a nostalgic retreat for the younger members of the house brings that same “upscale DIY” spirit indoors. We love the eclectic mix of 70s-inspired textures—think velvet, rattan, and shag—paired with modern tech and retro posters. It’s a space that feels curated yet lived-in, a cozy cocoon of self-expression where warm tones and funky patterns create an atmosphere that is both cool and incredibly comforting, perfect for late-night study sessions or hanging out with friends.
Essential Elements:
- Rattan or wicker furniture (accent chairs or headboards)
- Lava lamps or neon wall signs
- Record player and vinyl display ledge
- Textured throw pillows (velvet, corduroy, or faux fur)
- Gallery wall of retro-inspired art or vintage posters
How to make it
- Choose a color palette that leans into nostalgic tones: mustard yellow, burnt orange, sage green, and creamy off-whites.
- Create a focal point, such as a bed with a DIY upholstered headboard or a dedicated “listening nook” featuring a record player and floor cushions.
- Layer lighting using a mix of functional desk lamps and vibe-setting floor lamps; use warm-toned bulbs to enhance the vintage feel.
- Build a gallery wall using a mix of thrifted frames and new prints, ensuring the layout is balanced but intentionally slightly asymmetrical.
- Incorporate natural elements like hanging spider plants or pothos in macramé hangers to bring life and soft texture to the corners of the room.
- Organize “tech clutter” using vintage-looking wooden crates or woven baskets to keep the space looking like a curated retreat rather than a messy bedroom.
- Add a DIY custom pegboard painted in a coordinating color to display headphones, jewelry, and instant-film photos for a personalized touch.
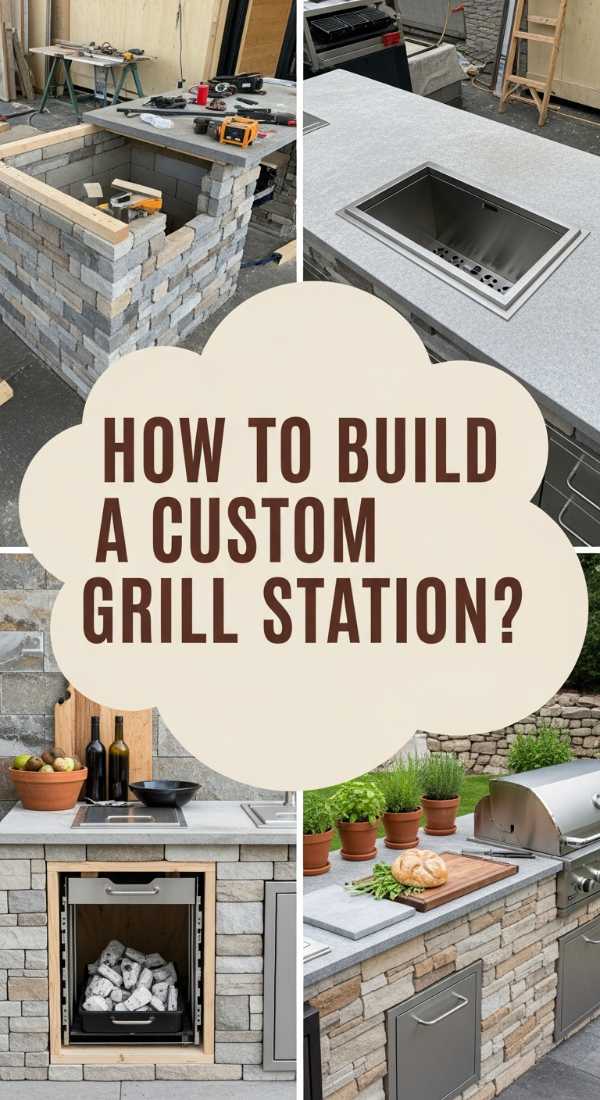
How to Build a Custom Grill Station for Professional Backyard BBQing

Why we love this
For the home chef, a custom grill station is the ultimate backyard upgrade, moving the cooking process from a lonely corner to the heart of the action. We love the industrial-chic look of a stone or wood-wrapped station topped with a durable, heat-resistant counter. It provides the necessary workspace for prepping marinades and resting meats, all while keeping the chef engaged with guests. There’s a professional, high-end feel to having your tools, spices, and prep area organized in one beautiful, dedicated outdoor kitchen module.
Essential Elements:
- Standard propane or charcoal grill
- Pressure-treated lumber or metal studs for the frame
- Cement board siding (if using stone or tile)
- Countertop material (Granite remnants, tile, or sealed wood)
- Outdoor-rated cabinet hardware and hooks
How to make it
- Measure your grill precisely, ensuring you account for any side shelves that may need to be removed or integrated into the new structure.
- Build a sturdy frame using 2×4 lumber or metal studs, creating a “cutout” area where the grill will sit securely with proper clearance for heat.
- Add middle supports to create shelving for charcoal, wood chips, or propane tanks, ensuring there is adequate ventilation for gas lines.
- Sheath the frame in cement board if you plan to add stone veneer or tile, as this provides a fire-resistant and weather-proof surface.
- Install your countertop, ensuring it is level and has a slight overhang to prevent water from running down the sides of the station.
- Apply your finish—whether it’s cedar slats for a modern look or faux stone for a traditional feel—and seal all joints with outdoor-grade caulk.
- Attach heavy-duty hooks for grilling tools and a bottle opener to the side of the station to complete the professional look and functionality.
How to Construct a Lush Planter Privacy Wall for Secluded Outdoor Relaxation
[IMAGE_10]
Why we love this
Privacy is the ultimate luxury in a backyard, and a planter wall offers a “living” solution that is far more beautiful than a standard fence. We love the vertical greenery—the way climbing jasmine or thick evergreen shrubs create a wall of texture and scent that buffers noise and wind. It creates a secluded sanctuary where you can truly relax, feeling enveloped by nature while adding a modern, architectural element to your patio or deck that looks like it belongs in a high-end landscape design magazine.
Essential Elements:
- Large rectangular cedar planters
- Tall, vertical plants (Arborvitae, Bamboo, or Trellised Ivy)
- Potting soil with moisture-retaining crystals
- Landscape liners for the planters
- Casters (optional, if you want the wall to be mobile)
How to make it
- Select or build three to four large, uniform planters; cedar is the best choice for its natural rot resistance and high-end appearance.
- Line each planter with heavy-duty plastic or landscape fabric, poking small holes in the bottom to ensure proper drainage while protecting the wood.
- If you want the flexibility to move your privacy wall, install heavy-duty locking casters to the bottom of each planter before filling them.
- Fill the bottom third of the planters with lightweight filler (like empty plastic jugs or foam) to reduce the overall weight, then top with high-quality potting soil.
- Plant your vertical greenery; for instant privacy, choose fast-growing evergreens like ‘Green Giant’ Arborvitae or install a trellis for fast-growing vines like Clematis.
- Install a simple drip irrigation line hidden along the back of the planters to ensure your living wall stays lush and green with minimal effort.
- Arrange the planters in a slight curve or a staggered line to create a natural-looking barrier that completely transforms the feel of your outdoor space.
The Final Flourish: Your Upscale Outdoor Haven Awaits
Transforming your backyard into an upscale retreat is a journey of layers—from the structural foundation of a floating deck to the delicate glow of solar lanterns. By taking the time to DIY these elements, you aren’t just increasing your property value; you’re creating a backdrop for a more intentional, beautiful life. Whether you’re harvesting herbs from your new planters or hosting a dinner at your handmade table, the pride of a DIY glow-up is the best amenity of all. Now, go grab your tools and start building your own slice of paradise!