

We’ve all been there—standing in the kitchen while our friends laugh in the living room, feeling like we’re missing the very party we spent days planning. I used to think hosting meant complex plating and five-course meals, but lately, I’ve realized that the most memorable nights happen over a ‘Lazy Board.’ It’s that viral hack where you ditch the formal dishes and pile everything—from burgers to pasta—onto one giant, glorious board for everyone to grab as they please.
This isn’t just about food; it’s about the feeling of abundance and the freedom of messy, shared joy. There is something so incredibly intimate and relaxed about seeing a spread of piping hot, handheld favorites laid out on a rustic wooden surface. It invites people to linger, to reach for that second slider, and to actually enjoy the conversation without the stuffiness of a formal table setting. Let’s dive into the components that make this viral board a total game-changer.
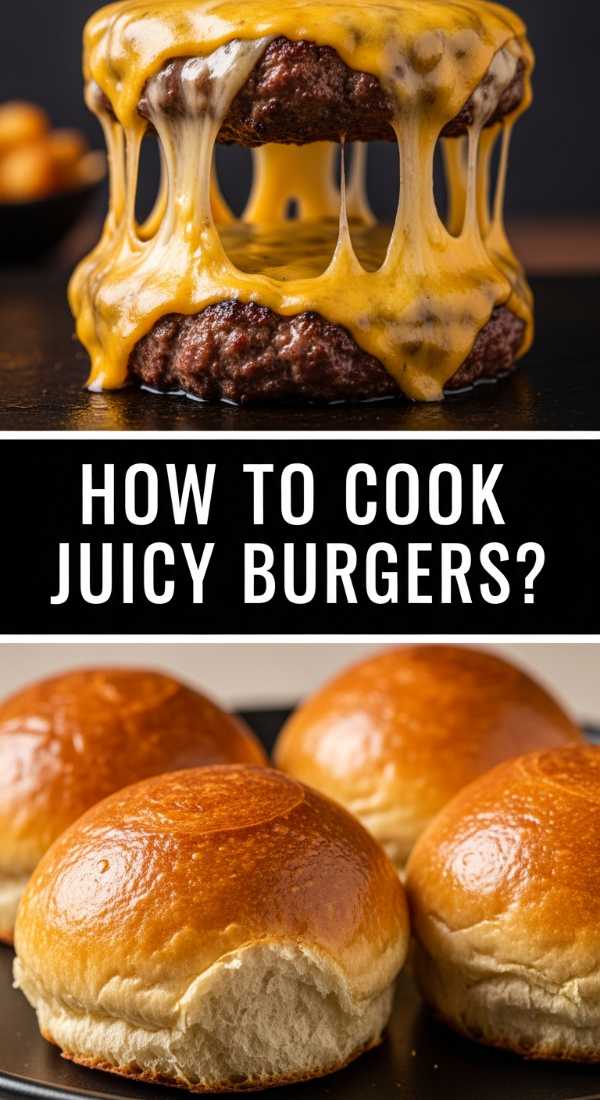
How to cook juicy burgers?
Why we love this
There is nothing quite like the sensory explosion of a perfectly seared burger hitting the board. The aroma of caramelized beef fat mingling with the sharp tang of melting cheddar creates an instant Pavlovian response in any guest. When you bite in, you want that contrast of a salty, crusty exterior and a center so tender it almost dissolves, releasing a flood of savory juices that soak into a toasted, pillowy brioche bun. It’s the ultimate comfort food that feels like a celebration of summer, no matter the season.
Ingredients
- 80/20 ground chuck beef
- Kosher salt and cracked black pepper
- Slices of sharp cheddar or American cheese
- Brioche buns
- Unsalted butter
- Optional: Garlic powder and onion powder
How to make it
- Divide your cold ground chuck into 6-ounce portions. Gently shape them into rounds without overworking the meat; the less you touch it, the more tender it will be. Press a shallow dimple into the center of each patty to prevent it from puffing up into a football shape.
- Heat a heavy cast-iron skillet or griddle over medium-high heat until it is wispy with smoke. This high heat is crucial for the Maillard reaction, which creates that delicious brown crust.
- Season the patties generously with salt and pepper only seconds before they hit the heat to prevent the salt from drawing out moisture prematurely.
- Place the patties on the hot surface. Let them sear undisturbed for 3-4 minutes until a deep brown crust forms. Do not press down with a spatula, as this squeezes out the essential juices.
- Flip the burgers and immediately top with cheese. Cover the pan with a lid for 60 seconds to create a steam chamber that perfectly melts the cheese while the bottom finishes cooking (about 2-3 more minutes for medium-rare).
- Rest the burgers on a warm plate for 5 minutes before placing them on your board; this allows the juices to redistribute so they don’t run out on the first bite.
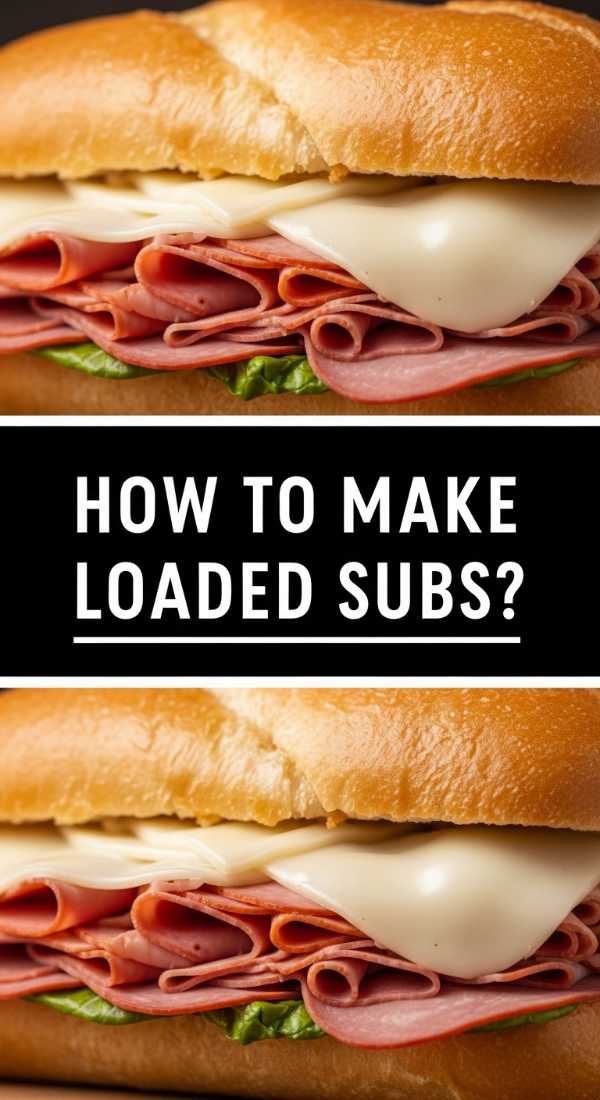
How to make loaded subs?
Why we love this
A loaded sub is a masterpiece of textures, offering a symphonic crunch from toasted Italian bread followed by the silky, salty layers of premium cold cuts and the zesty snap of pickled peppers. We love it because it’s a customizable crowd-pleaser that looks stunning when sliced into rounds on a board. The smell of dried oregano and red wine vinegar wafting off the meat creates an atmosphere of an authentic East Coast deli right in your living room, making every bite feel like a sun-drenched afternoon in a sidewalk cafe.
Ingredients
- Long Italian bread or baguettes
- Provolone cheese slices
- Genoa salami, pepperoni, and ham
- Shredded iceberg lettuce
- Thinly sliced red onion and tomatoes
- Olive oil, red wine vinegar, and dried oregano
- Banana peppers or pepperoncini
How to make it
- Slice the bread lengthwise but not all the way through, creating a ‘hinge.’ Open the bread and lightly toast it under a broiler for 1-2 minutes until the edges are golden brown and crisp.
- Layer the cheese directly onto the warm bread first; this creates a moisture barrier that prevents the vegetables from making the bread soggy.
- Fold the meats into ‘ribbons’ or waves rather than laying them flat. This adds volume and creates air pockets that make the sub feel lighter and more professional.
- In a small bowl, toss the shredded lettuce with a splash of olive oil, vinegar, and a heavy pinch of oregano. Layer this seasoned lettuce over the meat for an even distribution of flavor.
- Top with onions, tomatoes, and peppers. Use a long serrated knife to cut the sub into 2-inch wide ‘party bites.’
- Secure each bite with a bamboo skewer to keep the layers intact when guests pick them up from the board.
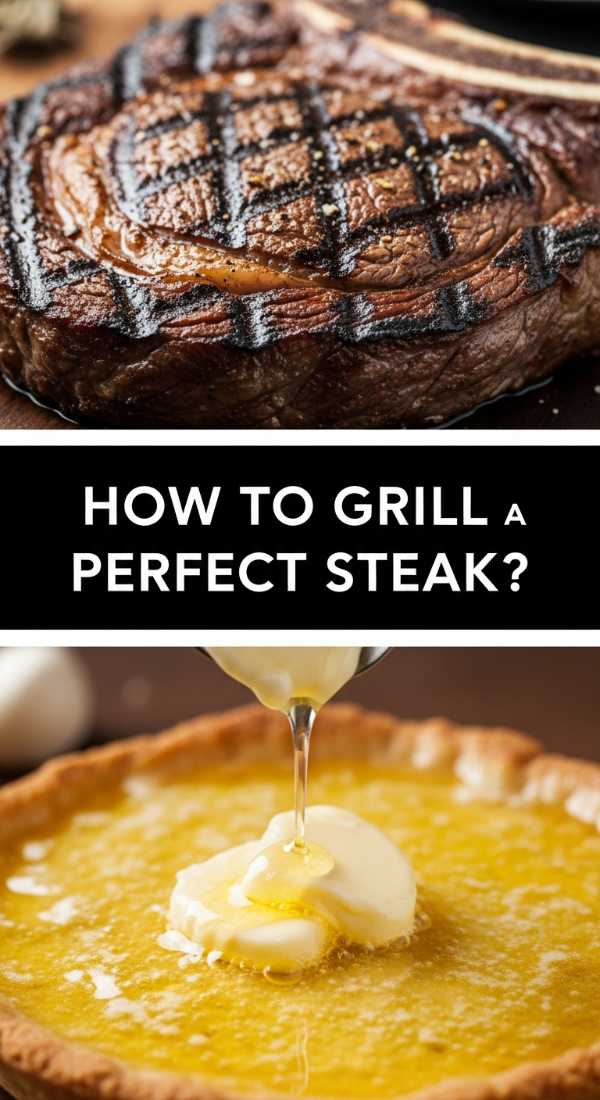
How to grill perfect steak?
Why we love this
Steak on a charcuterie board is the ultimate ‘flex’ that elevates the entire spread from casual to gourmet. The sight of perfectly pink, sliced ribeye with a glistening, herb-flecked crust is enough to make anyone’s mouth water. We adore the smoky, charred aroma that lingers in the air and the way the rich, buttery fat melts on the tongue, providing a luxurious contrast to the simpler elements on the board. It’s the centerpiece that commands attention and satisfies that primal craving for a high-quality, flame-kissed protein.
Ingredients
- Ribeye or New York Strip steaks (at least 1.5 inches thick)
- Coarse sea salt and peppercorns
- Fresh rosemary and thyme sprigs
- 3 cloves of smashed garlic
- 4 tablespoons of high-quality unsalted butter
- Neutral oil with a high smoke point (like avocado oil)
How to make it
- Remove the steaks from the refrigerator 45 minutes before cooking to bring them to room temperature. This ensures even cooking throughout the center of the meat.
- Pat the steaks extremely dry with paper towels. Moisture is the enemy of a good sear. Season very heavily with salt and cracked pepper on all sides, including the edges.
- Preheat your grill or cast-iron pan to a screaming-hot temperature. Add a thin layer of oil.
- Lay the steak in the pan, laying it away from you to avoid oil splatter. Sear for 3 minutes per side without moving it, looking for a dark, mahogany-colored crust.
- During the final 2 minutes of cooking, turn the heat down to medium, add the butter, garlic, and herbs. Tip the pan and use a large spoon to continuously pour the foaming, aromatic butter over the steak (this is called ‘basting’).
- Remove the steak when it reaches an internal temperature of 130°F (for medium-rare). Crucially, let it rest on a cutting board for at least 10 minutes before slicing against the grain to ensure the juices stay inside the meat.
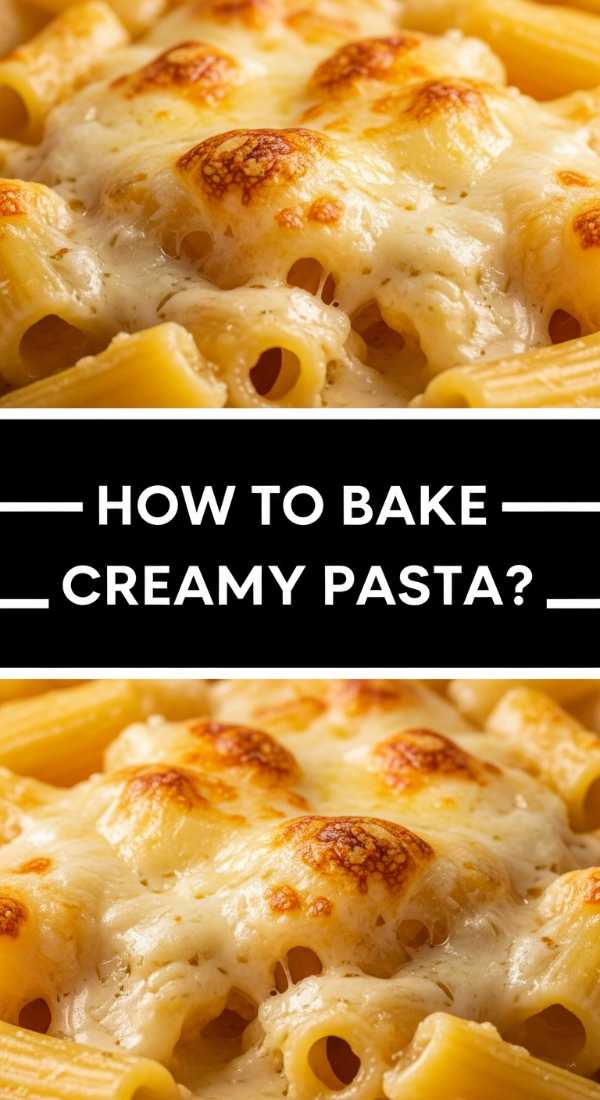
How to bake creamy pasta?
Why we love this
There is a unique magic in a baked pasta dish where the top layer of noodles becomes slightly crispy while the underneath remains a molten, velvety sea of cheese and sauce. On a shared board, it acts as the ultimate ‘anchor’ dish that feels warm and inviting. We love the way the steam rises when the first scoop is taken, releasing the scent of toasted garlic and nutty parmesan. It’s a tactile experience—twirling those gooey, cheese-coated strands and feeling the rich, heavy creaminess coat your palate in pure, unadulterated comfort.
Ingredients
- 1 lb Penne or Rigatoni pasta
- 2 cups heavy cream
- 1 cup freshly grated Parmesan cheese
- 2 cups shredded Mozzarella
- 3 cloves minced garlic
- Fresh parsley and red pepper flakes
How to make it
- Boil your pasta in heavily salted water, but pull it out 2 minutes before the package says ‘al dente.’ The pasta will finish cooking in the oven, and this prevents it from becoming mushy.
- Reserve 1/2 cup of the starchy pasta water before draining. This is liquid gold for emulsifying your sauce later.
- In a large bowl, whisk together the heavy cream, minced garlic, half of the parmesan, and the reserved pasta water. Season with salt, pepper, and red pepper flakes to taste.
- Toss the undercooked pasta into the cream mixture until every tube is filled with sauce. Pour the mixture into a shallow baking dish that fits within your board layout.
- Top generously with the mozzarella and the remaining parmesan. Bake at 400°F (200°C) for 15-20 minutes.
- For the final 2 minutes, turn on the broiler to get those characteristic brown ‘cheesebubbles’ and crispy pasta edges. Let it sit for 5 minutes to set before serving.
How to bake outdoor pizza?

Why we love this
Outdoor pizza is more than a meal; it’s an event. The crackle of a wood fire (or the roar of a gas stone) combined with the scent of fermenting dough and bubbling tomato sauce creates an atmosphere of pure rustic charm. We love the ‘leopard spotting’—those beautiful charred bubbles on the crust—that provide a bitter, smoky counterpoint to the sweet acidity of the tomatoes and the milky richness of fresh buffalo mozzarella. It’s the ultimate interactive food that brings a touch of artisan flair to your viral board spread.
Ingredients
- High-hydration pizza dough (00 flour is best)
- San Marzano tomato sauce
- Fresh mozzarella pearls or torn buffalo mozzarella
- Fresh basil leaves
- Extra virgin olive oil
- Semolina flour (for dusting)
How to make it
- Preheat your outdoor pizza oven for at least 20 minutes. You are aiming for a stone temperature of at least 750°F (400°C) to get that professional spring in the dough.
- Dust your work surface with semolina flour. Gently stretch the dough from the center outward, leaving the edges slightly thicker to form the ‘cornicione’ (crust). Do not use a rolling pin, as it kills the air bubbles.
- Spread a very thin layer of tomato sauce over the base—too much sauce will make the dough soggy and difficult to launch.
- Add your cheese and toppings sparingly. High-heat ovens cook fast (usually in 60-90 seconds), so heavy toppings won’t have time to heat through properly.
- Use a pizza peel to ‘launch’ the pizza onto the stone. After 30 seconds, use a turning peel to rotate the pizza 180 degrees to ensure even browning.
- Remove once the crust is blistered and the cheese is bubbling vigorously. Garnish with fresh basil and a drizzle of olive oil immediately after it comes out of the heat.
How to fry crispy chicken?
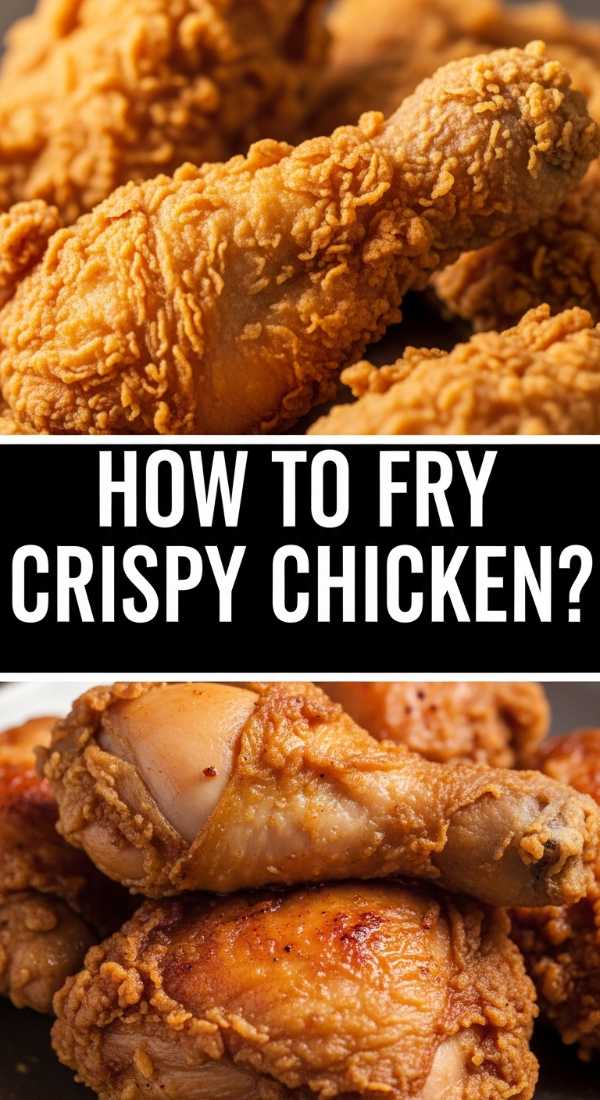
Why we love this
The sound of biting into a piece of truly crispy fried chicken is one of the most satisfying noises in the culinary world. We love the dramatic contrast between the craggy, golden-brown armor of the breading and the steaming, succulent meat hidden inside. It’s a sensory delight of salt, spice, and heat that feels indulgent and festive. Placing small, bite-sized pieces of fried chicken on a board allows guests to enjoy that crunch without the commitment of a full meal, making it the star of any snack-heavy gathering.
Ingredients
- Chicken thighs or breast tenders
- Buttermilk and hot sauce (for the marinade)
- All-purpose flour and cornstarch (80/20 ratio)
- Seasonings: Smoked paprika, garlic powder, onion powder, cayenne, salt
- Neutral frying oil (peanut or canola)
How to make it
- Marinate your chicken pieces in a mixture of buttermilk and hot sauce for at least 4 hours, or overnight. The acid in the buttermilk tenderizes the proteins, while the hot sauce adds depth.
- Prepare your dry dredge by mixing the flour, cornstarch, and all your spices. The cornstarch is the secret to a ‘glass-like’ crunch that stays crispy longer on the board.
- Drip a few tablespoons of the buttermilk marinade into the flour mixture and stir with a fork to create small clumps. These clumps will stick to the chicken and create those extra-crispy crags.
- Dredge the chicken thoroughly, pressing the flour into the meat. Let the coated chicken rest on a wire rack for 10 minutes before frying; this helps the coating adhere and prevents it from falling off in the oil.
- Heat your oil to exactly 350°F (175°C). Fry the chicken in batches, being careful not to crowd the pot, which would drop the oil temperature and lead to greasy chicken.
- Fry until the internal temperature reaches 165°F and the exterior is a deep golden brown. Drain on a wire rack—never paper towels, which trap steam and soften the crust.
How to make breakfast sliders?

Why we love this
Breakfast sliders bring a touch of morning whimsy to a viral food board, proving that ‘brunch for dinner’ is always a good idea. We love the sweet and savory interplay of soft Hawaiian rolls brushed with maple butter, encasing fluffy eggs and salty bacon. The way the melted cheese acts as a ‘glue’ for all those breakfast flavors is purely addictive. They are tiny, warm bundles of joy that fill the room with the scent of toasted sugar and sizzling pork, making everyone feel like they’re at a cozy, upscale bed-and-breakfast.
Ingredients
- 12-pack of sweet Hawaiian rolls
- 6 eggs (scrambled)
- 8 slices of cooked crispy bacon
- Slices of cheddar or Havarti cheese
- Melted butter, maple syrup, and a pinch of salt (for the glaze)
How to make it
- Keep the pack of rolls intact and slice the entire slab in half horizontally. Place the bottom half in a baking dish.
- Layer your slices of cheese across the bottom buns, followed by a thick layer of soft-scrambled eggs. Make sure your eggs are slightly underdone, as they will cook further in the oven.
- Top the eggs with the crispy bacon strips and another layer of cheese to ensure the top bun sticks. Place the top half of the rolls back on.
- Whisk together the melted butter and maple syrup. Use a pastry brush to coat the tops and sides of the rolls generously.
- Cover the dish with foil and bake at 350°F (175°C) for 10 minutes. Remove the foil and bake for another 5 minutes until the tops are golden and slightly tacky.
- Use a sharp knife to separate the sliders and pile them onto your board while they are still steaming hot and the cheese is stretchy.
How to make cheesy tacos?

Why we love this
Cheesy tacos, specifically the ‘quesabirria’ style, are a textural marvel that adds a vibrant, festive energy to your board. We love the sight of the lacy, fried cheese ‘skirt’ that forms around the edges of the tortilla, offering a concentrated burst of toasted dairy flavor. The aroma of chili-infused oil and melted Monterey Jack is intoxicating. When you pull one apart, the sight of the gooey, stretchy cheese mixed with savory protein is pure food-porn, making these the most photographed items on any viral food spread.
Ingredients
- Small corn tortillas
- Shredded Monterey Jack or Oaxaca cheese
- Slow-cooked shredded beef or chicken
- Cilantro and diced white onion
- Lime wedges
- Chili oil or leftover braising liquid (consomé)
How to make it
- Heat a non-stick skillet or griddle over medium heat. Dip your corn tortilla lightly into chili oil or the fat from your shredded meat.
- Place the tortilla on the skillet and immediately cover the entire surface with a generous layer of shredded cheese. Wait about 30 seconds until the cheese begins to melt and bubble.
- Place a small amount of shredded meat on one half of the tortilla. Fold the other half over to create a half-moon shape.
- Continue to cook the taco, pressing down with a spatula, until the cheese that has leaked out onto the pan forms a crispy, brown crust (the ‘costra’).
- Flip and repeat on the other side until the tortilla is crispy and stained red/orange from the oil.
- Serve on the board with small bowls of fresh cilantro, onions, and plenty of lime wedges to cut through the richness of the cheese.
How to roast fresh veggies?

Why we love this
Roasted vegetables are the unsung heroes of the ‘Lazy Board,’ providing a much-needed pop of color and an earthy, caramelized sweetness that balances out the heavier meats and cheeses. We love the way high-heat roasting transforms a humble floret of broccoli or a slice of bell pepper into a charred, tender delicacy with crispy edges. The scent of roasting garlic and rosemary fills the kitchen with a wholesome, garden-fresh aroma, and the vibrant greens, reds, and purples make the board look like a work of art rather than just a meal.
Ingredients
- Assorted veggies (Brussels sprouts, carrots, bell peppers, asparagus)
- Extra virgin olive oil
- Balsamic glaze
- Garlic cloves (smashed)
- Fresh rosemary and sea salt
How to make it
- Cut all your vegetables into uniform sizes to ensure they cook at the same rate. Keep smaller items like asparagus separate from denser items like carrots.
- Toss the vegetables in a large bowl with enough olive oil to coat them thoroughly. Season with a generous amount of sea salt, cracked pepper, and fresh rosemary.
- Spread the veggies out on a large sheet pan in a single layer. Do not crowd the pan; if the vegetables touch, they will steam rather than roast, and you will lose that desirable char.
- Roast at a high temperature—425°F (220°C). This high heat caramelizes the natural sugars quickly.
- Toss the vegetables halfway through the cooking time (usually around the 12-15 minute mark) to ensure even browning on all sides.
- Once they are tender with charred tips, remove from the oven and immediately drizzle with a bit of balsamic glaze for a sweet, acidic finish before arranging them in clusters on your board.
How to make cheese melts?
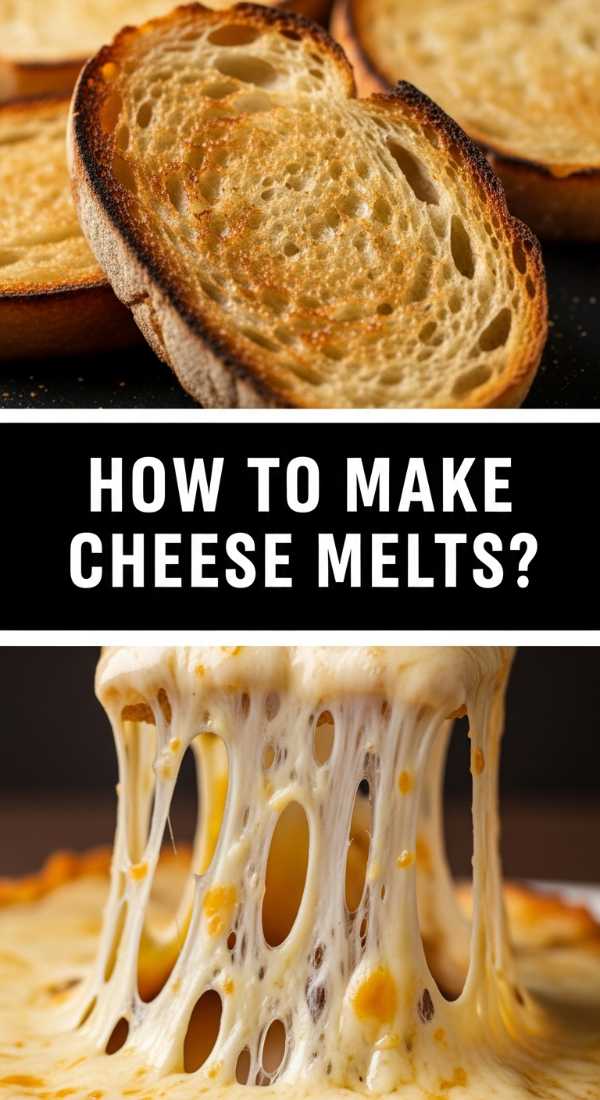
Why we love this
A perfect cheese melt is the epitome of simple sophistication. We love the way the bread becomes a golden, buttery vessel for a molten core of complex, aged cheeses. There is something deeply nostalgic about a warm melt, but when done with high-quality sourdough and sharp gruyère, it feels entirely grown-up. The sound of the knife slicing through the butter-fried crust and the sight of the slow, thick cheese pull is the ultimate ‘foodie’ moment that brings everyone to the board with their hands outstretched.
Ingredients
- Sourdough bread slices
- Aged White Cheddar and Gruyère
- Mayonnaise (for the crust)
- Dijon mustard (optional)
- Salted butter
How to make it
- The biggest secret to a professional cheese melt is using mayonnaise instead of butter on the outside of the bread. Mayo has a higher smoke point and contains egg, which creates an incredibly even, deep-golden crust that doesn’t burn as easily.
- Spread a thin layer of Dijon mustard on the inside of the slices for a subtle acidic ‘zip’ that cuts through the fat.
- Use a mix of cheeses. Cheddar provides the sharp flavor, while Gruyère or Fontina provides the superior meltability and stretch. Grate your own cheese; pre-shredded bags contain anti-clumping agents that prevent a smooth melt.
- Heat a skillet over medium-low heat. You want a low temperature to give the cheese enough time to melt completely before the bread gets too dark.
- Place the sandwich in the pan and cover with a lid. The lid creates a mini-oven that traps heat to melt the cheese efficiently.
- Cook for 3-4 minutes per side until the bread is the color of a polished penny. Slice into thin ‘dipping strips’ (soldiers) so guests can dip them into jams or sauces on the board.
Conclusion: The Art of the Shared Board
The beauty of the viral ‘Lazy Board’ isn’t just in the recipes themselves, but in the way it breaks down the barriers of a traditional meal. It’s about creating a landscape of flavors where a crispy chicken tender can sit happily next to a roasted carrot or a slice of steak. By focusing on these high-impact, handheld foods, you’re not just feeding your friends—you’re creating a tactile, sensory experience that encourages everyone to slow down and savor the moment. So, grab your biggest wooden board, fire up the stove, and get ready to host the most relaxed and delicious party of the year.