
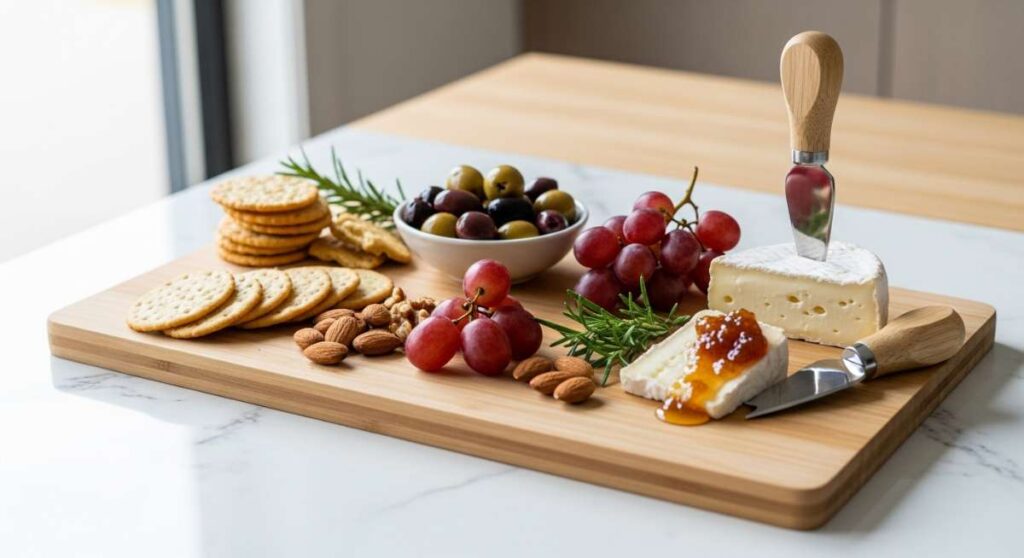
There is something inherently magical about a shared meal, isn’t there? Lately, my social media feeds have been overflowing with a specific kind of magic: the ‘Everything Summer’ board. It’s more than just a charcuterie platter; it’s a living, breathing celebration of sunshine, fresh produce, and the joy of effortless entertaining. I used to spend hours tucked away in the kitchen while my guests laughed on the patio, but this hack has completely changed my hosting game by bringing all the vibrant flavors of the season into one communal, beautiful center-piece.
The secret to this viral obsession isn’t just the aesthetics, though let’s be honest, it looks stunning on camera. It’s the philosophy of ‘assembly over cooking’ combined with high-quality, seasonal ingredients that do the heavy lifting for you. Whether you are hosting a breezy backyard brunch or a sunset dinner, these ten components will turn your simple board into a gourmet experience that your friends will be talking about for weeks. Let’s dive into the heart of the summer board hack and discover how to make these viral favorites at home.
How to make creamy rotel dip?

Why we love this
This dip is the ultimate nostalgic comfort food, transformed into a velvety, molten masterpiece that anchors any festive gathering. As you dip a salty, crunchy tortilla chip into the bowl, you’re met with the spicy, tangy aroma of green chilies and the rich, buttery scent of melted cheese. The texture is impossibly smooth with just the right amount of chunky texture from the tomatoes, providing a warm, gooey contrast to the fresh vegetables on your board. It’s that perfectly addictive, crowd-pleasing classic that disappears in minutes because every bite offers a satisfyingly savory kick.
Ingredients
- 1 lb Velveeta cheese, cubed
- 1 can (10 oz) Ro-Tel Diced Tomatoes and Green Chilies (do not drain)
- 1/2 lb ground breakfast sausage or chorizo
- 1/2 cup sharp cheddar cheese, shredded
- 1/4 cup fresh cilantro, chopped (for garnish)
- 1/2 tsp smoked paprika
How to make it
- Begin by browning your ground sausage in a skillet over medium-high heat. Use a wooden spoon to break the meat into small, even crumbles, cooking until it is deeply browned and slightly crispy—usually about 8 to 10 minutes. Drain the excess fat thoroughly to ensure your dip isn’t greasy.
- In a heavy-bottomed saucepan or a small slow cooker, combine the cubed Velveeta and the entire can of Ro-Tel (including the juices). The juices are essential for achieving that iconic creamy consistency.
- Set the heat to low. This is critical; high heat will cause the cheese to separate or scorch on the bottom. Stir constantly with a silicone spatula until the Velveeta is 80% melted.
- Fold in the cooked sausage and the shredded sharp cheddar. Continue to stir until the mixture is completely uniform and silky. The shredded cheddar adds a complex depth of flavor that Velveeta alone lacks.
- Once the dip is bubbling gently at the edges, sprinkle with smoked paprika and cilantro. Serve immediately in a warmed bowl to maintain the fluid, pourable texture.
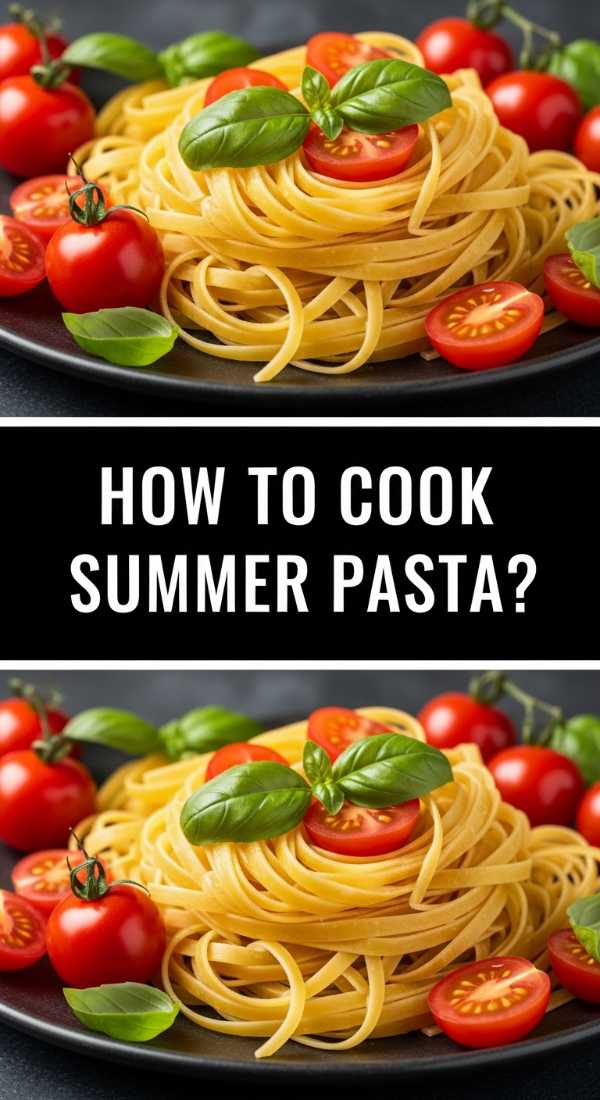
How to cook summer pasta?
Why we love this
Summer pasta is all about celebrating the harvest in its purest form, smelling of fresh-picked basil and sun-warmed lemons. This dish feels light and airy rather than heavy, with a delicate olive oil sauce that coats each strand of pasta like a silken ribbon. You get the burst of sweet cherry tomatoes against the sharp, salty bite of parmesan, creating a sensory experience that feels like a Mediterranean vacation on a plate. It’s the kind of meal that tastes best eaten outdoors, with the steam carrying the scent of garlic and herbs through the evening air.
Ingredients
- 12 oz Linguine or Angel Hair pasta
- 1 pint cherry tomatoes, halved
- 3 cloves garlic, thinly sliced
- 1/2 cup extra virgin olive oil
- 1 cup fresh basil leaves, torn
- 1/2 cup pasta water (reserved)
- 1 tbsp lemon zest
- Salt and cracked black pepper to taste
How to make it
- Bring a large pot of heavily salted water to a rolling boil. Add your pasta and cook for exactly one minute less than the package directions for ‘al dente’. The pasta should still have a firm bite, as it will finish cooking in the sauce.
- While the pasta cooks, heat the olive oil in a wide skillet over medium-low heat. Add the sliced garlic and cook slowly for 2-3 minutes. You want the garlic to become golden and fragrant, not brown or bitter; if it turns dark, start over.
- Increase the heat to medium and add the halved cherry tomatoes. Sauté them for 4 to 5 minutes until they begin to soften and release their juices, creating a light, natural sauce.
- Before draining the pasta, use a heat-proof measuring cup to scoop out at least one cup of the starchy cooking water. This liquid gold is the secret to an emulsified, restaurant-quality sauce.
- Toss the pasta directly into the skillet with the tomatoes. Pour in half of the reserved pasta water and toss vigorously with tongs. The starch will bind the oil and tomato juice together into a glossy coating. Add more water if it looks dry.
- Turn off the heat. Fold in the fresh basil, lemon zest, and a generous amount of parmesan. The residual heat will wilt the basil perfectly without turning it black.
How to make hummingbird food?

Why we love this
While not for human consumption, making hummingbird food is the ultimate lifestyle hack for creating a lively, enchanting backyard atmosphere while you enjoy your food board. There is a quiet, meditative joy in boiling the sugar and water, knowing you are inviting these iridescent, tiny creatures to join your garden party. The sight of a hummingbird hovering near your patio table, its wings a blurred hum of energy, adds a layer of natural beauty and serenity to any summer afternoon. It’s a simple act of stewardship that turns a regular backyard into a vibrant, buzzing sanctuary of life and color.
Ingredients
- 1 cup granulated white sugar
- 4 cups filtered water
- No red dye needed (the red on the feeder is enough)
How to make it
- Measure out four cups of filtered water and pour them into a clean saucepan. Use filtered water to ensure there are no impurities or heavy chlorine scents that might deter the birds.
- Add one cup of plain white granulated sugar. Do not use honey, brown sugar, or artificial sweeteners, as these can be fatal to hummingbirds or promote dangerous mold growth.
- Place the pan over medium-high heat and stir until the sugar is completely dissolved. Bring the mixture to a brief boil for about 2 minutes; this helps slow the growth of bacteria and ensures the sugar is fully integrated.
- Remove from heat and allow the solution to cool completely to room temperature. This is vital; pouring hot liquid into a plastic feeder can warp the feeder or injure the birds.
- Fill your clean bird feeders. Store any extra nectar in a sealed glass jar in the refrigerator for up to one week. Remember to clean your feeders every 3 days in hot weather to prevent fermentation.
How to bake summer desserts?

Why we love this
Nothing says summer like the aroma of bubbling fruit and golden, buttery pastry wafting from a warm oven. These desserts are a celebration of peak-season produce—think jammy peaches, tart blackberries, and sweet strawberries that collapse into a delicious syrup when baked. The contrast between a crisp, flaky crust and a cool dollop of melting vanilla bean ice cream creates a textural harmony that is both rustic and sophisticated. It’s the perfect, sweet finale to a food board, offering a hand-held or spoonable delight that captures the essence of a sun-drenched orchard.
Ingredients
- 2 cups fresh peaches or berries
- 1 sheet refrigerated puff pastry or pie crust
- 1/4 cup sugar (plus extra for dusting)
- 1 tbsp cornstarch
- 1 egg (for egg wash)
- 1 tsp vanilla extract
- Zest of half a lemon
How to make it
- Preheat your oven to 400°F (200°C). A high temperature is essential for ‘puffing’ the pastry and creating those distinct, buttery layers.
- In a medium bowl, gently toss your sliced fruit with sugar, cornstarch, vanilla, and lemon zest. The cornstarch is the secret ingredient—it thickens the fruit juices as they bake, preventing a ‘soggy bottom’ on your pastry.
- Roll out your chilled pastry dough onto a sheet of parchment paper. If using puff pastry, keep it cold until the very last second to ensure the butter layers don’t melt prematurely.
- Mound the fruit in the center of the dough, leaving a 2-inch border. Gently fold the edges of the dough over the fruit, pleating as you go to create a rustic galette shape. The center should remain open.
- Whisk the egg with a tablespoon of water and brush the exposed dough generously. This creates a professional, high-gloss golden finish. Sprinkle the edges with coarse sugar for an extra crunch.
- Bake for 20-25 minutes until the crust is a deep golden brown and the fruit filling is thick and bubbling. Allow it to set for 10 minutes before slicing so the juices can firm up.
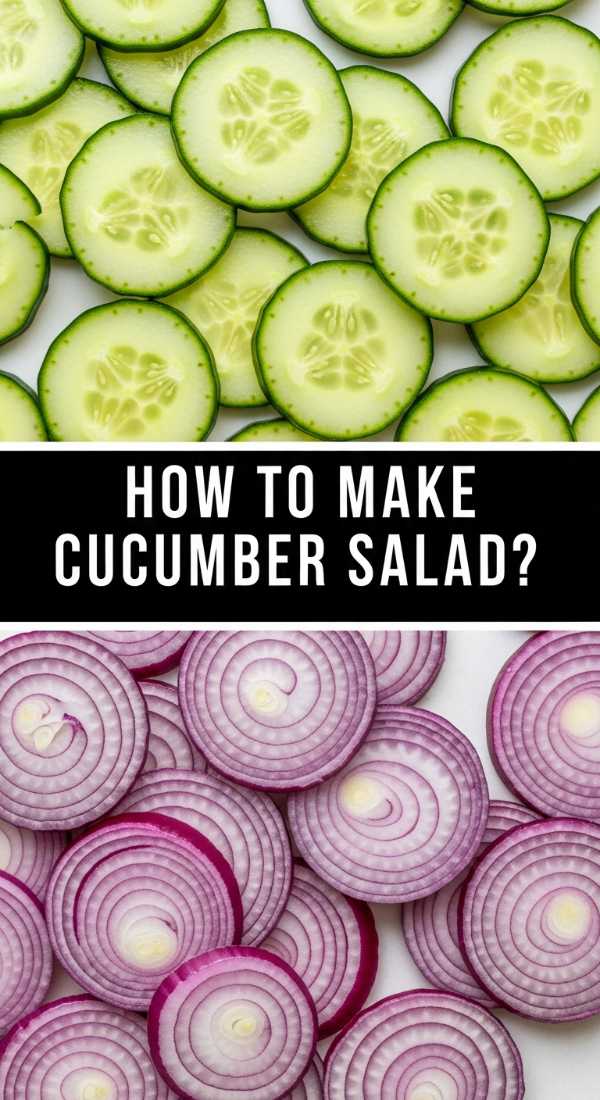
How to make cucumber salad?
Why we love this
This salad is the definition of refreshing, acting as a crisp, cooling palate cleanser against the richer items on your food board. Each bite is an explosion of hydration, flavored with the sharp tang of vinegar and the earthy, aromatic punch of fresh dill and thinly sliced red onions. The texture is incredibly satisfying—a rhythmic crunch that sounds as fresh as it tastes, especially when the cucumbers have been properly chilled. It’s a bright, green, and vibrant dish that looks like a pile of emeralds and brings a much-needed acidity to balance out grilled meats or salty cheeses.
Ingredients
- 2 large English cucumbers, thinly sliced
- 1/2 red onion, shaved into half-moons
- 1/2 cup white wine vinegar or apple cider vinegar
- 2 tbsp fresh dill, chopped
- 1 tbsp sugar
- 1 tsp salt
- 1/2 tsp red pepper flakes (optional)
How to make it
- Slice your cucumbers as thinly as possible using a mandoline or a very sharp chef’s knife. Using English (seedless) cucumbers is best because their skins are thin and they have fewer bitter seeds.
- Place the sliced cucumbers in a colander and sprinkle with a teaspoon of salt. Let them sit for 15 minutes. This process, called ‘weeping’, draws out excess moisture so your salad stays crunchy and the dressing doesn’t get watered down.
- While the cucumbers drain, whisk together the vinegar, sugar, and red pepper flakes in a large bowl until the sugar is fully dissolved.
- Pat the cucumbers dry with a paper towel and add them to the bowl along with the shaved red onions and the fresh dill.
- Toss thoroughly to coat every slice. For the best flavor, let the salad marinate in the refrigerator for at least 30 minutes before serving. This allows the onions to soften their bite and the cucumbers to absorb the tangy dressing.
- Give it one final toss before plating to redistribute the juices.
How to cook summer soup?

Why we love this
Summer soup, like a chilled Gazpacho or a light corn chowder, is a revelation for those who think soup is only for the winter months. It’s a liquid garden in a bowl, capturing the concentrated essence of ripe tomatoes, bell peppers, and cucumbers in a way that is incredibly revitalizing on a hot day. The texture is silkier than a salad but fresher than a stew, often finished with a drizzle of grassy olive oil or a squeeze of lime that makes the flavors sing. Serving small shooters of chilled soup on your food board adds an element of surprise and a sophisticated, spa-like elegance to your spread.
Ingredients
- 6 ripe Roma tomatoes, roughly chopped
- 1 red bell pepper, seeded
- 1 small cucumber, peeled
- 1 clove garlic
- 2 tbsp sherry vinegar
- 1/4 cup extra virgin olive oil
- Salt and pepper to taste
- Croutons or microgreens for garnish
How to make it
- Place the chopped tomatoes, bell pepper, cucumber, and garlic into a high-powered blender. If your tomatoes aren’t very juicy, you can add a splash of tomato juice or water to help the blades catch.
- Pulse the mixture until it reaches your desired consistency. Some prefer a rustic, chunky texture, but for a viral-worthy board, blend until completely smooth and velvety.
- With the blender running on low, slowly stream in the sherry vinegar and the extra virgin olive oil. This creates a stable emulsion that gives the soup a rich, creamy mouthfeel without using any dairy.
- Season generously with salt and pepper. Tomatoes need a surprising amount of salt to reach their flavor potential, so taste and adjust as you go.
- Pour the soup into a glass container and chill in the refrigerator for at least 2 to 4 hours. Chilling is a critical step in ‘cooking’ a cold soup; it allows the raw garlic and vinegar to mellow and the vegetable flavors to marry.
- Serve in chilled small glasses or ramekins, topped with a few microgreens or a single toasted crouton for a crunch.
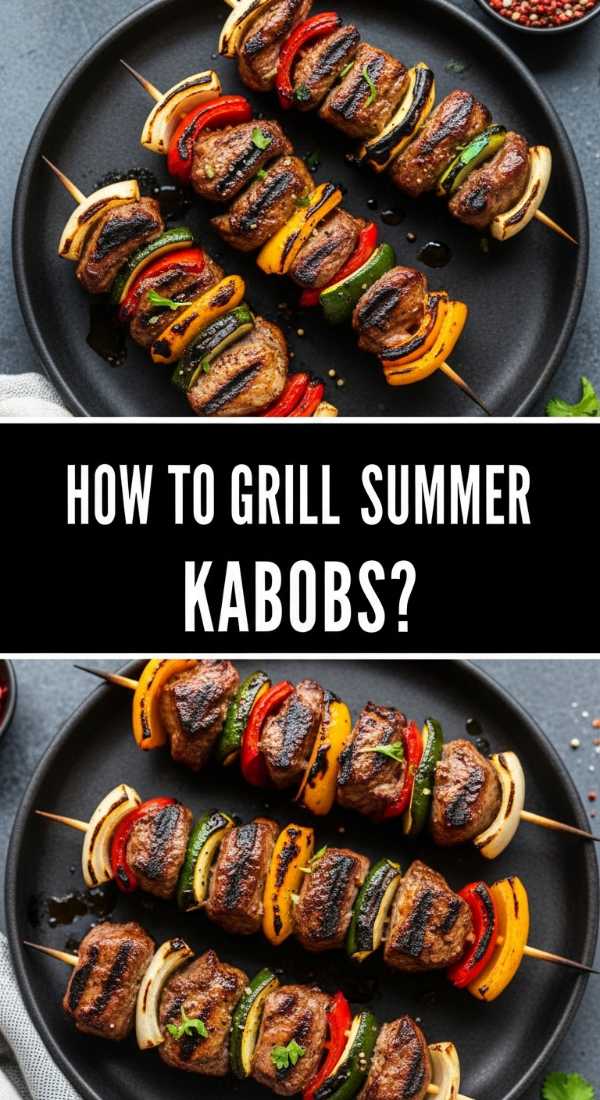
How to grill summer kabobs?
Why we love this
Kabobs bring a sense of theater and fire to the summer board, offering charred, smoky morsels of protein and vegetables that look like colorful jewels on a stick. There is something deeply satisfying about the aroma of caramelized onions and seared meat wafting from the grill, signaling that the party has truly begun. The texture is a delightful mix of tender, juicy centers and crisp, flame-kissed edges that provide a complex smoky flavor you can’t get in an oven. They are the perfect ‘grab-and-go’ item for a communal board, making the dining experience interactive and fun.
Ingredients
- 1 lb chicken breast or top sirloin, cut into 1-inch cubes
- 1 red onion, cut into chunks
- 2 bell peppers (mixed colors), cut into squares
- 1 zucchini, sliced into thick rounds
- 1/2 cup balsamic vinaigrette or teriyaki sauce (for marinade)
- Wooden or metal skewers
How to make it
- If using wooden skewers, soak them in water for at least 30 minutes before grilling. This prevents them from igniting and breaking while over the flame.
- Place your cubed meat in a bowl with your chosen marinade. Let it sit for at least 30 minutes (or up to 4 hours in the fridge). This ensures the meat stays juicy under the high heat of the grill.
- Thread the ingredients onto the skewers, alternating between meat and vegetables. Do not pack them too tightly; leaving a tiny bit of space between items allows the heat to circulate and ensures everything cooks evenly.
- Preheat your grill to medium-high heat (about 400°F). Clean the grates thoroughly and wipe them with an oil-soaked paper towel to create a non-stick surface.
- Place the kabobs on the grill. Cook for 10-12 minutes, turning a quarter-turn every 3 minutes. Look for clear grill marks and a firm texture on the meat. Chicken should reach an internal temperature of 165°F.
- During the last 2 minutes of cooking, brush a little fresh marinade over the kabobs to create a glossy, flavorful glaze. Remove and let rest for 5 minutes before adding to your board.
How to mix summer drinks?

Why we love this
A perfectly mixed summer drink is the ultimate accessory for your food board, offering a sparkling, ice-cold reprieve from the afternoon heat. Whether it’s a muddled berry mojito or a citrus-infused sparkling water, these drinks are all about the sensory details: the clinking of ice cubes, the fragrance of slapped mint, and the bright, acidic pop of fresh lime. They provide a beautiful splash of color to your table and a refreshing bridge between the salty and sweet components of your meal. Sipping something cold and fruity while grazing on a board is the peak of summer relaxation.
Ingredients
- 1 cup fresh berries or watermelon chunks
- 1 bunch fresh mint leaves
- 2 tbsp agave or simple syrup
- 1/2 cup fresh lime juice
- 1 liter sparkling water or club soda
- Ice (lots of it!)
How to make it
- In a large pitcher or individual glasses, combine the fresh fruit and mint leaves. Use a muddler or the back of a wooden spoon to gently press the fruit until it releases its juices and the mint becomes fragrant. Do not shred the mint; you only want to release the oils.
- Add the lime juice and the sweetener (agave or simple syrup). Stir well to combine the base flavors.
- Fill the pitcher or glasses to the brim with ice. Using large, solid ice cubes is better than crushed ice, as they melt slower and won’t dilute your drink as quickly.
- Pour the sparkling water over the ice. Stir gently with a long spoon to pull the muddled fruit from the bottom up through the drink without losing the carbonation.
- Taste for balance. If it’s too tart, add a splash more syrup; if it’s too sweet, add another squeeze of lime.
- Garnish with a sprig of fresh mint and a slice of fruit on the rim for that viral ‘pro-bartender’ look.
How to prep picnic sides?
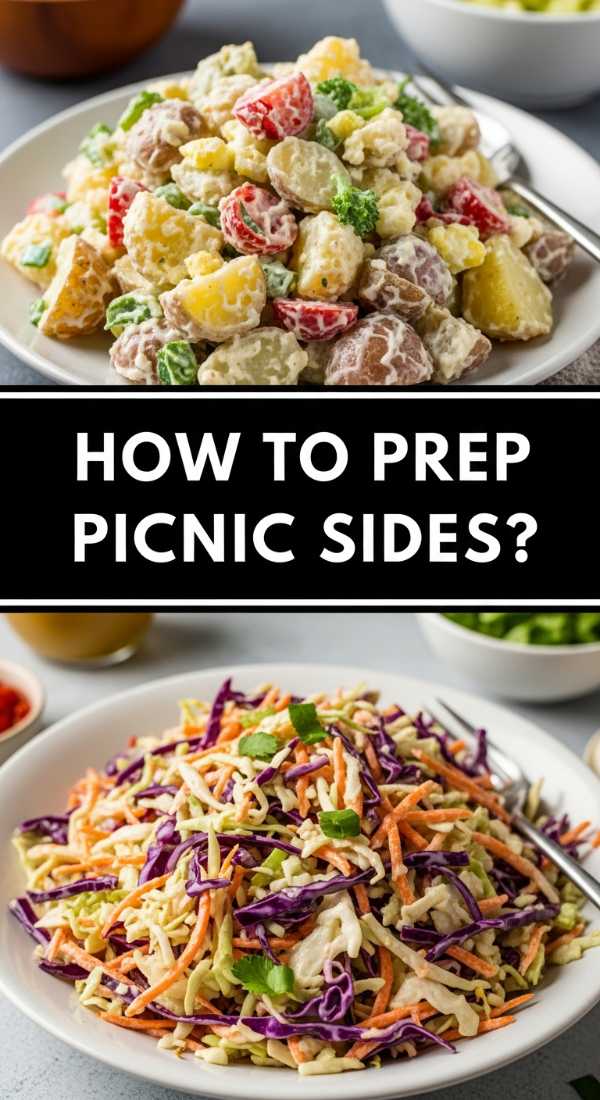
Why we love this
Picnic sides like herby potato salads or Mediterranean orzo are the unsung heroes of the food board, providing hearty, earthy foundations that keep guests satisfied. These dishes are designed to be eaten at room temperature, making them incredibly low-stress for the host. We love the creamy, tangy dressings and the way the starches soak up the flavors of fresh herbs like parsley, chives, and dill over time. Each spoonful is a dense, flavorful bite that grounds the lighter fruits and vegetables on the board, offering a sense of abundance and traditional picnic charm.
Ingredients
- 1 lb baby potatoes or 1 cup dried orzo
- 1/2 cup mayonnaise or Greek yogurt
- 1 tbsp Dijon mustard
- 2 stalks celery, finely diced
- 1/4 cup fresh herbs (parsley, dill, chives)
- Salt and pepper
- 1 tbsp capers (for a salty pop)
How to make it
- If making potato salad, boil baby potatoes in salted water until they are fork-tender (about 12-15 minutes). For orzo, cook according to package directions in salted water until al dente.
- Drain the potatoes or pasta and let them cool slightly, but not completely. Adding the dressing while the base is still warm allows it to absorb into the starch, creating a much deeper flavor profile.
- In a small bowl, whisk together your base (mayo or yogurt), mustard, salt, and pepper. This ensures the dressing is perfectly smooth before it hits the bulk ingredients.
- Fold the dressing into the potatoes or pasta. Add the diced celery and capers. The celery adds a crucial textural contrast (the ‘crunch factor’) that keeps the side dish from feeling one-note.
- Finely chop your fresh herbs and fold them in last. Adding them at the end ensures they stay bright green and don’t bruise or turn brown.
- Let the side dish sit for at least an hour in the fridge. This ‘resting phase’ is when the magic happens—the flavors meld and the starch softens further.
How to make mini sandwiches?

Why we love this
Mini sandwiches, or ‘sliders,’ are the adorable, bite-sized kings of the viral food board. There is something irresistibly charming about a perfectly composed, tiny sandwich that you can pick up with two fingers. They offer a concentrated burst of flavor—perhaps creamy chicken salad on a buttery brioche bun or crisp cucumber and herbed butter on white bread. The texture is a soft, pillowy delight that contrasts beautifully with the crunchier elements of the board. They are the ultimate finger food, allowing your guests to sample multiple flavors without feeling weighed down by a full-sized meal.
Ingredients
- 1 pack mini brioche rolls or a loaf of white bread
- 1/2 lb deli turkey or homemade chicken salad
- 1 block herb-infused cream cheese or high-quality butter
- Handful of microgreens or butter lettuce
- Thinly sliced cucumber or tomato
How to make it
- Prepare your bread. If using a loaf, cut off the crusts for a dainty ‘tea sandwich’ look. If using brioche rolls, slice them across the middle but keep them attached in one large sheet if possible for easier assembly.
- Spread a thin, even layer of herb cream cheese or softened butter on both sides of the bread. This isn’t just for flavor; it acts as a moisture barrier to prevent the bread from becoming soggy if the sandwiches sit on the board for a while.
- Layer your proteins and vegetables. If using deli meat, fold it several times to create height and texture rather than laying it flat.
- Add a small handful of microgreens. These provide a delicate crunch and make the sandwiches look professionally styled.
- If you kept the rolls attached, use a long serrated knife to cut through the entire sheet of sandwiches at once for perfectly even edges. If using white bread, cut into triangles or rectangles.
- Secure each sandwich with a decorative toothpick. This keeps the layers together and makes them easy for guests to grab from the board.
Conclusion
Creating a viral-worthy food board is less about being a professional chef and more about embracing the colors and textures of the season. By mixing warm dips, chilled salads, smoky kabobs, and sweet treats, you create a culinary landscape that invites everyone to slow down and savor the moment. This hack works because it removes the formality of dining and replaces it with a fun, interactive experience that celebrates the abundance of summer. So, grab your largest platter, gather your favorite people, and start building your own masterpiece!