

We’ve all been there—it’s 6:00 PM on a Tuesday, your energy is flagging, and the thought of standing over a stove for an hour feels like a Herculean task. Yet, there’s a primal craving for something that feels intentional, beautiful, and deeply nourishing. That’s why the ‘Simple Food Board’ has completely taken over my TikTok feed and my kitchen; it’s the ultimate antidote to the decision fatigue of modern life, turning a collection of diverse, delicious components into a communal masterpiece that looks like a million bucks but takes mere minutes to assemble.
The magic isn’t just in the aesthetics, though let’s be honest, those vibrant colors are pure serotonin. It’s about the permission to mix and match textures and temperatures—the sizzle of a perfectly seared steak sitting right next to the cool, crisp snap of fresh fruit. It transforms a meal into an experience where every bite is a new adventure, and the best part is that it brings everyone to the table, lingering over conversation while picking at their favorite bits. It’s slow living for the fast-paced soul, and I can’t wait to show you how to master the elements of the perfect board.
How to grill better burgers?

Why we love this
There is nothing quite like the intoxicating aroma of beef fat hitting a hot grill, sending up plumes of smoke that signal the start of summer. When you bite into a perfectly grilled burger, you should experience a transformative contrast: a deeply caramelized, salty exterior crust that gives way to a center so juicy it almost melts on your tongue. The warmth of the toasted bun and the sharpness of melted cheese create a comforting, savory harmony that grounds the entire food board with a hearty, nostalgic soul.
Ingredients
- 80/20 ground chuck beef
- Kosher salt and freshly cracked black pepper
- Brioche buns
- High-smoke point oil (like avocado oil)
- Sharp cheddar cheese slices
How to make it
- Start with cold ground beef and form into 6-ounce patties, making them slightly wider than your buns as they will shrink during cooking. Press a small thumbprint indentation into the center of each patty to prevent it from puffing up into a ball.
- Preheat your grill to high heat (about 450°F). Clean the grates thoroughly and wipe them with an oil-soaked paper towel to create a non-stick surface.
- Generously season only the outside of the patties with salt and pepper right before they hit the heat; seasoning too early can result in a sausage-like texture.
- Place the patties on the grill and leave them undisturbed for 3-4 minutes until a dark brown crust forms and the meat releases easily from the grates. Flip once using a sturdy spatula.
- Add the cheese during the last minute of cooking and close the grill lid to ensure a perfect, gooey melt. Remove when the internal temperature hits 135°F for medium-rare or 145°F for medium.
How to make smoked brisket?

Why we love this
Smoked brisket is the undisputed king of the board, offering a rich, umami-packed depth that you simply can’t get from any other cooking method. The texture is a miracle of patience—a dark, peppery ‘bark’ on the outside that crackles slightly before revealing ribbons of tender meat that fall apart at the slightest touch of a fork. The scent of hickory or oak smoke clings to the meat, providing a rustic, campfire-esque backdrop that makes every bite feel like a special occasion.
Ingredients
- Whole packer beef brisket (10-12 lbs)
- Equal parts coarse salt and 16-mesh black pepper
- Apple cider vinegar (for spritzing)
- Hickory or Oak wood chunks
How to make it
- Trim the brisket while cold, leaving about 1/4 inch of fat cap to protect the meat during the long smoke. Remove any hard, ‘knobby’ fat that won’t render down.
- Apply a heavy coating of the salt and pepper rub to all sides of the meat, pressing it in firmly to ensure it adheres. Let it sit at room temperature for 45 minutes while the smoker preheats.
- Set your smoker to a steady 225°F. Place the brisket on the grates, fat side up or towards the heat source depending on your smoker’s airflow.
- Smoke undisturbed for about 6 hours. Once the internal temperature reaches 165°F and the exterior bark is dark and set, spritz it with apple cider vinegar to keep it moist.
- Wrap the brisket tightly in pink butcher paper and continue cooking until the internal temperature reaches 203°F and a probe slides in like it’s hitting softened butter. Rest the meat in an insulated cooler for at least 2 hours before slicing against the grain.
How to prepare fresh fruit?

Why we love this
Fresh fruit provides the essential ‘bright’ notes to your board, acting as a natural palate cleanser between the richer, savory elements. Imagine the vibrant explosion of a perfectly ripe strawberry or the floral, honeyed sweetness of a sliced peach dripping with juice. The visual appeal of deep ruby berries and golden citrus wheels adds a gemstone-like sparkle to the spread, while the crisp, cool textures offer a refreshing relief from the heat of the grilled items.
Ingredients
- Seasonal berries (strawberries, blueberries, raspberries)
- Stone fruits (peaches, plums, or nectarines)
- Citrus (blood oranges or Meyer lemons)
- Fresh mint leaves for garnish
- Honey for drizzling
How to make it
- Wash all fruit in cold water and pat dry thoroughly; moisture is the enemy of a clean-looking board and can make other items soggy.
- Slice larger fruits like peaches and oranges into uniform wedges or rounds. Use a sharp paring knife to ensure clean edges that won’t bruise the delicate flesh.
- Hull the strawberries but consider leaving the green tops on a few for a rustic, garden-fresh aesthetic that adds a pop of green to the board.
- Arrange the fruit in clusters, grouping colors together for a high-impact visual. Place juicy fruits in small ceramic bowls to prevent their juices from bleeding into the savory meats or breads.
- Finish with a light chiffonade of fresh mint and a tiny drizzle of honey over the stone fruits to enhance their natural sugars and give them a beautiful, glossy sheen.
How to make mini quiches?
Why we love this
Mini quiches are the ultimate finger food, offering a sophisticated, buttery pastry shell filled with a silky, cloud-like egg custard. Each bite is a delicate balance of the flaky, salty crust and the rich, savory filling that can be customized with everything from earthy mushrooms to sharp, nutty gruyère. They feel incredibly fancy but are secretly the perfect way to use up bits of herbs and cheese, providing a warm, comforting mouthfeel that satisfies without being overly heavy.
Ingredients
- Pre-made pie crust or puff pastry
- 4 large eggs
- 1 cup heavy cream
- Salt, nutmeg, and white pepper
- Filling: Sautéed spinach and feta cheese
How to make it
- Preheat your oven to 375°F and lightly grease a mini-muffin tin with butter or non-stick spray.
- Roll out your dough on a floured surface and use a circular biscuit cutter to cut rounds that are slightly larger than the muffin cups. Press the dough gently into the bottom and sides of the tin.
- In a bowl, whisk together the eggs and heavy cream until completely smooth. Season with a pinch of salt, a dash of white pepper, and a tiny grating of nutmeg, which brings out the richness of the dairy.
- Place a small amount of your chosen fillings (like the spinach and feta) into each pastry cup. Do not overfill, or the custard will overflow and stick to the pan.
- Carefully pour the egg mixture over the fillings until each cup is about 3/4 full. Bake for 15-20 minutes until the pastry is golden brown and the centers are set but still have a slight jiggle.
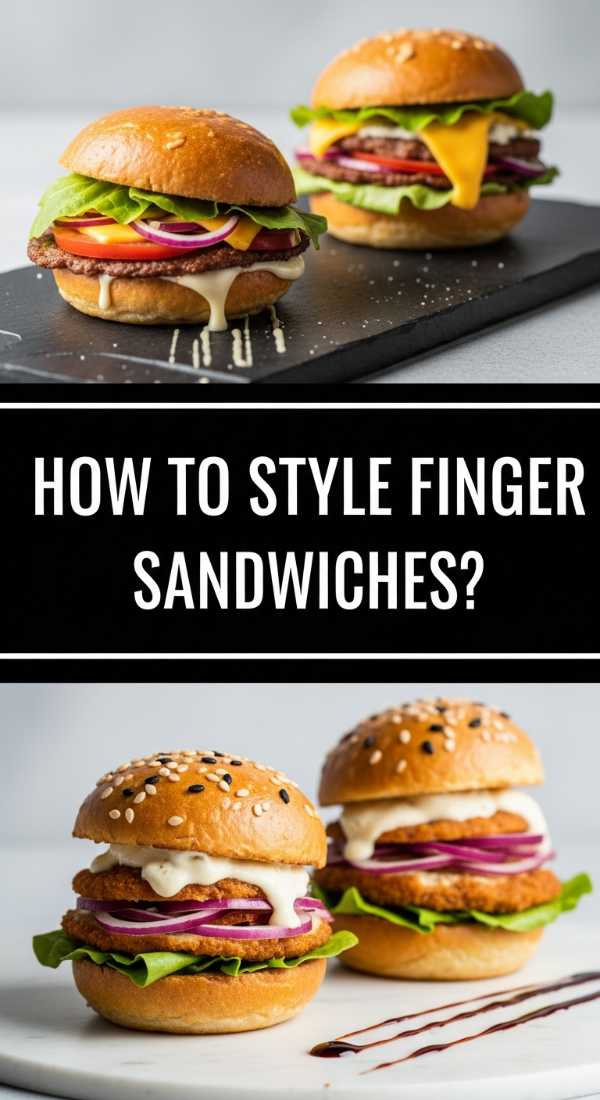
How to style finger sandwiches?

Why we love this
There is something inherently charming about a perfectly styled finger sandwich—it’s the epitome of elegance and mindful eating. The soft, pillowy texture of high-quality white bread combined with cool, creamy fillings like herbed butter or cucumber creates a soothing, delicate experience. They add a sense of structure and whimsy to the board, bridging the gap between the heavy proteins and the light fruits with their neat, geometric shapes and subtle flavors.
Ingredients
- Thinly sliced white or whole wheat bread
- Softened unsalted butter
- English cucumbers, sliced paper-thin
- Fresh dill and chives
- Cream cheese or high-quality mayonnaise
How to make it
- Start with very fresh, soft bread. Spread a thin, even layer of softened butter or cream cheese all the way to the very edges of each slice; this creates a moisture barrier that prevents the bread from getting soggy from the fillings.
- Layer your fillings evenly. For cucumber sandwiches, overlap the thin slices slightly to ensure every bite has a consistent crunch. Sprinkle with finely chopped herbs and a tiny pinch of sea salt.
- Place the second slice of bread on top and use a very sharp serrated knife to gently saw off the crusts. Do not press down hard, or you will squash the delicate bread.
- Cut the sandwiches into uniform shapes—either long ‘fingers,’ small squares, or elegant triangles. Aim for bites that are roughly 1 to 2 inches wide.
- To prevent drying out before serving, cover them with a slightly damp paper towel or arrange them tightly together on the board so minimal surface area is exposed to the air.
How to fry chicken wings?

Why we love this
Fried chicken wings bring an irresistible, high-energy crunch to the board that everyone gravitates toward immediately. The sound of that first bite—the shatter of the golden-brown skin—followed by the steam rising from the tender, juicy meat inside is pure culinary bliss. Whether tossed in a spicy glaze or kept simple with salt and pepper, their savory depth and addictive texture make them the ‘main character’ of any social gathering, providing a satisfying, hands-on eating experience.
Ingredients
- 2 lbs chicken wings (flats and drums separated)
- Cornstarch or potato starch
- Kosher salt and garlic powder
- Neutral oil for frying (like peanut or vegetable oil)
- Your favorite buffalo or honey-garlic sauce
How to make it
- The secret to a viral-worthy crunch is dryness. Pat the wings with paper towels until they are bone-dry, then toss them in a mixture of cornstarch, salt, and garlic powder to create a light, even coating.
- Heat at least 2 inches of oil in a heavy-bottomed pot or Dutch oven until it reaches 350°F. Use a thermometer to maintain this temperature, as it prevents the wings from absorbing too much oil.
- Carefully lower the wings into the oil in batches. Do not crowd the pot, as this will drop the oil temperature and lead to soggy skin.
- Fry for 8-10 minutes, turning occasionally, until the wings reach an internal temperature of 165°F and are a deep, golden mahogany color. For an extra-crispy ‘double fry,’ remove them at 7 minutes, let them rest for 5, and then fry again at 375°F for 2 minutes.
- Drain on a wire rack (not paper towels) to maintain the crunch. Toss in your chosen sauce while still piping hot and serve immediately.
How to sear ribeye steaks?
Why we love this
A perfectly seared ribeye is the height of luxury, offering a rich, buttery flavor profile that is deeply satisfying. The marbling in a ribeye melts during the searing process, basting the meat from the inside out and creating a velvety texture that contrasts beautifully with the hard, salty crust developed in the pan. Infused with the aromas of scorched rosemary and toasted garlic, this steak brings a sophisticated, steakhouse-quality anchor to your simple food board.
Ingredients
- 1.5-inch thick Ribeye steak (Prime or Choice grade)
- 3 tablespoons unsalted butter
- 3 cloves of garlic, smashed
- Fresh rosemary and thyme sprigs
- Coarse sea salt
How to make it
- Take the steak out of the fridge at least 30-45 minutes before cooking to bring it to room temperature. This ensures even cooking throughout. Generously salt all sides.
- Heat a cast-iron skillet over high heat until it is screaming hot—you should see wisps of smoke. Add a high-heat oil and carefully lay the steak in, laying it away from you to avoid splashes.
- Sear for 3-4 minutes without moving it until a thick, dark crust forms. Flip the steak and immediately lower the heat to medium-high.
- Add the butter, garlic, and herbs to the pan. Once the butter foams, tilt the pan and use a large spoon to continuously pour that hot, flavored butter over the steak (the ‘arroser’ technique) for another 3 minutes.
- Remove the steak when the internal temperature hits 130°F for medium-rare. Let it rest for at least 10 minutes on a cutting board before slicing into thick strips to show off the perfect pink center.
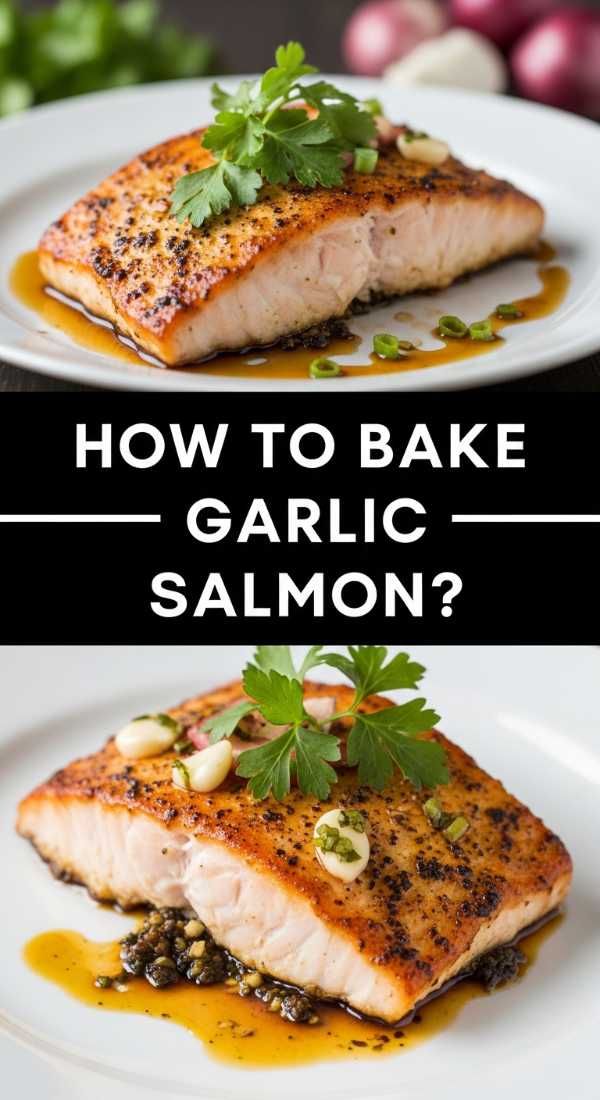
How to bake garlic salmon?

Why we love this
Baked garlic salmon is the lighter, more elegant cousin to the heavier meats on the board, offering a delicate flake and a clean, oceanic sweetness. The aroma of roasting garlic and lemon zest creates an inviting fragrance that draws people in, while the rich omega-3 fats provide a silky mouthfeel that pairs beautifully with the crisp fruits. It’s a bright, sophisticated addition that ensures there is something for everyone, providing a burst of heart-healthy flavor that feels both indulgent and virtuous.
Ingredients
- Large salmon fillet (center cut)
- 4 cloves garlic, minced
- Fresh lemon juice and zest
- Olive oil
- Fresh parsley and dill
How to make it
- Preheat your oven to 400°F and line a baking sheet with parchment paper. Place the salmon fillet on the paper and pat the skin side dry to ensure it doesn’t stick.
- In a small bowl, whisk together the olive oil, minced garlic, lemon zest, and a generous pinch of salt and pepper. Let this sit for 5 minutes to infuse the oil with the garlic flavor.
- Spread the garlic mixture evenly over the top of the salmon, pressing it down so it forms a light ‘crust.’
- Bake for 12-15 minutes, depending on the thickness. Look for the white proteins (albumin) just starting to bead on the surface; this is the visual cue that it is almost done.
- Remove from the oven when the salmon flakes easily with a fork but remains translucent in the very center. Finish with a squeeze of fresh lemon juice and a shower of chopped fresh herbs.
How to cook foil packets?

Why we love this
Foil packets are like little treasure chests on your food board, sealing in all the moisture and intense flavors of the ingredients inside. When you peel back the silver foil, a concentrated cloud of steam carries the scent of whatever you’ve tucked inside—perhaps herby potatoes or snap peas. The texture is unique, sitting somewhere between steamed and roasted, where vegetables become incredibly tender and infused with the seasoned juices, making them a fun and interactive element for guests to open and enjoy.
Ingredients
- Baby potatoes or mixed vegetables (zucchini, bell peppers)
- Olive oil or butter
- Dried oregano and red pepper flakes
- Lemon slices
- Heavy-duty aluminum foil
How to make it
- Cut your ingredients into small, uniform pieces. Since they are cooking in a sealed environment, smaller pieces ensure that everything finishes at the same time without the outside getting mushy.
- Cut a large square of heavy-duty foil. Place the ingredients in the center and toss them with oil, salt, and your favorite dry spices. Place a lemon slice or a pat of butter on top for extra moisture.
- Bring the long edges of the foil together and fold them down tightly several times to create a seal. Then, fold the ends inward to make a completely airtight packet.
- Place the packets directly on a hot grill or in a 400°F oven. The steam generated inside will cook the food rapidly and keep it incredibly moist.
- Cook for 15-20 minutes. Be extremely careful when opening the packets, as the trapped steam will be very hot. Pour the contents directly onto the board or serve them in the foil for a rustic look.
How to bake sweet potatoes?
[IMAGE_10]
Why we love this
Baking sweet potatoes brings out a natural caramelization that transforms a humble root vegetable into a candy-like delight. The skin becomes thin and slightly crisp, while the interior turns into a vibrant, velvety puree that is both earthy and sweet. They provide a grounding, starchy component to the board that acts as a perfect base for either savory toppings like salt and chives or sweet additions like a hint of cinnamon, making them a versatile and crowd-pleasing favorite.
Ingredients
- Medium-sized sweet potatoes
- Olive oil
- Kosher salt
- Optional: Cinnamon or smoked paprika
How to make it
- Preheat your oven to 425°F. Scrub the sweet potatoes thoroughly to remove any dirt and pat them completely dry.
- Use a fork to prick the potatoes 5-6 times all over. This allows steam to escape and prevents the potato from bursting in the high heat.
- Rub the skins with a light coating of olive oil and a generous sprinkle of salt. This helps the skin crisp up and enhances the flavor of the flesh inside.
- Place the potatoes directly on the oven rack for the best air circulation, with a baking sheet on the rack below to catch any sugary drips. Bake for 45-60 minutes.
- The potatoes are done when they feel soft when squeezed (use a mitt!) and a knife glides into the center with zero resistance. Let them rest for 5 minutes, then slice down the middle and fluff the insides with a fork.
Conclusion: The Joy of the Board
Assembling a viral food board isn’t about perfection; it’s about the celebration of variety and the ease of bringing people together. Whether you’re leaning into the smoky depths of a brisket or the bright snap of fresh berries, these boards remind us that the best meals are often the ones that require the least amount of formal plating and the most amount of sharing. So grab your biggest platter, fire up the grill, and let your creativity take over—your next favorite memory is just a 10-minute assembly away.