

The Secret DIY Trends Taking Over Your Feed (And How to Master Them)
Have you ever found yourself scrolling through your feed at 2 AM, mesmerized by the satisfying transformation of a dusty backyard or a cluttered pantry? We’ve all been there—that spark of inspiration that whispers, “I could totally do that.” There is something deeply therapeutic about taking a project into your own hands, feeling the grain of the wood under your palms, or seeing the first green shoots of a garden you designed yourself. It’s not just about the aesthetic; it’s about reclaiming your space and infusing it with your unique soul.
In this guide, I’m pulling back the curtain on the most viral home and garden trends currently dominating our screens. These aren’t just for professional contractors or interior designers; they are for us—the dreamers, the weekend warriors, and the lovers of a well-placed accent wall. From the nostalgic charm of a retro bedroom to the architectural serenity of a rock river bed, let’s walk through exactly how to bring these high-end looks to your own home with a touch of elbow grease and a whole lot of heart.
How to Remodel a Vintage Ranch for Modern Curb Appeal

Why we love this
There is a profound sense of satisfaction in honoring the mid-century bones of a vintage ranch while breathing new, sophisticated life into its silhouette. We love the way modern textures—like the warmth of horizontal cedar slats against a moody charcoal exterior—create a visual dialogue between the past and the present. Walking up to a home that feels both grounded and fresh provides an immediate sense of pride, characterized by the smell of fresh black paint and the crisp, clean lines of minimalist hardware that catch the golden hour light perfectly.
Essential Elements:
- Dark exterior paint (Matte Charcoal or Navy)
- Horizontal cedar slat siding or accents
- Modern black metal house numbers
- Large-scale rectangular pavers
- Sleek, down-lighting wall sconces
How to make it
- Begin by power washing the entire exterior to remove decades of dust and loose paint, ensuring a pristine canvas for your transformation.
- Select a high-quality masonry or wood paint in a deep, modern hue; apply two coats using an airless sprayer for that professional, streak-free finish that makes the architecture pop.
- Construct accent sections using 1×2 cedar boards spaced exactly 1/2 inch apart; seal them with a clear UV-resistant coat to maintain that rich, honey-toned contrast against the dark walls.
- Replace dated, ornate hardware with oversized, brushed metal house numbers and a modern handle set to instantly elevate the entry point.
- Install minimalist LED sconces that cast light both upward and downward, highlighting the new textures of the siding and providing a high-end architectural glow at night.
How to Design Front Flower Beds for a Lush Entryway
Why we love this
An entry garden is the ultimate handshake of the home—it welcomes you with open arms and fragrant whispers. We adore the sensory layering of velvet-soft lamb’s ear against the structural elegance of boxwoods, creating a tapestry of greens that feels intentional yet wild. The aroma of damp cedar mulch after a summer rain, mixed with the sweet scent of blooming jasmine or hydrangeas, creates a transition zone that instantly lowers your heart rate as you approach your front door.
Essential Elements:
- Evergreen foundation shrubs (like Boxwood or Yew)
- Perennial flowers for seasonal color
- Textural groundcovers
- Premium dark brown or black mulch
- Natural stone or metal edging
How to make it
- Sketch a curved layout using a garden hose to mark the boundaries; soft, organic curves feel more luxurious and professional than rigid straight lines.
- Remove existing grass and till the soil to a depth of 8 inches, mixing in organic compost to provide a nutrient-rich foundation for your new plants.
- Place your tallest shrubs in the back (the “thrillers”), medium-sized perennials in the middle (the “fillers”), and low-growing groundcovers at the very front (the “spillers”).
- Dig holes twice as wide as the root balls, ensuring each plant sits level with the soil surface to prevent stem rot.
- Apply a 3-inch layer of high-quality mulch, keeping it away from the base of the stems, to lock in moisture and create a clean, finished look that highlights the vibrant greens.
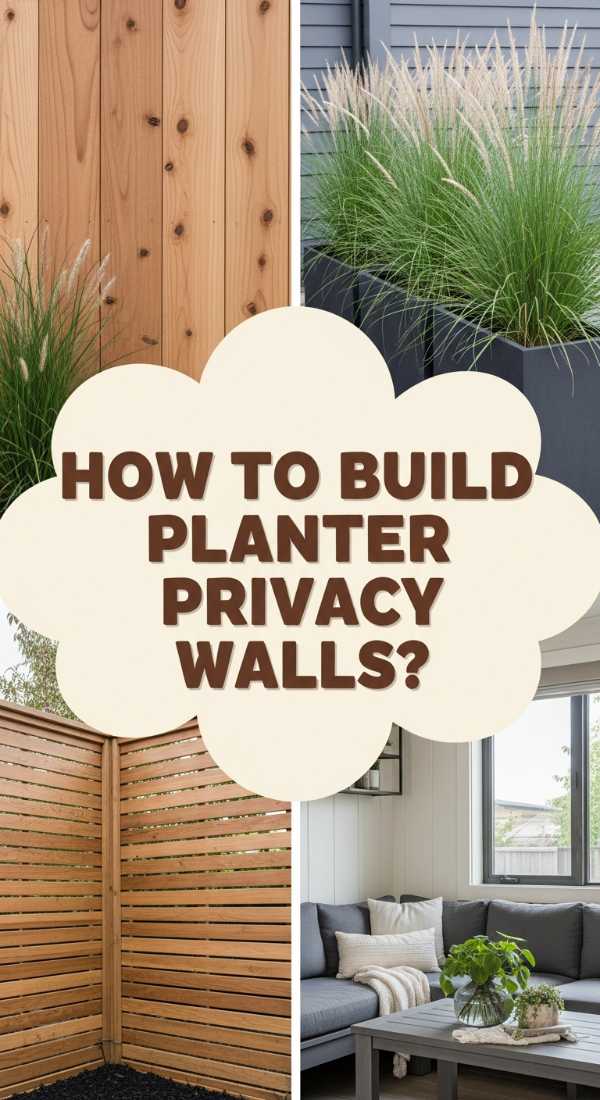
How to Build Privacy Planters for a Quiet Backyard
Why we love this
Privacy planters are the secret weapon for creating a sanctuary in a crowded neighborhood, offering a living wall that moves gently with the breeze. There is something incredibly cozy about being tucked away behind a screen of tall, swaying bamboo or ornamental grasses that rustle softly like a private forest. The warm, earthy scent of pressure-treated timber and the sight of lush green foliage rising from a sleek wooden box provide a sense of security and intimacy that traditional fencing just can’t match.
Essential Elements:
- 4×4 pressure-treated posts
- Cedar or pine 1×6 planks
- Heavy-duty pond liner
- Drainage gravel and high-quality potting mix
- Tall privacy plants (Bamboo, Horsetail, or Feather Reed Grass)
How to make it
- Build a rectangular frame using your 4×4 posts as the internal corners and 1×6 planks for the sides, securing everything with exterior-grade deck screws.
- Install a sturdy plywood base with pre-drilled drainage holes every 6 inches to ensure your plants don’t succumb to root rot during heavy rains.
- Line the interior with a heavy-duty pond liner or landscape fabric to protect the wood from constant moisture, stapling it firmly to the top edge.
- Add a 2-inch layer of drainage gravel at the bottom, then fill the remaining space with a lightweight, nutrient-dense potting mix designed for containers.
- Plant your tall specimens (like ‘Karl Foerster’ grass) closely together to create an immediate visual barrier, and finish with a layer of decorative pebbles to keep the soil cool.
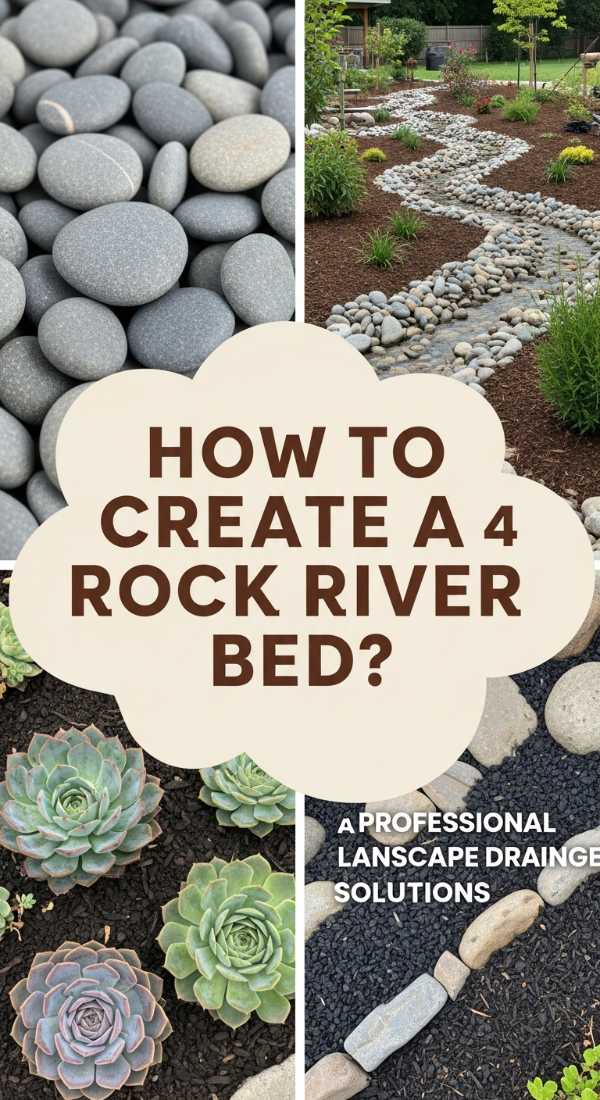
How to Layer Rock River Beds for a Serene Landscape
Why we love this
There is a profound, meditative beauty in the way a rock river bed mimics the flow of water, bringing a sense of movement to a static yard. We love the tactile contrast between smooth, cool river stones and the rugged edges of larger boulders, which create a naturalistic landscape that feels like it’s been there for centuries. In the heat of the day, the stones retain a gentle warmth, and when the rain falls, they transform into glistening jewels that guide the water safely away from your home’s foundation.
Essential Elements:
- Multi-sized river rocks (from pea gravel to large cobbles)
- 2-3 large focal point boulders
- Heavy-duty weed barrier fabric
- Spade and landscape pins
- Accent plants (like Blue Fescue or Japanese Forest Grass)
How to make it
- Dig a shallow, meandering trench approximately 4-6 inches deep, varying the width as you go to mimic the natural erosion of a real stream.
- Lay down a professional-grade weed barrier, securing it with landscape pins and ensuring it overlaps at the seams to prevent unwanted growth.
- Place your largest “anchor” boulders first at the curves or “bends” of the river to create a sense of weight and permanence.
- Fill the center of the trench with mid-sized cobbles, then scatter smaller river rocks around the edges to create a natural, graded transition.
- Tuck small, drought-tolerant grasses into the pockets between rocks along the “banks” to soften the edges and add a touch of life to the stone feature.
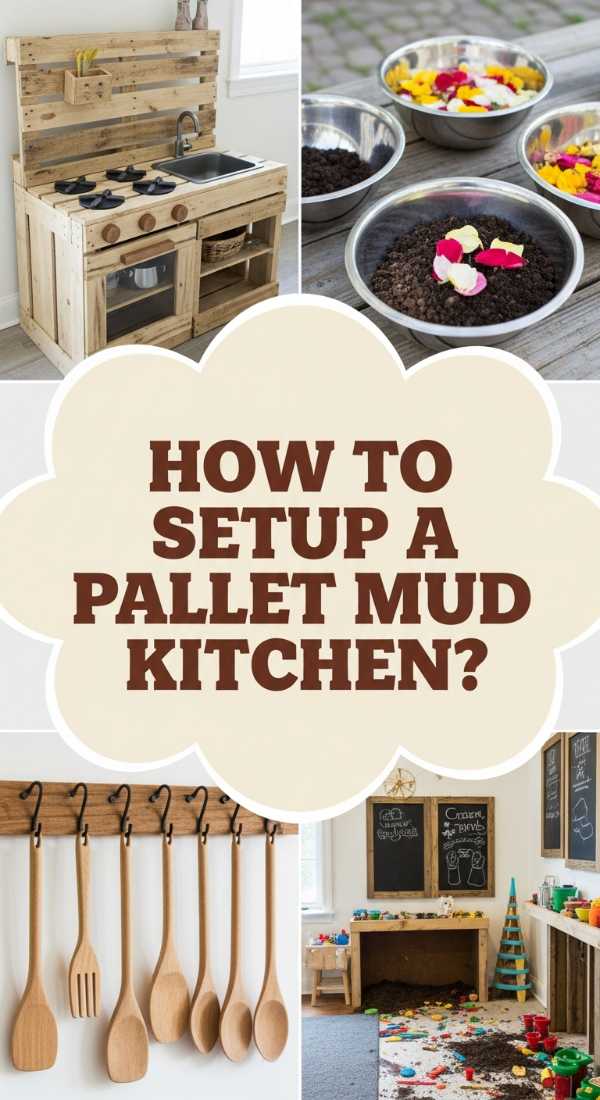
How to Craft a Mud Kitchen for Endless Outdoor Fun

Why we love this
A mud kitchen is a portal to a world of messy, glorious imagination where “dirt cupcakes” are the highest form of culinary art. We love the rustic, handmade aesthetic of weathered wood paired with shiny stainless steel basins that catch the afternoon sun. The air fills with the smell of damp earth and crushed mint leaves as children explore the textures of mud, sand, and water, creating a sensory-rich environment that encourages them to get their hands dirty and their spirits high.
Essential Elements:
- Reclaimed wood or heat-treated pallets
- Stainless steel mixing bowls (for sinks)
- Old kitchen faucets or PVC pipe “taps”
- Small hooks for utensils
- Outdoor-safe chalkboard paint
How to make it
- Construct a sturdy table frame at child-height (usually 20-24 inches) using 2×4 lumber, ensuring all edges are sanded completely smooth to prevent splinters.
- Cut circular holes in your countertop using a jigsaw, sized slightly smaller than the lip of your stainless steel bowls, so they drop in securely as “sinks.”
- Attach a vertical “backsplash” using leftover planks, providing a surface to mount hooks for ladles, whisks, and old pots.
- Install a non-functional or hose-connected faucet; if using a hose, ensure the drainage from the bowls is directed away from the child’s standing area.
- Paint a small section with chalkboard paint for a “Daily Menu” and add a lower shelf for storing “ingredients” like pinecones, stones, and jars of water.
How to Arrange a Hot Tub Space for Pure Relaxation

Why we love this
Transforming a hot tub area into a spa-like retreat is all about the art of the atmosphere—the steam rising into the cool night air and the gentle hum of bubbles. We love the feeling of stepping onto soft, weather-resistant outdoor rugs and being surrounded by the warm glow of string lights that twinkle like low-hanging stars. It’s a sensory escape that combines the therapeutic heat of the water with the soft textures of plush towels and the calming scent of cedar-infused steam.
Essential Elements:
- Reinforced concrete or deck foundation
- Privacy screening (lattice or frosted glass)
- Weatherproof outdoor rug
- Dimmable string lighting
- All-weather towel rack and side table
How to make it
- Ensure your site is perfectly level and capable of supporting the immense weight of a filled tub (approx. 100 lbs per square foot); a 4-inch concrete pad is the gold standard.
- Position the tub to maximize views while maintaining privacy, then install a decorative screen on at least two sides to block wind and neighbors’ eyes.
- String Edison-style LED lights overhead, ensuring they are connected to a GFCI outlet and hung high enough to avoid any contact with the water.
- Place a heavy-duty, quick-dry rug around the entrance to prevent slips and keep the interior of the tub free of tracked-in debris.
- Add a sturdy side table for drinks and a dedicated rack with rolled, high-GSM cotton towels to complete the five-star resort experience at home.
How to Organize a Real Pantry for Kitchen Harmony

Why we love this
There is a specific kind of domestic euphoria that comes from opening a pantry door to see perfectly aligned glass jars and uniform baskets. We love the visual calm of a “decanted” pantry, where the chaotic colors of grocery store packaging are replaced by the soft whites of flour, the deep browns of grains, and the vibrant hues of dried pasta. The rhythmic “click” of an airtight lid and the ease of knowing exactly when you’re running low on essentials brings a quiet, organized harmony to the heart of the home.
Essential Elements:
- Uniform glass or BPA-free plastic canisters
- Woven or wire baskets for bulk items
- Airtight lids with silicone seals
- Custom labels or a paint pen
- Tiered “stadium seating” for canned goods
How to make it
- Empty the entire pantry and discard any expired items; this “reset” is crucial for seeing the true potential of your storage space.
- Categorize your items into groups (e.g., Baking, Breakfast, Snacks, Grains) and measure your shelf heights to ensure your new containers will fit perfectly.
- Decant dry goods into uniform canisters; use a funnel to avoid spills and always include the “best by” date on a small sticker on the bottom of the jar.
- Utilize tiered risers for cans and jars so that every label is visible at a glance, preventing the “lost in the back” syndrome that leads to overbuying.
- Apply clean, minimalist labels at eye level on every container and basket, creating a system so intuitive that even the busiest family members can maintain it.
How to Detail Glass Yard Art for a Whimsical Garden

Why we love this
Glass yard art brings a playful, kaleidoscopic energy to the garden, catching the sun and scattering rainbows across the lawn. We love the way vintage plates and colored glass vases can be reimagined into towering “garden totems” that stand tall among the flowers. The smooth, cool touch of the glass and the way it glows with an inner light during the golden hour adds a touch of whimsical magic that feels both sophisticated and wonderfully eccentric.
Essential Elements:
- Vintage glassware (plates, bowls, vases, votives)
- Clear, waterproof industrial adhesive (like E6000)
- Rebar or sturdy copper pipe for the stake
- Glass drill bit (optional)
- Small rubber grommets
How to make it
- Scour thrift stores for glass pieces with interesting textures and colors; look for “sun-catchers” like cobalt blue, ruby red, or amber depression glass.
- Thoroughly clean and dry every piece of glass to remove all oils, which ensures the industrial adhesive creates a permanent, weatherproof bond.
- Experiment with “dry stacking” your pieces on a flat surface until you find a balanced, aesthetically pleasing totem design.
- Apply the adhesive in a continuous ring where the glass pieces meet, then stack them carefully and let them cure for a full 24-48 hours without movement.
- Mount your finished totem onto a rebar stake driven deep into the ground, using a strong adhesive or a drilled-hole method to secure the glass to the metal.
How to Decorate a Retro Bedroom for Total Teen Vibes

Why we love this
The retro-revival bedroom is a celebration of personality, blending the nostalgia of the 70s and 90s with modern, high-tech comforts. We love the juxtaposition of soft, tufted velvet headboards against the sharp, neon glow of customized LED signs. The air feels electric and creative, filled with the warmth of a record player’s crackle and the tactile comfort of chunky knit throws, making it the ultimate sanctuary for self-expression and late-night dreaming.
Essential Elements:
- Checkered or floral wallpaper (peel-and-stick)
- RGB LED strip lighting
- Acrylic or rattan furniture pieces
- Gallery wall of vinyl records or vintage prints
- Plush, textured textiles (velvet, faux fur, corduroy)
How to make it
- Start with a focal wall using a bold, retro-patterned peel-and-stick wallpaper; this sets the entire color palette for the room without a permanent commitment.
- Install smart LED strips along the ceiling line or behind the bed frame to allow for customizable “mood lighting” controlled via a smartphone.
- Mix eras by pairing a sleek, modern acrylic desk with a vintage-style rattan chair and a brass floor lamp to create a curated, non-generic look.
- Create a gallery wall by mounting vinyl record covers with damage-free command strips, ensuring they are level and spaced evenly for a professional finish.
- Layer the bed with varying textures: a velvet duvet, corduroy toss pillows, and a faux-fur rug at the bedside to create a cocoon-like environment.
How to Install a Floating Deck for a Perfect Patio
[IMAGE_10]
Why we love this
A floating deck is the ultimate weekend luxury, providing a level, wooden oasis in the middle of a sea of grass. We love the architectural “hover” effect it creates, looking like a high-end platform for evening cocktails and summer barbecues. The smell of freshly cut cedar and the solid, rhythmic “thud” of footsteps on real wood boards create an grounded, expensive feel that completely transforms an underutilized corner of the yard into a destination.
Essential Elements:
- Pressure-treated 2×6 lumber for the frame
- Cedar or composite decking boards
- Deck blocks (concrete foundations)
- Hidden deck fasteners or stainless steel screws
- Landscape fabric and gravel (for underneath)
How to make it
- Clear the area and lay down heavy-duty landscape fabric topped with 2 inches of gravel to prevent weeds and provide proper drainage under your new deck.
- Layout your concrete deck blocks in a perfect grid, spaced no more than 4 feet apart, using a long level to ensure every single block is perfectly flush with the others.
- Construct the outer frame using 2×6 pressure-treated joists, securing the corners with heavy-duty lag bolts and ensuring the frame is perfectly square.
- Install the internal joists 16 inches on-center to provide a rock-solid foundation that won’t bounce or sag when people walk on it.
- Lay your decking boards starting from the outside edge, using 1/8-inch spacers for consistent gaps, and secure them with hidden fasteners for a sleek, screw-free surface.
Wrapping Up Your DIY Journey
Whether you’re tackling a full curb-appeal remodel or simply decanting your flour into glass jars, the magic of DIY lies in the process of making a space truly yours. These trends are more than just “viral” moments; they are blueprints for a more beautiful, functional life. Don’t be afraid to make mistakes—that’s just part of the story your home tells. Now, grab your tools and get started; your dream space is just one project away.