

Transform Your Garden Overnight: The Viral Hacks Everyone Is Talking About
There is something almost magical about the way a garden can change your entire mood. I remember sitting on my old, cracked concrete patio last summer, looking at the overgrown weeds and feeling like my outdoor space was more of a chore than a sanctuary. We all crave that Pinterest-perfect oasis—a place where the golden hour light hits the petals just right and the air smells like fresh cedar and blooming jasmine—but the price tags on professional landscaping can be absolutely terrifying. That is exactly why I dove headfirst into the world of viral DIY hacks that promise maximum impact with minimal stress.
The secret I discovered? You don’t need a massive renovation budget to create a high-end look; you just need a little weekend warrior spirit and the right plan. These projects are about more than just aesthetics; they are about reclaiming your space and creating a backdrop for those late-night porch chats, messy mud-pie afternoons with the kids, and quiet mornings with a cup of coffee. Let’s roll up our sleeves and turn that backyard dream into a reality that your neighbors will be whispering about for all the right reasons.
How to Design a Rock River Bed Landscape for Instant Curb Appeal
Why we love this
A rock river bed is the ultimate marriage of functionality and high-end design, offering a textural masterpiece that solves drainage issues while looking like a million bucks. There is a soothing, grounded feeling that comes from seeing smooth, cool-toned river stones winding through your yard, mimicking the natural flow of water even on the driest days. The way the grey and tan hues of the stones contrast against the vibrant green of your lawn creates a sophisticated visual boundary that feels both organic and intentional. It adds a professional, sculpted layer to your landscape that instantly elevates your home’s exterior presence.
Essential Elements:
- River rocks in various sizes (pea gravel to large cobbles)
- Landscaping fabric (heavy-duty)
- Garden staples
- Shovel and metal rake
- Boulders for accenting
- Edging material (optional)
How to make it
- Map out your path using a garden hose or spray paint, creating a natural, meandering “S” curve to mimic a real stream bed. Avoid straight lines, as organic curves are what create that high-end look.
- Excavate the area to a depth of about 4-6 inches, ensures you are sloping the trench slightly away from your home’s foundation to assist with drainage. Remove all grass, roots, and large debris.
- Lay down heavy-duty landscaping fabric across the entire trench, overlapping seams by at least 6 inches to prevent weeds from poking through. Secure the fabric tightly with garden staples every 12 inches.
- Place your largest “anchor” boulders first at the bends of your river. This creates a realistic look where water would naturally hit an obstacle and change direction.
- Fill the base with medium-sized river rocks, spreading them evenly with a rake until the fabric is completely covered.
- Add smaller pebbles and pea gravel along the edges to soften the transition to the lawn or garden bed, creating a layered, naturalistic gradient.
- Rinse the stones with a hose to remove dust and reveal their true colors and textures.
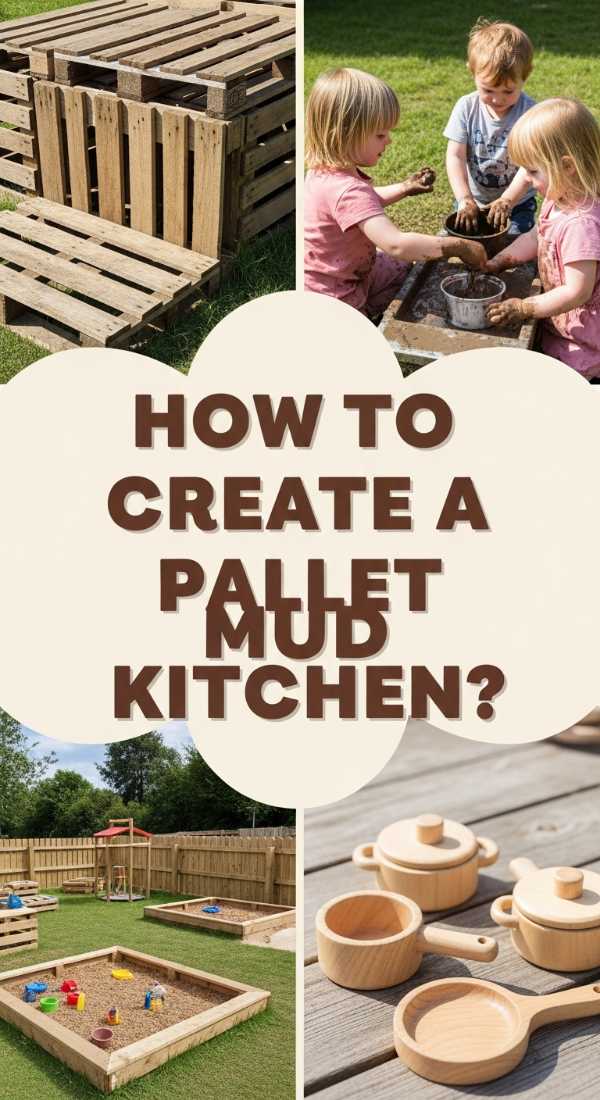
How to Create a Pallet Mud Kitchen for Endless Outdoor Play

Why we love this
There is nothing quite like the sound of wooden spoons clacking against metal bowls and the sight of dirt-smudged smiles to remind us of the joys of childhood. A pallet mud kitchen is a rustic, charming addition to any backyard that invites sensory play and endless imagination into the fresh air. The rough-hewn texture of the reclaimed wood, the cool splash of water in a stainless steel sink, and the earthy aroma of damp garden soil come together to create a whimsical workstation. It’s a sustainable way to upcycle while giving the little ones a dedicated space to explore the textures of nature without tracking the mess indoors.
Essential Elements:
- Two heat-treated (HT) wooden pallets
- Outdoor-rated wood screws
- Stainless steel mixing bowl (for the sink)
- Battery-operated outdoor faucet or pump
- Old knobs, hooks, and kitchen utensils
- Outdoor wood sealer or colorful paint
- Jigsaw and drill
How to make it
- Select two pallets in good condition, ensuring they are stamped with “HT” (Heat Treated) rather than chemically treated for safety. Sand every inch thoroughly to remove splinters and smooth out the grain.
- Stand one pallet vertically to serve as the back wall and kitchen hutch. Secure it to a fence or a sturdy base for stability.
- Disassemble the second pallet to create the countertop frame and legs. Measure the height of your child (usually 20-24 inches) to ensure the counter is at a comfortable working level.
- Cut a circular hole in your countertop boards using a jigsaw, sized slightly smaller than the lip of your stainless steel bowl, then drop the bowl in to create a “sink.”
- Attach the countertop frame to the vertical back pallet using heavy-duty wood screws, ensuring the structure is level and won’t wobble.
- Apply a thick coat of outdoor-rated sealer or exterior paint to protect the wood from the elements and mud splatters.
- Install your decorative elements: screw in old stove knobs, attach hooks for hanging spoons, and mount a small shelf for “spice jars” filled with pebbles and acorns.
How to Style Front Porch Flower Pots for a Welcoming Entry
Why we love this
The front porch is the handshake of your home, and perfectly styled flower pots are the ultimate way to say “welcome.” There is a sensory delight in the layered heights of lush foliage, the sweet, intoxicating scent of petunias on a warm breeze, and the vibrant pop of color against a neutral front door. By mixing textures—from the soft, velvety leaves of dusty miller to the architectural spikes of a dracaena—you create a living art piece that changes with the seasons. It’s a quick, high-impact way to make your entryway feel curated, intentional, and bursting with life, providing a cheerful greeting every time you pull into the driveway.
Essential Elements:
- Large, high-quality planters (varying heights)
- Potting soil with slow-release fertilizer
- “Thriller” plants (tall, focal point)
- “Filler” plants (mounded, voluminous)
- “Spiller” plants (trailing vines)
- Mulch or moss for topping
How to make it
- Choose a color palette that complements your front door—try monochromatic for a modern look or complementary colors (like purple and yellow) for high energy.
- Ensure your pots have drainage holes; if not, drill them carefully to prevent root rot. Fill the bottom third of large pots with empty plastic water bottles to save on heavy soil and improve drainage.
- Fill the rest of the pot with high-quality potting mix, leaving about 2 inches of space from the rim.
- Plant your “Thriller” in the center (if the pot is viewed from all sides) or at the back (if viewed from the front). This should be your tallest, most dramatic plant, like a Canna Lily or a tall ornamental grass.
- Surround the thriller with “Fillers.” These are mid-height plants like Geraniums or Lantana that add volume and hide the base of the taller plant.
- Tuck your “Spillers” around the edges. These trailing plants, like Creeping Jenny or Sweet Potato Vine, will cascade over the rim, softening the hard edges of the pot.
- Water deeply until water runs out of the bottom, then top with a layer of Spanish moss or decorative mulch to retain moisture and provide a finished, professional look.
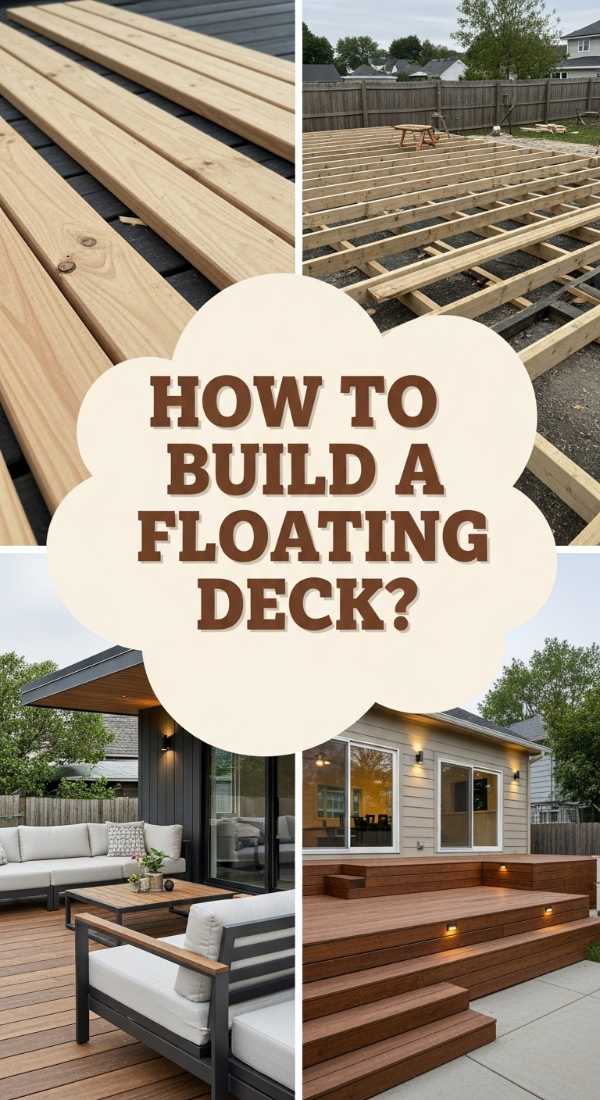
How to Build a Floating Deck for the Perfect Summer Hangout
Why we love this
A floating deck offers a level of sophistication and relaxation that a simple patch of grass just can’t match. Imagine the feeling of smooth, sun-warmed wood beneath your bare feet and the way a defined platform instantly creates a cozy “outdoor room” for entertaining. The beauty of a floating deck lies in its low profile and the fact that it doesn’t require deep footings, making it a reachable dream for the DIY enthusiast. It provides a clean, modern aesthetic that makes your backyard feel expansive and luxurious, serving as the perfect stage for chic patio furniture, twinkling string lights, and long summer nights under the stars.
Essential Elements:
- Pressure-treated 2×6 boards for the frame
- Decking boards (cedar, pressure-treated, or composite)
- Deck blocks (concrete)
- Level and chalk line
- Galvanized deck screws
- Speed square and miter saw
How to make it
- Clear the area of grass and debris, then level the ground as much as possible. Lay down landscape fabric and a thin layer of gravel to prevent weeds and improve drainage beneath the deck.
- Position your concrete deck blocks at the corners and every 4 feet along the perimeter. Use a long straight board and a level to ensure all blocks are perfectly level with one another.
- Construct the outer frame using pressure-treated 2x6s, checking for square by measuring the diagonals—they must be equal.
- Install interior joists every 16 inches on center, securing them to the outer frame with joist hangers and galvanized nails. This provides the structural integrity needed to support weight.
- Lay your decking boards across the joists, starting from the most visible edge. Use spacers (like a 1/4 inch drill bit) to ensure consistent gaps for water drainage and wood expansion.
- Screw the boards into every joist using two deck screws per joist. Pre-drill the ends of the boards to prevent the wood from splitting.
- Trim any overhanging deck boards with a circular saw for a perfectly flush edge, then apply a high-quality stain or sealer to protect the wood and enhance its natural grain.
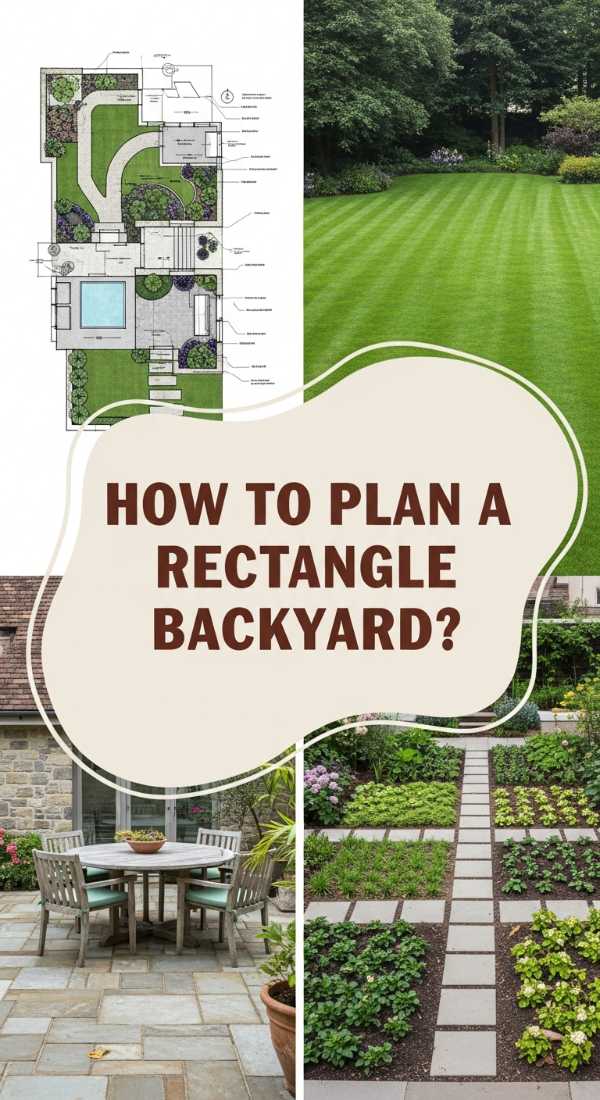
How to Plan a Backyard Layout Rectangle for Maximum Function
Why we love this
There is a profound sense of peace that comes from a perfectly organized space, and a rectangular backyard layout is the gold standard for clean, functional design. By utilizing the geometric strength of a rectangle, you can create distinct “zones”—an area for dining, a corner for lounging, and a space for play—that flow together seamlessly. The crisp lines and clear borders make the yard feel larger and more intentional, turning a chaotic patch of land into a curated outdoor suite. It’s about maximizing every square inch of your property to ensure that form meets function in the most beautiful way possible.
Essential Elements:
- Grid paper or a digital design app
- Measuring tape
- Landscape stakes and string
- Visual markers (outdoor rugs, planters)
- Furniture for different zones
- Lighting (path lights and string lights)
How to make it
- Measure the total dimensions of your yard and plot it on grid paper, noting the location of the back door, any existing trees, and the path of the sun throughout the day.
- Divide the rectangle into thirds: one-third for a “hardscape” dining area, one-third for a “softscape” lawn or garden, and one-third for a focal point like a fire pit or lounge.
- Use “anchors” to define each zone. A large outdoor rug can anchor the lounge area, while a row of tall planters can act as a natural wall to separate the dining space from the play area.
- Create clear walkways between the zones using stepping stones or a consistent mulch path. Ensure the paths are at least 3 feet wide for comfortable movement.
- Place your dining area closest to the house for easy access to the kitchen, and place the lounging or fire pit area further back to create a sense of “destination.”
- Install vertical elements, like a pergola or tall privacy hedges, on the perimeter of the rectangle to draw the eye upward and create a feeling of enclosure.
- Layer your lighting: use bright task lighting near the grill and soft, ambient string lights over the lounge area to reinforce the purpose of each zone.
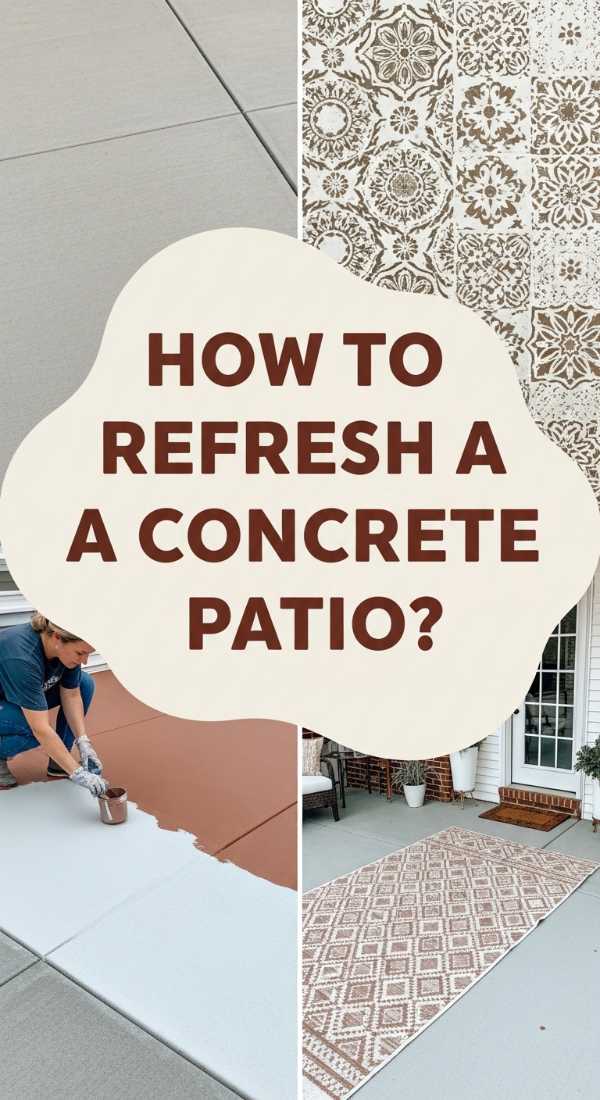
How to Refresh a Concrete Slab Patio for an Expensive Look
Why we love this
We’ve all seen those tired, grey concrete slabs that look more like a sidewalk than a sanctuary, but with a little creativity, they can become the crown jewel of your backyard. A concrete refresh is like a facelift for your patio; it takes something cold and industrial and turns it into a warm, inviting canvas. Whether you use a geometric stencil to mimic expensive Mediterranean tiles or a sophisticated stain that looks like natural stone, the transformation is visceral. The smooth, finished surface feels incredible underfoot and reflects light in a way that makes the whole garden feel brighter and more modern.
Essential Elements:
- Pressure washer and concrete cleaner
- Concrete patch or filler (for cracks)
- Concrete primer and porch/patio paint
- Large scale stencil (optional)
- Small foam roller and painter’s tape
- Outdoor concrete sealer
How to make it
- Begin with a pristine surface. Pressure wash the concrete thoroughly to remove all dirt, oil, and old flaking paint. Use a stiff brush and concrete cleaner for stubborn stains.
- Repair any cracks or pits using concrete filler, smoothing it out with a putty knife. Allow it to cure completely according to the manufacturer’s instructions.
- Apply a high-quality concrete primer. This is a non-negotiable step to ensure the topcoat adheres and doesn’t peel under the summer heat or winter frost.
- Apply two coats of your base color using a long-handled roller, allowing ample drying time between coats. Choose a light neutral like sand or dove grey for a high-end feel.
- If stenciling, secure your stencil with painter’s tape in the center of the patio and work outward. Use a “dry brush” technique with a foam roller—apply very little paint and build it up to prevent bleeding under the stencil.
- Once the pattern is dry, apply two thin coats of a clear, slip-resistant outdoor sealer to protect your handiwork from UV rays and foot traffic.
- Allow the patio to cure for at least 72 hours before moving heavy furniture back into place.
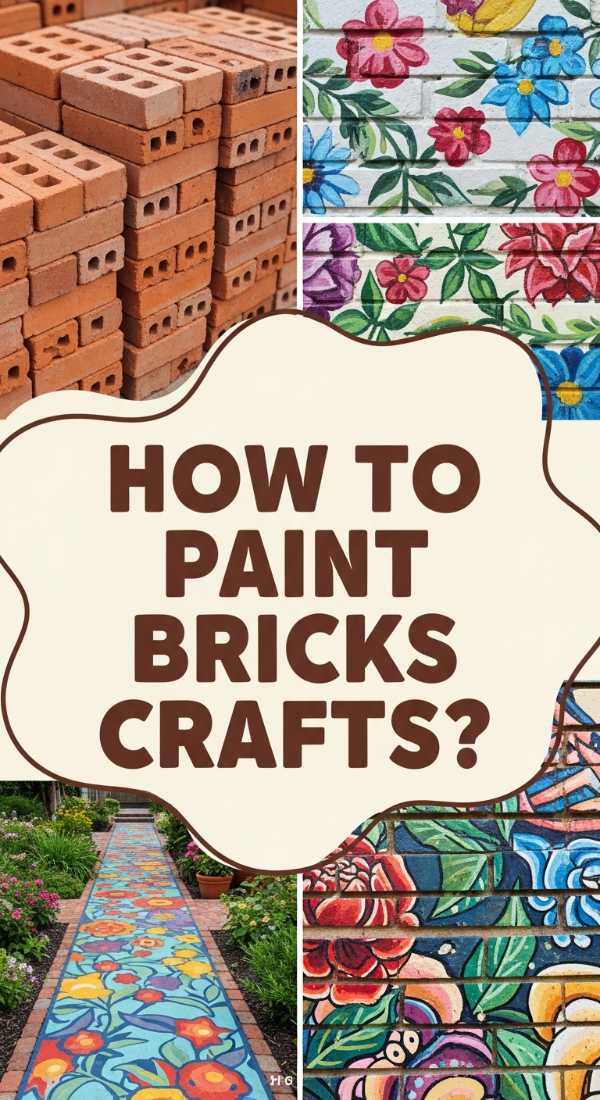
How to Paint Bricks Crafts for a Charming Garden Path

Why we love this
There is a whimsical, storybook quality to a painted brick path that adds instant character to any garden corner. Walking along a path of colorful or patterned bricks feels like a journey through a secret garden, with each step revealing a new detail or a pop of cheer. The tactile nature of the bricks—their heavy weight and rough surface—contrasts beautifully with delicate painted designs, from simple stripes to intricate floral motifs. It’s a wonderful way to repurpose old construction materials and turn them into a vibrant, personalized trail that guides guests through your blooms with a sense of wonder.
Essential Elements:
- Old bricks (reclaimed or new)
- Exterior masonry paint
- Small detail brushes and foam brushes
- Outdoor clear coat (matte or gloss)
- Sand and leveling tool
- Landscape edging
How to make it
- Clean your bricks thoroughly with a wire brush and water to remove any loose debris or moss. They must be completely dry before you start painting.
- Prime the bricks with a masonry-specific primer to ensure the paint bonds with the porous surface.
- Apply your base designs. You can go for a “rainbow” path with solid vibrant colors, or use a stencil to create a repetitive pattern like a fleur-de-lis or a geometric star.
- Use small detail brushes to add hand-painted elements like vines, ladybugs, or even house numbers if the path leads to your front door.
- Once the paint is dry, seal each brick with a heavy-duty, UV-resistant outdoor clear coat to prevent the colors from fading and the paint from chipping.
- Dig a shallow trench for your path, about 3 inches deep, and fill it with an inch of leveled sand to create a stable base for the bricks.
- Lay the bricks in your desired pattern (herringbone or basketweave look great), tapping them into the sand with a rubber mallet, and fill the gaps with more sand to lock them in place.
How to Install an Air Return Vent Cover DIY for a Seamless Wall

Why we love this
While most garden projects focus on the outdoors, the transition between your home and your garden should be just as beautiful. A bulky, industrial-looking air return vent can be a total eyesore in a room filled with natural light and garden views. By DIYing a custom vent cover, you turn a functional necessity into a seamless piece of wall art. The clean lines of a wooden slat cover or a decorative metal screen create a polished, high-end look that makes your interior feel as curated as your exterior. It’s that final “designer touch” that makes a house feel like a finished, luxury home.
Essential Elements:
- Wood trim or molding
- Decorative metal grate or laser-cut wood panel
- Magnetic catch or hidden screws
- Miter saw and wood glue
- Paint or stain matching your wall/trim
- Measuring tape
How to make it
- Measure the existing vent opening and add 1-2 inches to the height and width to create a frame that will sit flush against the wall, completely hiding the old metal louvers.
- Build a simple rectangular frame using mitered corners for a professional finish. Glue and nail the corners together, ensuring they are perfectly square.
- Cut your decorative panel (metal or wood) to fit the inside of the frame. You can find beautiful laser-cut patterns that allow for maximum airflow while obscuring the dark vent hole.
- Secure the panel to the back of the frame using small staples or clips.
- Sand the entire assembly and paint or stain it to match your baseboards or your wall color for that “invisible” look.
- Remove the old metal vent cover. To make the new cover easily removable for filter changes, use strong neodymium magnets on the corners of the frame and corresponding metal plates on the wall.
- Snap the new cover into place, ensuring it sits level and tight against the wall.
How to Arrange Front Yard Flower Beds for a Lush Garden
Why we love this
A well-arranged flower bed is like a symphony for the eyes, with every plant playing its part to create a harmonious and lush landscape. There is a deep satisfaction in the layering of textures—the wispy softness of ornamental grasses against the broad, glossy leaves of hostas, and the vibrant sparks of color from seasonal blooms. A lush garden bed doesn’t just look beautiful; it feels alive, humming with the movement of bees and butterflies and smelling of damp earth and floral perfume. It frames your home with a sense of abundance and care, creating a soft, organic boundary that makes the architecture pop.
Essential Elements:
- A variety of perennials and annuals
- Quality garden soil and organic compost
- Edging material (stone, metal, or a “v-trench”)
- Mulch (shredded bark or pine needles)
- Hand trowel and garden fork
- Soaker hose (optional)
How to make it
- Design your bed with a “staircase” effect: place the tallest plants in the back (near the house), mid-sized plants in the middle, and low-growing groundcovers in the front.
- Incorporate various shapes and textures. Pair spiked plants like Salvia with mounded plants like Boxwood and airy plants like Baby’s Breath to keep the eye moving.
- Plant in odd numbers (groups of 3, 5, or 7). This looks more natural and less “planted” than even numbers, creating a sense of effortless abundance.
- Consider bloom times. Choose a mix of early-spring, mid-summer, and late-fall bloomers so your garden stays colorful for as many months as possible.
- Define the edges clearly. A crisp “v-trench” edge (a small ditch between the grass and the bed) or a stone border prevents the lawn from encroaching and gives the bed a professional finish.
- Incorporate “evergreen anchors” like dwarf conifers or boxwoods so the bed has structure and visual interest even in the middle of winter.
- Apply a 3-inch layer of mulch around the plants, keeping it a few inches away from the stems. This suppresses weeds, retains moisture, and gives the bed a clean, dark backdrop that makes the plants stand out.
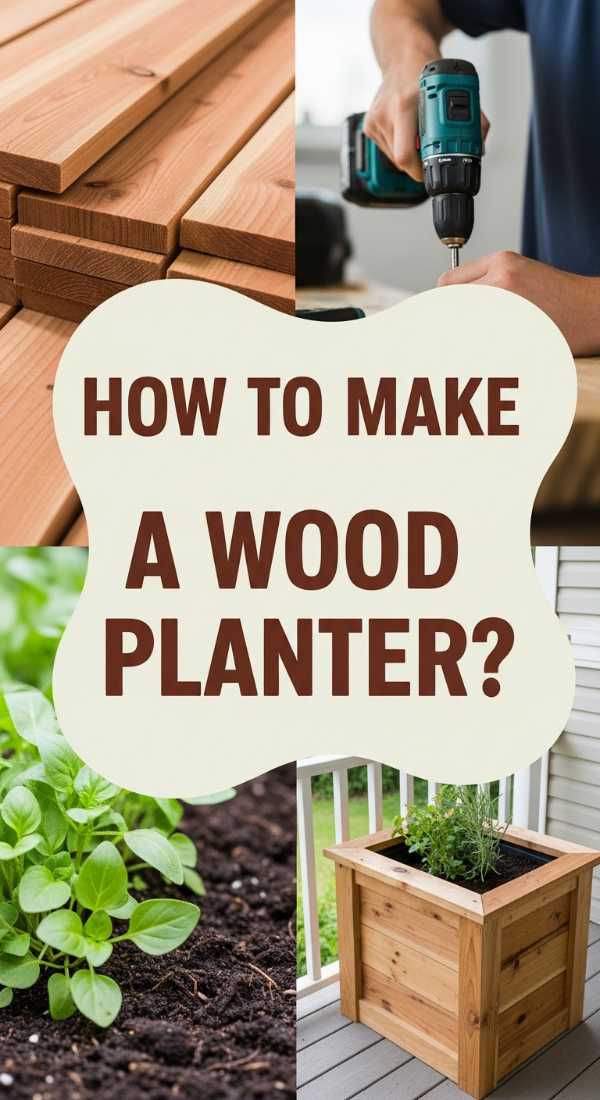
How to Make a DIY Wood Planter Box for a Personal Green Space
[IMAGE_10]
Why we love this
There is a special kind of pride that comes from building a home for your plants with your own two hands. A DIY wood planter box brings warmth and a handcrafted feel to any porch, balcony, or patio, providing a dedicated space for your favorite herbs or flowers. The smell of freshly cut cedar, the sturdy weight of the wood, and the way the natural grain complements the vibrant greens of the foliage create a beautiful, tactile experience. It’s a project that is as rewarding to build as it is to look at, offering a personal touch that store-bought plastic pots simply can’t replicate.
Essential Elements:
- Cedar or redwood boards (naturally rot-resistant)
- Exterior-grade wood glue
- Pocket hole jig or wood screws
- Drill and driver
- Landscape fabric (for lining)
- Staple gun
- Wood sealer or stain
How to make it
- Cut your boards to size: you will need four sides, a bottom panel, and four 2×2 blocks for the internal corners to add strength and act as legs.
- If using a pocket hole jig, drill holes into the ends of the side panels. If not, pre-drill pilot holes to prevent the wood from splitting when you drive screws through the face.
- Assemble the sides into a box using exterior-grade wood glue and screws. Ensure the box is square by checking the corner angles.
- Attach the bottom panel, making sure to drill several 1/2 inch drainage holes so your plants’ roots don’t sit in standing water.
- Sand all exterior surfaces and edges until smooth. Apply a food-safe sealer if you plan to grow herbs or vegetables, or a decorative exterior stain for ornamental plants.
- Line the inside of the box with landscape fabric, stapling it to the sides. This prevents soil from washing out of the drainage holes and helps protect the wood from direct moisture.
- Elevate the box slightly using the internal corner blocks as feet, which allows for better airflow underneath and prevents the wood from rotting against the ground.
Conclusion: Your Garden Transformation Awaits
Transforming your garden doesn’t require a team of professionals or a bottomless bank account—it just requires the courage to start. Whether you begin with a simple set of front porch pots or go big with a floating deck, each project adds a layer of personality and peace to your home. These viral hacks are proof that with a little creativity and some sweat equity, you can create a backyard sanctuary that is both stylish and soulful. So, grab your gloves and your tools; your dream garden is just one weekend project away!