
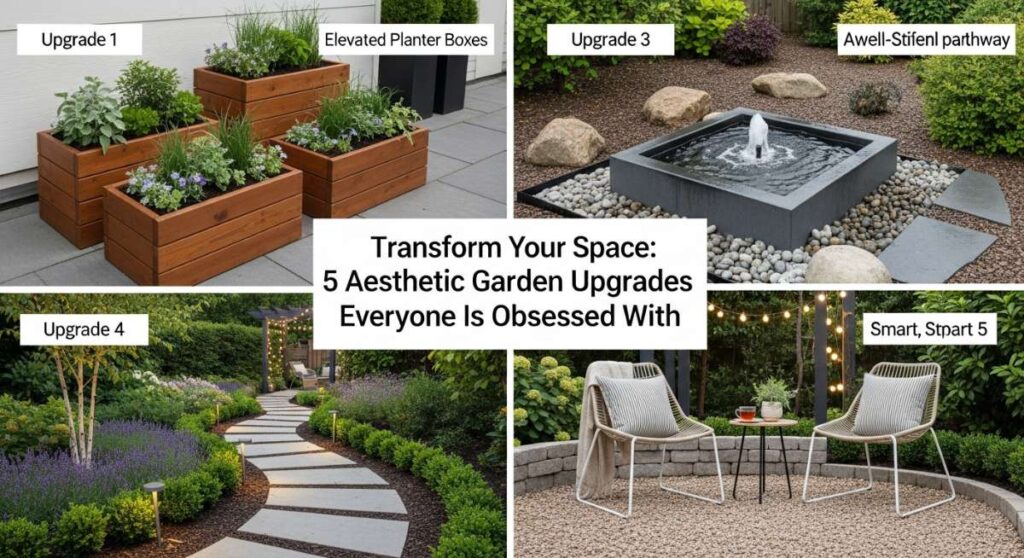
There is something almost magical about pulling into your driveway and feeling a literal wave of peace wash over you. Your home is your sanctuary, but so often, our outdoor spaces become the ‘one day’ projects that we never quite get to. I spent years staring at a patchy lawn and a blank porch, dreaming of those Pinterest-perfect garden escapes before I realized that a viral-worthy aesthetic isn’t about a massive budget—it’s about intentional, soulful details.
Today, I’m sharing the ultimate guide to transforming your yard into a lush, inviting haven that will have the whole neighborhood stopping to take a second look. From the whimsy of a backyard flock to the structured beauty of cottage-core flower beds, these upgrades are all about creating a lifestyle that feels as good as it looks. Let’s dive into the garden secrets that are currently taking over our feeds!
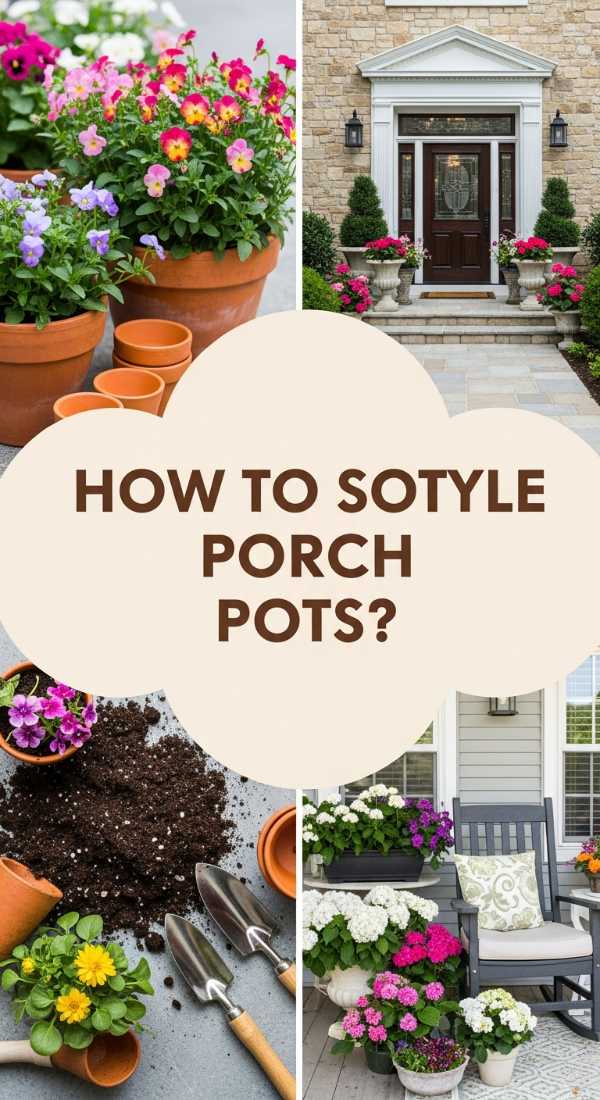
How to Style Front Porch Flower Pots for an Inviting Home Entrance
Why we love this
Nothing says ‘welcome home’ quite like the vibrant, textural explosion of a perfectly styled planter. The way the soft petals of a petunia catch the late afternoon sun, combined with the earthy, mossy scent of fresh potting soil, creates an immediate sensory bridge between the outside world and your personal sanctuary. It’s about that crisp, clean feeling of a manicured entrance that makes you want to linger with a cup of coffee before heading inside.
Essential Elements:
- Large ceramic or terracotta planters in varying heights
- High-quality potting mix with perlite
- A ‘Thriller’ (tall focal plant like Dracaena or Grasses)
- A ‘Filler’ (mounding plants like Geraniums or Begonias)
- A ‘Spiller’ (trailing plants like Sweet Potato Vine or Ivy)
How to make it
- Select a color palette that complements your front door; for a classic look, stick to whites, greens, and one pop of color like deep purple or vibrant pink.
- Fill your heavy planters with a lightweight filler at the bottom (like crushed plastic bottles) if they are very deep, then top with at least 12 inches of premium potting soil.
- Position your ‘Thriller’ plant slightly off-center towards the back to create height and drama without blocking the view of the other plants.
- Surround the focal point with ‘Fillers,’ tucking them in tightly so no soil is visible; this creates that ‘lush and expensive’ look immediately.
- Place ‘Spillers’ along the edges, angling them slightly outward so they are encouraged to cascade down the sides of the pot as they grow.
- Water deeply until moisture runs out the drainage hole, then top with a layer of decorative mulch or moss to hide any exposed dirt and retain moisture.
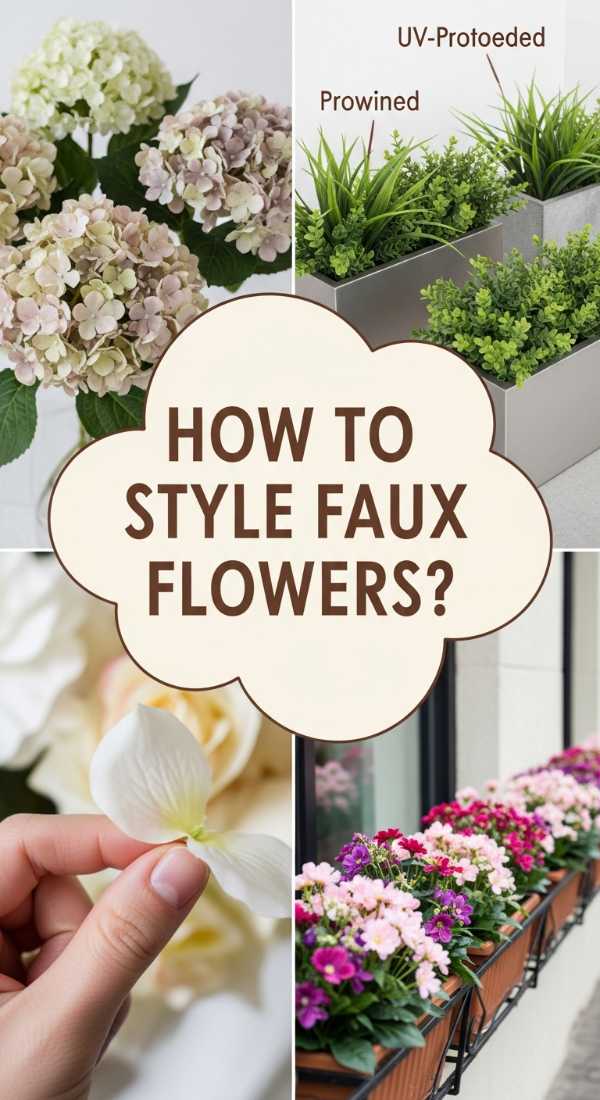
How to Use Outdoor Fake Flower Pot Ideas for an Everlasting Vibrant Garden
Why we love this
Let’s be real: sometimes the summer heat is just too much for even the most dedicated plant parent. High-quality UV-protected faux florals offer that permanent pop of color that never wilts or fades, providing a consistent visual delight that requires zero water. There is a specific joy in seeing a burst of ‘everlasting’ lavender or boxwood that stays perfectly manicured and vibrant through every heatwave and thunderstorm.
Essential Elements:
- UV-resistant artificial flowers or silk bushes
- Heavy-duty planters
- Expanding foam or floral foam blocks
- Real dried moss or river rocks
- Outdoor-rated clear UV protectant spray (optional for extra longevity)
How to make it
- Choose artificial plants specifically labeled for outdoor use to ensure the plastic has UV inhibitors that prevent the ‘blue-tint’ fading common with indoor silks.
- Weight the bottom of your planter with bricks or heavy gravel to prevent it from blowing over in the wind, as faux plants are much lighter than soil-filled ones.
- Secure a thick block of floral foam inside the pot using industrial-strength adhesive or by wedging it tightly against the bricks.
- Stick the stems of the faux flowers into the foam, starting from the center and working out; use wire cutters to vary the heights for a more natural, staggered growth pattern.
- Gently bend and ‘fluff’ the leaves and stems to mimic the irregular, organic way real plants reach for the light.
- Cover the foam and any visible mechanics with a thick layer of real preserved moss or polished stones to trick the eye into thinking the plant is rooted in nature.
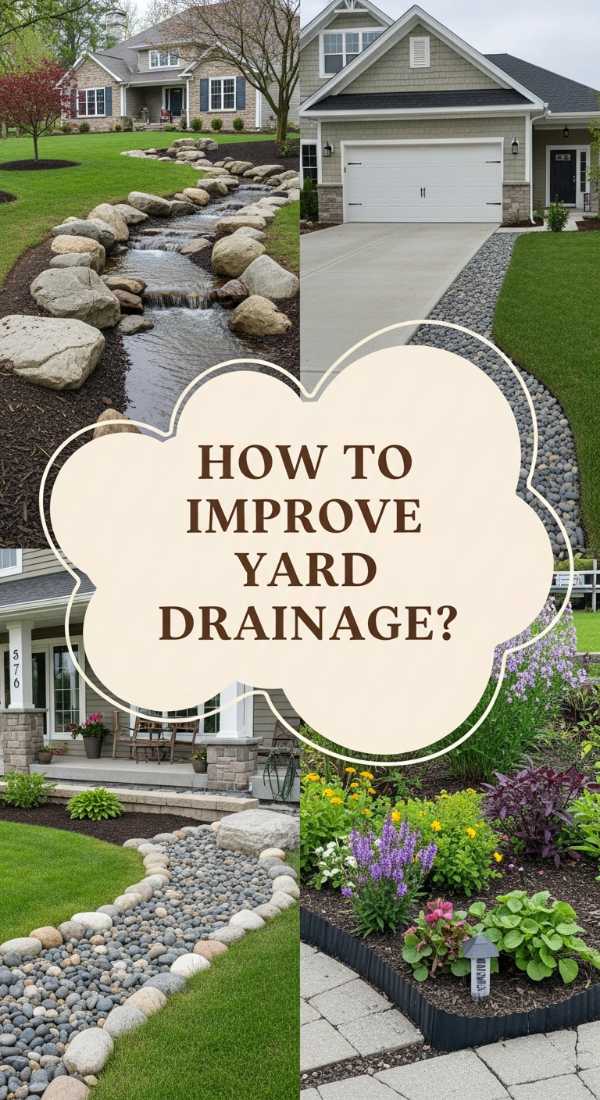
How to Improve Drainage Around House for a Protected Dry Foundation
Why we love this
While drainage might not sound ‘aesthetic,’ the peace of mind that comes with a dry, protected foundation is the ultimate luxury. There is a rhythmic, soothing sound to a well-directed rain spout, and seeing water flow purposefully away from your home through a beautiful rock-lined swale is strangely satisfying. It’s the invisible backbone of a beautiful garden, ensuring your hard work isn’t washed away by the next big storm.
Essential Elements:
- Perforated drainage pipe (French drain style)
- Landscape fabric (non-woven)
- River rock or decorative gravel
- Shovel and trenching tool
- PVC downspout extensions
How to make it
- Identify the low spots near your foundation where water pools and map out a path that slopes at least 1 inch for every 10 feet away from the house.
- Dig a trench approximately 12-18 inches deep and 10 inches wide along your planned path, ensuring a consistent downward grade.
- Line the entire trench with landscape fabric, leaving enough excess on the sides to fold over the top later; this prevents silt from clogging your drain.
- Pour a 2-inch base layer of gravel into the trench, then lay your perforated pipe with the holes facing downward to allow water to rise into the pipe and flow away.
- Fill the remaining space with gravel, fold the fabric over the top, and then cover with a decorative layer of larger river rocks to create a ‘dry creek bed’ look.
- Direct your downspouts into the head of the drain system using secure adapters to ensure all roof runoff is captured immediately.
How to Design Flower Beds in Front of House for Maximum Curb Appeal
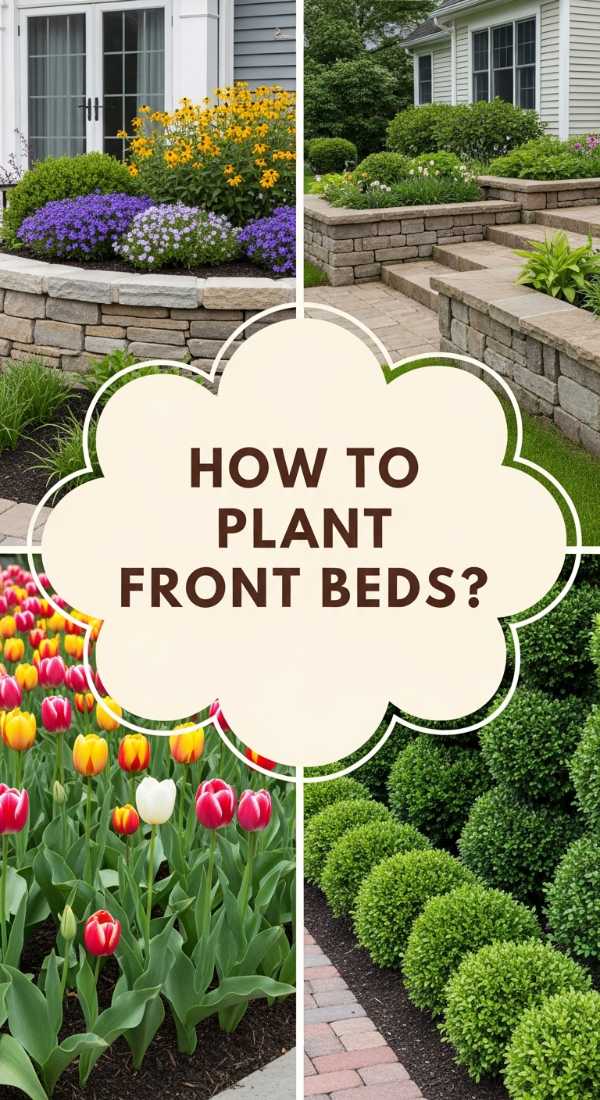
Why we love this
A well-designed flower bed is like a frame for a masterpiece—it defines the soul of your home. We love the layering of textures, from the velvety softness of lamb’s ear to the rigid structure of dwarf conifers, all working together to create a visual journey. Walking up to a home with intentional beds feels like a warm embrace, filled with the sweet, honeyed scent of alyssum and the rustle of ornamental grasses in the breeze.
Essential Elements:
- Edging material (stone, brick, or metal)
- A mix of perennials and annuals
- Hardwood mulch (dark brown or black for contrast)
- Organic compost
- Garden hose for outlining curves
How to make it
- Use a garden hose to ‘draw’ organic, flowing curves on the ground; avoid straight lines as curves look more high-end and natural.
- Remove all grass within the outline and till the soil to a depth of 8 inches, mixing in a generous amount of organic compost to nourish future plants.
- Install a crisp edge using stones or a deep ‘English edge’ (a vertical trench) to keep the lawn from creeping into your beautiful new beds.
- Place your largest ‘anchor’ plants first (like hydrangeas or boxwoods) near the back, then layer medium-height flowers in the middle, and short groundcovers at the front.
- Space plants according to their mature size, not their size at the nursery; this prevents overcrowding and ensures air circulation to prevent disease.
- Apply a 3-inch layer of premium mulch to suppress weeds and give the bed a professional, finished look that highlights the colors of the foliage.
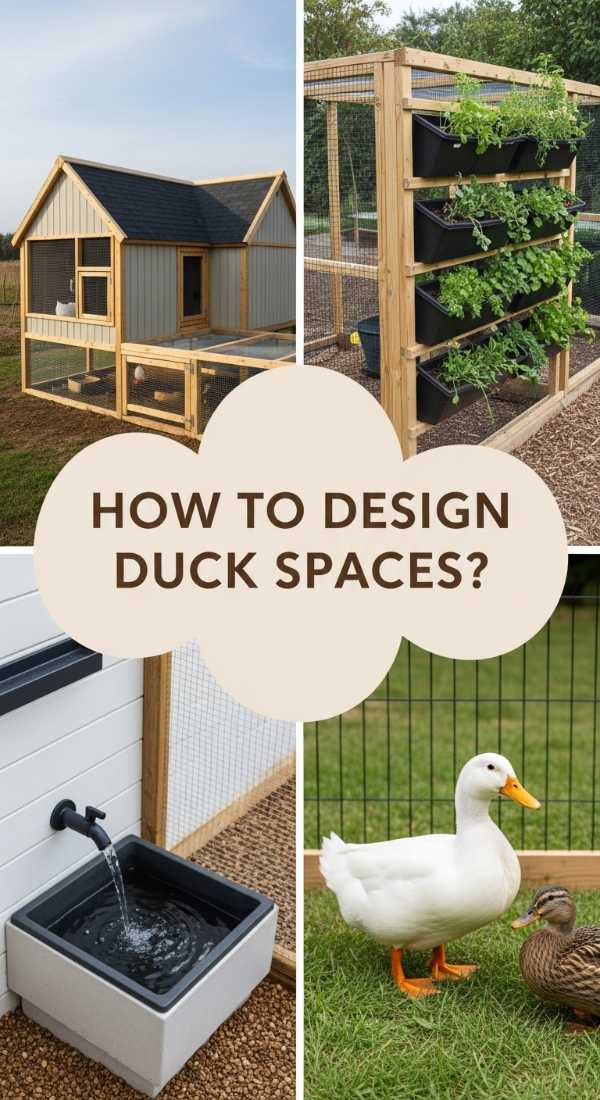
How to Construct DIY Duck Enclosure Ideas for a Happy Backyard Flock
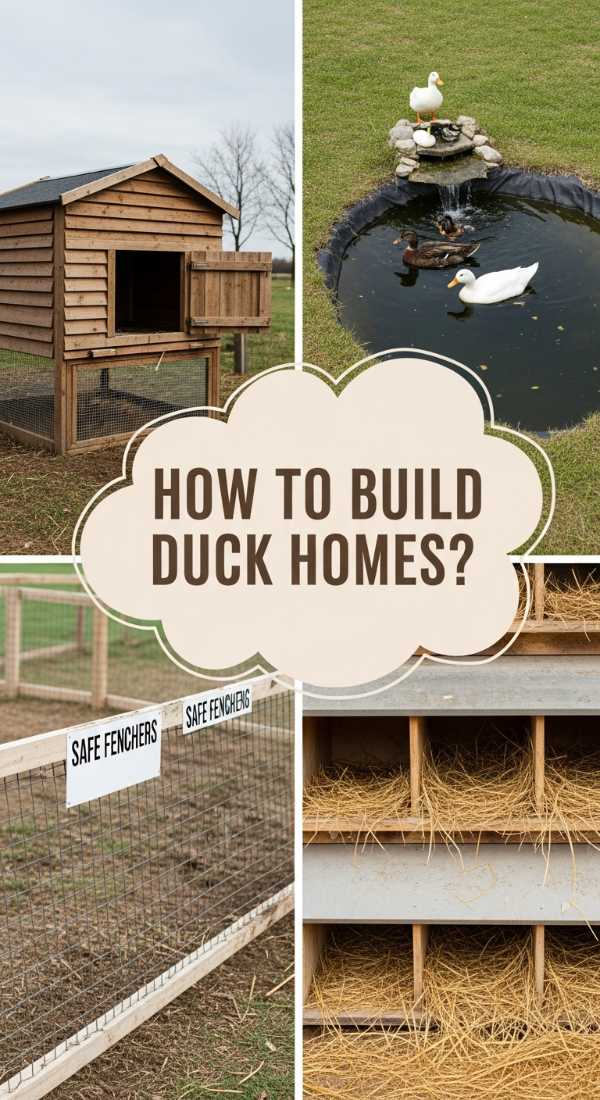
Why we love this
There is nothing quite like the whimsical, cheerful ‘quacks’ of a happy flock to turn a backyard into a homestead dream. The texture of soft straw, the splashing of water in a sunlit pond, and the sight of ducks waddling through the grass bring a lively, farmhouse aesthetic that is incredibly trendy right now. It’s a hobby that rewards you with fresh eggs and endless entertainment, all while adding a rustic, lived-in charm to your property.
Essential Elements:
- Pressure-treated lumber for the frame
- Hardware cloth (not chicken wire, for predator protection)
- Secure locking latches
- A predator-proof duck house or coop
- A shallow water feature or heavy-duty plastic tub
How to make it
- Choose a level spot with both sun and shade, ensuring the area has good drainage so the ducks don’t end up living in a mud pit.
- Build a sturdy wooden frame for the ‘run’ (the outdoor area), aiming for at least 10-15 square feet per duck to ensure they have room to forage.
- Attach 1/2-inch hardware cloth to the exterior using heavy-duty staples; bury the wire at least 12 inches into the ground or create a ‘skirt’ to prevent digging predators.
- Incorporate a secure, ventilated wooden house inside the enclosure where the ducks can sleep at night, featuring a ramp with ‘cleats’ for their flat feet.
- Install a large, easy-to-drain water basin; ducks need to submerge their heads to stay healthy, so a dedicated ‘pool’ area is vital for their happiness.
- Finish the space with a thick layer of pine shavings or straw in the house and pea gravel around the water area to manage moisture and keep the enclosure smelling fresh.
How to Select Low Maintenance Flower Bed Ideas for a Stress Free Yard
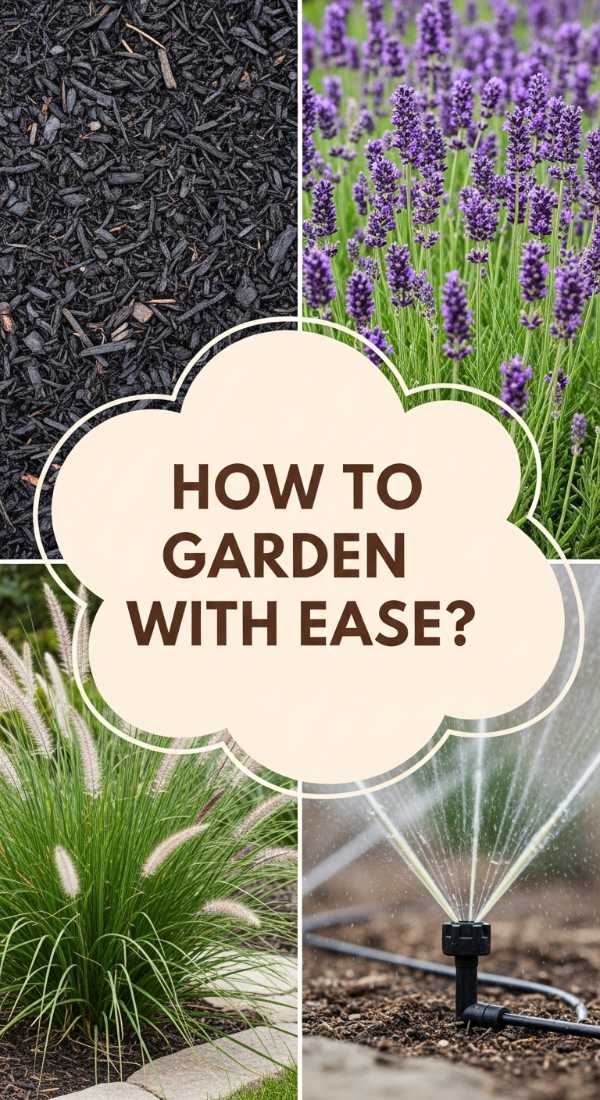
Why we love this
We are obsessed with the idea that a beautiful garden shouldn’t require a second full-time job. A low-maintenance bed focuses on resilient, ‘set it and forget it’ plants like Sedum, Coneflowers, and Hostas that return year after year with more vigor. There is a deep satisfaction in watching a garden thrive on its own, providing a lush green backdrop and pops of color without the need for constant deadheading or specialized care.
Essential Elements:
- Native plants (hardy to your specific zone)
- Drought-tolerant perennials
- Landscape fabric or heavy mulch layers
- Slow-release fertilizer spikes
- Drip irrigation kit (optional)
How to make it
- Research and select plants that are native to your region; these are biologically programmed to thrive in your soil and weather without extra help.
- Group plants by their water needs (hydro-zoning) so you aren’t overwatering one while underwatering another.
- Install a simple drip irrigation system on a timer to ensure consistent moisture without you having to drag a hose around every evening.
- Use a heavy-duty weed barrier or a double-layer of cardboard under your mulch to virtually eliminate weeding tasks for the first few seasons.
- Choose ‘self-cleaning’ varieties of flowers that don’t require manual deadheading to keep blooming throughout the summer.
- Focus on foliage-heavy plants like Heuchera or ornamental grasses that provide color through their leaves rather than fleeting flower petals.
How to Arrange Front Porch Flower Pots for a Seasonal Color Refresh

Why we love this
Changing your porch decor with the seasons is the ultimate way to keep your home feeling fresh and ‘in the moment.’ We love the transition from the cool, crisp pansies of spring to the warm, spicy burnt oranges of autumn mums and kale. It’s a rhythmic celebration of time passing, bringing a new scent—like the spicy aroma of marigolds—and a new vibe to your entryway every few months.
Essential Elements:
- Seasonal ‘star’ plants (Spring: Bulbs; Summer: Tropicals; Fall: Mums; Winter: Evergreens)
- Decorative accents (pumpkins, birch logs, or faux berries)
- Fresh potting soil top-off
- A variety of pot sizes for grouping
How to make it
- At the start of a new season, remove the ‘spent’ annuals from your pots but leave the evergreen perennials or grasses that still look healthy.
- Loosen the top 4 inches of soil and mix in a handful of fresh compost or potting mix to replenish nutrients used by the previous plants.
- Group your pots in ‘triads’ (odd numbers)—one tall, one medium, and one small—to create a visually pleasing, tiered effect on your porch.
- Incorporate non-living elements like tall curly willow branches in the winter or mini white pumpkins in the fall to add height and seasonal charm.
- Rotate your pots every week to ensure all sides of the plants receive equal sunlight, preventing them from becoming ‘lopsided’ or leggy.
- Switch out your doormat and add a coordinating wreath to tie the entire seasonal story together for a cohesive ‘viral’ look.
How to Combine Outdoor Fake Flower Pot Ideas for a Seamless Natural Look
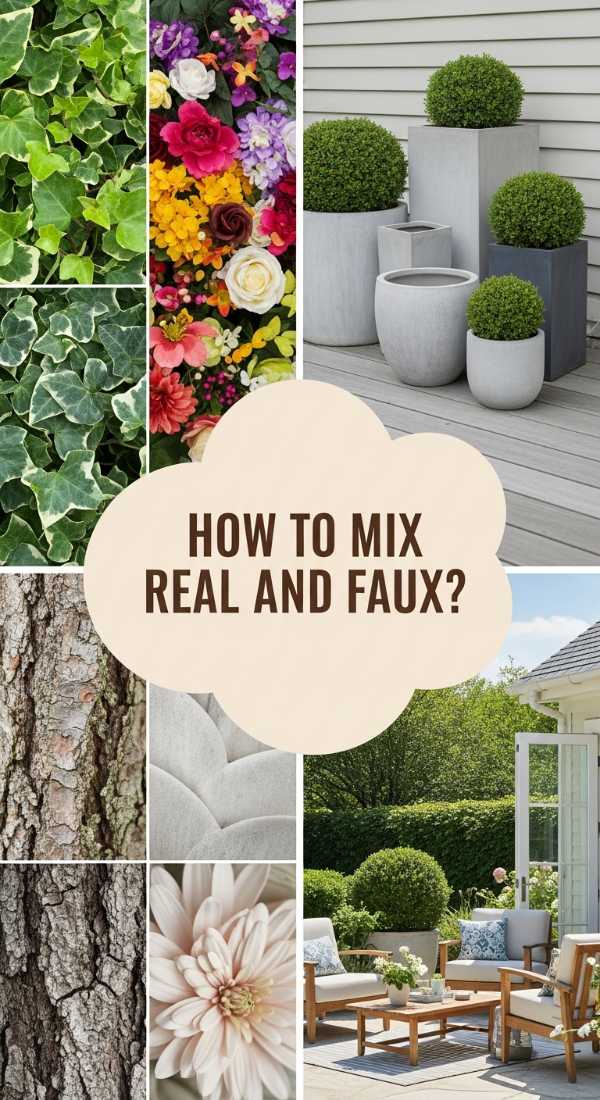
Why we love this
The secret the pros use for a ‘perfect’ garden is often the ‘muddled’ look—mixing real greenery with high-end faux florals. This hybrid approach gives you the organic movement and scent of real plants with the permanent, un-killable color of artificial stems. It’s about creating an illusion so perfect that your guests have to actually touch the petals to know if they’re real, giving you the best of both worlds.
Essential Elements:
- Real, hardy evergreen shrubs (like Boxwood or Juniper)
- High-quality faux flower ‘picks’
- Real soil or mulch for the surface
- Wire cutters and floral tape
How to make it
- Plant a real, low-maintenance evergreen shrub in the center of your pot to provide a living, breathing base and a natural scent.
- Tuck high-quality faux flower stems into the soil around the base of the real plant; ensure the faux stems are pushed deep enough to be stable.
- Use wire cutters to trim the faux stems so they sit at a height that looks like they are ‘growing’ out from under the real shrub’s foliage.
- Intertwine some of the faux leaves with the real branches to blur the line where the living plant ends and the artificial one begins.
- Top the pot with real damp mulch or even some dried pine needles to provide a consistent, natural texture across the entire surface.
- Mist the entire arrangement with water before guests arrive; the water droplets on the faux petals will make them look freshly bloomed and indistinguishable from the real ones.
How to Plant Flower Beds in Front of House for a Cottage Core Aesthetic
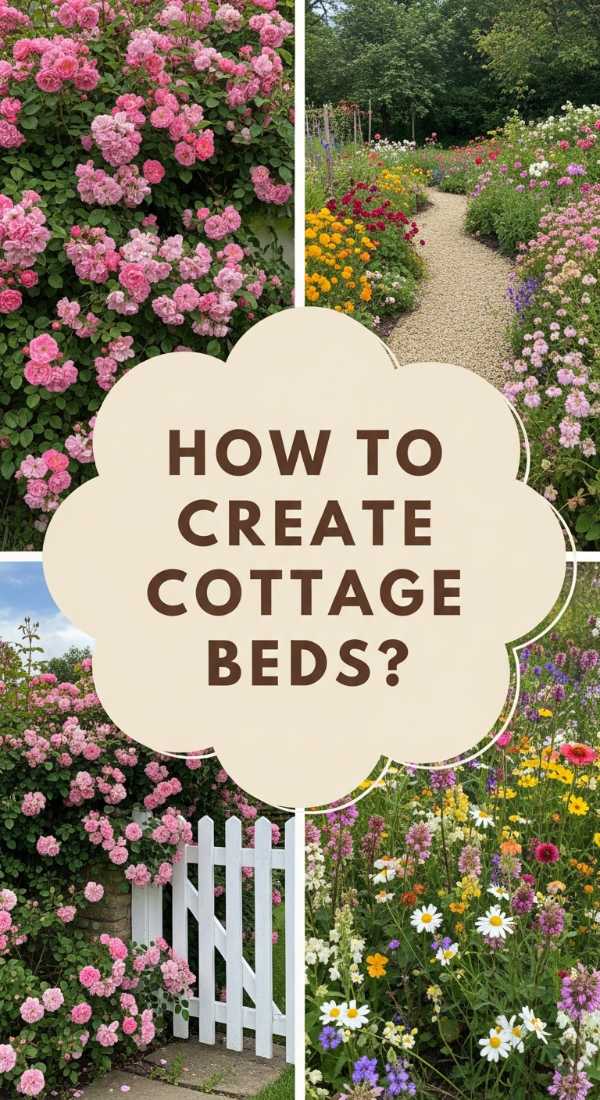
Why we love this
Cottage-core is all about ‘organized chaos’—the feeling of a romantic, rambling garden that has been there for decades. We love the soft, dreamy palette of lavenders, dusty roses, and sage greens, and the way the air smells of jasmine and old-fashioned roses. It’s a whimsical, nostalgic aesthetic that prioritizes ‘more is more,’ creating a dense tapestry of life that feels like it’s straight out of a storybook.
Essential Elements:
- Heirloom rose varieties
- Tall spiky flowers (Foxgloves, Delphiniums, or Hollyhocks)
- Fragrant herbs like Lavender and Thyme
- Rustic wooden or stone edging
- Self-seeding annuals
How to make it
- Ditch the neat rows and ‘soldiers in a line’ planting style; instead, plant in drifts and clusters of 3, 5, or 7 to mimic a meadow.
- Place tall, structural ‘spires’ like Foxgloves towards the middle and back to create that iconic vertical interest associated with English gardens.
- Allow plants to spill over the edges of your walkways; this softening of hard lines is the key to the ‘lived-in’ cottage feel.
- Incorporate edible elements like strawberries or herbs amongst the flowers to add a layer of practical charm and varied foliage texture.
- Plant climbing roses or clematis on a simple wooden trellis against the house to draw the eye upward and add a sense of romance.
- Leave some areas of the soil bare for self-seeding flowers like Nigella or Poppies to drop their seeds, ensuring the garden ‘evolves’ naturally next year.
How to Plan DIY Duck Enclosure Ideas for Small Backyard Spaces
Why we love this
You don’t need an acre to enjoy the ‘duck life’! A thoughtfully planned small-scale enclosure can be a stunning focal point in an urban backyard. We love the clever use of vertical space and the ‘zen garden’ feel of a compact, clean pond area. It’s about creating a miniature ecosystem that provides a peaceful, tactile experience—the sound of trickling water and the sight of happy birds—without overwhelming your patio space.
Essential Elements:
- Vertical ‘A-frame’ or lean-to style coop
- Stock tank or large pre-formed pond liner
- Easy-to-clean flooring (like removable rubber mats or pea gravel)
- Climbing vines for natural shade
- Solar-powered water pump
How to make it
- Utilize a corner of your yard or the space along a fence to build a ‘lean-to’ enclosure, which saves space by using the existing fence as one wall.
- Choose a stock tank or a large plastic ‘tuff tub’ for the water source; these are easier to drain and clean in tight spaces than a dug-out pond.
- Install a bulkhead drain and a simple ball valve on the bottom of the water tub, connected to a hose, so you can water your garden with the nutrient-rich ‘duck water’ easily.
- Opt for vertical nesting boxes inside the coop to keep the footprint small while still giving your ducks a cozy place to lay.
- Use ‘poultry netting’ or decorative lattice on the top of the run to keep ducks in and predators out, while allowing climbing plants like beans or jasmine to grow over it for shade.
- Focus on cleanliness by using a ‘deep litter’ method in the coop or easily hose-able surfaces, ensuring your small backyard remains a pleasant place for humans too.
Creating Your Outdoor Sanctuary
Transforming your garden is a journey, not a destination. Whether you start with a single styled pot on your porch or dive into building a haven for a new flock of ducks, the goal is to create a space that reflects your soul and invites you to slow down. Remember, the most viral-worthy gardens aren’t the ones that are perfect—they are the ones that are loved. Happy gardening!