

Have you ever spent hours scrolling through your feed, captivated by spaces that seem to breathe with a life of their own? There is a certain magic in a home that feels both curated and lived-in, a specific ‘vibe’ that stops the thumb and sparks a thousand ‘where did you get that?’ comments. We are living in an era where our homes have become our sanctuaries, our offices, and our main creative outlets, and the internet has noticed.
The secret isn’t necessarily about having a massive budget; it’s about leaning into specific aesthetics that resonate on a sensory level. Whether it’s the cool touch of a galvanized steel pool on a humid July afternoon or the seamless, spa-like serenity of oversized shower tiles, these trends are breaking the internet because they prioritize feeling over just ‘looking’ good. They invite us to slow down, take a deep breath, and appreciate the textures and colors that make up our daily lives.
How to Install a Poly Stock Tank Pool for Refreshing Summer Days
Why we love this
There is something undeniably nostalgic and rugged about a stock tank pool. Imagine the sensation of cool, crystal-clear water against your skin while the sun beats down on a Saturday afternoon. The galvanized steel glimmers in the light, offering a refreshing industrial-chic aesthetic that feels far more grounded and intentional than a standard blue plastic pool. It’s about the sound of a gentle splash against the metal walls and the earthy scent of the garden surrounding your DIY oasis.
Essential Elements:
- 8-foot or 10-foot galvanized poly stock tank
- Above-ground pool pump and filter system
- Through-wall plunger valves and suction outlets
- Leveling sand or crushed stone base
- Hole saw with a metal-cutting blade
- Marine-grade silicone sealant
How to make it
- Level the ground perfectly by excavating a circular area slightly larger than your tank. Use a long 2×4 board and a level to ensure the dirt is flat. Add a two-inch layer of leveling sand, tamping it down firmly to create a soft, even bed that won’t puncture the tank.
- Position the tank onto the sand. Use a hole saw (typically 2-3/4 inches, but check your pump fittings) to cut two holes in the side of the tank—one for the water intake (lower) and one for the return (higher). Wear eye protection as metal shards will fly.
- Install the plunger valves and gaskets through the holes. Apply a generous bead of marine-grade silicone around the fittings on both the inside and outside of the tank to ensure a watertight seal. Let this cure for at least 24 hours.
- Connect the pool hoses from the tank valves to the filter pump. Ensure the ‘in’ on the pump connects to the lower hole and the ‘out’ connects to the upper hole. Tighten all clamps securely using a screwdriver.
- Fill the tank slowly with a garden hose, checking for leaks at the fittings as the water level rises. Once full, prime your pump according to the manufacturer’s instructions and turn it on to begin circulation.
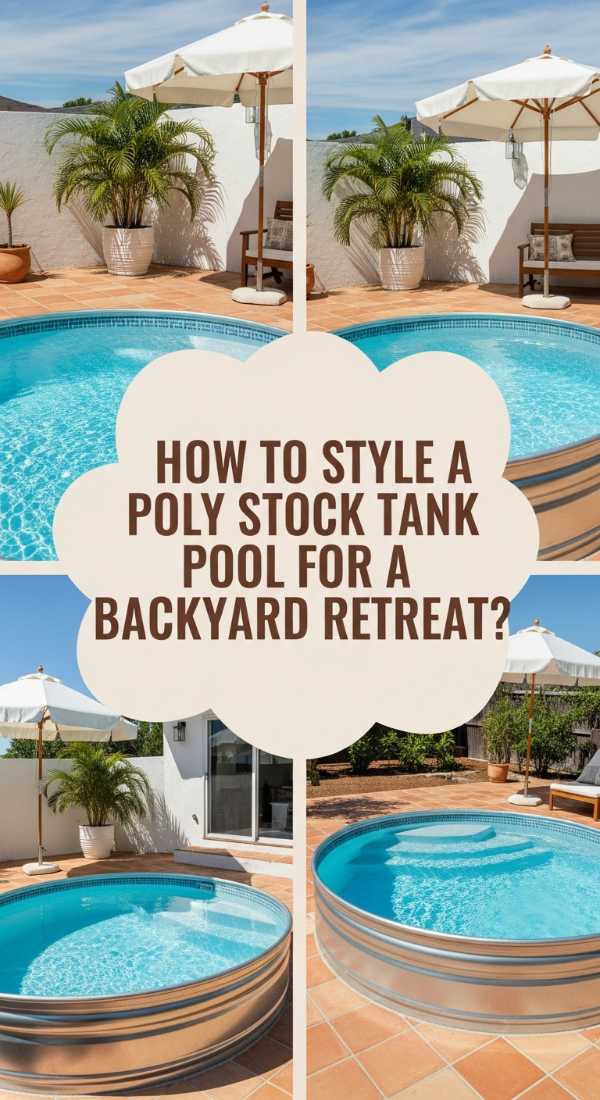
How to Style a Poly Stock Tank Pool for a Backyard Retreat
Why we love this
Styling your stock tank is where the ‘viral’ magic truly happens. It turns a piece of farm equipment into a high-end resort feature. Picture soft, oversized Turkish towels draped over the rim, the ambient glow of Edison bulbs reflecting off the water’s surface at dusk, and the lush green of potted ferns framing the metal. The aesthetic is a perfect blend of hard and soft, creating a sanctuary that feels like a hidden Mediterranean courtyard right in your suburban backyard.
Essential Elements:
- Weather-resistant outdoor rug
- Surrounding pea gravel or cedar mulch
- Large terracotta or ceramic planters with tropical foliage
- String lights or solar-powered lanterns
- A small wooden deck or step stool for easy entry
How to make it
- Create a defined zone around the pool by laying down landscape fabric and covering it with three inches of pea gravel. This provides excellent drainage for splashes and prevents a muddy perimeter while adding a satisfying crunch underfoot.
- Build or buy a simple wooden step or a small ‘half-deck’ that hugs the curve of the tank. Use cedar or pressure-treated wood to withstand moisture. This provides a place to sit with your feet in the water without fully submerging.
- Layer your lighting. String heavy-duty bistro lights above the pool area, ensuring they are high enough to be safe. Place solar lanterns at the base of the tank to highlight the metal texture at night.
- Incorporate greenery by grouping planters of varying heights. Use tall grasses for privacy and broad-leafed plants like Cannas or Elephant Ears to create a lush, tropical canopy effect.
- Accessorize with high-quality textiles. Choose a color palette—like navy and white or terracotta and cream—and stick to it for your towels, pillows, and umbrellas to create a cohesive, professional look.
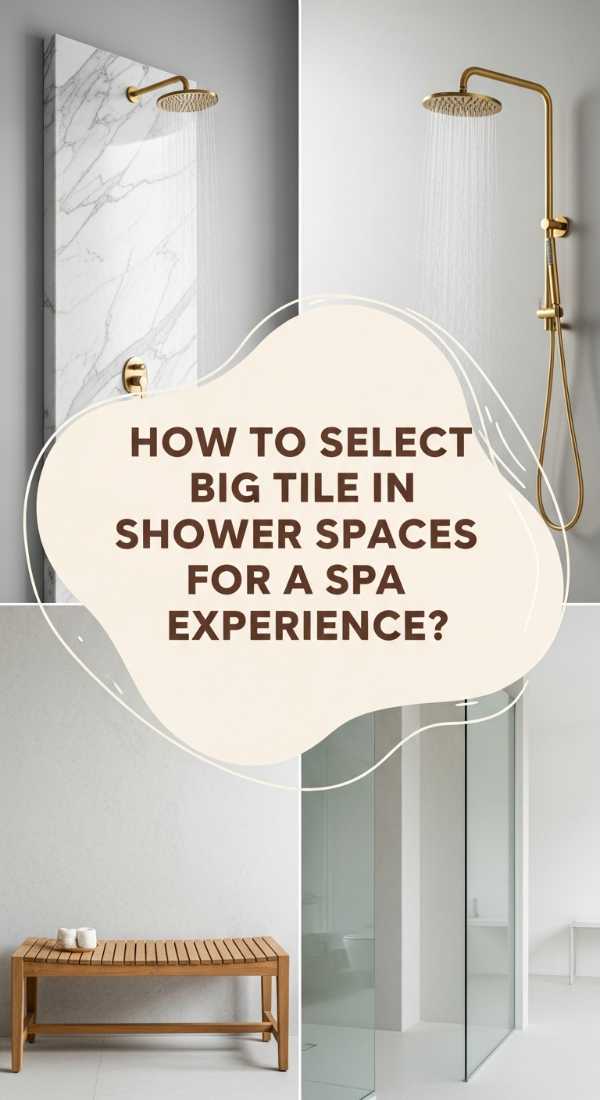
How to Select Big Tile in Shower Spaces for a Spa Experience
Why we love this
Walking into a shower clad in large-format tiles feels like entering an upscale boutique hotel. The lack of grout lines creates a seamless, expansive visual that calms the mind instantly. You can feel the smooth, cool surface of porcelain or stone under your fingertips, smelling the faint aroma of eucalyptus steam as it rises against the monolithic walls. It’s a minimalist’s dream that maximizes the sense of space and luxury through sheer scale and texture.
Essential Elements:
- Large-format tiles (at least 12×24 inches, ideally 24×48)
- Proper PEI rating (Class 3 or higher for durability)
- Slip-resistance rating (R10 or higher for floors)
- Coordinated grout color (to minimize visual breaks)
- Schluter strips or edge trims for a clean finish
How to make it
- Assess your space dimensions. Large tiles work best when you can avoid tiny ‘slivers’ at the edges. Measure the wall and calculate the tile layout to ensure the focal point (usually the back wall) has centered, full-sized tiles.
- Check the tile ‘rectification.’ Only buy rectified tiles for a big-tile look; these have perfectly straight, 90-degree edges that allow for the thinnest possible grout lines (1/16th of an inch), which is crucial for the spa aesthetic.
- Verify the moisture absorption rate. For showers, you need porcelain tiles with an absorption rate of less than 0.5%. This ensures the tile won’t hold onto water or harbor mold over time.
- Coordinate your finishes. Select a grout that is an exact match to the tile’s primary color. If you have a marble-look tile, pick a grout that matches the ‘background’ white rather than the grey veining to keep the surface looking like a solid slab.
- Perform a ‘dry lay.’ Before any thin-set touches the wall, lay your tiles out on the floor in the exact pattern you intend to use. This allows you to see how the patterns or veins flow together and make adjustments for the best visual impact.
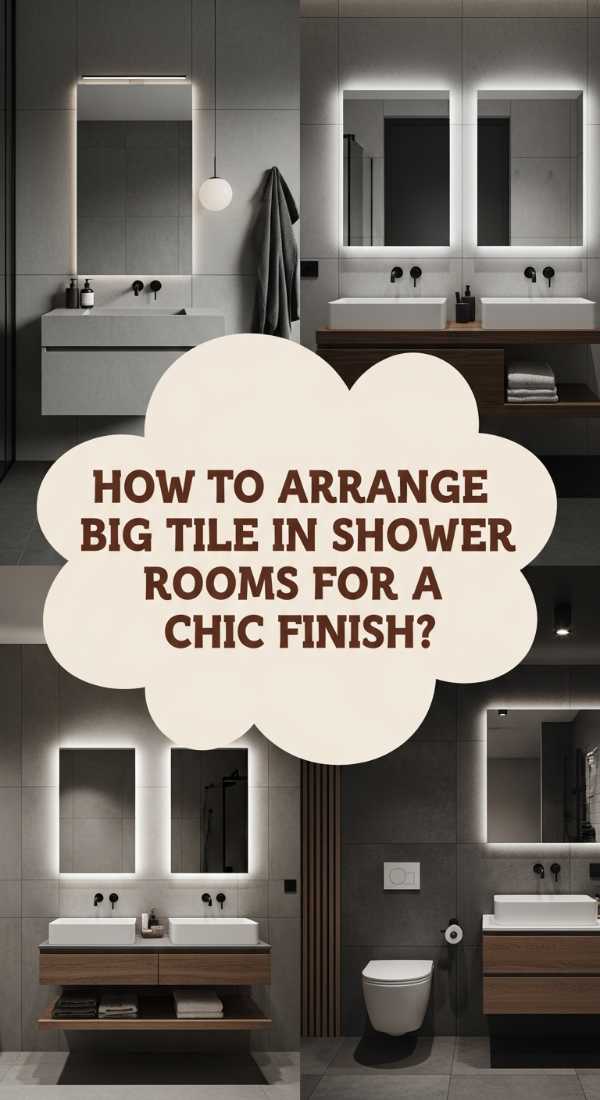
How to Arrange Big Tile in Shower Rooms for a Chic Finish
Why we love this
The arrangement of large-format tiles is an art form that dictates the flow of the entire bathroom. When stacked vertically, they draw the eye upward, making the ceiling feel impossibly high and the space airy. When laid in a classic brick or horizontal stack, they offer a grounded, architectural stability. The way light catches the subtle ripples in a large tile surface creates a dance of shadows and highlights that you just don’t get with small mosaics.
Essential Elements:
- Tile leveling system (clips and wedges)
- Large-format thin-set mortar (high-bond strength)
- 1/2 inch notched trowel
- Diamond blade wet saw
- Suction cup tile lifters
How to make it
- Prep your substrate perfectly. Because big tiles have zero flexibility, the wall behind them must be flatter than flat. Use a long straightedge to identify high or low spots and use a feathering compound to smooth them out before starting.
- Apply mortar using the ‘back-buttering’ technique. Spread a layer of thin-set on the wall with the notched trowel, and then spread a thin, flat layer on the back of the tile itself. This ensures 100% coverage, which is vital to prevent the heavy tile from cracking or falling.
- Use a tile leveling system. Insert clips under the edges of each tile as you set them. Once the adjacent tile is placed, insert the wedge and tighten. This ‘locks’ the tiles into the same plane, eliminating ‘lippage’ (where one tile edge is higher than another).
- Decide on your orientation. For a modern ‘chic’ look, use a ‘stacked bond’ where tiles are aligned perfectly in both directions. For a more traditional but still upscale look, use a 1/3 offset pattern. Avoid a 50/50 brick lay with large tiles as they often have a slight ‘bow’ in the center.
- Handle with care using suction cups. Large tiles are heavy and awkward. Using double-cup suction lifters allows you to place the tile precisely without pinching your fingers or disturbing the mortar bed, ensuring a professional, clean result.
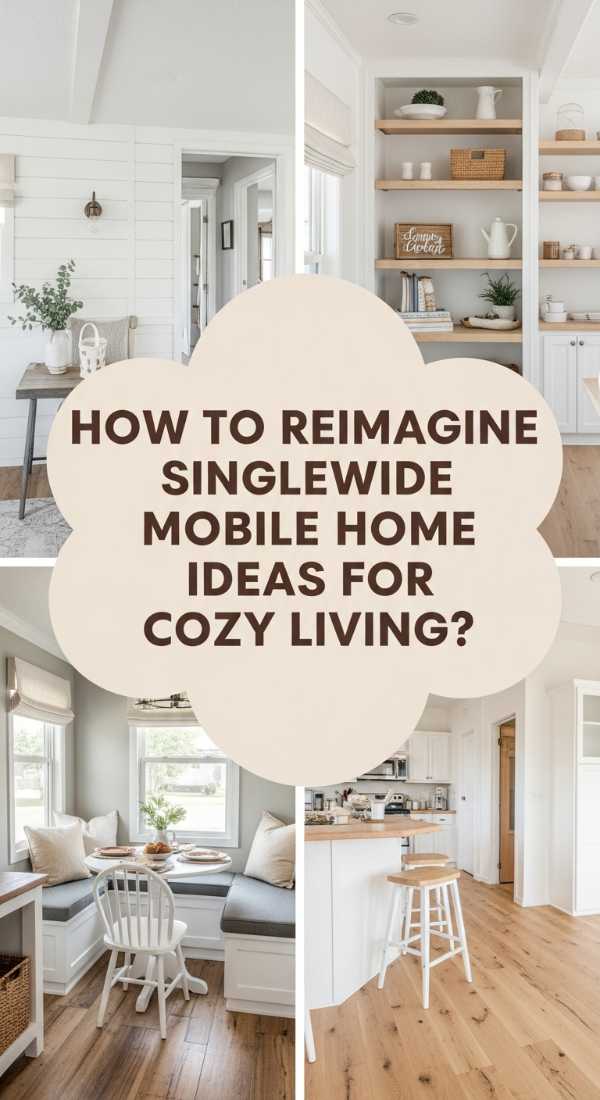
How to Reimagine Singlewide Mobile Home Ideas for Cozy Living
Why we love this
There is a unique, cozy intimacy found in a well-imagined singlewide. It’s about the clever use of every square inch, turning a narrow layout into a series of warm, connected vignettes. Think of the smell of fresh coffee in a sun-drenched breakfast nook and the soft touch of velvet curtains that divide a sleeping area. This aesthetic celebrates the ‘small living’ movement by proving that style isn’t about footprint, but about the thoughtfulness of the details and the warmth of the materials used.
Essential Elements:
- Lighter-colored luxury vinyl plank (LVP) flooring
- Custom built-in storage or shelving
- Updated interior doors and modern hardware
- Light-filtering window treatments
- Recessed or flush-mount LED lighting
How to make it
- Open up the visual plane by removing non-load-bearing walls or oversized cabinets that block line-of-sight from the kitchen to the living room. Consult a structural diagram of your specific model first to ensure you aren’t removing a support.
- Install continuous flooring throughout the entire home. Using the same LVP in every room removes visual ‘stops’ and makes the entire singlewide feel like one large, cohesive suite rather than a series of cramped boxes.
- Upgrade the ‘bones’ by replacing thin, standard mobile home trim with wider, modern baseboards and window casings. This simple change instantly makes the space feel like a traditional stick-built home.
- Maximize vertical space with built-ins. Instead of bulky furniture, build shelves that go from floor to ceiling. This draws the eye upward and provides storage without eating into the limited floor space.
- Focus on the ceiling. Mobile homes often have paneled ceilings with strips. Remove the strips, tape the seams, and apply a subtle texture or a fresh coat of high-reflectivity white paint to brighten the entire interior.
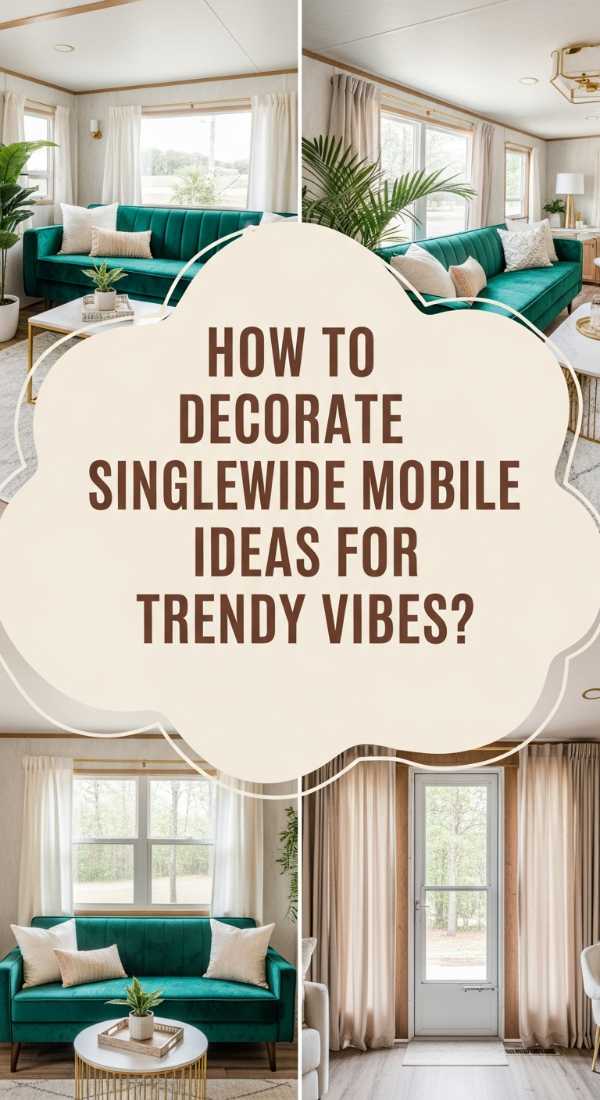
How to Decorate Singlewide Mobile Home Ideas for Trendy Vibes

Why we love this
The trendy singlewide is all about the ‘New Boho’ or ‘Modern Farmhouse’ look—spaces that feel bright, airy, and full of personality. We love the contrast of matte black hardware against crisp white walls and the way a strategically placed gallery wall can make a narrow hallway feel like a curated art experience. It’s about creating a home that feels curated over time, filled with textures like woven seagrass, soft linens, and the vibrant green of indoor plants that bring life to every corner.
Essential Elements:
- Peel-and-stick backsplash in bold patterns
- Matte black or brass faucet and cabinet pulls
- Large-scale mirrors to reflect light
- Indoor plants (Snake plants, Pothos, or Fiddle Leaf Figs)
- Area rugs to define different ‘zones’
How to make it
- Paint everything a warm, creamy white (like Alabaster or Swiss Coffee). Mobile home walls are often vinyl-coated; use a high-quality bonding primer (like Zinsser B-I-N) first to ensure the paint sticks and provides a smooth, professional finish.
- Swap out all standard lighting fixtures. Replace the ‘boob lights’ with modern pendants in the kitchen and a statement chandelier in the living area. This is the fastest way to signal a high-end, trendy aesthetic.
- Use ‘zone’ decorating. Since singlewides are linear, use different area rugs to define the living room, the dining area, and the entry. This creates the illusion of separate ‘rooms’ within an open floor plan.
- Introduce ‘weighty’ textures. Because the walls in mobile homes are thin, use heavy, high-quality linen curtains hung high and wide to add a sense of luxury and substance to the windows.
- Create a focal point. In the absence of a fireplace, create a ‘media wall’ with shiplap or dark paint and a floating wooden mantel. This gives the living room a heart and a sense of architectural permanence.
How to Create Vendor Booth Ideas for Instant Brand Recognition

Why we love this
A successful vendor booth is a sensory experience that tells a story the moment a customer glimpses it from across the aisle. It’s the soft glow of well-placed spotlights hitting handmade ceramics, the subtle scent of a signature candle, and a color palette that feels intentional and inviting. We love the clever use of height and texture—like a reclaimed wood backdrop or a velvet-draped table—that turns a 10×10 square into a fully realized world where the brand’s soul is on full display.
Essential Elements:
- Consistent brand color palette
- Professional, high-resolution signage
- Varying levels of display (risers, crates, shelves)
- Brand-appropriate lighting (warm LEDs or spotlights)
- Branded tablecloth or floor covering
How to make it
- Define your ‘Hero’ area. Every booth needs one focal point that stops traffic. This should be your best-selling or most visually striking product, placed at eye level and highlighted with its own dedicated light source.
- Use the ‘Rule of Three’ for heights. Never lay products flat on a table. Use risers, wooden crates, or acrylic stands to create three distinct levels of display. This keeps the eye moving and makes the booth feel full and professional.
- Invest in a custom vinyl or fabric banner that features your logo in a clear, legible font. Avoid ‘busy’ backgrounds; a clean, high-contrast sign is much more effective for brand recognition from a distance.
- Incorporate ‘living’ elements. Even a small vase of fresh flowers or a single potted plant can make a booth feel more approachable and ‘human,’ which is key for building trust with new customers.
- Keep your ‘business’ hidden. Use a full-length tablecloth that reaches the floor to hide your extra stock, lunch, and personal items. A cluttered booth distracts from the brand, so keep the surface area strictly for display.
How to Plan Vendor Booth Ideas for a Memorable Shopping Experience

Why we love this
Memorable shopping is about the ‘flow’ and the ‘find.’ We love a booth that guides the customer on a journey, making them feel comfortable enough to linger and explore. Think of the tactile satisfaction of picking up a heavy, linen-wrapped journal or the ease of a clearly marked price tag. It’s the difference between a cluttered stall and a curated mini-boutique where every item feels like a treasure waiting to be discovered, leaving the customer with a lasting impression of the brand’s quality.
Essential Elements:
- Clear, easy-to-read pricing labels
- Interactive elements (samples, testers, or demos)
- An obvious and easy payment station
- Takeaway materials (business cards or postcards)
- A ‘threshold’ rug or entry point
How to make it
- Map the customer path. Place your most inviting items on the outside edge to draw people in, then position your higher-ticket items further back to encourage them to enter the booth space. Keep the center clear to avoid crowding.
- Design an ‘Engagement Station.’ If you sell skincare, have a tester area with mirrors and wipes. If you sell art, have a ‘flip-bin’ of prints. Allowing customers to touch and interact with products significantly increases the likelihood of a sale.
- Streamline the checkout process. Have a dedicated spot for your POS system (like Square) with a sign that says ‘Pay Here.’ This reduces the ‘awkwardness’ of the transaction and makes the experience feel professional.
- Use ‘Lifestyle’ grouping. Instead of grouping by product type, group by ‘vibe.’ Place a candle next to a book and a cozy throw. This helps customers visualize how the items fit into their own homes, increasing the chance of a multi-item purchase.
- Prepare a ‘Thank You’ kit. Have your bags, tissue paper, and business cards pre-staged. A beautifully packaged item makes the shopping experience feel like receiving a gift, which is what makes a customer remember your brand and return later.
How to Design Casas Estilo Rancho for a Rustic Dream
![]()
Why we love this
The ‘Casas Estilo Rancho’ aesthetic is a love letter to the earth and the sun. It’s the feeling of cool terracotta tiles under bare feet on a scorching afternoon, the smell of sun-baked cedar beams, and the sprawling, open-concept layout that invites the outdoors in. We love the rugged honesty of the materials—wrought iron, rough-hewn stone, and heavy wooden doors—that age beautifully and tell a story of a life lived in harmony with the landscape.
Essential Elements:
- Terracotta or saltillo tile flooring
- Exposed wooden ceiling beams (vigas)
- Wrought iron light fixtures and hardware
- Open floor plan with large windows or French doors
- Plaster or ‘stucco’ look interior walls
How to make it
- Prioritize natural materials. When choosing finishes, opt for ‘living’ materials that will develop a patina over time. Choose real wood over laminate and stone over plastic. The ‘Rustic Dream’ relies on the authenticity of the textures.
- Incorporate architectural ‘weight.’ If your home doesn’t have them, add decorative faux wood beams to the ceiling. Ensure they are sized correctly for the room—too thin and they look fake; too thick and they overwhelm the space.
- Focus on the hearth. In a ranch-style home, the fireplace is the soul. Use stacked stone or a simple white plaster finish for the surround, extending it to the ceiling to emphasize the height and create a grand focal point.
- Select a ‘dusty’ color palette. Look to the desert for inspiration: sage greens, muted ochres, dusty roses, and deep browns. These colors ground the home and make the transition between the house and the garden feel seamless.
- Maximize natural light. Ranch homes are known for their connection to the land. Install large, black-framed windows or sliding glass doors that lead to a patio. This ‘erases’ the boundary between the interior and the landscape.
How to Transform Casas Estilo Rancho for a Sophisticated Look
[IMAGE_10]
Why we love this
The sophisticated ranch takes the rustic bones and elevates them with a layer of modern luxury. It’s the juxtaposition of a rugged stone wall against a sleek, Italian leather sofa, or the way a minimalist brass chandelier hangs from an old-world wooden ceiling. We love this look because it feels established and ‘moneyed’ without being stuffy. It’s a space where high-end design meets the relaxed, effortless comfort of the country, creating a vibe that is both timeless and incredibly ‘of the moment.’
Essential Elements:
- High-end, neutral upholstery (linen, velvet, leather)
- Modern, sculptural lighting fixtures
- Minimalist art in oversized frames
- Polished concrete or dark-stained hardwood floors
- Clean-lined furniture with organic shapes
How to make it
- Simplify the palette. To move from ‘rustic’ to ‘sophisticated,’ stick to a monochromatic or tonal color scheme. Use varying shades of charcoal, cream, and sand to create depth without visual ‘clutter.’
- Contrast textures. Pair the rough textures of the ranch (stone, wood) with smooth, refined ones. Place a glass coffee table in front of a stone fireplace or hang silk drapes against a plaster wall to create a high-design tension.
- Edit your decor. The sophisticated look is about quality over quantity. Remove small ‘knick-knacks’ and replace them with one or two large-scale statement pieces, like a single large sculpture or a massive, floor-to-ceiling piece of abstract art.
- Upgrade your kitchen and bath hardware. Use sleek, modern silhouettes in a consistent finish throughout the house. A modern, high-arc faucet in a matte black finish can instantly modernize a rustic ranch kitchen.
- Introduce ‘low-profile’ furniture. To keep the ranch feeling open and airy, choose sofas and chairs that sit lower to the ground. This preserves the sightlines and emphasizes the sprawling nature of the ranch architecture.
Conclusion
Creating a space that ‘breaks the internet’ isn’t about following every passing fad; it’s about finding the intersection of functionality and deep, sensory beauty. Whether you’re splashing in a stock tank pool or walking through a reimagined singlewide, the common thread is a commitment to an aesthetic that makes you feel something. When we design with intention, texture, and light, we don’t just create a viral image—we create a sanctuary that truly feels like home. So, take that leap, pick up that paintbrush, or install that oversized tile; your dream space is just one DIY away.