
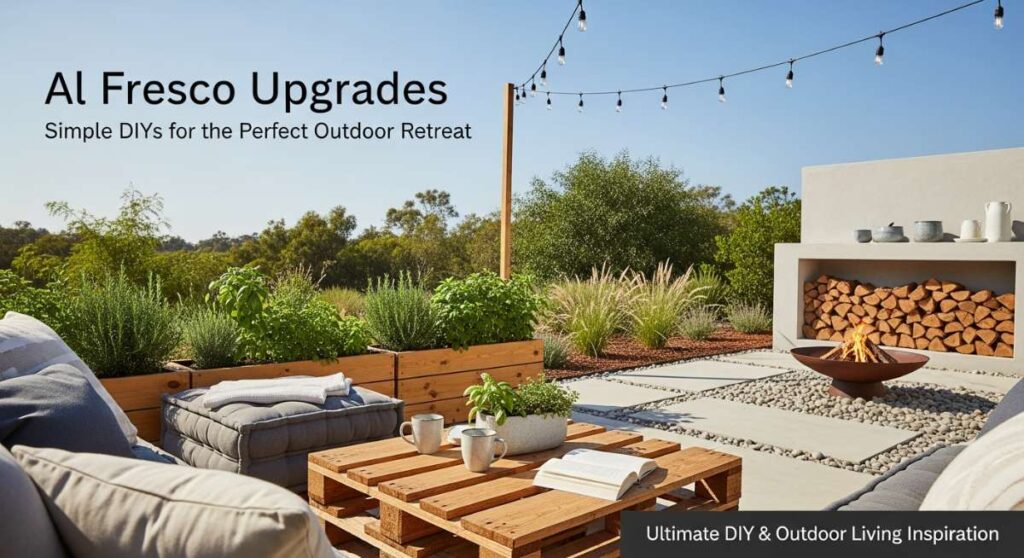
Al Fresco Upgrades: Simple DIYs for the Perfect Outdoor Retreat
There is a specific kind of magic that happens when the sun begins to dip below the horizon, casting a golden, honey-colored glow over your backyard. It is that moment when the air turns crisp, the crickets begin their evening symphony, and you realize that your outdoor space is so much more than just a patch of grass—it is an extension of your soul. We have all scrolled through those breathtaking Pinterest boards, dreaming of a sanctuary that feels like a permanent vacation, but often, the gap between inspiration and reality feels like a mountain we aren’t quite ready to climb.
The truth is, creating a dreamy retreat doesn’t require a professional landscape crew or a bottomless bank account; it requires a bit of vision, some dirt under your fingernails, and the willingness to DIY your way to happiness. Whether you are looking to boost your curb appeal or create a secluded nook for midnight stargazing, these projects are designed to bridge that gap. We are diving deep into the art of intentional living, from the way we organize our creative spaces to the way we build havens for our feathered friends. Let’s roll up our sleeves and transform the ordinary into the extraordinary.
How to Design Flower Beds in Front of House for Instant Curb Appeal
Why we love this
There is nothing quite like the sensory explosion of a well-designed flower bed to welcome you home after a long day. Imagine the sweet, intoxicating scent of lavender wafting through the air, mingled with the earthy aroma of fresh cedar mulch and the vibrant visual rhythm of perennial blooms swaying in the breeze. A thoughtfully curated front garden adds a layer of soft texture to the hard lines of your home’s architecture, creating a living tapestry that changes with the seasons and makes your heart swell every time you pull into the driveway.
Essential Elements:
- Layered perennials (various heights)
- Premium cedar or hemlock mulch
- Defined edging (brick, stone, or plastic)
- Soil conditioner and organic compost
- A mix of evergreen shrubs for winter structure
- Native flowering plants for local pollinators
How to make it
- Begin by outlining your bed shape using a garden hose to create natural, flowing curves rather than rigid straight lines; this mimics the organic beauty of nature.
- Remove the existing grass using a flat-head spade, cutting beneath the root level to ensure no regrowth, and then turn the soil to a depth of at least 8 inches to ensure proper aeration.
- Incorporate a 3-inch layer of organic compost and soil conditioner, mixing it thoroughly with your native soil to create a nutrient-rich environment that feels soft and loamy to the touch.
- Place your taller plants at the back or center, medium-height plants in the middle, and low-growing groundcovers at the front, keeping them in their pots first to visualize the spacing and color transitions.
- Dig holes twice as wide as the root ball of each plant, gently tease the roots if they are pot-bound, and set them into the earth so the top of the root ball is level with the soil surface.
- Water each plant deeply at the base until the soil is saturated, then apply a 2-to-3-inch layer of mulch, being careful not to let the mulch touch the actual stems or trunks of the plants to prevent rot.
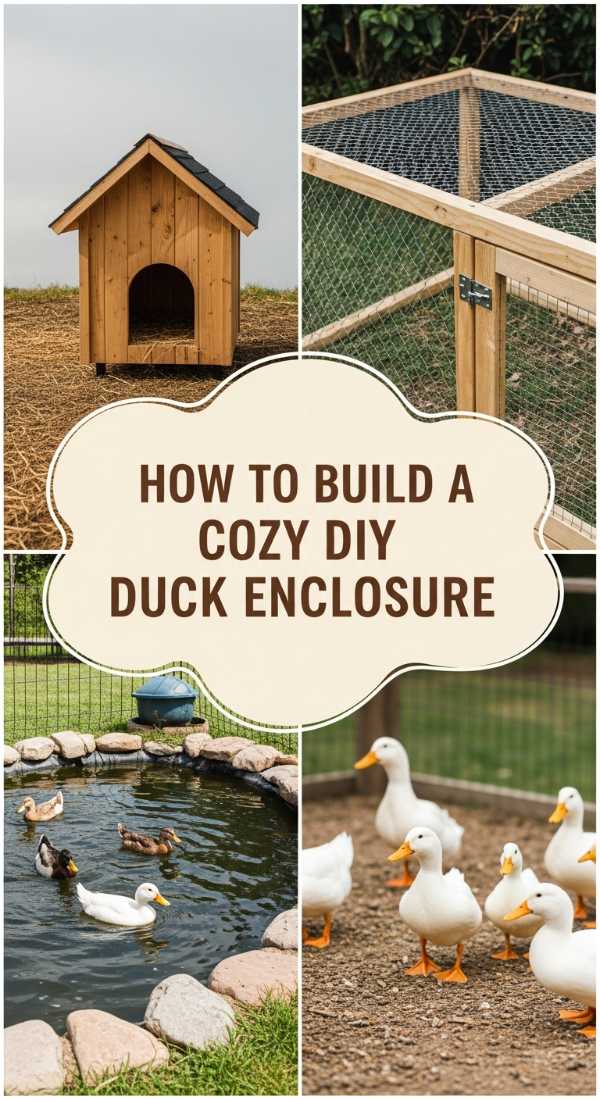
How to Build a DIY Duck Enclosure for Happy Backyard Pets

Why we love this
Ducks bring a whimsical, quirky energy to any backyard, with their soft, rhythmic quacking and the charming way they waddle through the grass. A dedicated enclosure provides these delightful creatures with a safe haven that protects them from predators while giving them the space to express their natural behaviors. We love the contrast of sturdy wood frames against the soft, feathery texture of the ducks, and the peaceful feeling of knowing your feathered friends are tucked in for the night in a space built specifically for their comfort and joy.
Essential Elements:
- Pressure-treated lumber for the frame
- Hardware cloth (not chicken wire) for predator protection
- Corrugated roofing panels
- Clean straw or wood shavings for bedding
- A shallow pool or water feature for splashing
- Secure latching mechanisms
How to make it
- Start by leveling the ground where the enclosure will sit, ensuring there is a slight slope for drainage so the area doesn’t become a muddy bog during rainy seasons.
- Construct a sturdy rectangular frame using 4×4 posts for the corners and 2×4 beams for the walls, ensuring the structure is at least 4 feet tall to allow for easy cleaning access.
- Wrap the entire exterior in 1/2-inch hardware cloth, burying the mesh at least 12 inches into the ground or creating a “skirt” around the perimeter to deter digging predators like foxes or raccoons.
- Install a sloped roof using corrugated panels, ensuring a slight overhang to direct rainwater away from the entrance and keeping the interior dry and cozy.
- Build a sturdy wooden door with a heavy-duty sliding bolt latch, and add a smaller “duck door” with a ramp that leads into the secure run area.
- Layer the floor with 4-6 inches of clean straw, which provides a soft, insulating texture, and place their water basin in a corner where it can be easily emptied and refilled daily.
How to Create a Dreamy Hot Tub Area for Ultimate Backyard Relaxation
Why we love this
There is a profound sense of serenity that comes from submerging yourself in swirling, warm water while the steam rises to meet the cool night air. A well-styled hot tub area transforms a simple utility into a luxury spa experience, where the scent of cedar and the soft glow of string lights create an atmosphere of pure tranquility. It’s the ultimate retreat for the senses—the contrast of the hot water against the skin and the visual peace of a secluded corner make it the perfect place to wash away the stresses of the modern world.
Essential Elements:
- Privacy screens (lattice or greenery)
- Nonslip outdoor rug
- String lights or solar lanterns
- Side table for drinks and towels
- Potted plants like ferns or bamboo
- A stable, level concrete or gravel pad
How to make it
- Select a location that offers both privacy and a clear path from the house, ensuring the ground is perfectly level and capable of supporting the immense weight of a filled tub (roughly 100 lbs per square foot).
- Install a privacy perimeter using tall wooden slats or a row of fast-growing evergreens to create a secluded “room” feel that blocks the wind and prying eyes.
- Roll out an outdoor rug made of woven polypropylene; this provides a soft, slip-resistant texture for bare feet and adds a pop of color to the functional space.
- Position a weather-resistant side table within arm’s reach of the tub to hold eucalyptus-scented towels and refreshments, keeping the relaxation uninterrupted.
- String warm-toned LED lights overhead, draping them loosely to mimic the stars, and add a few solar-powered spotlights to illuminate the path for safety.
- Incorporate oversized planters filled with lush greenery to soften the edges of the tub and provide a natural, jungle-like aesthetic that enhances the feeling of escape.
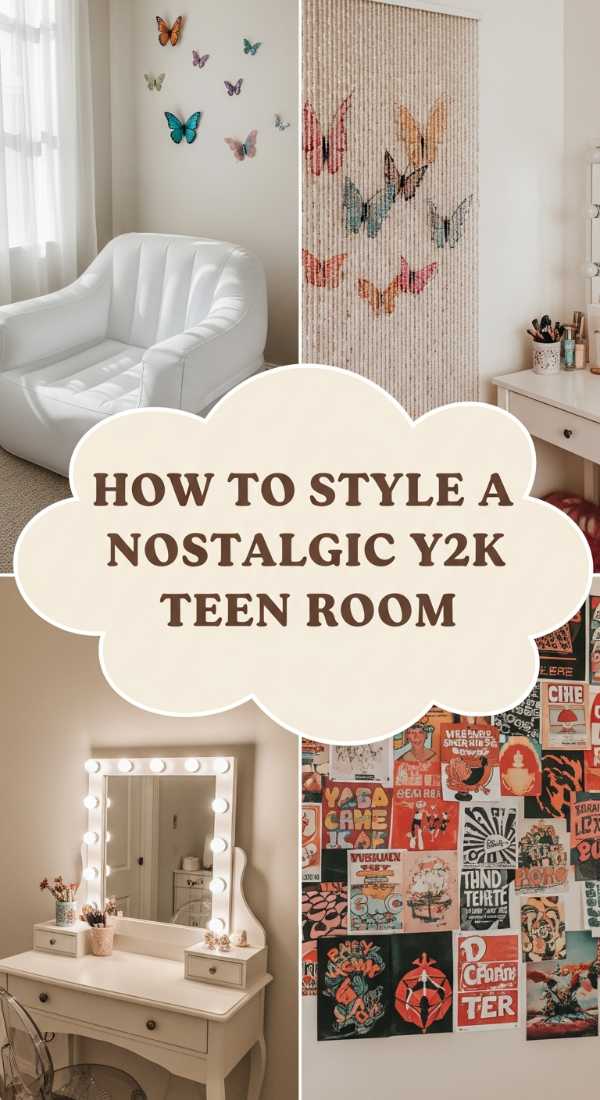
How to Style a Nostalgic Teen Room for a Total Y2K Vibe

Why we love this
Stepping into a Y2K-inspired room is like a joyful time machine back to an era of glitter, bold colors, and unapologetic self-expression. We love the tactile play of textures—from the squishy velvet of a butterfly chair to the shimmering shine of a disco ball reflecting light across neon-colored walls. It’s a space that feels electric and energetic, filled with the nostalgic scents of fruit-flavored lip gloss and the visual rhythm of checkered patterns and beaded curtains that dance whenever you walk through the door.
Essential Elements:
- Inflatable furniture or bean bags
- Lava lamps and neon signs
- Checkered or floral patterns
- Butterfly clips and wall decals
- Beaded door curtains
- Fuzzy textures (rugs or pillows)
- Poster collage wall
How to make it
- Start with a base color palette of lime green, hot pink, or baby blue, applying a fresh coat of satin-finish paint to create a vibrant backdrop that pops against the decor.
- Create a focal point by arranging a dense collage of magazine cutouts and retro posters on one wall, using double-sided tape to keep the aesthetic clean and organized.
- Introduce iconic Y2K furniture like an inflatable chair or a shaggy bean bag, ensuring the textures are varied to provide that classic early-2000s tactile experience.
- Hang a beaded curtain in the doorway to provide a satisfying tactile and auditory sound every time someone enters the room, heightening the nostalgic feel.
- Layer the lighting using a mix of lava lamps for a slow, mesmerizing glow and a neon sign with a fun phrase to serve as a modern-retro light source.
- Accessorize with small details like butterfly-shaped mirrors and fuzzy throw pillows, ensuring that every surface has a bit of kitschy charm and personality.
How to Achieve Realistic Pantry Organization for a Stress Free Kitchen
Why we love this
An organized pantry is a visual and mental sigh of relief, turning the daily chore of cooking into a streamlined, creative process. There is something deeply satisfying about seeing rows of glass jars filled with colorful grains and spices, the air lightly scented with dried herbs and roasted coffee. We love the way structured bins eliminate the “pantry avalanche” of half-opened bags, replacing chaos with a sense of calm order that makes your kitchen feel like a high-end boutique grocery store.
Essential Elements:
- Airtight glass or BPA-free plastic canisters
- Tiered shelving for canned goods
- Woven or plastic bins for bulk items
- Uniform labels (chalkboard or vinyl)
- Lazy Susans for oils and vinegars
- Over-the-door rack for snacks
How to make it
- Empty the entire pantry completely, wiping down every shelf with a mild vinegar solution to remove dust and crumbs, giving yourself a literal clean slate to work with.
- Group your items into categories—baking, breakfast, snacks, dinner staples—and discard anything that has expired or is no longer used to maximize your available space.
- Decant dry goods like flour, sugar, pasta, and cereal into airtight containers; this not only looks beautiful but keeps your food fresh and prevents pests from entering opened bags.
- Place a Lazy Susan in the corners or on hard-to-reach shelves to hold oils, vinegars, and honey, allowing you to spin the tray and find what you need without knocking over three other bottles.
- Utilize tiered “stadium seating” racks for canned goods so you can see every label at a glance, preventing you from buying doubles of items you already have.
- Apply uniform labels to every bin and jar at eye level, ensuring the font is legible and the placement is consistent for a polished, professional look.
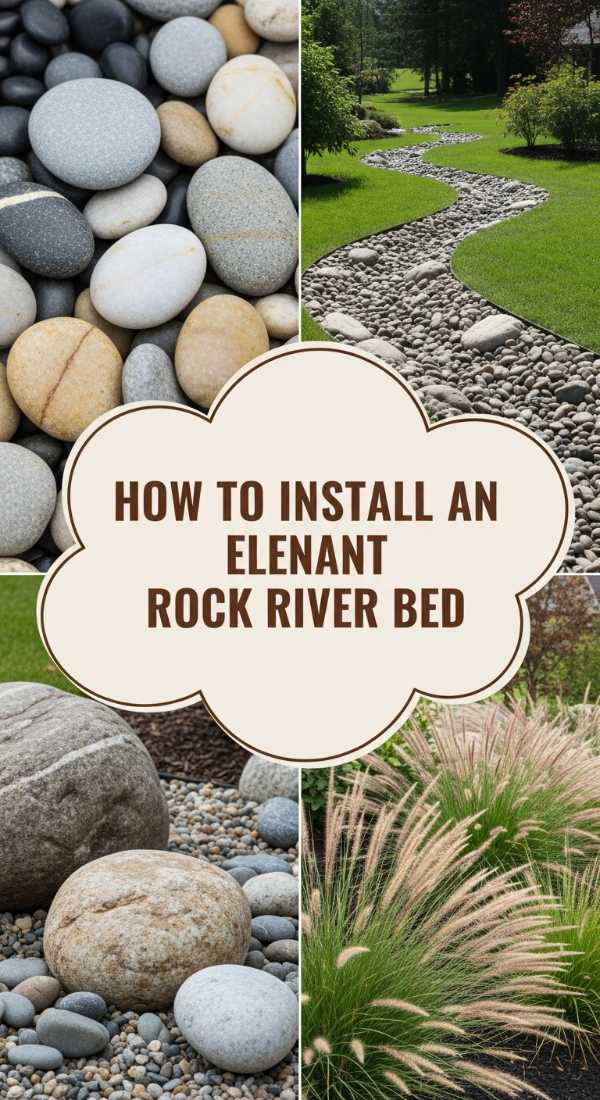
How to Install a Rock River Bed for Elegant Landscape Drainage

Why we love this
A rock river bed is the perfect marriage of form and function, turning a potential drainage problem into a stunning landscape feature that mimics a mountain stream. We love the rugged, natural texture of smooth river stones and the way they glisten after a light rain, creating a soothing visual path through your yard. It’s a project that brings an element of Zen to the garden, providing a hardscape contrast to soft lawns while effectively whisking water away from your home’s foundation with effortless grace.
Essential Elements:
- River rocks of varying sizes (cobbles to pebbles)
- Large “accent” boulders
- Heavy-duty landscape fabric
- Galvanized landscape staples
- Shovel and garden rake
- Edging material (optional)
How to make it
- Map out the “path” of your river bed, following the natural low points in your yard where water tends to collect or flow, ensuring it leads away from structures.
- Dig a trench along this path about 6 to 12 inches deep, making the center deeper than the edges to create a natural “V” or “U” shape that directs the water flow.
- Line the entire trench with heavy-duty landscape fabric to prevent weeds from poking through the stones, securing it firmly with galvanized staples every 12 inches.
- Place large boulders at “bends” in your river bed to act as natural anchors, burying the bottom third of the boulder in the ground so it looks like it has been there for centuries.
- Fill the trench with medium-sized river rocks, and then sprinkle smaller pebbles in the gaps and along the edges to create a realistic, graded texture.
- Test the drainage by running a garden hose at the top of the bed to ensure the water flows freely through the rocks and doesn’t pool in unintended areas.
How to Organize Elementary Art Rooms for Maximum Creative Spark

Why we love this
An elementary art room should feel like a playground for the imagination, where every color of the rainbow is within reach and inspiration is found in every corner. We love the vibrant, organized chaos of a room filled with the scent of tempera paint and fresh paper, where supplies are grouped so intuitively that even a kindergartner can find their way. It’s about creating a space that feels both structured and limitless, allowing young artists to focus on their masterpieces rather than searching for a missing glue stick.
Essential Elements:
- Clear plastic stackable bins
- Color-coded supply stations
- Drying racks for wet paintings
- Wall-mounted pegboards for tools
- Label maker or colorful tags
- Rolling carts for mobile projects
How to make it
- Divide the room into specific “zones”—the wet zone for painting and clay, the dry zone for drawing and collage, and the cleanup zone near the sink.
- Utilize clear bins for all small supplies like buttons, beads, and markers, so children can visually identify what they need without having to open every lid.
- Implement a color-coding system where each table group has a corresponding color bin, making it easy to distribute and collect supplies at the start and end of a lesson.
- Install a heavy-duty pegboard on a prominent wall to hang frequently used items like scissors, aprons, and palettes, keeping the surfaces of the tables clear for work.
- Set up a dedicated drying station with labeled slots for each grade level, ensuring that wet projects are safely stored away from high-traffic areas where they might be smudged.
- Label everything with both words and pictures; this supports early readers and ensures that the expectation for where items belong is crystal clear for every student.
How to Construct a Floating Deck for Luxury Outdoor Living
Why we love this
A floating deck provides an elevated, sophisticated platform for outdoor living without the complexity of deep footings or attachments to the house. We love the smooth, warm feel of finished wood underfoot and the way a low-profile deck creates a distinct “island” in the yard for dining or lounging. It’s a project that instantly upgrades the backyard’s luxury factor, offering a clean-lined, modern aesthetic that makes you want to linger outside with a good book and a glass of wine as the evening air cools.
Essential Elements:
- Pressure-treated 2×6 joists
- Decking boards (cedar, pine, or composite)
- Deck blocks (concrete)
- Exterior-grade deck screws
- Level and string line
- Wood stain or sealer
How to make it
- Clear the area of all vegetation and lay down landscape fabric topped with a thin layer of gravel to prevent weeds and provide a stable base for the deck blocks.
- Position your concrete deck blocks in a grid pattern, typically spaced 4 to 6 feet apart, ensuring each block is perfectly level with the others using a long spirit level.
- Build the outer frame of the deck using 2×6 pressure-treated lumber, checking for squareness by measuring the diagonals to ensure they are exactly equal.
- Install the interior joists within the frame, spacing them 16 inches apart (on center) to provide a rigid, sturdy feel that won’t bounce when you walk on it.
- Lay your decking boards across the joists, using spacers to maintain a consistent 1/8-inch gap for drainage and expansion, and secure them with two screws at every joist intersection.
- Trim the overhanging edges with a circular saw for a flush finish, then sand the surface until smooth and apply a high-quality UV-resistant stain to protect the wood from the elements.
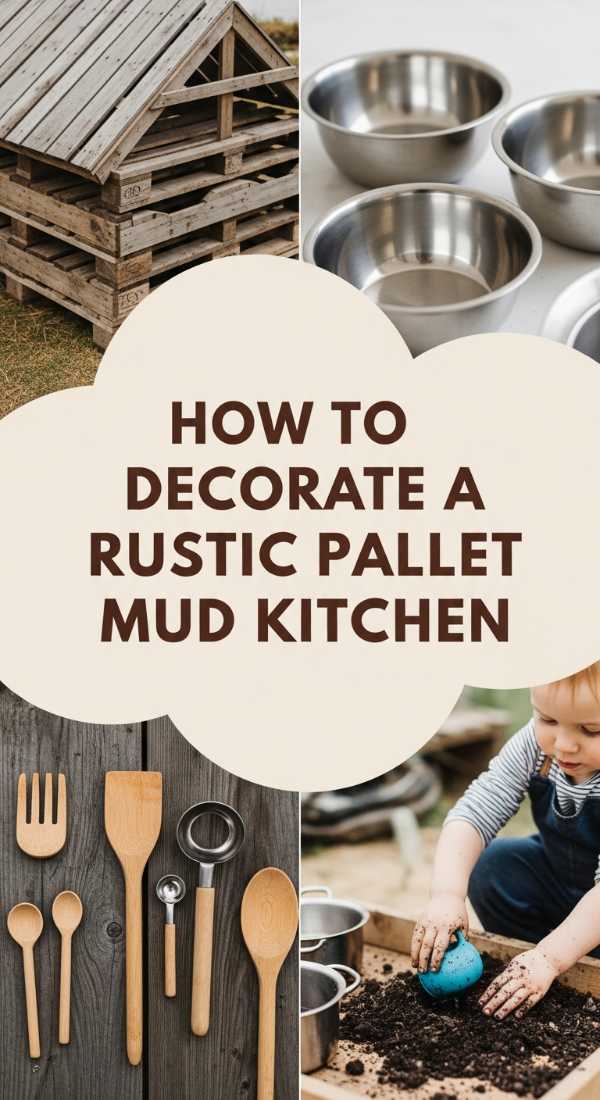
How to Decorate a Pallet Mud Kitchen for Endless Outdoor Play
Why we love this
A mud kitchen is a sanctuary of messy, joyful childhood discovery, where the “ingredients” are found in the dirt and the imagination is the only limit. We love the rustic, chunky texture of the upcycled pallet wood and the delightful clatter of old metal pots and spoons as “mud pies” are prepared. It’s a sensory-rich environment that smells like rain-soaked earth and sun-warmed wood, providing a space where kids can get as messy as they want while connecting deeply with the natural world around them.
Essential Elements:
- Heat-treated wood pallets (look for the “HT” stamp)
- Old stainless steel sinks or plastic tubs
- Hooks for hanging utensils
- Exterior paint or wood sealant
- Vintage kitchen tools (whisks, spoons, pots)
- A dedicated water source (hose or jug)
How to make it
- Dismantle your pallets and sand every piece of wood thoroughly with 80-grit sandpaper to remove any splinters or rough edges, making it safe for little hands.
- Construct a simple workbench frame at a height of about 20-24 inches, using the sturdiest pallet boards for the legs and the tabletop.
- Cut a hole in the tabletop that is slightly smaller than the lip of your stainless steel sink or plastic tub, then drop the basin in so it sits flush with the surface.
- Add a vertical backboard using more pallet slats, which provides a perfect surface for installing hooks where you can hang strainers, ladles, and old measuring cups.
- Paint the kitchen in cheerful, weather-resistant colors or apply a clear outdoor sealant to highlight the natural wood grain while protecting it from rain and mud.
- Stock the kitchen with “nature’s pantry”—bowls of pinecones, smooth stones, and dried leaves—and provide a nearby bucket of water to fuel hours of creative culinary play.
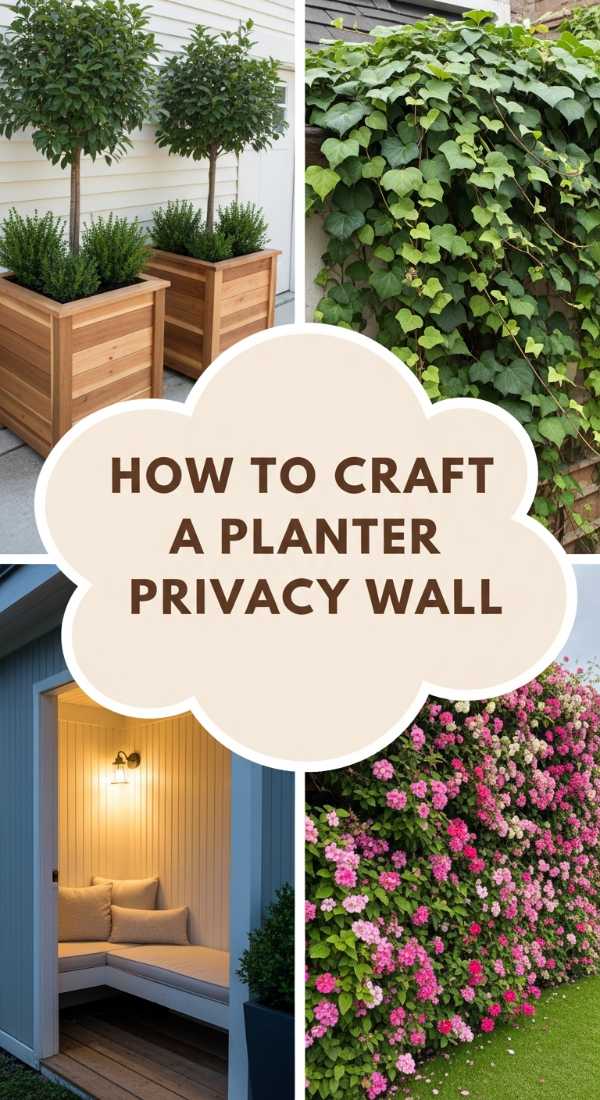
How to Craft a Planter Privacy Wall for a Secluded Garden Oasis
[IMAGE_10]
Why we love this
There is something incredibly cozy about being tucked away behind a wall of living greenery, shielded from the hustle and bustle of the neighborhood. A planter privacy wall offers a lush, vertical landscape that provides a sense of seclusion without feeling like a fortress. We love the way the green leaves catch the light and the subtle rustle of foliage in the wind, creating a soft, living barrier that smells of fresh cedar and jasmine, turning any patio into a private sanctuary for quiet reflection.
Essential Elements:
- Large rectangular planter boxes
- Wooden trellis or vertical slats
- Fast-growing climbing plants (clematis, jasmine, or ivy)
- High-quality potting mix
- Slow-release fertilizer
- Waterproof liner for the planters
How to make it
- Position your large planter boxes in a line to delineate the edge of your patio, ensuring they are sturdy enough to act as an anchor for the vertical structure.
- Attach a tall trellis or a series of horizontal wooden slats to the back of the planters, securing them with heavy-duty brackets so they can withstand wind and the weight of growing plants.
- Line the interior of the planters with a waterproof plastic liner, poking a few drainage holes through the bottom to prevent the soil from becoming waterlogged.
- Fill the boxes with a premium potting mix that contains perlite for aeration, as container plants need extra help to keep their roots healthy and oxygenated.
- Plant your climbers at 12-inch intervals, gently fanning out the stems and tying them to the lowest part of the trellis with soft garden twine to encourage upward growth.
- Water the planters thoroughly and add a layer of decorative pebbles on top to help retain moisture, then watch as the wall fills in to create a solid, green screen of privacy.
Conclusion
Transforming your home and garden into a curated retreat is a journey of small, intentional steps. By focusing on sensory details—the scent of a garden, the texture of a handmade deck, or the organized calm of a pantry—you create a lifestyle that nourishes the soul. Remember, the goal isn’t perfection; it’s about creating a space that feels like *you*. Whether you’re building a duck enclosure or a Y2K teen room, embrace the process and the joy of creating something with your own two hands.
FAQ
Q: What is the best wood to use for outdoor projects like the floating deck or mud kitchen?
A: Pressure-treated lumber is best for the structural frame because it resists rot and insects. For surfaces you touch (like the deck top or mud kitchen), cedar and redwood are beautiful, naturally rot-resistant options, though they are more expensive.
Q: How do I keep my rock river bed from getting clogged with leaves?
A: Use a leaf blower on a low setting to clear debris without dislodging the smaller stones. Occasional rinsing with a high-pressure hose can also help clear out silt and fine dirt that settles between the rocks.
Q: Are ducks harder to keep than chickens?
A: Ducks are generally hardier and more disease-resistant, but they are messier because they love water. As long as you have a well-designed enclosure with good drainage and access to clean water, they are a joy to keep!
Q: How can I make my pantry organization stay neat over time?
A: The key is the one-in, one-out rule and decanting. When you buy new staples, immediately put them into their designated jars. Labels are crucial because they tell everyone in the household exactly where things belong.