

Living Beautifully: Your Go-To Hub for DIY Projects and Daily Inspiration
Have you ever walked into a space and felt an immediate sense of peace wash over you? It’s that magical moment where every detail—the way the light hits a ceramic vase, the faint scent of fresh herbs, or the texture of a hand-knit throw—comes together to tell a story of care and intentionality. Living beautifully isn’t about chasing a magazine-perfect aesthetic; it’s about crafting a life that feels as good as it looks, turning the mundane into something extraordinary through the power of your own hands.
I’ve always believed that our homes are living, breathing extensions of our souls. Whether it’s the quiet joy of watching a seedling break through the soil in your front yard or the satisfaction of hearing the soft ‘click’ of a perfectly organized pantry, these small projects build a sanctuary. Today, I’m sharing ten of my favorite ways to infuse your daily life with inspiration, from outdoor retreats to creative corners that spark wonder in the smallest members of your family.
How to Grow Lush Front Yard Blooms for Instant Curb Appeal
Why we love this
There is nothing quite like the sensory embrace of a blooming front garden as you pull into your driveway after a long day. Imagine the intoxicating, honeyed scent of jasmine mingling with the crisp aroma of damp earth, while vibrant peonies heavy with dew nod their heads in the breeze. The visual feast of layered textures—velvety petals, serrated leaves, and delicate stems—creates a living tapestry that feels both welcoming and deeply personal, turning your home’s entrance into a fragrant sanctuary for both you and the local pollinators.
Essential Elements:
- High-quality organic potting soil and compost
- Selection of perennials (Peonies, Hydrangeas, Lavender)
- Annual fillers (Petunias, Sweet Alyssum)
- Slow-release fertilizer pellets
- Garden trowel and bypass pruners
- Mulch (Cedar or Hemlock)
How to make it
- Assess your sunlight for at least 48 hours to determine if you have full sun, partial shade, or deep shade, as this dictates your plant selection.
- Clear the area of weeds and grass, then till the soil to a depth of 12 inches, mixing in a generous 3-inch layer of organic compost to provide a nutrient-dense foundation.
- Arrange your plants while they are still in their nursery pots; place taller ‘thrillers’ in the back, mounding ‘fillers’ in the middle, and cascading ‘spillers’ near the edges for a professional, tiered look.
- Dig holes twice as wide as the root ball, gently tease the roots if they are pot-bound, and plant them at the same depth they were in the container.
- Backfill with soil, press down firmly to remove air pockets, and water deeply until the ground is saturated but not swampy.
- Apply a 2-inch layer of mulch around the base of the plants, keeping it a few inches away from the stems to prevent rot, and finish with a sprinkle of slow-release fertilizer.
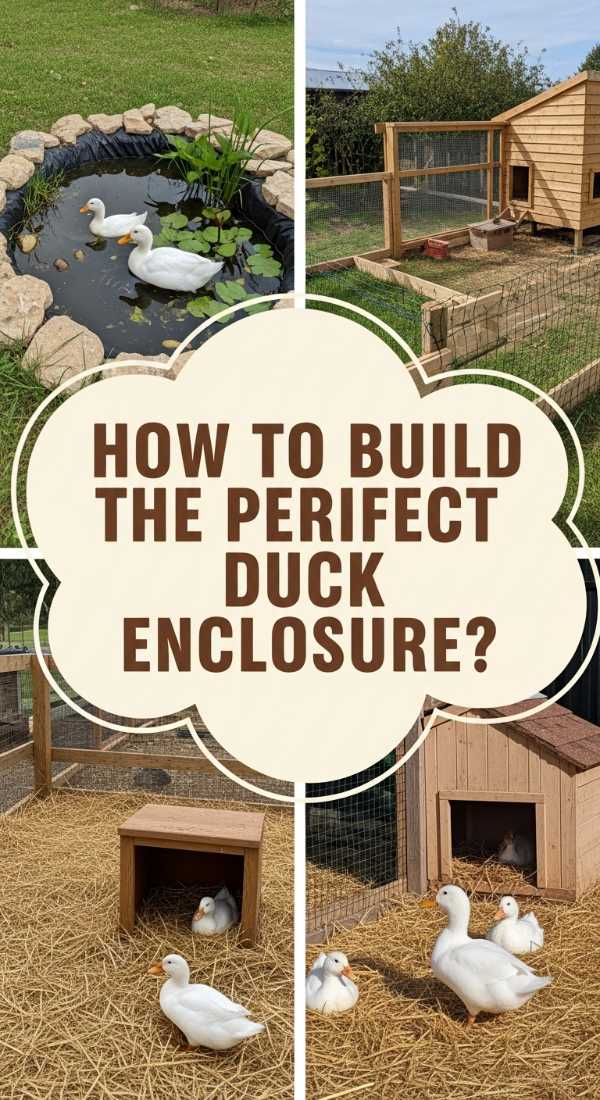
How to Build a Cozy Duck Sanctuary for Happy Feathered Friends
Why we love this
The gentle, rhythmic ‘waddle-cluck’ of happy ducks is one of the most soothing soundtracks a backyard can have. A well-designed sanctuary smells of fresh straw and clean water, providing a tactile experience of soft down feathers and the cool splash of a pond. Watching your feathered friends dive and preen in a space you built for them creates a profound connection to nature, offering a rustic, farm-to-home vibe that grounds your daily routine in the simple cycles of animal care and companionship.
Essential Elements:
- Pressure-treated lumber for the frame
- Hardware cloth (not chicken wire) for predator proofing
- Exterior-grade plywood
- Bedding (Pine shavings or straw)
- Water basin or pre-formed pond
- Solar-powered ventilation fan
How to make it
- Construct a sturdy wooden frame at least 4 square feet per duck, ensuring the floor is elevated off the ground to prevent moisture buildup and deter pests.
- Install hardware cloth over all openings and windows using heavy-duty staples, burying the mesh 12 inches into the ground around the perimeter to stop digging predators like foxes.
- Build a sloped roof and cover it with shingles or corrugated metal to ensure rain runs off efficiently, keeping the interior bedding dry and mold-free.
- Create a dedicated ‘wet zone’ outside the sleeping quarters using a pre-formed pond liner; ensure it has a drain or a pump system for frequent cleaning, as ducks need pristine water for ocular health.
- Layer the floor with 4-6 inches of pine shavings, which absorb moisture better than straw and provide a soft, insulating cushion for their webbed feet.
- Add a ramp with small wooden cleats for traction, allowing the ducks easy access to their elevated house without slipping.
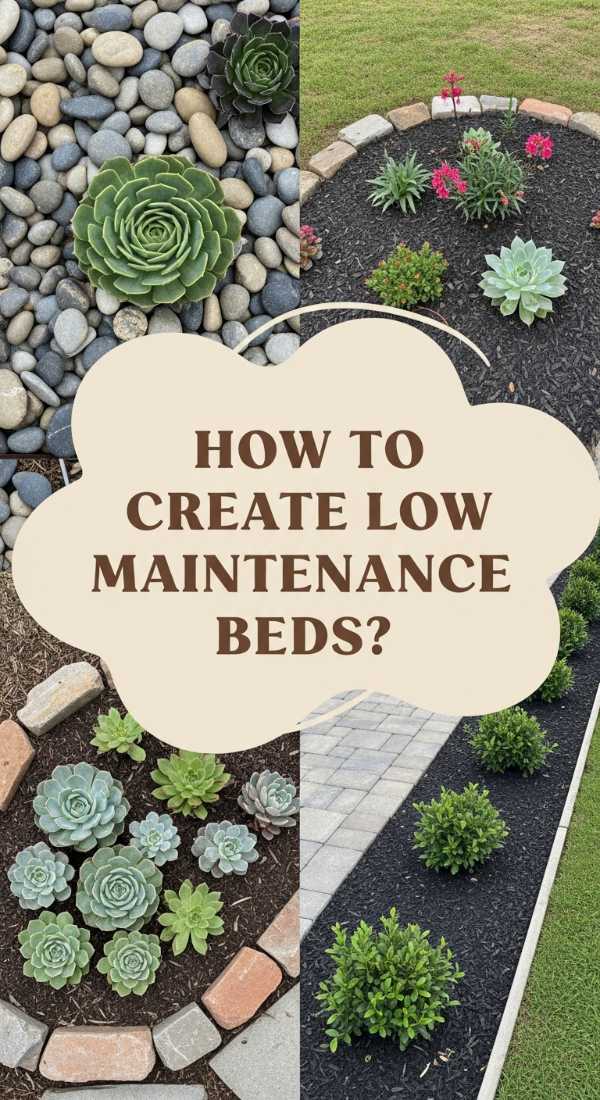
How to Design Simple Stone Gardens for Stress Free Maintenance

Why we love this
There is a Zen-like stillness in the composition of a stone garden, where the cool, rugged texture of slate meets the smooth, sun-baked surface of river rocks. The visual palette is one of earthy greys, deep charcoals, and sandy beiges, offering a sophisticated minimalist aesthetic that never wilts. We love the way the stones crunch satisfyingly underfoot and how they retain the day’s warmth long after the sun sets, providing a grounding, tactile environment that requires nothing more than your presence to enjoy.
Essential Elements:
- Heavy-duty landscape fabric
- Variety of stones (River rock, pea gravel, slate chips)
- Large focal point boulders
- Steel or plastic edging
- Drought-tolerant accent plants (Agave, Blue Fescue)
How to make it
- Excavate the area to a depth of 3-4 inches and level the ground using a rake, ensuring a slight slope away from any building foundations for proper drainage.
- Lay down a high-quality, woven landscape fabric to prevent weed growth, securing it tightly with galvanized landscape staples every 12 inches.
- Install your edging material along the perimeter to keep the stones contained; use a mallet to drive stakes deep enough so the edging sits flush with the desired stone height.
- Position your large ‘anchor’ boulders first, burying the bottom third of the rock to make them look naturally settled into the landscape rather than just sitting on top.
- Spread your base layer of smaller stones (like pea gravel) around the boulders, using a garden rake to distribute them evenly at a depth of at least 2 inches.
- Incorporate ‘islands’ of drought-tolerant plants by cutting ‘X’ shapes in the fabric, digging a small hole, and planting them before tucking the fabric back around the base and covering with decorative slate chips.
How to Organize Creative Art Stations for Inspiring Little Minds

Why we love this
An art station is a vibrant explosion of possibility, smelling of wax crayons, fresh paper, and the faint, sweet scent of washable paints. It is a place where textures reign supreme—from the smoothness of a brand-new sketchpad to the squish of modeling clay. We love how an organized station invites children into a world of tactile exploration, where every color is within reach and the clutter is replaced by a rainbow of structured inspiration that turns ‘boredom’ into a masterpiece in minutes.
Essential Elements:
- Pegboard and mounting hardware
- Clear acrylic bins and canisters
- Wall-mounted paper roll dispenser
- Comfortable, wipeable stools
- Adjustable-height table
- Rolling utility cart
How to make it
- Mount a large pegboard at the child’s eye level, ensuring it is anchored into studs to support the weight of various hanging buckets and baskets.
- Group supplies by medium—dry (markers, pencils), wet (paints, glues), and tactile (clay, stickers)—using clear bins so children can easily identify what they need without dumping everything out.
- Install a horizontal paper roll dispenser above the table surface, allowing for a continuous ‘canvas’ that can be pulled down and torn off when a project is complete.
- Label every container with both words and pictures to encourage literacy and make the clean-up process a self-sufficient matching game for younger kids.
- Dedicate a ‘work in progress’ shelf where wet paintings or half-finished sculptures can sit undisturbed while they dry or wait for the next spark of creativity.
- Use a rolling utility cart for the most frequently used items like scissors and glue sticks, allowing the ‘station’ to move to the kitchen table or the floor whenever inspiration strikes.
How to Construct a Custom Barbecue Nook for Affordable Outdoor Dining

Why we love this
The aroma of charred wood and sizzling herbs drifting through the air is the ultimate sign of a summer well-spent. A custom barbecue nook brings a professional, built-in feel to your patio, combining the rugged texture of stone or wood with the sleek gleam of stainless steel. It’s the heart of outdoor entertaining, where the warmth of the grill and the tactile satisfaction of chopping fresh vegetables on a sturdy outdoor counter turn a simple meal into a celebrated culinary event.
Essential Elements:
- Weather-resistant cabinetry or stone blocks
- Concrete or granite countertop remnants
- Built-in grill head or a designated ‘parking’ spot for a kettle grill
- Outdoor-rated lighting (LED strips or sconces)
- Stainless steel hooks for tools
How to make it
- Design your layout based on the ‘work triangle’ concept, ensuring you have at least 24 inches of clear counter space on either side of the grill for prep and landing zones.
- Build the base using pressure-treated 2x4s for a wooden frame or stackable retaining wall blocks for a masonry look; if using wood, clad it in cement board and stone veneer for fire safety.
- Measure the ‘cut-out’ dimensions of your grill precisely, allowing for a 1/2-inch clearance on all sides for heat expansion if you are using a built-in model.
- Level your countertops carefully; if using concrete, pour them into custom melamine forms with rebar reinforcement for a modern, seamless look that resists the elements.
- Install task lighting directly over the cooking surface—battery-operated LED puck lights are an easy DIY fix if you don’t have hardwired electricity.
- Add a magnetic tool bar or heavy-duty S-hooks to the side of the nook to keep spatulas, tongs, and grill brushes organized and within arm’s reach while cooking.
How to Create a Serene Spa Retreat for Maximum Backyard Relaxation

Why we love this
Imagine stepping into a pocket of paradise where the air is thick with the scent of eucalyptus and the only sound is the gentle trickle of water against stone. This retreat is all about the ‘soft’ elements—the plushness of oversized Turkish towels, the warmth of a cedar-planked walkway, and the cooling sensation of a misting system on a hot afternoon. It transforms a standard backyard into a sensory sanctuary that melts away the stress of the day through steam, scent, and stillness.
Essential Elements:
- Outdoor cedar sauna kit or stock tank soak tub
- Bamboo privacy screens
- Eucalyptus and lavender plants
- Solar-powered water fountain
- Weatherproof lounge seating with linen covers
How to make it
- Select a secluded corner of the yard and install tall bamboo fencing or a living wall of arborvitae to create a visual and acoustic barrier from the rest of the world.
- Prepare a level base of crushed gravel or a small deck made of rot-resistant Ipe or Cedar wood to house your focal point, whether it’s a modern stock tank tub or a DIY sauna.
- Install a simple outdoor shower or a wall-mounted misting line connected to your garden hose to provide a refreshing temperature contrast after soaking.
- Layer the area with sensory plants; place pots of fragrant lavender and lemon balm near the seating areas so their oils are released as you brush past them.
- Add a rhythmic element with a stone water feature; ensure the pump is adjustable so you can find the perfect ‘white noise’ level to mask neighborhood sounds.
- Finish the space with soft, dimmable solar lanterns and a weather-resistant basket filled with clean, rolled towels and essential oil sprays for an authentic spa experience.
How to Achieve Sustainable Kitchen Storage for an Orderly Daily Life

Why we love this
There is a profound sense of calm that comes from opening a pantry to see glass jars filled with grains, the organic textures of woven seagrass baskets, and the clean lines of bamboo lids. Gone is the visual ‘noise’ of bright plastic packaging, replaced by a soothing palette of natural materials. This setup isn’t just about looks; it’s about the tactile pleasure of scooping flour from a wide-mouthed jar and the efficiency of a kitchen that breathes, making the act of cooking feel like a choreographed dance rather than a frantic search.
Essential Elements:
- Glass airtight canisters (various sizes)
- Chalkboard or vinyl labels
- Seagrass or wicker baskets for produce
- Bamboo drawer dividers
- Tiered spice rack inserts
How to make it
- Empty your entire pantry and discard expired items; wipe down all shelves with a mixture of vinegar and water to create a fresh, clean slate.
- Decant dry goods (pasta, rice, flour, nuts) into uniform glass jars; this not only looks better but allows you to see exactly when you are running low on essentials.
- Group similar items into ‘zones’ using baskets—create a ‘breakfast basket’ with oatmeal and honey, and a ‘baking basket’ with sprinkles and extracts.
- Use expandable bamboo dividers in your utensil drawers to create custom slots for every whisk and spatula, preventing the dreaded ‘junk drawer’ pile-up.
- Install a tiered ‘stadium’ rack for spices, ensuring all labels are facing forward and organized alphabetically or by frequency of use (e.g., salts and peppers in the front).
- Apply consistent labeling to every jar using a paint pen or a label maker; place the ‘use by’ date on a small piece of painter’s tape on the bottom of the jar to maintain the clean aesthetic.
How to Revive Nostalgic Bedroom Aesthetics for a Total Retro Vibe

Why we love this
Stepping into a retro-inspired bedroom feels like a warm, velvet hug from the past. We are obsessed with the interplay of rich mustard yellows, burnt oranges, and deep teals against the grainy texture of mid-century walnut furniture. It’s a space that smells of old vinyl and teakwood incense, featuring tactile treasures like macramé wall hangings and shag rugs that invite you to kick off your shoes and stay a while. It’s nostalgic, soulful, and deeply comforting in its eclectic charm.
Essential Elements:
- Mid-century modern bed frame (tapered legs)
- Macramé or woven fiber wall art
- Retro-style record player and vinyl storage
- Lava lamps or globe pendant lighting
- Textured throw pillows (Velvet, Corduroy, Shag)
How to make it
- Start with a ‘hero’ piece of furniture, like a low-profile walnut bed frame or a vintage-inspired dresser with brass hardware, to anchor the room’s era.
- Choose a color palette based on 1970s earth tones—think ochre, terracotta, and olive green—and apply it through a bold accent wall or high-quality removable wallpaper.
- Layer your textures; place a high-pile shag rug over hardwood floors and mix velvet pillows with chunky knit blankets to create that signature ‘lived-in’ retro feel.
- Incorporate vintage tech, such as a restored rotary phone or a high-quality turntable, making sure to display your record sleeves as rotating pieces of graphic art.
- Swap out modern lighting for warm-toned globe lamps or a tiered ‘sputnik’ chandelier to cast a soft, amber glow that enhances the vintage mood.
- Add ‘greenery’ in the form of classic 70s plants like Spider Plants or Snake Plants, housed in hanging macramé planters or ceramic pots with geometric patterns.
How to Curate Sensory Play Elements for Meaningful Outdoor Learning

Why we love this
Outdoor sensory play is a messy, beautiful symphony of childhood. It’s the gritty feel of sand between fingers, the cool squish of mud pies, and the rustle of dried corn kernels in a wooden bin. We love how these elements bypass the ‘over-stimulation’ of screens, grounding children in the physical world. The scent of pine needles and the sound of wind chimes integrated into a play space turn a simple backyard into a laboratory of wonder, where every touch is a lesson and every smell is a memory in the making.
Essential Elements:
- Weatherproof sensory table or large plastic tubs
- Natural fillers (Dried beans, sand, river stones, water)
- Fine motor tools (Scoops, funnels, tweezers, tongs)
- Aromatic herbs (Mint, Rosemary, Basil)
- Sound elements (Outdoor xylophone or wind chimes)
How to make it
- Build or buy a sturdy wooden sensory table at a height that allows children to stand comfortably; ensure it has removable bins for easy cleaning and material swaps.
- Create ‘thematic’ bins based on the seasons: use real snow and pinecones in winter, and water with lemon slices and flower petals in the summer.
- Integrate ‘scent’ by planting a small sensory herb garden directly next to the play station; encourage kids to rub the leaves of mint or lavender to release the oils into their play.
- Incorporate various ‘resistances’ by offering different scooping tools—heavy metal spoons for wet sand and delicate bamboo tongs for picking up smooth river stones.
- Add an auditory layer by hanging a series of ‘sound makers’ like old metal pots or bamboo pipes that children can strike with a wooden mallet.
- Ensure the station is located in a shaded area to keep the materials (especially water and metal tools) at a safe, comfortable temperature for prolonged exploration.
How to Master Sand Play Solutions for Seamless Coastal Summer Days
[IMAGE_10]
Why we love this
There is a specific kind of magic in the ‘clink’ of a plastic shovel against a sturdy bucket and the cool, damp weight of perfect castle-building sand. A well-executed sand play setup brings the expansive, salty-air freedom of the beach right to your doorstep. We love the fine, silky texture of premium play sand and the way it shifts and flows, providing an endlessly malleable canvas for architects of all ages. It’s a sun-drenched, tactile experience that feels like a permanent vacation in your own backyard.
Essential Elements:
- Large wooden sandbox with a built-in cover
- Play-grade kiln-dried sand (white or natural)
- Sturdy silicone or heavy-duty plastic sand molds
- Sun canopy or oversized umbrella
- Corner seating ledges
How to make it
- Select a location with excellent drainage; avoid low spots in the yard where water might pool. Line the bottom of the pit with landscape fabric to keep bugs out while allowing rain to pass through.
- Fill the box with ‘play sand’ that has been washed and kiln-dried; this variety is softer on the skin and free of the dust found in industrial construction sand.
- Install a rigid, breathable cover (like a slatted wood lid) to keep out neighborhood cats and debris while still allowing the sand to ‘breathe’ and dry out after rain.
- Incorporate built-in corner seats or a wide perimeter ledge, giving adults a place to sit and engage without having to sit directly in the sand.
- Provide a ‘cleaning station’ nearby—a simple bucket of water and a coarse brush—to ensure that the sand stays in the box and doesn’t track into the house.
- Add a vertical element, like a sand-and-water wheel mounted to the side of the box, to teach basic physics through the flow of materials.
Conclusion
Living beautifully isn’t a destination you reach; it’s a series of small, intentional choices you make every single day. From the way you organize your spices to the sanctuary you build for a few backyard ducks, these DIY projects are about reclaiming your environment and infusing it with your unique spirit. I hope these ideas inspire you to pick up a shovel, a paintbrush, or a label maker and start crafting the life you’ve always dreamed of—one beautiful project at a time.