

Have you ever walked past a home and felt an immediate sense of warmth, as if every stone and piece of timber was placed there with a specific, loving intention? We’ve all spent hours scrolling through curated feeds, but lately, there is a shift happening. People are moving away from the mass-produced, ‘builder-grade’ look and embracing DIY projects that tell a story—projects that feel a little more grounded, a little more ‘underground,’ and a lot more soulful.
There is a unique kind of magic in getting your hands dirty and creating something that doesn’t just look good in a photo, but actually changes the way you live in your space. Whether it’s the quiet quack of backyard ducks or the shimmering light of a handmade glass garden sculpture, these trends are about reclaiming our homes as sanctuaries. They are about the tactile joy of wood grain, the scent of fresh mulch, and the deep satisfaction of knowing you built your own little slice of paradise.
In this post, we’re diving deep into the ten underground trends that are currently taking the lifestyle world by storm. From functional outdoor structures to nostalgic interior vibes, these are the projects that will turn your home into the neighborhood’s best-kept secret. Grab your tool belt and a cold drink, because we’re about to transform your living space into something truly extraordinary.
How to Design Rock Flower Beds for Natural Curb Appeal

Why we love this
There is something deeply satisfying about the tactile crunch of river stones underfoot and the way their cool, grey surfaces glisten after a summer rain. These rock flower beds bring a rugged, natural elegance to any home, grounding the vibrant greens of your favorite hostas and ferns against a backdrop of ancient, earthy textures. You can almost smell the damp moss and the crisp air that surrounds these stone-lined sanctuaries, creating a visual rhythm that guides the eye toward your front door with effortless grace and a permanent, timeless beauty.
Essential Elements:
- Smooth river rocks or crushed lava rocks
- Heavy-duty landscape weed barrier
- Galvanized landscape staples
- Steel or plastic edging
- A variety of drought-resistant perennials
How to make it
- Begin by marking the perimeter of your bed using a garden hose or spray paint to create soft, organic curves that mimic nature. Avoid harsh straight lines for a more ‘underground’ designer look.
- Excavate the area to a depth of about 3 to 4 inches. It is crucial to remove all grass and root systems to prevent future breakthroughs. Use a flat spade to create a clean, vertical edge along the perimeter.
- Lay down a high-quality, woven landscape fabric. This is the secret to a low-maintenance bed; overlap the seams by at least 6 inches and secure the fabric tightly with landscape staples every 12 inches.
- Install your edging material along the border. If using steel edging, ensure it sits slightly above the soil line to keep the rocks contained while allowing water to drain.
- Place your larger plants first. Cut an ‘X’ in the fabric, dig the hole, and tuck the fabric back around the base of the plant once it’s in the ground.
- Slowly pour your rocks over the fabric, starting from the center and working outward. Aim for a depth of 2-3 inches of stone to ensure total coverage and a lush, professional finish.
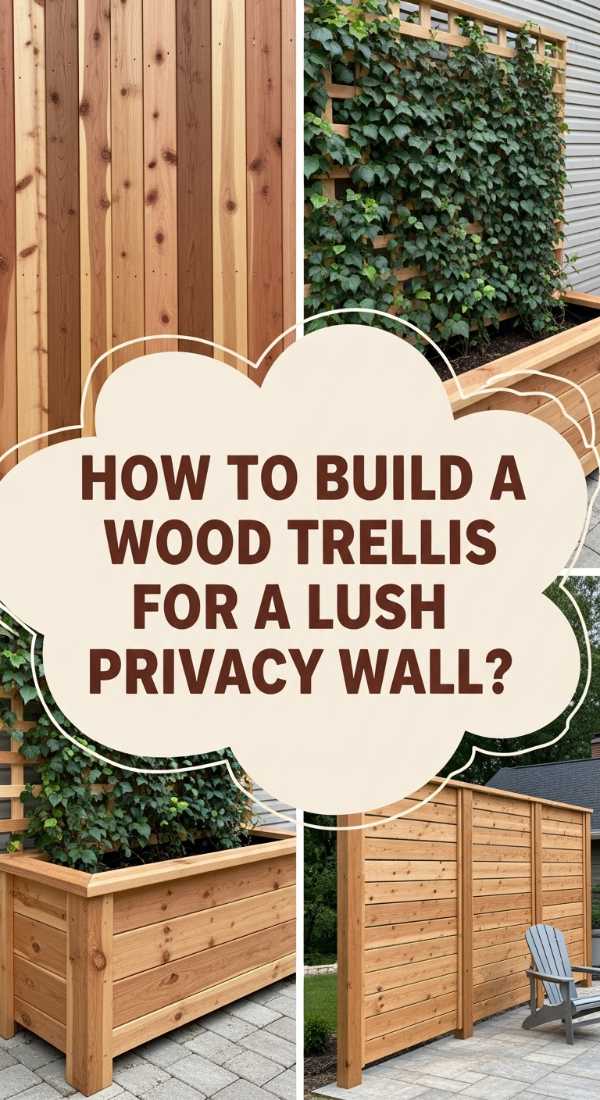
How to Build a Wood Trellis for a Lush Privacy Wall
Why we love this
Imagine sitting on your patio, shielded from the world by a living wall of fragrant jasmine and climbing roses that dance in the evening breeze. A handmade wood trellis offers more than just privacy; it creates a vertical garden that breathes life into small spaces, filling the air with the sweet, heady scent of blooms and the gentle rustle of leaves. The warm, honey-toned cedar provides a stunning contrast to the deep emerald vines, making your outdoor area feel like a secluded European courtyard hidden away from the suburban bustle.
Essential Elements:
- Pressure-treated or cedar 2x4s and 1x2s
- Exterior-grade wood screws
- Wood stain or sealant
- Post hole digger and concrete (if free-standing)
- Climbing plants like Clematis or Wisteria
How to make it
- Measure the height and width of the area you wish to screen. For a standard privacy wall, a height of 6 to 7 feet is ideal for blocking sightlines without feeling claustrophobic.
- Construct the outer frame using 2×4 cedar boards. Butt the joints together and secure them with two 3-inch exterior screws per corner. Ensure the frame is perfectly square by measuring diagonally from corner to corner.
- Lay out your vertical 1×2 slats. Space them approximately 4 to 6 inches apart, depending on how much privacy you desire. Secure each slat to the top and bottom of the frame using a drill and 1.5-inch screws.
- Add the horizontal slats to create a grid pattern. Use a spacer block to ensure consistent gaps between every row. This creates a professional, high-end aesthetic that looks custom-built.
- Sand the wood to remove any splinters and apply a UV-resistant stain. This step is vital to prevent the wood from greying and to protect it from the elements.
- Mount the trellis to an existing wall using spacers (to allow air for the plants) or set it into the ground using 4×4 posts and concrete for a sturdy, permanent installation.
How to Style a Teen Room for Retro Nostalgic Vibes

Why we love this
Stepping into a retro-styled teen room feels like a warm embrace of the best parts of the 70s, 80s, and 90s, blended into a cozy, creative sanctuary. The soft, ambient glow of neon signs reflects off velvet textures and checkerboard rugs, creating an atmosphere that is both vibrant and incredibly relaxing. It’s a space where the tactile scratch of a vinyl record meets the plush comfort of oversized floor pillows, offering a nostalgic escape that celebrates individuality and the timeless charm of ‘analog’ living in a digital world.
Essential Elements:
- Warm-toned LED strip lighting or neon signs
- Velvet or corduroy throw pillows
- Vintage-inspired posters and vinyl wall mounts
- A mix of mid-century modern and thrifted furniture
- Patterned textiles (checkered or floral)
How to make it
- Start with a base color palette of ‘new neutrals’—think sage green, terracotta, or a soft mustard yellow. These colors provide a sophisticated backdrop for the pops of retro brightness to come.
- Layer your lighting. Avoid the ‘big light’ and instead use a combination of lava lamps, mushroom-style desk lamps, and LED strips hidden behind the bed frame to create a moody, cinematic glow.
- Create a ‘curated’ gallery wall. Mix modern prints with vintage magazine clippings and record sleeves. Use varying frame styles to give it that ‘collected over time’ feel rather than a store-bought look.
- Incorporate varied textures. A shaggy faux-fur rug paired with a sleek wooden desk and a velvet bean bag chair adds depth and makes the room feel incredibly inviting and high-end.
- Dedicate a corner to ‘analog’ hobbies. Set up a dedicated record player station or a small Polaroid photo wall to encourage a break from screens and enhance the nostalgic atmosphere.
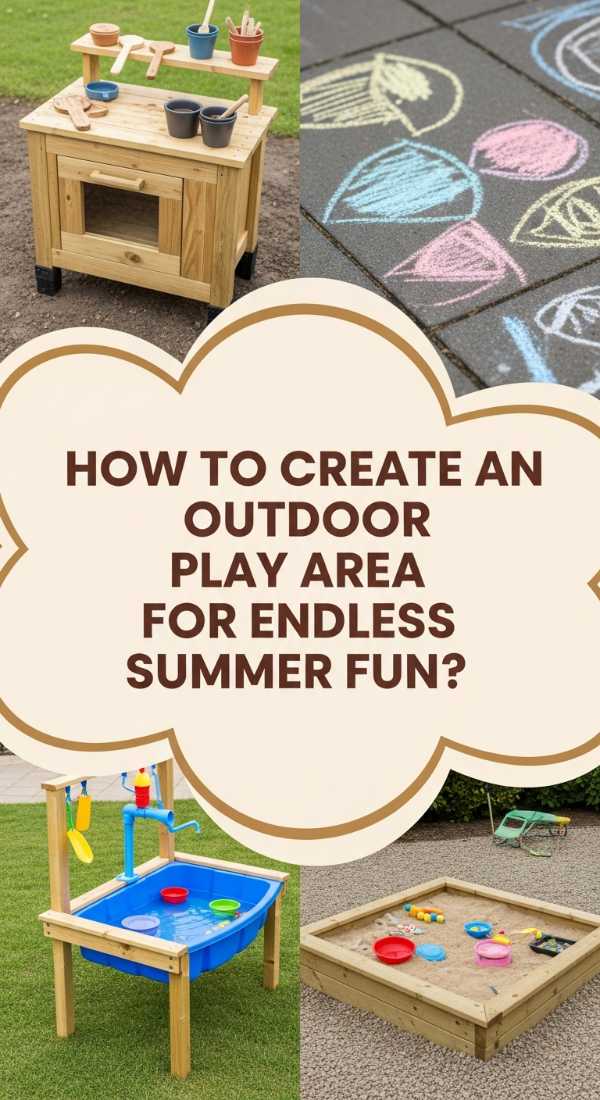
How to Create an Outdoor Play Area for Endless Summer Fun
Why we love this
There is a pure, unadulterated joy in watching a backyard transform into a realm of adventure where the only limit is a child’s imagination. This isn’t just a playground; it’s a sensory-rich environment where the scent of cedar chips mixes with the cooling spray of a misting station on a hot July afternoon. The vibrant colors of climbing holds and the smooth, cool touch of a slide provide a tactile playground that encourages movement, laughter, and the kind of deep, restorative sleep that only comes after a day spent entirely in the sunshine.
Essential Elements:
- Rubber mulch or engineered wood fiber
- Landscape timber for bordering
- Heavy-duty play equipment (swings, slides)
- Sun sails or umbrellas for shade
- Interactive elements like a mud kitchen or chalkboard
How to make it
- Select a level area in your yard that offers a mix of sun and natural shade. Clear the ground of all debris and large rocks to ensure a safe foundation for the little ones.
- Install a border using 4×4 or 6×6 pressure-treated timbers. Secure the timbers to the ground with 12-inch galvanized rebar spikes to prevent them from shifting during heavy play.
- Lay a heavy-duty landscape fabric over the soil. This prevents weeds from growing up through your safety surfacing and helps with drainage.
- Fill the area with at least 6 to 9 inches of safety surfacing, such as rubber mulch or certified play-grade wood chips. This depth is critical for impact absorption and meeting safety standards.
- Assemble and anchor your play structures. If building a swing set, ensure the legs are set in concrete or secured with heavy-duty earth anchors to prevent tipping during enthusiastic swinging.
- Add ‘zones’ of interest. Install a sensory mud kitchen in one corner and a shaded reading nook in another to provide variety and keep the kids engaged for hours on end.
How to Decorate a Hot Tub Area for Ultimate Nighttime Relaxation

Why we love this
When the sun dips below the horizon and the air turns cool, there is nothing quite like the steamy, bubbling invitation of a well-decorated hot tub area. The soft flickering of lanterns and the gentle hum of the jets create a private spa experience that melts away the stress of the day. You can feel the tension leave your shoulders as you sink into the warmth, surrounded by the lush shadows of potted palms and the ethereal glow of string lights reflecting off the water’s surface like a private constellation.
Essential Elements:
- Weather-proof string lights or Edison bulbs
- Outdoor privacy screens or tall potted plants
- Non-slip outdoor rugs
- A dedicated towel rack or basket
- A small side table for drinks and candles
How to make it
- Focus on privacy first. Use tall, feathered ornamental grasses in large planters or a slatted wooden screen to create a sense of enclosure and intimacy around the tub.
- Address the ground surface. Place a stylish, moisture-wicking outdoor rug near the entry point of the hot tub. This provides a soft, non-slip surface for wet feet and adds a touch of interior design to the outdoors.
- Hang string lights overhead. For a professional look, use 4×4 posts to suspend the lights in a ‘criss-cross’ pattern over the water, ensuring they are high enough to be safe but low enough to create a warm canopy.
- Set up a convenience station. A weather-resistant side table is essential for holding aromatherapy oils, a Bluetooth speaker, or a glass of sparkling water.
- Incorporate scent. Place citronella candles or jasmine plants nearby to keep pests away and fill the air with a relaxing fragrance that enhances the spa-like atmosphere.
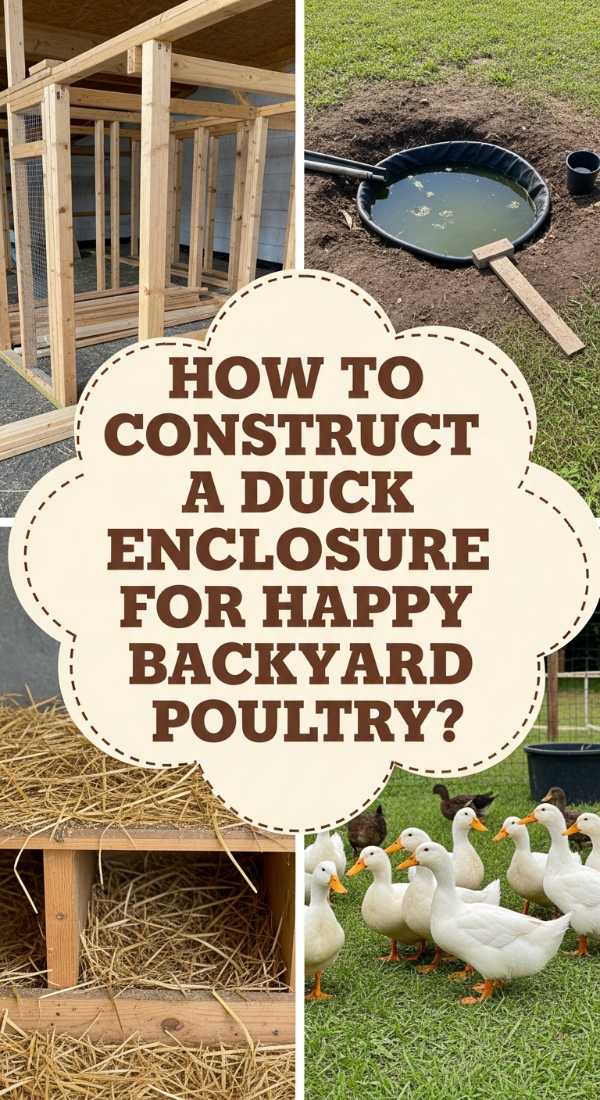
How to Construct a Duck Enclosure for Happy Backyard Poultry
Why we love this
The gentle, rhythmic ‘quack-quack’ of happy ducks is the ultimate soundtrack to a peaceful backyard lifestyle. These enclosures are more than just a home for poultry; they are a charming focal point where the rustic aroma of fresh straw meets the clean, splashing sounds of a small pond. Watching your ducks waddle through their secure, breezy habitat brings a sense of pastoral serenity to even the most suburban setting, offering a daily connection to nature that is both grounding and incredibly rewarding for the soul.
Essential Elements:
- 1/2 inch hardware cloth (not chicken wire)
- Sturdy timber frame (2×4 or 4×4)
- A secure, ventilated coop or ‘house’
- A small pre-formed pond or heavy-duty pool
- Deep bedding like straw or pine shavings
How to make it
- Design a ‘predator-proof’ footprint. Ducks are vulnerable, so your enclosure must have a foundation. Dig a trench 12 inches deep around the perimeter and bury hardware cloth to prevent burrowing animals from entering.
- Construct the vertical frame using pressure-treated lumber. For ducks, the run should be at least 4 to 5 feet high to allow for easy cleaning and human access.
- Attach the hardware cloth using heavy-duty fencing staples. Overlap the edges and ensure there are no gaps larger than half an inch. Never use chicken wire, as it is too flimsy to stop determined predators.
- Build a sloped roof over at least half of the enclosure. This provides essential shade and keeps the ducks dry during rainstorms. Use corrugated metal or polycarbonate panels for durability.
- Install a water source. A small, easy-to-drain pond is vital for duck health. Place it on a bed of gravel to help with the inevitable splashing and mud.
- Add a ‘night house’ inside the run. This should be a solid, well-ventilated wooden box with a latching door where the ducks can sleep securely away from the wind and nocturnal threats.
How to Craft Glass Yard Art for a Shimmering Garden
![]()
Why we love this
There is a whimsical, almost ethereal beauty in glass yard art that captures the sun’s rays and scatters them across your garden in a kaleidoscope of color. These handcrafted pieces act as jewel-toned sentinels among your flowers, glowing with an inner light that changes from the bright clarity of morning to the long, golden shadows of dusk. The smooth, cool surface of the glass contrasts beautifully with the organic texture of flower petals, creating a shimmering landscape that feels like a hidden fairy tale waiting to be discovered.
Essential Elements:
- Assorted colored glass bottles or vintage glassware
- Copper piping or rebar for stakes
- High-strength waterproof epoxy (like E6000)
- Glass drill bits (if connecting pieces)
- Glass beads or marbles for accents
How to make it
- Collect a variety of glass shapes—think cobalt blue wine bottles, amber apothecary jars, and clear textured vases. Thoroughly clean them to remove all labels and sticky residue for maximum shine.
- Design your ‘totem’ or sculpture on the ground first. Play with the height and color balance, stacking smaller items on top of larger ones to ensure a stable, tapered silhouette.
- Use a glass-specific epoxy to bond the pieces together. Apply the glue in a well-ventilated area and allow each joint to cure for at least 24 hours before adding the next layer.
- If creating ‘bottle trees,’ use a sturdy wooden or metal frame with ‘branches’ angled upward. Slide the bottles over the branches; the air trapped inside will prevent them from rattling in the wind.
- For ground stakes, insert a piece of copper piping or rebar deep into the soil. Apply epoxy to the top of the stake and carefully set your glass creation onto it, ensuring it is perfectly vertical.
- Position your art where it will catch the most sunlight. South-facing spots are ideal for creating those dazzling light reflections that make the garden feel truly magical.
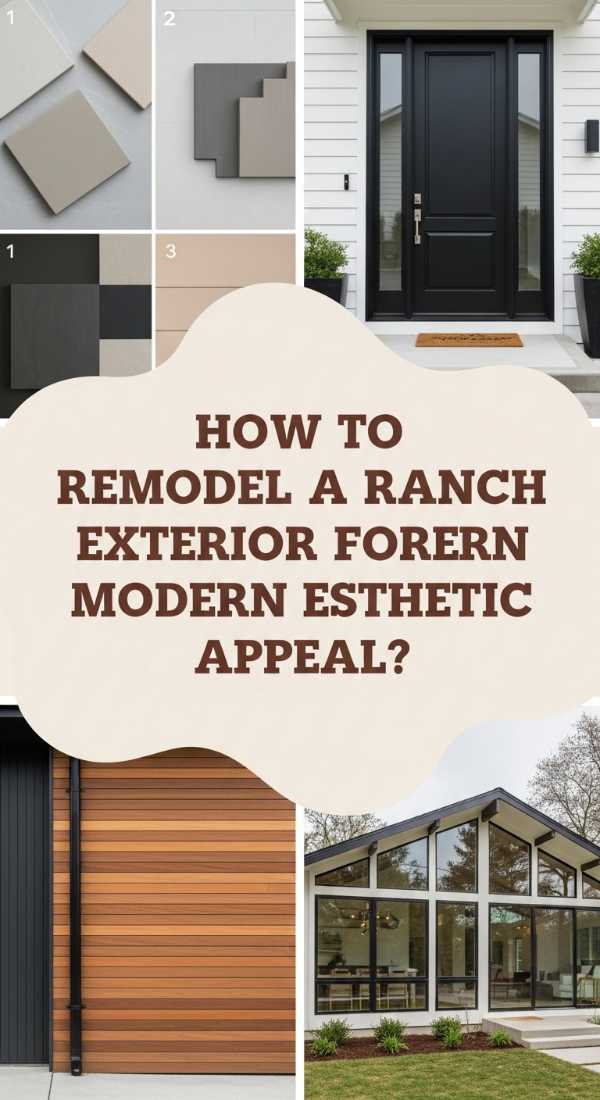
How to Remodel a Ranch Exterior for Modern Aesthetic Appeal
Why we love this
The classic ranch home is a canvas of mid-century potential, waiting to be awakened by a modern, sophisticated touch. By embracing clean lines and a moody, updated color palette, you transform a standard silhouette into a striking architectural statement that feels both grounded and high-end. Imagine the crisp contrast of matte black hardware against warm cedar accents and the way a fresh, charcoal grey exterior makes the surrounding greenery pop with a vibrant, neon intensity that breathes new life into the entire neighborhood.
Essential Elements:
- Premium exterior paint in a modern palette (Dark greys, navies, or whites)
- Cedar siding or ‘board and batten’ accents
- Modern black or brass house numbers and lighting
- A minimalist front door with clean glass panes
- Updated landscaping with structural plants
How to make it
- Start with a thorough power wash of the entire exterior. Removing years of dirt and oxidation is essential for the new paint to bond properly and provide that professional, smooth finish.
- Repair any damaged siding or trim. Ranch homes often have wood rot around the eaves; replace these with PVC or cedar before painting to ensure the longevity of your remodel.
- Apply a high-quality primer, especially if you are moving from a dark to a light color (or vice versa). Use a paint sprayer for the large expanses of siding to get a seamless, ‘factory-finish’ look.
- Install architectural accents. Adding cedar ‘slat’ siding to a small portion of the front (like the entryway) immediately elevates the house from ‘standard’ to ‘custom designer.’
- Update the jewelry of the home. Replace old, small light fixtures with oversized, modern lanterns and swap out dated house numbers for large, sans-serif floating numbers.
- Define the entryway with a bold door color. A matte black or a deep navy door serves as a focal point, drawing the eye in and completing the modern transformation.
How to Organize an Art Room for Creative Young Minds

Why we love this
An organized art room is a sanctuary of possibility, where every rainbow-hued marker and pristine brush has a home, waiting for the next spark of inspiration. The air in these rooms feels lighter, filled with the faint, nostalgic scent of crayons and the crisp promise of a fresh stack of paper. When a space is perfectly zoned, the visual clutter disappears, allowing the creative energy to flow freely, turning a simple afternoon of drawing into a deep, meditative dive into the world of color and imagination.
Essential Elements:
- Wall-mounted pegboards for tools
- Clear acrylic bins for color-sorting
- A sturdy, easy-to-clean work table
- Vertical drying rack for wet masterpieces
- Adjustable task lighting
How to make it
- Zone the room by activity. Create a ‘wet zone’ for painting near a sink or on a linoleum mat, and a ‘dry zone’ for sketching and paper crafts to prevent accidental messes.
- Utilize vertical space with a pegboard system. Hang buckets for scissors, tape, and brushes. This keeps the desktop clear for actual creating rather than just storage.
- Sort materials by color. Not only does this look stunningly ‘Instagram-ready,’ but it also helps young minds find what they need quickly and makes clean-up feel like a matching game.
- Invest in clear storage containers. If a child can’t see it, they won’t use it. Clear bins allow for an immediate inventory of supplies like beads, clay, and pom-poms.
- Label everything. Use a label maker or hand-written tags to mark each bin. This teaches organization skills and ensures that every item returns to its proper home at the end of the day.
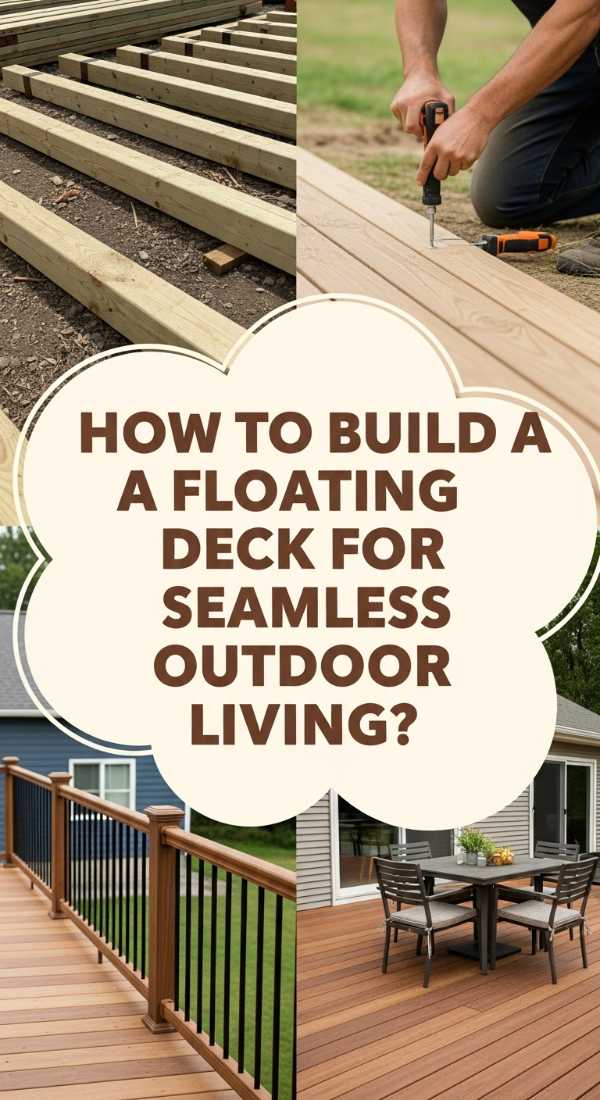
How to Build a Floating Deck for Seamless Outdoor Living
Why we love this
There is a weightless, effortless quality to a floating deck that seems to hover just above the grass, inviting you to step out and linger a while longer. The warm, textured grain of the wood underfoot and the way the boards align in a perfect, satisfying grid create an outdoor room that feels like a natural extension of your indoor sanctuary. It’s the perfect stage for sunset cocktails or slow morning coffees, where the boundaries between the comfort of home and the wild beauty of the backyard simply melt away.
Essential Elements:
- Pressure-treated 2×6 lumber for the frame
- Composite or cedar decking boards
- Pre-cast concrete deck blocks
- Level and string lines
- Hidden deck fasteners for a clean look
How to make it
- Clear the area and lay down a weed barrier topped with a thin layer of gravel. Since the deck ‘floats’ near the ground, you must prevent growth and ensure water drains away from the wood.
- Set your deck blocks in a grid pattern. Use a long straight-edge and a level to ensure every block is perfectly height-aligned with the others. This is the most critical step for a stable deck.
- Construct the outer box frame using 2×6 pressure-treated lumber. Place the frame into the slots of the deck blocks and check for squareness by measuring the diagonals.
- Install the interior joists every 12 or 16 inches on center. Use joist hangers and galvanized nails to secure them to the outer frame, ensuring a rock-solid foundation that won’t bounce.
- Lay your decking boards. Start from the outer edge and work toward the house. Use spacers to maintain a consistent 1/8-inch gap between boards for drainage and expansion.
- Use hidden fasteners or color-matched deck screws. This creates a high-end, ‘seamless’ look that is barefoot-friendly and highlights the natural beauty of the wood grain.
Conclusion: Your Home, Your Masterpiece
The beauty of these ‘underground’ trends isn’t just in the final product—it’s in the journey of creation. When you take the time to build a duck enclosure or meticulously layout a rock flower bed, you are pouring your personality into your surroundings. These projects prove that you don’t need a massive budget or a professional crew to create a lifestyle that feels luxurious, thoughtful, and uniquely yours. So, which project are you tackling first this weekend? The shimmering glass art or that dreamy floating deck? Whatever you choose, remember that the most beautiful homes are the ones that are lived in, loved in, and built by hand.