
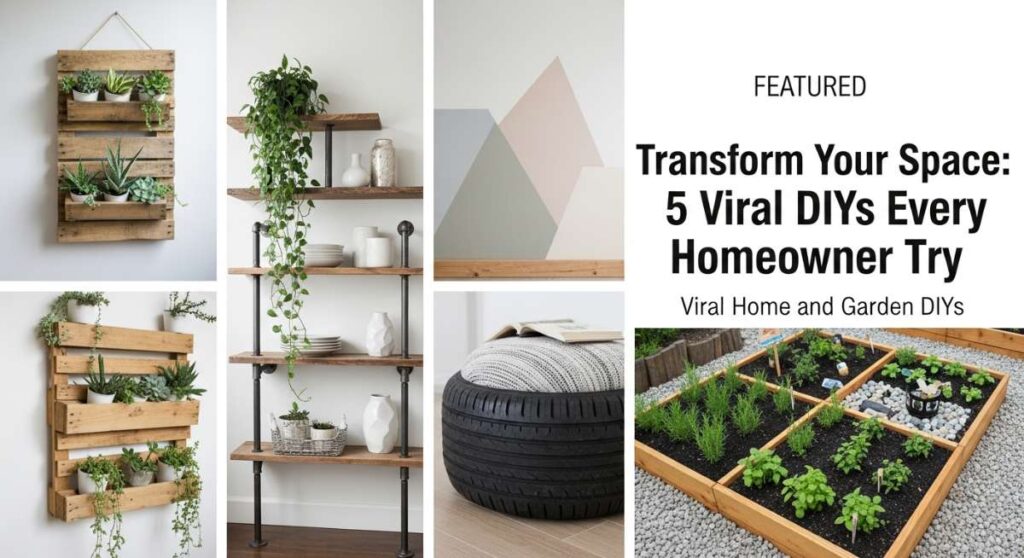
There is a special kind of magic that happens when you take a corner of your home and turn it into something truly personal. We’ve all scrolled through those mesmerizing social media reels, seeing spaces transform from mundane to breathtaking with just a few clever tweaks and a bit of elbow grease. Your home is your sanctuary, the place where memories are built and where your soul breathes, and it deserves to reflect the vibrant energy you bring to it every day.
Lately, I’ve been obsessed with how small, intentional projects can completely shift the mood of a living space. It’s not just about aesthetics; it’s about creating a lifestyle that feels curated and cozy. Whether it’s the sound of birds visiting a custom oasis or the satisfying click of a perfectly organized pantry, these DIYs are designed to touch all your senses. They are the viral projects that everyone is talking about, and for good reason—they actually work to make your daily routine feel like a luxury.
In this guide, I’m sharing ten of my favorite home and garden transformations that are currently taking the design world by storm. These projects range from artistic backyard upgrades to streamlined indoor solutions, ensuring there is a little something for every type of homeowner. Grab your toolkit, find a bit of inspiration, and let’s start making your dream space a reality one project at a time.
How to Create a Refreshing Garden Oasis for Local Songbirds
![]()
Why we love this
There is nothing quite as serene as the rhythmic splashing of water accompanied by the sweet, melodic trills of songbirds right outside your window. This project transforms your garden into a lively sanctuary where the cool mist of a fountain meets the soft, fluttering texture of feathers. Imagine sipping your morning coffee while watching a bright blue jay take a refreshing dip, the sunlight dancing on the water’s surface and the earthy scent of damp garden soil rising in the air. It creates a deep, soulful connection to nature that makes your backyard feel like a hidden woodland retreat.
Essential Elements:
- A shallow ceramic or stone basin
- A small solar-powered water pump
- Smooth river stones and pebbles
- A sturdy pedestal or level ground
- Fresh, dechlorinated water
- Surrounding pollinator plants like lavender or salvia
How to make it
- Begin by selecting a location that offers both sunlight (for the solar pump) and nearby cover, such as a shrub, so birds feel safe from predators; ensure the ground is perfectly level to prevent water runoff.
- Place your ceramic basin on a sturdy pedestal or directly on the earth, checking with a spirit level to ensure the water will sit evenly across the entire surface.
- Arrange the smooth river stones inside the basin, stacking some so they break the surface of the water; this provides essential perching spots for birds of different sizes to land without getting submerged.
- Submerge the solar-powered pump in the deepest part of the basin, securing the suction cups to the bottom, and position the solar panel in a spot that receives at least 6-8 hours of direct sunlight.
- Fill the basin with fresh water until the pump is completely covered, then wait for the sun to activate the motor; you should see a gentle, bubbling fountain effect within minutes.
- Maintain the oasis by scrubbing the stones once a week with a stiff brush to prevent algae buildup, ensuring the water remains crystal clear and inviting for your feathered visitors.
How to Transform Plain Outdoor Spaces with Colorful Garden Art
Why we love this
Adding art to your garden is like giving your landscape a voice; it’s an explosion of personality that breaks up the sea of green with vibrant, joyful hues. We love the tactile satisfaction of smooth, painted stones and the glossy finish of weather-resistant pigments that catch the light after a summer rain. This DIY brings a whimsical, gallery-like feel to your flower beds, turning every stroll through the yard into a sensory experience filled with bright pops of cobalt, sun-drenched yellow, and deep magenta. It’s a visual feast that celebrates creativity and makes your outdoor space feel uniquely yours.
Essential Elements:
- Smooth, flat river rocks or terracotta pots
- Outdoor-grade acrylic paints or paint pens
- High-quality synthetic brushes in varying sizes
- Clear UV-resistant outdoor sealant spray
- A bucket of soapy water for cleaning surfaces
- Stencils or painter’s tape for geometric designs
How to make it
- Start by thoroughly scrubbing your stones or pots in warm soapy water to remove any dirt, oils, or moss that could prevent the paint from adhering; let them dry completely in the sun for at least two hours.
- Apply a base coat of outdoor primer or a solid light-colored acrylic paint to create a blank canvas, which will make your final colors appear much more vivid and opaque.
- Once the base is dry to the touch, use your brushes or paint pens to create intricate patterns, mandalas, or bold stripes; for a professional look, apply thin layers rather than one thick one to avoid cracking.
- Watch for “doneness” by checking if the paint has lost its wet sheen and moved to a matte or semi-gloss finish, indicating it is ready for the next layer or detail work.
- After your masterpiece is finished, allow the paint to cure for a full 24 hours in a dry, dust-free environment to ensure maximum bond strength.
- Apply two light coats of UV-resistant clear sealant, waiting 30 minutes between sprays, to protect your art from fading under the harsh sun or peeling during heavy rainstorms.
How to Design a Charming Nesting Spot for Backyard Wildlife

Why we love this
There is a profound sense of stewardship that comes with building a home for the tiny creatures that share our environment. This nesting spot is a tactile marvel, filled with the rough textures of pinecones, the softness of dried moss, and the hollow reediness of bamboo stalks. It smells of cedar and autumn leaves, providing a cozy, organic aesthetic that blends seamlessly into any garden corner. Watching a solitary bee or a small toad find refuge in a structure you built with your own hands offers a quiet, heartwarming thrill that connects you to the cycle of life.
Essential Elements:
- A wooden frame or an old drawer (untreated wood)
- Hollow bamboo sticks or paper straws
- Dry pinecones, bark, and twigs
- Dried moss or untreated wood wool
- Chicken wire or mesh to secure the front
- Galvanized nails or wood glue
How to make it
- Construct or repurpose a wooden box frame with a slanted roof to ensure rainwater sheds away from the interior, keeping the nesting materials dry and mold-free.
- Cut your bamboo stalks or hollow reeds to the depth of the box using a fine-tooth saw, ensuring the edges are smooth so delicate wings don’t get snagged.
- Begin filling the frame by packing the bamboo sticks tightly in one section; they should be so snug that you cannot pull one out easily, which mimics the natural crevices bees love.
- In the remaining sections, layer in pinecones, bark, and moss, creating different densities of material to attract a variety of beneficial insects and small wildlife.
- Staple a layer of chicken wire over the front of the frame to prevent birds from raiding the nesting materials while still allowing the inhabitants easy entry and exit.
- Mount the structure on a south-facing wall or fence at least three feet off the ground, ensuring it is stable and doesn’t swing in the wind, providing a warm and secure environment.
How to Build a Summer Entertainment Station for Refreshing Poolside Drinks
Why we love this
Nothing says “summer luxury” like a dedicated station for ice-cold refreshments, where the clinking of ice cubes and the scent of freshly sliced lime define the afternoon. This setup brings the high-end resort vibe directly to your patio, featuring the sleek smoothness of a polished counter and the refreshing condensation on glass carafes. It’s the ultimate hub for social connection, where guests can gather to mix their own botanical-infused waters or zesty lemonades. The combination of functional organization and chic styling makes every outdoor gathering feel like a curated event.
Essential Elements:
- A weather-resistant utility cart or potting bench
- Large glass beverage dispensers with spigots
- An insulated ice bucket and metal tongs
- Acrylic shatterproof glassware
- Stainless steel garnish bowls
- Outdoor-rated lighting or fairy lights
How to make it
- Select a sturdy, weather-resistant cart and give it a thorough cleaning; if using wood, apply a fresh coat of outdoor sealant or a bright pop of waterproof paint to match your patio decor.
- Position the beverage dispensers on the top tier, ensuring the spigots hang slightly over the edge for easy pouring without needing to lift the heavy glass.
- Fill the lower shelves with organized stacks of acrylic glasses and a designated basket for colorful napkins and biodegradable straws to keep everything within arm’s reach.
- Set up a “garnish station” using small bowls filled with pre-sliced lemons, limes, and sprigs of mint; keep these on a bed of crushed ice to maintain their vibrant color and crisp texture.
- Install battery-operated fairy lights or a small outdoor lamp around the perimeter of the station to ensure the party can continue safely after the sun goes down.
- Top the station with a large, insulated bucket filled with high-quality ice, and keep a backup supply in a nearby cooler to ensure drinks stay frost-bitten even in the peak afternoon heat.
How to Set Up an Outdoor Sensory Station for Creative Child Play
Why we love this
This DIY is a celebration of childhood wonder, where the cool, squishy texture of mud and the gritty flow of sand become the building blocks of imagination. It’s a space that encourages little hands to explore, smell, and create, away from screens and surrounded by the fresh air. We love the organic chaos of this station—the sight of dandelion “soup” being stirred in a wooden bowl and the earthy aroma of wet garden soil. It’s a durable, messy, and absolutely vital addition to any yard that turns play into a rich, sensory-driven learning experience.
Essential Elements:
- A low wooden table or repurposed pallets
- Plastic washbasins or stainless steel bowls
- Assorted spoons, whisks, and funnels
- Natural materials: sand, smooth stones, pinecones
- Water source (hose or large jug)
- Non-toxic outdoor chalk or washable paints
How to make it
- Build or buy a sturdy, low-profile table that is at child-waist height; if using pallets, sand them thoroughly with 120-grit sandpaper to remove any possible splinters.
- Incorporate recessed areas by cutting holes in the tabletop that snugly fit your plastic or stainless steel basins, allowing them to stay in place during vigorous mixing.
- Fill one basin with clean play sand and another with water, providing a variety of kitchen tools like old whisks and metal measuring cups to encourage fine motor skill development.
- Create a “nature pantry” nearby—a small shelf stocked with buckets of pebbles, dried leaves, and flower petals that the children can “cook” with.
- Set the station on a surface that can handle spills, like a patch of grass or a pea-gravel area, to ensure cleanup is as simple as a quick spray with the garden hose.
- Check the station daily for “play-readiness” by refreshing the water and ensuring no sharp sticks or debris have fallen into the basins, keeping the environment safe and inviting.
How to Achieve a Streamlined Kitchen Storage System for Stress Free Cooking

Why we love this
There is a unique, calming satisfaction that comes from opening a pantry and seeing a perfectly uniform row of clear canisters filled with grains, pastas, and spices. This system removes the visual “noise” of mismatched packaging, replacing it with the clean lines of glass and the warmth of bamboo lids. We love the tactile feel of a smooth-gliding drawer and the instant accessibility of every ingredient. It transforms the kitchen from a place of cluttered chaos into a streamlined laboratory of flavor, where the aroma of toasted spices is the only thing competing for your attention.
Essential Elements:
- Airtight glass or BPA-free plastic canisters
- Uniform waterproof labels and a white paint pen
- Tiered shelf organizers or “Lazy Susans”
- Drawer dividers for utensils and tools
- A vacuum sealer for bulk items
- Measuring scoops that fit inside each jar
How to make it
- Empty your entire pantry or cabinet and group items by category—baking, grains, snacks, and oils—discarding anything past its prime to ensure a fresh start.
- Measure the height and depth of your shelves precisely before purchasing containers to maximize every inch of vertical space and avoid “dead zones” in the back.
- Decant dry goods into your uniform canisters; this not only looks beautiful but also allows you to see exactly when you are running low on essentials like flour or rice.
- Apply labels at the same height on every jar for a professional, viral-worthy aesthetic; use a waterproof pen so the labels don’t smudge during cooking or cleaning.
- Utilize tiered risers for canned goods so you can see every label at a glance, and place a Lazy Susan in the corners for oils and vinegars to prevent them from getting lost in dark corners.
- Maintain the system by performing a “five-minute reset” after grocery shopping, immediately decanting new items and wiping down any stray crumbs to keep the space pristine.
How to Illuminate Your Garden Path with Magical Evening Glow

Why we love this
As the sun sets, your garden can transform into a fairytale landscape with the simple addition of soft, ambient lighting. We love the way warm light catches the delicate edges of leaves and creates long, dancing shadows across the lawn. The glow is soft, not harsh, mimicking the ethereal quality of moonlight and guiding your steps with a gentle, golden radiance. It’s an invitation to spend more time outdoors after dark, breathing in the cooling night air and enjoying the peaceful stillness of your own private, illuminated world.
Essential Elements:
- Solar-powered LED path lights or lanterns
- Sturdy shepherd’s hooks (if using hanging lanterns)
- Rechargeable outdoor batteries
- Hand trowel for installation
- Glass beads or gravel for drainage around the base
- A soft cloth for cleaning solar panels
How to make it
- Plan your lighting path by walking the route at dusk to identify the darkest spots and potential tripping hazards where illumination is most needed for safety and beauty.
- Space your lights approximately 3 to 5 feet apart to create a soft overlap of light pools rather than a harsh, continuous runway look.
- Use a hand trowel to loosen the soil before inserting the light stakes; never force them into hard ground as this can snap the plastic or metal connectors.
- Ensure the solar panels are angled toward the south or the area of your yard that receives the most midday sun to ensure a full charge that lasts throughout the night.
- Wipe the solar sensors with a damp cloth once a month; visual cues of “doneness” for this step include a clear, shiny surface free of dust or pollen, which maximizes energy absorption.
- For an extra touch of magic, hang a few lanterns at varying heights on shepherd’s hooks tucked into flower beds to add vertical interest and a deeper sense of glow.
How to Add Artistic Personality to Your Backyard Storage Space
Why we love this
Storage sheds and utility boxes are often the forgotten “ugly ducklings” of the backyard, but they offer a massive canvas for artistic expression. We love the transformation of a boring grey wall into a mural of botanical dreams or a geometric masterpiece. The feel of the brush pulling across the wood grain and the smell of fresh, outdoor-grade paint signifies a space that is being cared for in every detail. It turns a functional necessity into a focal point of beauty, proving that even the most practical corners of our homes can be infused with soul and style.
Essential Elements:
- Outdoor wood or metal primer
- Exterior-grade latex paints in high-contrast colors
- A set of wide rollers and fine-detail brushes
- Painter’s tape for crisp lines
- Drop cloths to protect the grass
- A high-quality clear topcoat
How to make it
- Clean the surface of your shed or storage box with a pressure washer or a stiff brush and TSP (trisodium phosphate) to remove all dirt and loose debris.
- Apply a high-quality primer specifically designed for the material of your shed (wood vs. metal) and let it dry for the full time recommended on the can, usually 4-6 hours.
- Sketch your design lightly with a pencil; if you aren’t confident in freehanding, use a projector at night to trace a design onto the wall for perfect proportions.
- Start with the background colors first using a roller for even coverage, then move to smaller brushes for the detailed foreground elements like leaves or abstract shapes.
- Apply a second coat once the first is dry to the touch, looking for a solid, opaque finish with no “holidays” or thin spots where the primer shows through.
- Protect your mural with a clear, non-yellowing exterior topcoat to prevent the colors from fading in the sun or peeling due to moisture exposure.
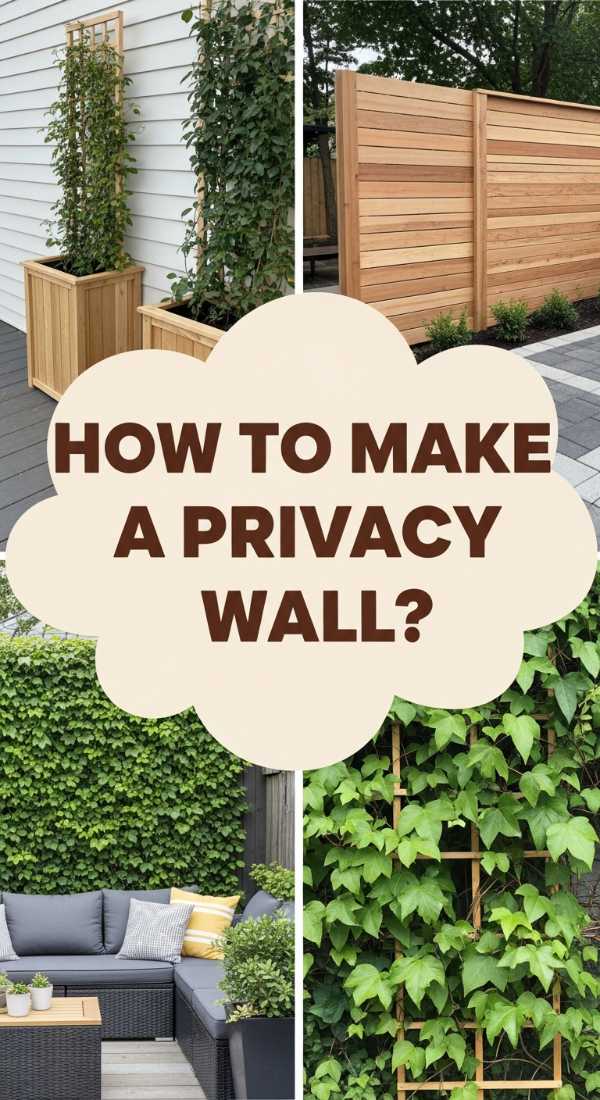
How to Build a Natural Green Barrier for Maximum Backyard Seclusion

Why we love this
There is nothing quite as luxury as true privacy, especially when it’s provided by a living, breathing wall of lush greenery. We love the rustling sound of leaves in the wind and the way a wall of jasmine or ivy can perfume the entire yard with a heady, sweet scent. This barrier feels soft and organic compared to a harsh wooden fence, providing a cooling effect on hot days and a sense of deep seclusion. It’s a sanctuary of emerald tones and varied textures that makes your outdoor space feel like a secret garden hidden away from the rest of the world.
Essential Elements:
- Pressure-treated wooden lattice or wire trellises
- Fast-growing climbers (Star Jasmine, Clematis, or English Ivy)
- High-quality organic potting soil and mulch
- Sturdy garden stakes or wall anchors
- Drip irrigation or a consistent watering schedule
- Pruning shears for shaping
How to make it
- Install your trellis or lattice panels securely to an existing fence or wall, or set them into the ground using 4×4 posts anchored in concrete for a freestanding barrier.
- Dig a trench or large holes at the base of the trellis, ensuring the soil is amended with organic compost to give your young climbers the best possible start.
- Space your plants roughly 12 to 18 inches apart; gently tease the roots out before planting to encourage them to spread into the new soil.
- Guide the initial tendrils of the plants onto the trellis using soft garden twine, being careful not to tie them too tight which can restrict growth.
- Water deeply and apply a thick layer of cedar mulch to retain moisture and keep the roots cool; visual cues of healthy growth include bright green tips and firm, hydrated leaves.
- Prune the plants twice a year to encourage thicker, bushier growth rather than just height, eventually creating a dense mat of greenery that blocks out the world.
How to Style a Nostalgic Retro Space for the Ultimate Aesthetic Vibe
[IMAGE_10]
Why we love this
Stepping into a retro-styled space is like taking a curated journey back in time, where every object tells a story of craftsmanship and cool. We love the mixture of velvet textures, warm teak wood, and the crackling, warm sound of a vinyl record playing in the corner. It’s an aesthetic that prioritizes comfort and personality, using bold patterns and earthy tones like mustard, olive, and burnt orange to create a vibe that is both cozy and incredibly chic. This DIY is about more than just decor; it’s about capturing a mood that is timeless, soulful, and deeply relaxing.
Essential Elements:
- Mid-century modern inspired furniture (tapered legs are key)
- A collection of vintage or reproduction vinyl records
- Textured throw pillows in velvet or macramé
- Warm-toned lighting (amber bulbs or lava lamps)
- Indoor greenery like Snake Plants or Monstera
- Retro-inspired artwork or geometric wall hangings
How to make it
- Choose a focal point for the room, such as a low-profile sideboard or a record player stand, and ensure it features the clean lines and warm wood tones characteristic of the mid-century era.
- Layer your lighting by avoiding harsh overhead lights; instead, use a mix of floor lamps with drum shades and small accent lights to create a warm, inviting amber glow.
- Incorporate varying textures to add depth—place a shag or geometric rug on the floor and toss a velvet throw over a leather chair to create a sense of tactile luxury.
- Curate a “styling moment” on your shelves by mixing modern books with vintage finds like brass figurines or old-school cameras for an authentic, lived-in feel.
- Add life to the space with large-leafed tropical plants placed in ceramic pots with wooden stands, which provides a natural contrast to the structured furniture.
- Fine-tune the vibe by playing with the scent of the room—use incense or candles with notes of sandalwood or tobacco to complete the nostalgic sensory experience.
Conclusion
Transforming your home doesn’t require a massive renovation budget; it just requires a bit of creativity and the willingness to get your hands dirty. From the soothing sounds of a bird oasis to the organized bliss of a streamlined kitchen, these ten DIY projects offer a way to make your living space truly work for you. Each one is a step toward a home that feels more personal, more beautiful, and infinitely more joyful. I hope these ideas inspire you to look at your space with fresh eyes and start your next project today!
FAQ Section
Q: Do I need professional tools for these DIY projects?
A: Most of these projects are designed for beginners and can be completed with basic household tools like a drill, level, and brushes. For more complex builds like the green barrier or the sensory station, a few extra power tools might be helpful but aren’t always strictly necessary.
Q: How long do these projects typically take?
A: Most can be completed in a single weekend! Smaller tasks like organizing the kitchen or creating garden art might only take an afternoon, while the living green barrier takes time to grow into its full potential.
Q: Are these projects safe for households with pets?
A: Generally, yes! However, always double-check that the plants you choose for your garden or home are non-toxic to your specific pets, and ensure all paints and sealants are fully cured before allowing animals near them.