
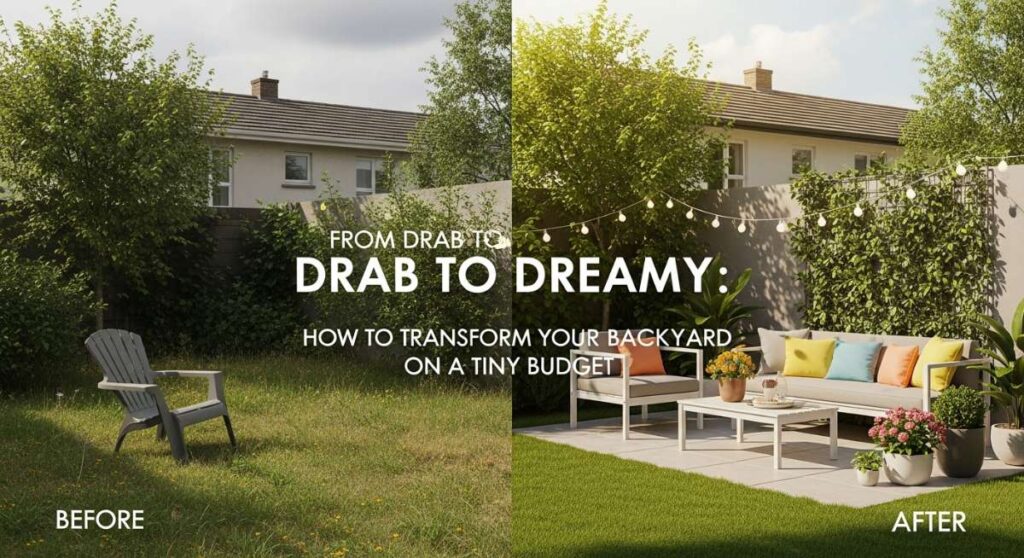
From Drab to Dreamy: How to Transform Your Backyard on a Tiny Budget
We’ve all been there—staring out the kitchen window at a patch of grass that feels more like a chore than a sanctuary. You scroll through Pinterest, sighing at the sprawling estates and designer patios, thinking your little slice of the outdoors is destined to remain ‘just fine.’ But what if I told you that the secret to a high-end, viral-worthy backyard isn’t a massive bank account, but a little bit of creative elbow grease and some strategic styling?
Last summer, I decided to stop waiting for the ‘perfect time’ to fix my yard and started experimenting with small, high-impact changes. From the way we frame our property lines to the secret magic of garden lighting, I discovered that the most luxurious spaces are often built on smart DIYs and thoughtful zoning. Today, I’m sharing my ultimate guide to turning your outdoor space into a whimsical, polished haven that looks like it cost a fortune, even if you’re working with a shoestring budget.
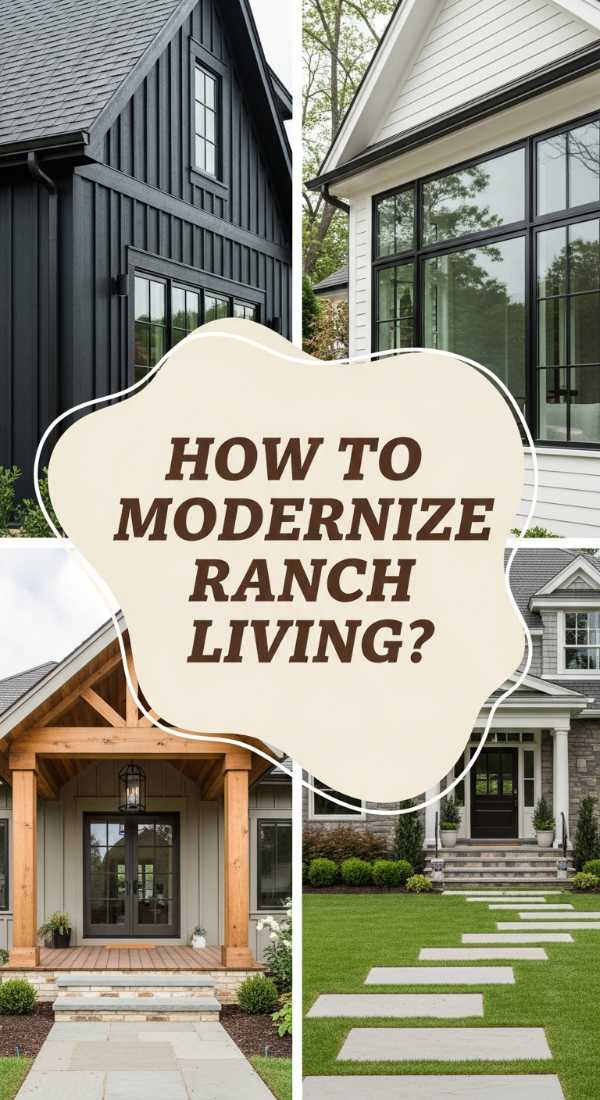
How to Modernize Ranch Living for Timeless Curb Appeal
Why we love this
There is something so incredibly grounding about a classic ranch-style home, but its low profile can sometimes feel a bit dated if it isn’t framed correctly. By modernizing the approach to the front yard, you create a seamless transition from the street to your front door that feels both expansive and welcoming. Imagine walking up a path lined with soft, waving grasses that catch the golden hour light, while the clean lines of your home’s architecture are highlighted by sophisticated, dark-trimmed accents. It turns a simple one-story dwelling into a statement piece that feels curated, timeless, and effortlessly chic.
Essential Elements:
- Neutral, high-contrast paint palette (think charcoal and off-white).
- Low-profile native shrubbery.
- Clean-lined wooden or stone walkways.
- Modern black hardware and house numbers.
- Oversized ceramic planters.
How to make it
- Start by assessing your home’s existing trim; sand down any peeling wood and apply a high-quality exterior semi-gloss in a bold, modern shade like ‘Iron Ore’ to define the windows and roofline.
- Remove any overgrown or ‘boxy’ hedges that block the low horizontal lines of the ranch, replacing them with airy perennials like Lavender or Feather Reed Grass for movement.
- Level your walkway path using a plate compactor, then lay large-format concrete pavers with a two-inch gap between them.
- Fill the gaps between pavers with dark river pebbles or pea gravel for a high-end ‘zen’ look that provides drainage and visual texture.
- Swap out dated gold or brass light fixtures for oversized, matte black lanterns to anchor the entryway and provide a warm, inviting glow at night.
How to Create Radiant Garden Accents for a Whimsical Outdoor Haven

Why we love this
As the sun begins to set, there is nothing more magical than a garden that begins to glow from within, transforming your backyard into a starlit sanctuary. Radiant garden accents take the guesswork out of outdoor styling by using light as a structural element, casting soft shadows and highlighting the intricate textures of your favorite plants. The aroma of damp earth and blooming jasmine seems even sweeter when you’re surrounded by the gentle hum of warm LED globes and hidden spotlights. It’s an ethereal experience that invites you to stay outside just a little bit longer, sipping tea under a canopy of light.
Essential Elements:
- Warm-toned solar-powered orb lights.
- Submersible LED pucks for water features.
- Copper string lights for tree canopies.
- Path lighting with ‘hidden’ bulbs to prevent glare.
- Frosted glass lanterns.
How to make it
- Identify the ‘anchor’ plants in your garden, such as a mature Japanese Maple or a large fern, and place a solar-powered spotlight at the base, angled upward at 45 degrees to create a dramatic ‘uplighting’ effect.
- Intertwine thin copper fairy lights through the branches of your patio umbrella or overhead pergola, securing them with clear zip ties for a ‘starry night’ vibe.
- Strategically place varying sizes of frosted solar globes in garden beds; tuck them slightly behind foliage so the light appears to be radiating from the plants themselves.
- For a budget water feature, fill a galvanized tub with water and floating solar fountains that light up at night, creating a shimmering focal point on your deck.
- Install motion-sensor deck lights under the lip of your stairs or railings to ensure safety while maintaining a sophisticated, built-in look.
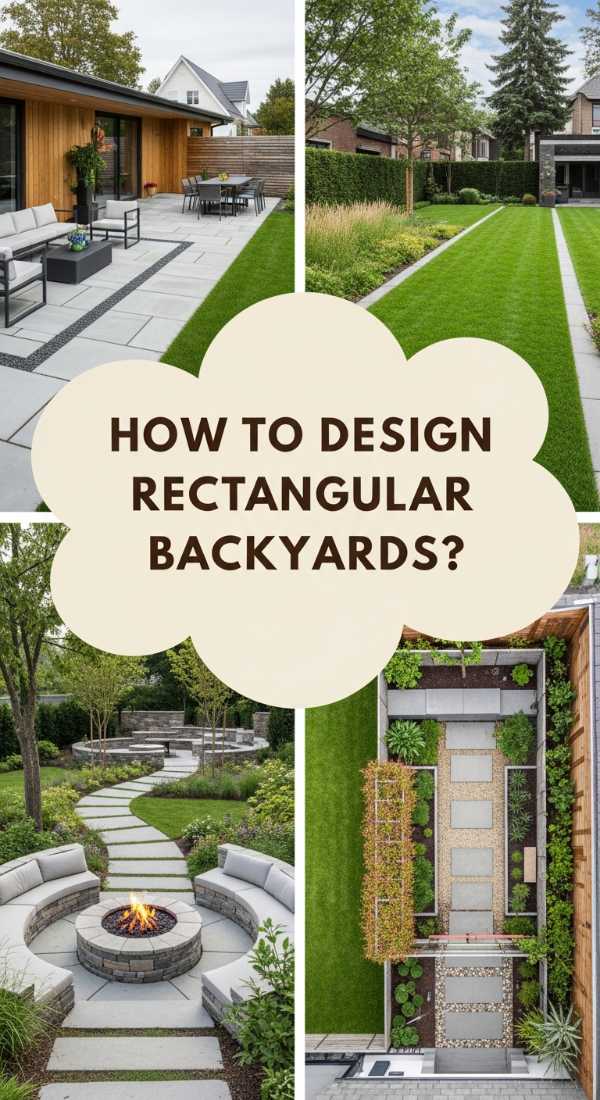
How to Design Rectangular Backyards for Maximum Style and Flow
Why we love this
Rectangular yards can often feel like a boring green hallway, but with the right design, they become the ultimate multi-functional retreat. We love this approach because it uses geometry to create ‘rooms’ outdoors, making a standard lot feel twice as large and significantly more expensive. There is a profound sense of satisfaction in walking from a cozy lounge area to a dining zone, guided by a path that feels intentional and rhythmic. It’s all about breaking up the long lines with textures and heights that draw the eye across the space rather than just down it.
Essential Elements:
- Defined outdoor rugs to anchor ‘rooms’.
- Vertical trellises to break the visual plane.
- L-shaped sectional seating.
- Geometric paver patterns.
- Taller border plants like Bamboo or Arborvitae.
How to make it
- Divide your yard into three distinct zones: a hardscape area for dining near the house, a soft grassy area for play or lounging in the middle, and a focal point (like a fire pit) at the far end.
- Use physical ‘barriers’ that don’t block the view, such as a low wooden bench or a row of mid-height planters, to signify the transition from one zone to the next.
- Lay a gravel or mulch path along one side of the rectangle, curving it slightly to break up the harsh straight lines of the fence.
- Install a vertical garden or a series of tall trellises along the longest fence line to add height and lushness without sacrificing floor space.
- Place a large outdoor rug in the central seating area, ensuring it is big enough that all furniture legs rest on the fabric, which visually ‘locks’ the space together.
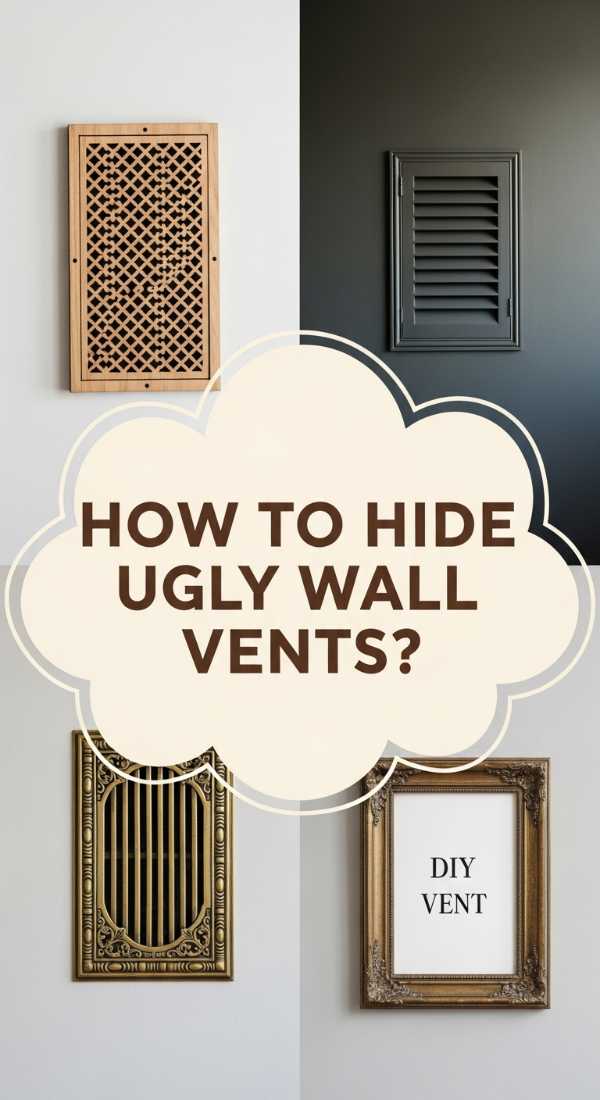
How to Hide Ugly Wall Vents for a Polished Home Aesthetic
Why we love this
Nothing kills a luxury backyard vibe faster than a giant, plastic dryer vent or a rusted intake pipe sticking out of your beautiful siding. We love this hack because it’s the ultimate ‘secret’ of professional home stagers—hiding the functional eyesores to let the architecture shine. When you cover these necessary evils with stylish, breathable solutions, the entire exterior of your home suddenly looks more expensive and custom-built. It’s that final 5% of effort that makes the difference between a house that looks ‘maintained’ and a home that looks ‘designed.’
Essential Elements:
- Decorative laser-cut metal screens.
- Cedar wood slats.
- Outdoor-rated spray paint.
- Magnetic mounting strips.
- Hinged ‘shutter’ boxes.
How to make it
- Measure the vent and add two inches of clearance on all sides to ensure proper airflow—never fully seal or block a vent’s exhaust path.
- Build a simple five-sided box frame out of pressure-treated cedar strips, leaving half-inch gaps between each slat for ventilation.
- For a more modern look, purchase a decorative aluminum screen panel and cut it to size using tin snips, then paint it to match your home’s trim color.
- Attach the screen or box to the siding using masonry screws or heavy-duty outdoor magnets, ensuring it can be easily removed for maintenance or cleaning.
- Plant a ‘distraction’ nearby, such as a tall potted ornamental grass, to further soften the area and integrate the vent cover into the landscaping.
How to Build Budget Fencing for Privacy and Style
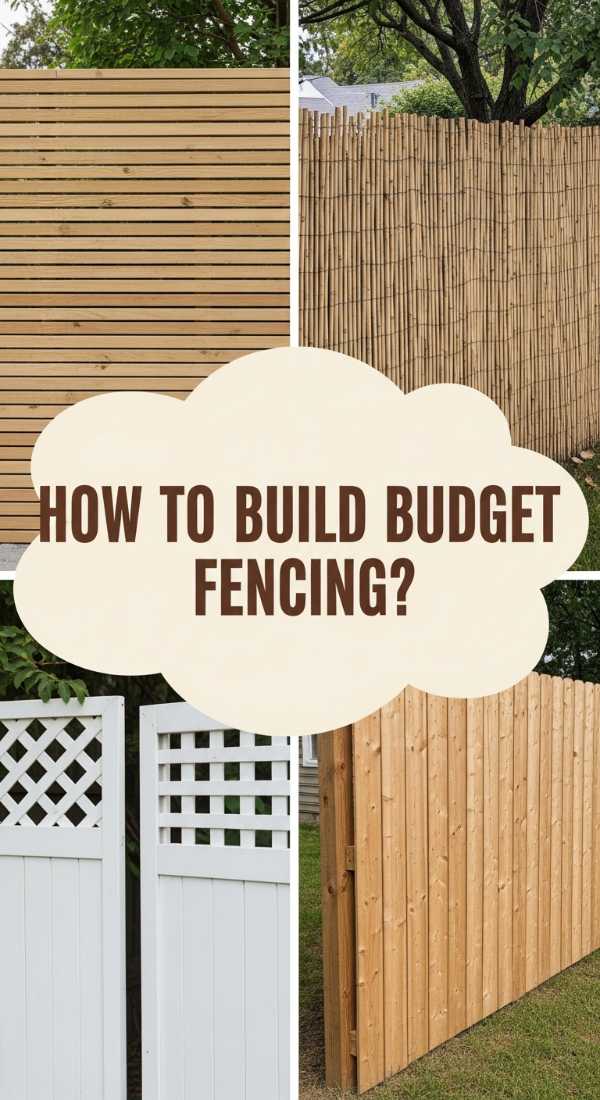
Why we love this
Privacy is the cornerstone of backyard relaxation, but traditional fencing can cost a small fortune. We love the budget-friendly approach of horizontal slat fencing because it feels incredibly modern and high-end while using standard lumber in a clever way. There’s a wonderful sense of seclusion that comes from a well-built fence that filters the light perfectly, creating a private cocoon where you can sunbathe or host dinner parties without feeling watched. It turns a basic boundary into a beautiful architectural feature that smells of fresh cedar and looks like a boutique hotel.
Essential Elements:
- Pressure-treated 1×4 pine or cedar boards.
- 4×4 support posts set in concrete.
- Black deck screws for a ‘hardware’ look.
- Wood stain (semi-transparent for grain visibility).
- Spacers (like a 1/2 inch piece of scrap wood).
How to make it
- Dig your post holes at least 24 inches deep, space them 6 to 8 feet apart, and set the 4×4 posts in quick-set concrete, ensuring they are perfectly plumb using a level.
- Starting from the top of the posts, screw your first horizontal board into place, ensuring it is perfectly level to prevent the entire fence from looking slanted.
- Use your 1/2 inch spacer to set the gap for the next board down; this gap allows wind to pass through, preventing the fence from blowing over in a storm.
- Stagger your board joints across different posts if you are doing a long run to increase the structural integrity and create a professional ‘brick-lay’ pattern.
- Finish with a high-quality oil-based stain in a ‘Teak’ or ‘Walnut’ tone to protect the wood from UV damage and give it that expensive, custom-milled appearance.
How to Transform Ranch Exteriors for a Luxe Contemporary Feel
![]()
Why we love this
Transforming a ranch exterior is all about celebrating its low-slung, ‘mid-century’ roots while adding the crispness of contemporary design. We love this because it’s essentially a facelift for your home, boosting curb appeal by thousands of dollars for the cost of some paint and lighting. The result is a home that feels grounded and expansive, with a luxe vibe that comes from a monochromatic color palette and the warmth of natural wood accents. It’s about creating a ‘wow’ factor that starts the moment someone pulls into the driveway, making the old feel brand new again.
Essential Elements:
- Dark siding paint (Navy, Charcoal, or Black).
- Natural wood garage door accents or wraps.
- Large, modern address numbers in brushed gold.
- Symmetrical landscaping.
- Modern ‘up-and-down’ wall sconces.
How to make it
- Power wash the entire exterior to remove oxidation and dirt, then apply a high-adhesion primer specifically designed for your siding type (brick, vinyl, or wood).
- Paint the main body of the house a deep, moody neutral and the trim a slightly darker shade of the same color for a sophisticated, monolithic look.
- Apply ‘wood-look’ vinyl wrap or thin cedar planks to your existing garage door to add an instant element of warmth and luxury without the cost of a new door.
- Replace small, builder-grade light fixtures with 18-inch modern cylinder lights that cast light both up toward the eaves and down toward the ground.
- Finish by framing the front door with two identical, oversized planters filled with structural plants like Sansevieria or Boxwood globes for a high-end, symmetrical finish.
How to Curate Sculptural Garden Features for Artistic Vibes

Why we love this
Every garden needs a ‘moment’—a place where the eye can rest and appreciate something more than just greenery. Sculptural features add an artistic, intentional vibe that makes a backyard feel like a curated gallery. Whether it’s the rugged texture of a large boulder, the smooth finish of a concrete sphere, or a DIY metal installation, these pieces provide year-round structure even when the flowers have faded. We love how a single well-placed object can change the entire energy of a corner, turning a ‘dead spot’ into a focal point of conversation and beauty.
Essential Elements:
- Basalt pillars or large fieldstones.
- Cast concrete spheres or cubes.
- Weathered steel (Corten) panels.
- Driftwood or large architectural branches.
- Pedestals for height variation.
How to make it
- Choose a location at the end of a sightline (like the end of a path or visible through a window) to place your main sculptural element.
- Create a ‘base’ for the sculpture by clearing a circular area and filling it with a contrasting material like white marble chips or dark lava rock.
- For a budget sculptural piece, use quick-set concrete and a large exercise ball as a mold to create a massive, smooth garden sphere; pop the ball once the concrete is cured.
- Group objects in threes of varying heights—for example, three stones of different sizes—to create a natural, pleasing visual rhythm.
- Install a dedicated low-voltage pin-light focused directly on the sculpture to highlight its textures and cast artistic shadows across the lawn at night.
How to Zone Narrow Outdoor Spaces for Effortless Entertaining
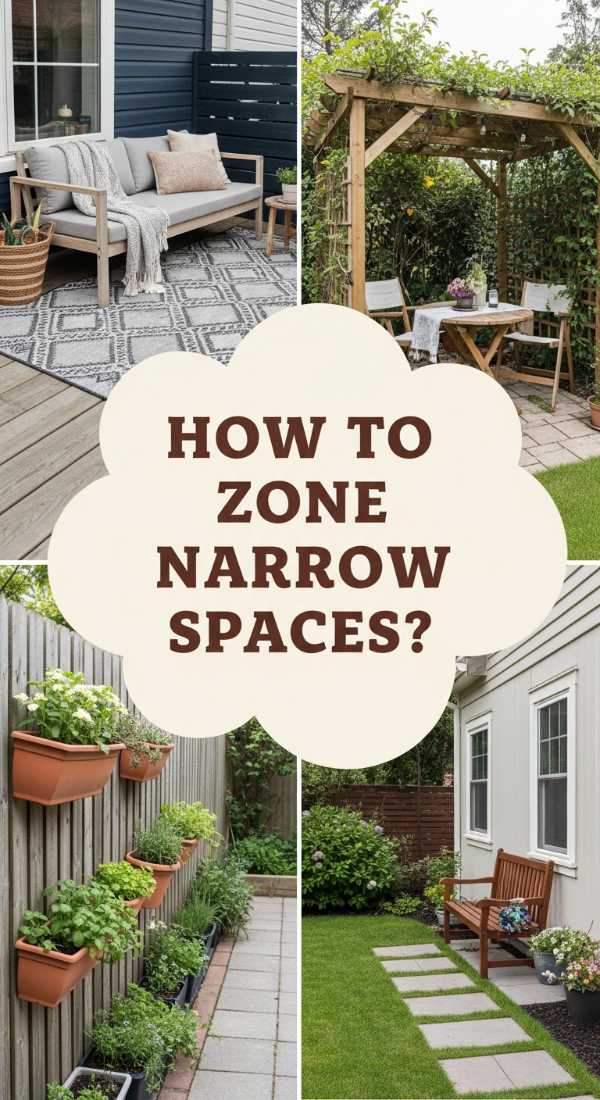
Why we love this
Narrow yards (the dreaded ‘side yard’) are often wasted, but they are actually the easiest spaces to make feel cozy and intimate. We love zoning these areas because it forces you to think vertically and strategically, resulting in a ‘secret garden’ feel that larger yards often lack. Imagine a long, narrow table under a canopy of lights, or a skinny bar top built right into the fence. It’s about maximizing every square inch to create a high-flow entertaining space that feels like a chic urban bistro rather than a cramped alleyway.
Essential Elements:
- Slim-profile bistro furniture.
- Wall-mounted folding tables.
- Vertical herb gardens.
- Long, linear string lighting.
- Mirrors to create the illusion of width.
How to make it
- Install a ‘floating’ bar top along the longest fence line using heavy-duty brackets and a stained 2×10 board, providing a place for drinks without needing bulky tables.
- Use vertical space by hanging tiered planters or a pallet herb garden, which adds lushness without taking up any precious floor width.
- Place your seating at the very ends of the narrow space to keep the middle ‘throughway’ clear, ensuring guests can move easily from the front to the back.
- Mount a large, outdoor-safe mirror on the fence; the reflection of the plants will trick the eye into thinking the yard is twice as wide as it actually is.
- Run string lights lengthwise along the narrow path to draw the eye forward, emphasizing the length of the space and making it feel like an intentional ‘destination.’
How to Craft Custom Interior Vent Covers for High-End Detail

Why we love this
The hallmark of a truly luxe home is that no detail is overlooked, even the interior floor and wall vents. While this is an ‘interior’ tip, it’s the perfect rainy-day project to match the high-end energy of your new backyard. We love this because those standard white metal slats are a total eyesore against beautiful hardwood or custom-painted walls. Replacing them with custom wood or decorative metal covers adds a level of craftsmanship that screams ‘custom-built home.’ It’s a tactile, visual upgrade that you’ll appreciate every single time you walk through a room.
Essential Elements:
- Decorative brass or steel mesh sheets.
- Pine or Oak trim molding.
- Wood glue and a brad nailer.
- Stain or paint to match your flooring/walls.
- Fine-mesh screen (to catch debris).
How to make it
- Remove the old metal cover and measure the interior opening precisely, then cut a frame out of thin wood molding to fit perfectly around the perimeter.
- Using tin snips, cut a piece of decorative metal mesh (patterns like ‘cloverleaf’ or ‘honeycomb’ look best) to fit the back of your new wooden frame.
- Secure the mesh to the back of the frame using a heavy-duty stapler, then glue a layer of fine insect screen over the mesh to prevent dust and small items from falling into the duct.
- Sand the wood frame until smooth and apply a finish that perfectly matches your floorboards or wall color for a ‘seamless’ look.
- Use small dabs of clear silicone or magnetic tape to hold the new cover in place, allowing it to be easily removed for vacuuming the vents.
How to Upgrade Property Boundaries for Affordable Curb Appeal

Why we love this
Your property boundary is the frame for your entire home ‘painting.’ When it’s messy or undefined, the whole house looks cluttered; when it’s crisp and intentional, everything looks expensive. We love this upgrade because it relies mostly on clear lines and simple materials rather than pricey installations. A well-defined boundary—whether it’s a perfectly edged lawn, a low stone wall, or a line of uniform shrubs—gives off a sense of order and prestige. It’s the ultimate way to claim your space and tell the world that every inch of your property is loved and maintained.
Essential Elements:
- Steel or plastic ‘no-dig’ edging.
- Dark, uniform mulch (black or dark brown).
- Boxwood or Privet for low hedging.
- Solar-powered path markers.
- Large white river rocks for contrast.
How to make it
- Use a half-moon edger or a spade to cut a crisp, 3-inch deep ‘V’ trench between your lawn and your garden beds or property line.
- Install black steel edging into the trench to maintain that sharp line and prevent grass from creeping into your mulch or gravel.
- Fill the beds with a thick, 3-inch layer of dark hardwood mulch, which provides a professional, high-contrast backdrop for your plants.
- Plant a ‘living border’ of low-maintenance shrubs like ‘Green Velvet’ Boxwoods, spacing them so they eventually grow together into a solid, velvet-green wall.
- Line the street-facing boundary with a row of uniform solar lanterns or large white stones to create a clear, high-end visual ‘finish’ to your property.
Creating Your Personal Sanctuary
Transforming your backyard doesn’t require a lottery win; it requires a vision. By focusing on these high-impact zones and taking the time to hide the ‘drab’ functional elements, you can create a space that feels curated, peaceful, and entirely yours. Whether you’re building a horizontal fence or just spray-painting an old vent, remember that the best homes are the ones that reflect the care and creativity of the people living inside them. Now, grab a shovel and a glass of lemonade—your dream backyard is waiting!