
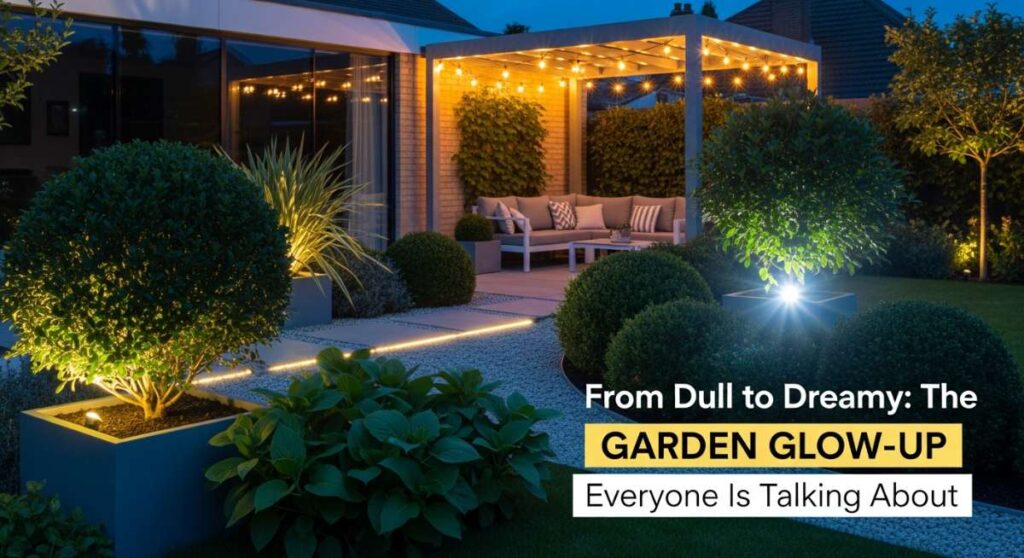
Have you ever looked out your back window and felt a little bit of a sigh escape your lips? Not the ‘ah, peace’ kind of sigh, but the ‘we really need to do something about this’ kind. I’ve been there. For years, our garden was just a patch of tired grass and a few forgotten pots. But something magical happens when you stop seeing your outdoor space as a chore and start seeing it as a canvas. The ‘glow-up’ isn’t just about curb appeal; it’s about creating a sanctuary where the air feels lighter and the evenings feel longer.
In this post, I’m sharing the exact projects that took our home from dull to dreamy. We aren’t just talking about a quick mow of the lawn; we are diving into the textures, the scents, and the functional beauty that turns a house into a lifestyle. Whether you’re looking to host the ultimate summer soirée or just want a quiet corner to watch the sunset with a glass of lemonade, these transformations are designed to inspire your inner designer and get your hands a little dirty in the best way possible.
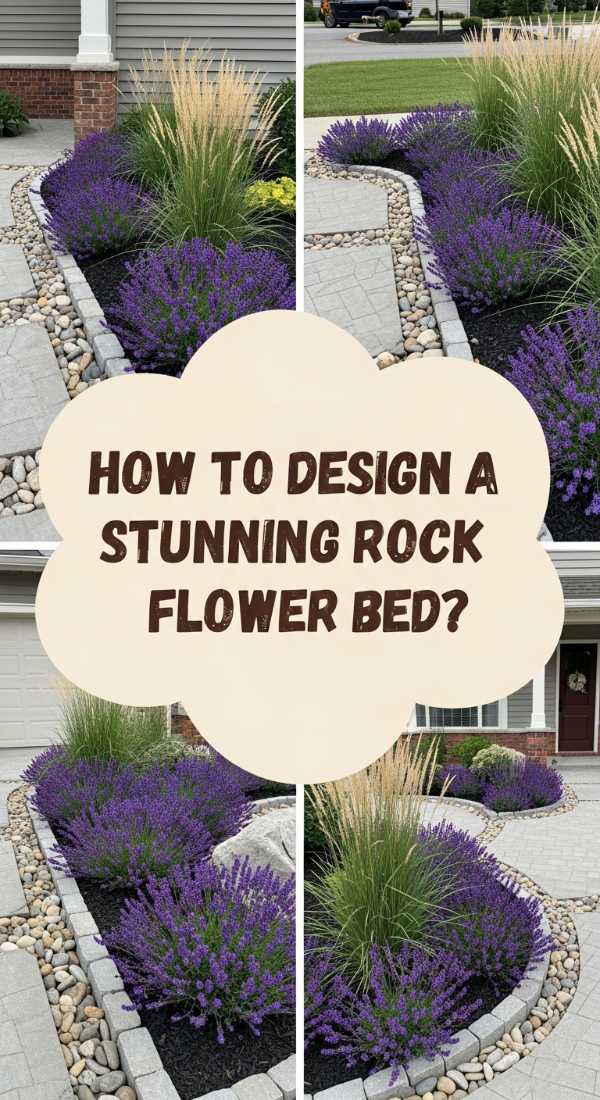
How to Design a Stunning Rock Flower Bed for Effortless Curb Appeal
Why we love this
There is something incredibly grounding about the contrast between rugged, cool-toned river rocks and the soft, vibrant petals of a well-curated flower bed. The texture of the stones provides a sophisticated, permanent structure that looks just as beautiful under a soft spring rain as it does glowing in the heat of a summer afternoon. We love the way the earthy scent of damp stone mingles with the fragrance of lavender or creeping thyme, creating a low-maintenance landscape that feels both modern and timeless. It’s the ultimate way to frame your home with a clean, intentional aesthetic that never feels overgrown.
Essential Elements:
- Multi-sized river rocks or Mexican beach pebbles
- Heavy-duty landscape fabric
- Large accent boulders
- Galvanized steel or heavy-duty plastic edging
- Drought-tolerant perennials (like Stonecrop, Salvia, or Ornamental Grasses)
- Garden staples for fabric security
How to make it
- Begin by marking your perimeter using a garden hose or spray paint to create fluid, organic curves rather than rigid straight lines.
- Excavate the area to a depth of about 3 to 4 inches, ensuring you remove all grass and root systems to prevent future breakthroughs.
- Install your edging material along the perimeter; if using steel, ensure it is driven deep enough to prevent tripping while still providing a crisp visual border.
- Lay down high-quality landscape fabric, overlapping seams by at least 6 inches, and secure it firmly with garden staples every 12 inches to ensure no weeds can find a foothold.
- Cut ‘X’ shapes into the fabric where you wish to plant, dig your holes, and set your perennials into the soil, ensuring they are level with the ground.
- Place your large accent boulders first to create focal points, then pour your smaller rocks around them, spreading evenly to a depth of 2 inches so the fabric is completely obscured.
How to Build a Cozy Duck Enclosure for Happy Backyard Pets

Why we love this
Watching ducks waddle through a beautifully designed enclosure is pure soul-therapy. We love the rustic, homestead charm that a dedicated duck house adds to a backyard—the sound of soft quacking and the sight of them splashing in a clean pool is a sensory delight. The enclosure should feel like a cozy cottage, filled with the sweet, dry aroma of fresh pine shavings and the earthy scent of damp garden soil. It’s about more than just housing; it’s about creating a safe, picturesque environment where your feathered friends can thrive and you can enjoy the simple joys of nature right outside your door.
Essential Elements:
- Pressure-treated lumber for the frame
- Hardware cloth (1/2 inch gauge for predator protection)
- Corrugated roofing panels
- Clean pine shavings or hemp bedding
- A low-entry water basin or pre-formed pond
- Nesting boxes and a secure latching door
How to make it
- Frame out a 4×8 foot structure using 2×4 lumber, ensuring the roof has a slight pitch to allow for rain runoff.
- Wrap the entire frame in hardware cloth, burying the mesh at least 12 inches into the ground or creating a ‘skirt’ to prevent digging predators like foxes or raccoons from entering.
- Install the corrugated roofing, securing it with specialized roofing screws that include rubber washers to ensure a completely leak-proof interior.
- Build a sturdy ramp with small wooden cleats spaced 4 inches apart to help the ducks navigate the entrance without slipping.
- Inside, create a dedicated ‘dry zone’ with thick bedding for sleeping and a ‘wet zone’ where their water basin sits on a gravel base to manage splashes and mud.
- Finish with a heavy-duty sliding bolt latch on the door to keep the enclosure secure at night, and add a coat of exterior-grade, bird-safe paint for a polished look.
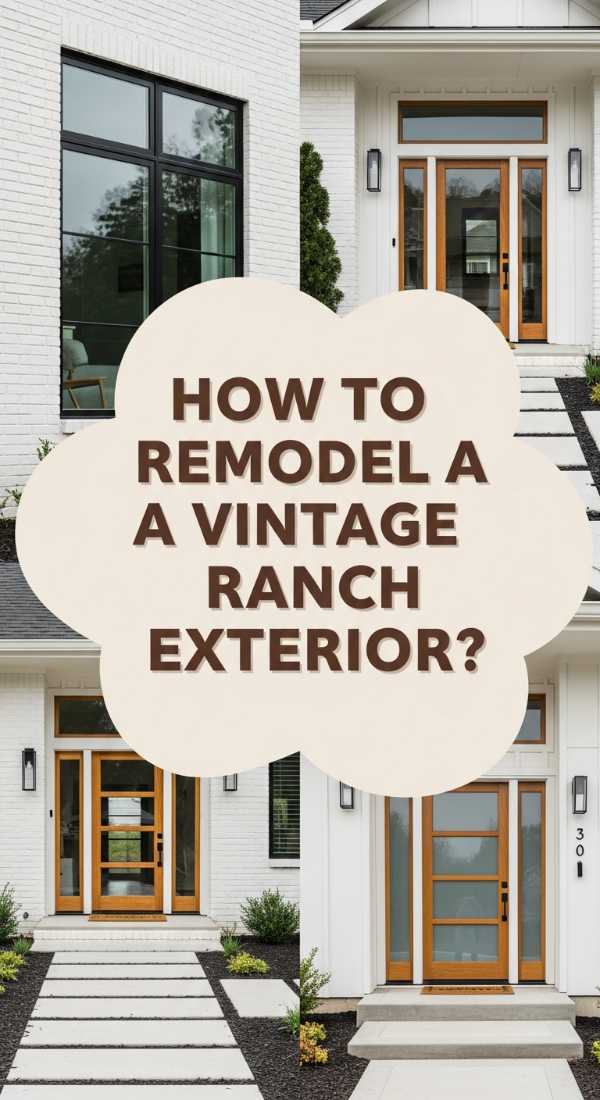
How to Remodel a Vintage Ranch Exterior for a Modern Dream Home Look
Why we love this
There is a profound satisfaction in peeling back the layers of a dated ranch and revealing its sleek, mid-century potential. We love the transformation from ‘tired’ to ‘trending’ through the use of bold contrasts—think deep charcoals against warm, natural wood accents. The feel of a freshly painted brick or the smooth texture of new horizontal slats creates a visual rhythm that is incredibly calming. It’s about honoring the original soul of the home while infusing it with the crisp, clean lines of modern design, making your house the undisputed star of the neighborhood.
Essential Elements:
- High-quality exterior masonry paint or limewash
- Cedar or composite horizontal slat siding
- Modern black metal light fixtures
- A bold, matte-finish front door
- Minimalist house numbers
- Modern landscaping elements like boxwoods or architectural agaves
How to make it
- Thoroughly power wash the exterior to remove decades of dust and loose paint, ensuring a pristine surface for new applications.
- Apply a high-quality primer followed by two coats of masonry paint; use a sprayer for the most even, professional-grade finish on brick surfaces.
- Install cedar slat accents around the entryway or as window shutters to introduce warmth and break up the monochromatic paint scheme.
- Swap out dated, ornate hardware for oversized, matte black handles and minimalist house numbers that align with the home’s horizontal lines.
- Replace old exterior sconces with ‘up-and-down’ lighting fixtures that create dramatic shadows and highlight the new texture of the walls at night.
- Finish the look by clearing away overgrown bushes and replacing them with a structured, minimalist garden bed that mirrors the home’s new modern geometry.
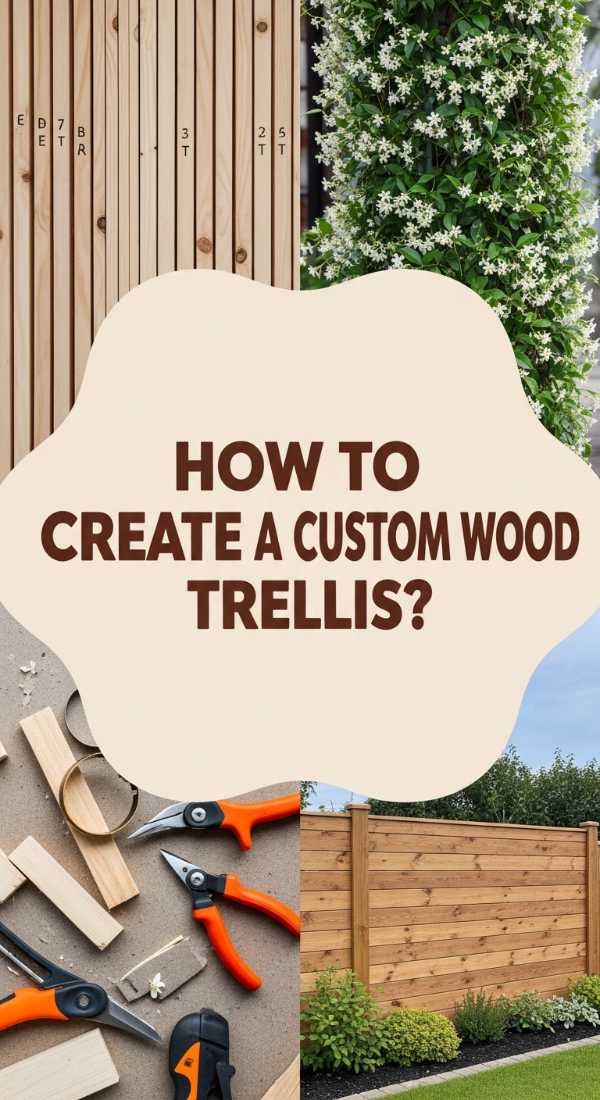
How to Create a Custom Wood Trellis for a Vertical Garden Oasis
Why we love this
A custom wood trellis is the secret ingredient to turning a flat wall into a living, breathing tapestry. We love the way the scent of blooming jasmine or climbing roses clings to the cedar, creating a fragrant hallway that dances in the breeze. The tactile quality of the rough-hewn wood combined with the delicate tendrils of a vine creates a beautiful tension between structure and wildness. It’s a vertical escape that draws the eye upward, making even the smallest patio feel like a lush, expansive secret garden where you can lose yourself in a book for hours.
Essential Elements:
- Cedar 2×2 posts and 1×2 slats
- Outdoor-rated wood screws
- Wood stain or sealant (clear or tinted)
- Wall mounting spacers and anchors
- Climbing plants (Clematis, Honeysuckle, or Star Jasmine)
- Measuring tape and a level
How to make it
- Measure your designated wall space and cut your cedar posts to the desired height, creating a rectangular outer frame first.
- Layout your horizontal and vertical slats on the ground, using a 6-inch or 8-inch square spacing pattern for a classic grid look.
- Pre-drill holes at every intersection to prevent the cedar from splitting, then secure the slats to the frame with exterior screws.
- Apply two coats of weather-resistant stain, ensuring you get into every joint to prevent rot in damp conditions.
- Mount the trellis to the wall using 1-inch spacers; this is crucial as it allows air to circulate and gives the plants room to wrap their tendrils around the back.
- Plant your climbers at the base, gently weaving the initial stems through the lower slats to ‘train’ them to grow upward.
How to Construct a Stylish Pool Bar for the Ultimate Summer Hangout
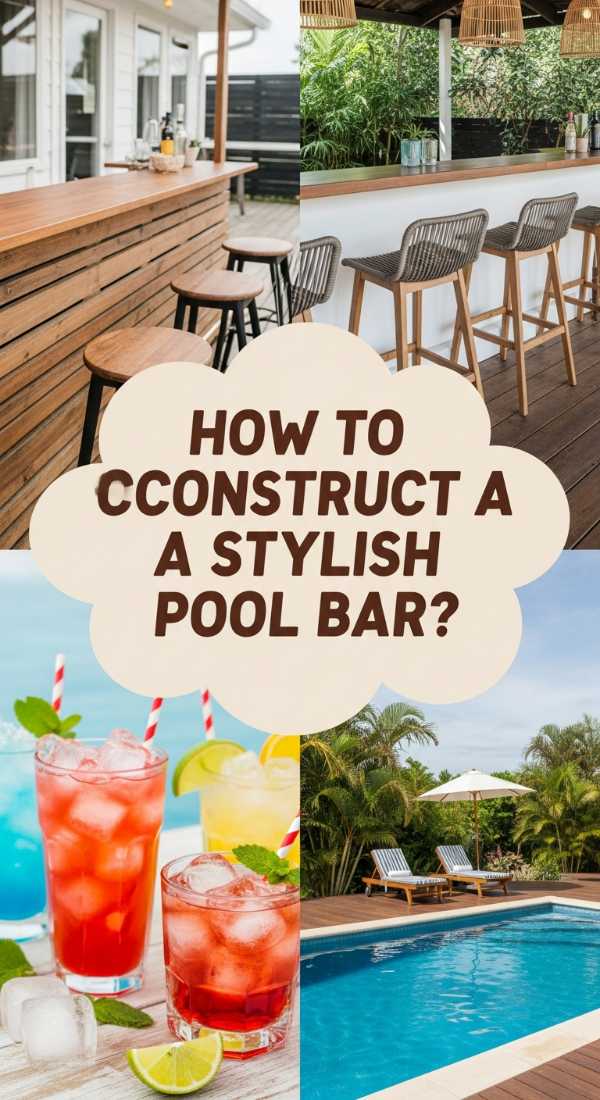
Why we love this
Imagine the feeling of a cool, smooth countertop under your arms while the sun warms your back and the scent of coconut lime cocktails fills the air. We love a pool bar because it bridges the gap between luxury resort vibes and the comfort of home. It’s the centerpiece of summer memories—the sound of ice clinking in glasses and the easy conversation that flows when everyone has a place to gather. Whether it’s finished in sleek concrete or warm tropical wood, it’s the ultimate lifestyle upgrade that makes every weekend feel like a vacation.
Essential Elements:
- Pressure-treated 4×4 posts for the base frame
- Corrugated metal or wood siding for the face
- Countertop material (poured concrete, butcher block, or stone)
- Outdoor-rated bar stools
- Built-in ice chest or beverage trough
- LED under-counter lighting
How to make it
- Build a heavy-duty rectangular frame using 4×4 posts and 2×4 cross-beams, ensuring the height is exactly 42 inches (standard bar height).
- Install a plywood sub-base for the countertop, then secure your chosen surface—if using concrete, ensure your form is perfectly level before pouring.
- Clad the front and sides of the bar with your aesthetic material; corrugated metal provides a modern industrial look, while cedar planks offer a coastal vibe.
- Create a ‘recessed’ area in the countertop for a stainless steel beverage trough, ensuring there is a drainage hole that leads away from the bar base.
- Sand all edges of the countertop until they are buttery smooth, then apply a food-safe, UV-resistant sealant to protect against spills and sun damage.
- Install a footrail about 6-8 inches off the ground using a sturdy metal pipe to ensure maximum comfort for your guests.
How to Craft a Sustainable Mud Kitchen for Endless Outdoor Play
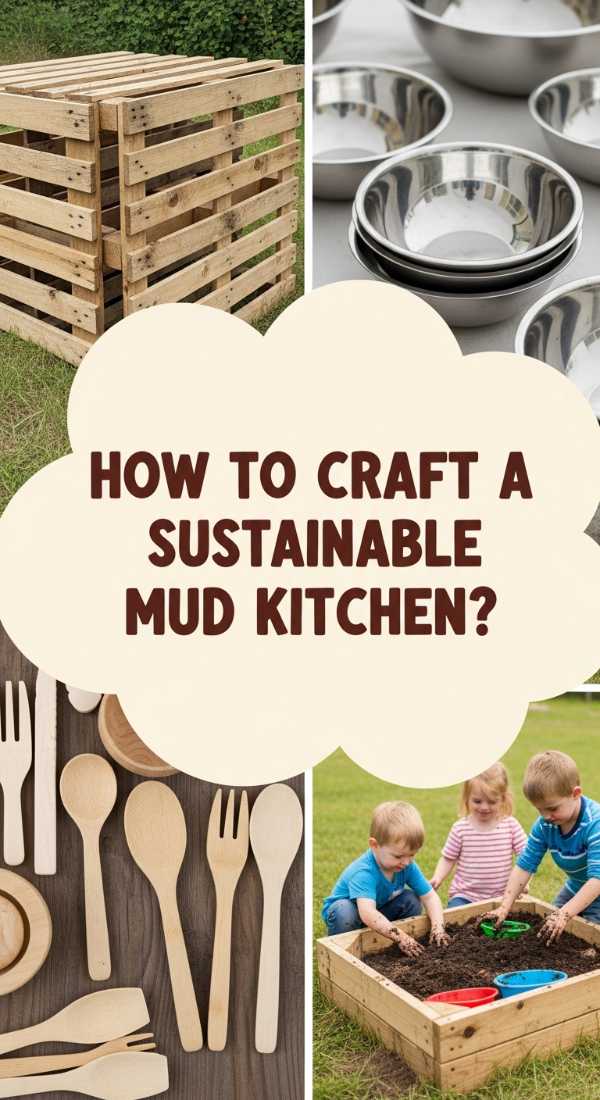
Why we love this
There is nothing quite like the joyful mess of a mud kitchen to bring out the pure magic of childhood. We love the tactile experience—the squish of wet earth between fingers, the aroma of crushed pine needles, and the clatter of old metal spoons against stainless steel bowls. It’s a sensory playground that encourages ‘slow play’ and imagination. By using repurposed materials, you’re creating a sustainable space that feels like a rustic woodland workshop, where ‘mud pies’ are the specialty of the house and the only limit is a child’s creativity.
Essential Elements:
- Upcycled wooden pallets or cedar planks
- Old stainless steel mixing bowls (for sinks)
- Discarded kitchen utensils and pots
- A non-functional (or functional) faucet
- Hanging hooks for storage
- Chalkboard paint for ‘menus’
How to make it
- Dismantle your pallets and sand the wood thoroughly to remove any splinters, then build a basic table structure at a height appropriate for your children.
- Trace the circumference of your mixing bowls onto the tabletop and use a jigsaw to cut out the circles, allowing the bowls to drop in and sit flush.
- Attach a vertical ‘backsplash’ board where you can mount a vintage faucet and several hooks for hanging colanders and whisks.
- Paint a small section of the backsplash with chalkboard paint so the kids can write out the daily specials of their ‘forest cafe.’
- Apply a non-toxic, water-resistant outdoor sealer to the wood to ensure it can withstand the inevitable water and mud play.
- Organize ‘sensory bins’ below the counter filled with dried beans, pinecones, and stones to give them plenty of ‘ingredients’ to work with.
How to Master Realistic Pantry Organization for a Stress Free Kitchen

Why we love this
A perfectly organized pantry is like a deep breath for your brain. We love the visual rhythm of uniform glass jars and the satisfying ‘click’ of a sealed lid. Walking into a space where every grain, spice, and snack has a home eliminates the mental clutter of a busy morning. The faint scent of cinnamon and coffee beans lingering in the air, combined with the aesthetic beauty of natural textures like rattan and wood, turns a mundane chore into a moment of domestic bliss. It’s not about perfection; it’s about a functional flow that makes nourishing your family effortless.
Essential Elements:
- Airtight glass or BPA-free plastic canisters
- Woven rattan or seagrass baskets for bulk items
- Tiered ‘stadium’ shelving for canned goods
- A high-quality label maker or vinyl decals
- Rotating turntables (Lazy Susans) for oils and vinegars
- Over-the-door organizers for small items
How to make it
- Completely empty your pantry and wipe down every shelf with a mild cleaner to start with a totally fresh slate.
- Group your items into ‘zones’ based on how you use them (e.g., Baking, Breakfast, Quick Dinners, Kids’ Snacks).
- Decant dry goods like flour, pasta, and cereal into airtight canisters; this not only looks better but keeps food fresh significantly longer.
- Place heavier, less-used items in large baskets on the floor or bottom shelf, while keeping daily essentials at eye level.
- Use a Lazy Susan in the corners or for tall bottles of oils and sauces so nothing gets lost in the ‘back-of-the-shelf’ abyss.
- Label everything clearly—include expiration dates on the bottom of jars—to ensure the whole family can maintain the system.
How to Style a Nostalgic Teen Room for a Total Y2K Aesthetic

Why we love this
The Y2K aesthetic is a vibrant, neon-soaked trip down memory lane that feels both playful and incredibly cozy. We love the mix of high-tech futurism and soft, fuzzy textures—think inflatable chairs meeting faux-fur rugs. The glow of a lava lamp against a wall covered in butterfly clips and CD collages creates a dreamy, iridescent atmosphere that is perfect for late-night chats or creative sessions. It’s a celebration of individuality and ‘maximalist’ fun, where the colors are bright, the vibes are optimistic, and the room feels like a personal sanctuary of cool.
Essential Elements:
- Inflatable furniture or velvet bean bags
- Beaded curtains for doorways
- Fairy lights and neon LED signs
- Butterfly wall decals and CD wall collages
- Lava lamps and glitter globes
- Pastel bedding with checkered or floral patterns
How to make it
- Choose a color palette that screams the early 2000s—think baby blue, hot pink, and lime green—and use these for your main textile elements.
- Create a ‘focal wall’ by arranging old CDs or printed posters in a tight, overlapping grid to mimic the bedroom walls of the pop-star era.
- Install a beaded curtain in the closet or main doorway to add that satisfying tactile ‘clack’ every time you enter the room.
- Incorporate various light sources: drape fairy lights along the ceiling and place a purple or pink neon sign above the bed for a cinematic glow.
- Add ‘soft’ elements like a white shaggy rug and heart-shaped pillows to balance out the plastic textures of the Y2K decor.
- Finish the look with a dedicated ‘vanity’ area featuring a trifold mirror and plenty of glittery organizers for the ultimate nostalgic vibe.
How to Install Budget Solar Lighting for a Magical Garden Glow

Why we love this
There is a specific kind of magic that happens when the sun goes down and your garden begins to twinkle with soft, golden light. We love solar lighting because it’s a guilt-free way to add ambiance without touching a single wire. The gentle glow highlighting the texture of a brick path or the silhouette of a Japanese Maple creates an enchanting evening landscape. It’s about the ‘glow-up’ that happens after dark, turning your backyard into a romantic, starlit retreat where the shadows are soft and the atmosphere is pure peace.
Essential Elements:
- Warm-toned solar stake lights (at least 10-15 lumens)
- Solar string lights (Edison style for a vintage look)
- Solar spotlights for focal trees
- Microfiber cloth for panel cleaning
- A rubber mallet for installation
- Rechargeable solar batteries (as backups)
How to make it
- Identify the areas that receive at least 6-8 hours of direct sunlight during the day to ensure your lights have a full ‘charge’ for the evening.
- Place path lights about 3 to 5 feet apart in a staggered pattern; avoid a straight ‘runway’ look for a more organic, professional feel.
- Use a rubber mallet to create a pilot hole in the ground before inserting the stakes to prevent the plastic poles from snapping in hard soil.
- Drape Edison-style solar string lights across fences or pergolas, ensuring the solar panel is mounted at the highest, sunniest point possible.
- Position spotlights at the base of your favorite garden features, angling them upward to create a ‘grazing’ light effect on textures like bark or stone.
- Clean the solar panels once a month with a damp microfiber cloth; dust and pollen can significantly reduce their charging efficiency.
How to Build a Lush Planter Privacy Wall for a Secluded Backyard Retreat

Why we love this
Privacy doesn’t have to look like a boring wooden fence; it can look like a towering wall of living green. We love the planter privacy wall because it provides a sense of seclusion while still feeling open and airy. The scent of cedar wood combined with the fresh, herbal aroma of tall grasses or bamboo creates a ‘spa-like’ enclosure. The rustle of leaves in the wind provides a natural sound barrier, making your patio feel like a hidden oasis where you can truly unplug from the world and enjoy your own private slice of paradise.
Essential Elements:
- Large rectangular cedar planter boxes
- Vertical 4×4 posts and 2×2 horizontal slats
- Heavy-duty pond liner (to protect the wood)
- Fast-growing tall plants (Bamboo, Horsetail, or Karl Foerster grass)
- Potting soil with moisture-retention crystals
- Organic mulch for the top layer
How to make it
- Construct or buy three large rectangular planters and line them with heavy-duty plastic to prevent the wet soil from rotting the wood over time.
- Attach 6-foot vertical posts to the back of the planters, then screw horizontal slats across them with 2-inch gaps to create a modern trellis screen.
- Fill the bottom third of the planters with lightweight stones or recycled soda cans to improve drainage without making the planters too heavy to move.
- Fill with a high-quality potting mix and plant your tall greenery; bamboo offers the densest screen, while ornamental grasses provide a softer, swaying motion.
- Add a 2-inch layer of cedar mulch to the top of the soil to lock in moisture and give the planters a professional, finished look.
- Position the planters in a slight ‘U’ shape or a straight line to block the specific sightlines from neighbors, creating your private nook.
The Final Glow-Up: Your Home, Reimagined
Transforming your space isn’t about spending a fortune; it’s about intentional choices that elevate your daily life. From the crunch of a new rock bed to the nostalgic glow of a Y2K bedroom, these projects prove that ‘dreamy’ is a DIY away. I hope this guide helps you look at your home with fresh eyes and a sparked imagination. Remember, the best homes aren’t just seen—they are felt. Happy building!
Frequently Asked Questions
- Q: What is the best way to maintain solar lights in winter?
A: It is best to bring solar lights indoors during extreme snow or ice, or at the very least, ensure the panels are kept clear of snow so they can still receive a charge on sunny winter days. - Q: Are ducks harder to keep than chickens?
A: Not necessarily, but they are messier! They require more water for splashing, which means you’ll need to manage drainage more carefully than you would with a chicken coop. - Q: Can I use regular paint for a brick ranch exterior?
A: No, you should always use a breathable masonry paint or limewash. Regular latex paint can trap moisture inside the brick, leading to peeling and structural issues over time.