
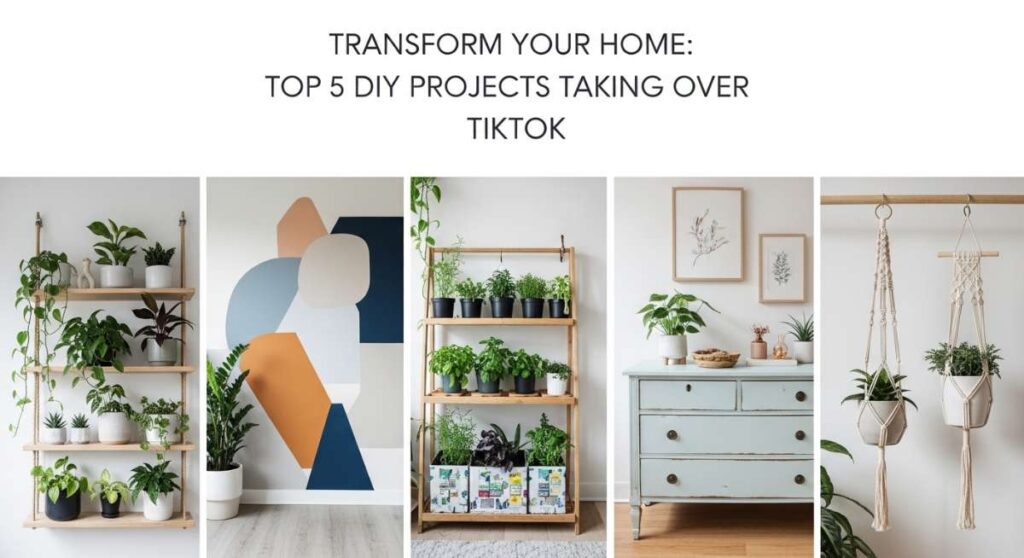
Transform Your Home: Top 5 DIY Projects Taking Over TikTok
Have you ever scrolled through your social media feed and felt that sudden, electric spark of inspiration? One moment you’re casually browsing, and the next, you’re imagining your dated ranch exterior transformed into a modern masterpiece or your cluttered kitchen pantry finally finding its Zen. There is something deeply satisfying about taking a weekend to roll up your sleeves and breathe new life into the spaces where you live, laugh, and grow.
Home isn’t just a place where we store our things; it’s a reflection of our journeys and a sanctuary from the outside world. These viral DIY projects aren’t just about aesthetics; they’re about reclaiming your environment and creating a home that feels uniquely yours. Whether you have a green thumb or you’re picking up a power drill for the first time, these projects are designed to be accessible, beautiful, and—most importantly—utterly transformative.
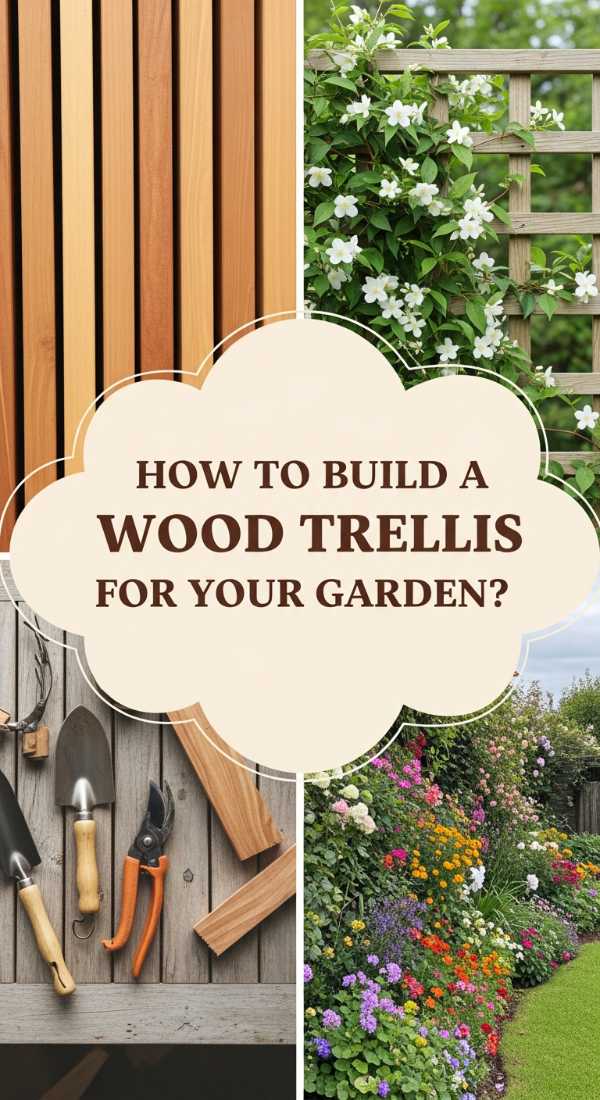
How to Build a Wood Trellis for a Lush Secret Garden
Why we love this
There is an ethereal, romantic quality to a vertical garden that simply cannot be matched by ground-level planting. Imagine the sweet, heady scent of jasmine or climbing roses wafting through the air as they wind their way up a handcrafted cedar structure. The texture of the raw wood against the vibrant green leaves creates a visual depth that turns a flat wall into a living tapestry, dappled with the soft glow of the afternoon sun. It creates a sense of enclosure and privacy that makes even the smallest backyard feel like a hidden, magical escape from the bustle of everyday life.
Essential Elements:
- Pressure-treated cedar or redwood lath strips
- Exterior-grade wood screws
- Power drill and drill bits
- Wood glue (exterior strength)
- Measuring tape and pencil
- Level
How to make it
- Measure your designated wall or fence area and decide on the height and width of your trellis; professional tip: leave a 2-inch gap between the trellis and the wall for air circulation to prevent rot.
- Cut your vertical support beams first, then lay them out on a flat surface like a driveway or garage floor to ensure they are perfectly parallel.
- Cut your horizontal lath strips to the desired width, and use a spacer block (a small piece of scrap wood) to ensure the distance between each horizontal rung is perfectly uniform throughout the build.
- Apply a small bead of exterior wood glue to each joint before driving in your screws; pre-drilling pilot holes is crucial here to prevent the thin lath strips from splitting as the screw enters the grain.
- Check the squareness of the frame by measuring diagonally from corner to corner; if the measurements are identical, your trellis is perfectly square.
- Once assembled, let the glue cure for 24 hours before mounting it to your exterior surface using sturdy masonry anchors or deck screws, ensuring it is perfectly level.
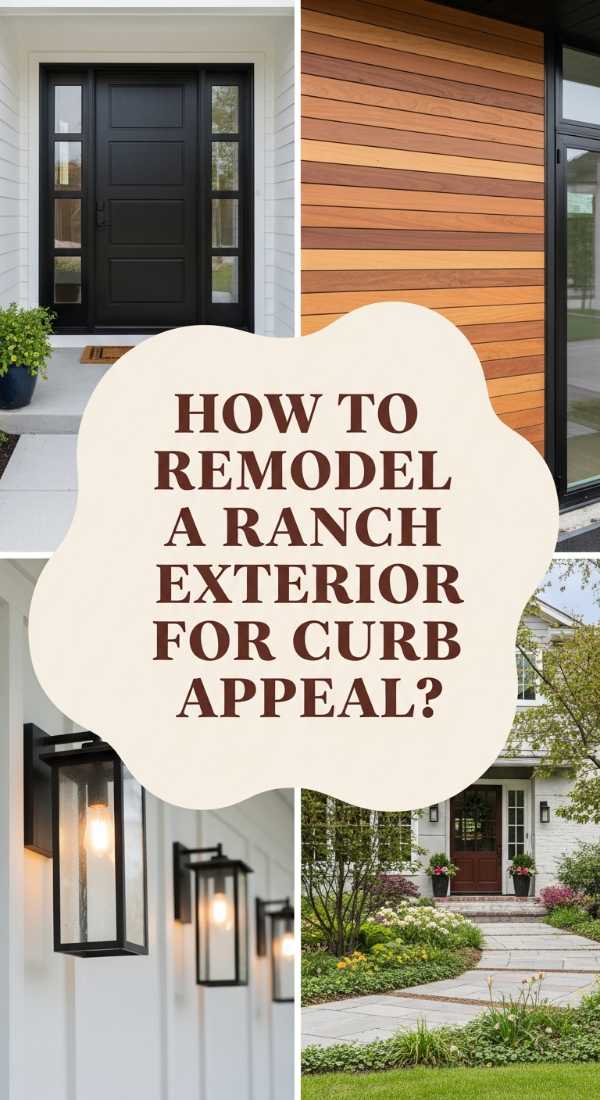
How to Remodel a Ranch Exterior for Total Curb Appeal
Why we love this
The classic ranch home is a canvas of potential, often hiding its true beauty behind dated brick or tired trim. There is a profound sense of pride that comes with driving up to a home that looks fresh, modern, and intentional. Imagine the contrast of crisp charcoal paint against warm wooden accents, and the way the morning light catches a newly installed glass-paneled door. It’s about more than just resale value; it’s about the emotional shift that happens when your home’s exterior finally reflects the warmth and style you’ve curated on the inside.
Essential Elements:
- High-quality exterior latex paint and primer
- Modern house numbers and hardware
- New shutters or cedar window boxes
- Power washer
- Paint sprayer or high-nap rollers
How to make it
- Begin by thoroughly power washing the entire exterior to remove years of dust, oxidation, and loose paint; professional tip: let the surface dry for at least 48 hours to ensure the new paint adheres properly.
- Scrape away any remaining peeling paint and patch cracks in the siding or brick with an appropriate exterior-grade filler, sanding it smooth once dry.
- Tape off windows, doors, and light fixtures with high-adhesion painter’s tape and plastic sheeting to protect them from overspray or drips.
- Apply a coat of high-bond primer, especially if you are painting over brick or transitioning from a dark to a light color; this provides the “bite” needed for the finish coat.
- Apply the topcoat using a paint sprayer for a professional, seamless finish, moving in steady, overlapping horizontal strokes to avoid runs.
- Install updated hardware, such as sleek matte black house numbers and a modern mailbox, then finish by mounting cedar shutters to add a touch of organic warmth to the cool paint tones.
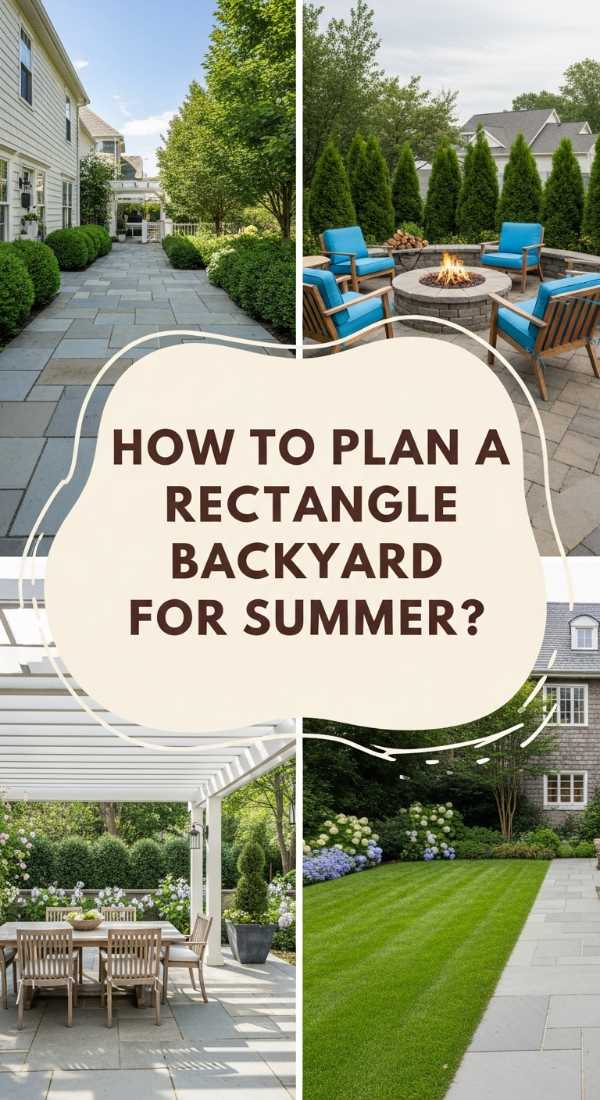
How to Plan a Rectangle Backyard for Maximum Summer Fun
Why we love this
A rectangular backyard often feels like a bowling alley, but with the right zoning, it becomes a multi-dimensional playground for summer memories. Picture the transition from a cool, stone-paved dining area to a soft, grassy lounge zone, and finally to a flickering fire pit corner where the scent of roasted marshmallows fills the air. The structured lines provide a sense of modern order, while the clever use of textures—from fuzzy outdoor rugs to smooth pavers—invites you to kick off your shoes and stay a while. It’s the ultimate setting for golden hour cocktails and long, laughter-filled dinners under the stars.
Essential Elements:
- Pavers or flagstones
- Outdoor furniture sets (dining and lounge)
- String lights and poles
- Landscaping fabric and gravel
- Low-maintenance perennials
How to make it
- Divide the rectangle into three distinct “rooms”: a dining zone closest to the house, a central play/lawn zone, and a relaxation zone at the far end.
- Excavate the dining zone to a depth of 4 inches, lay down a weed barrier, and fill with a base of leveled crushed stone before laying your pavers.
- Install 4×4 wooden posts in the corners of your seating areas, securing them in concrete-filled buckets or directly in the ground to serve as anchors for heavy-duty string lights.
- Create a visual “break” between zones using narrow garden beds filled with tall grasses or shrubs; this adds height and prevents the eye from seeing the whole yard as one flat rectangle.
- For the relaxation zone, clear a circular area for a fire pit and surround it with Adirondack chairs, ensuring there is a 3-foot safety clearance around the heat source.
- Finish by laying down outdoor rugs in the lounge areas to define the “floors” of your outdoor rooms, choosing weather-resistant materials like polypropylene for durability.
How to Use Rock Landscaping for a Zen Outdoor Retreat
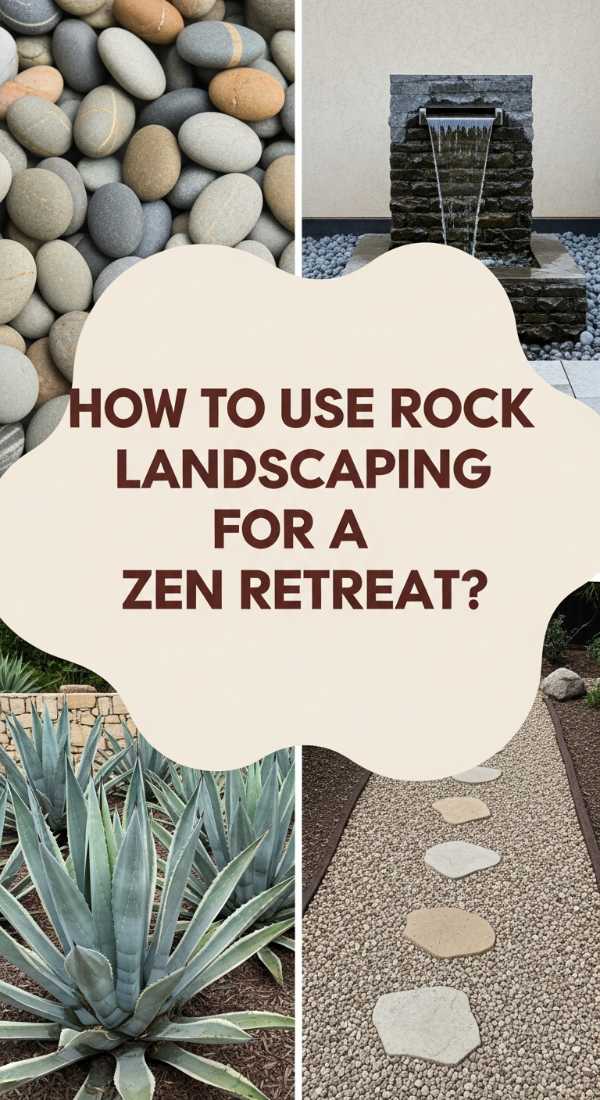
Why we love this
There is a timeless, grounding energy that comes from working with stone and gravel. The tactile experience of smooth river rocks underfoot and the rhythmic sound of gravel crunching as you walk creates an immediate sense of calm. A Zen rock garden offers a low-maintenance beauty that looks stunning in every season, providing a minimalist backdrop for architectural plants like Japanese Maples or ornamental grasses. It’s a space designed for deep breaths and quiet contemplation, where the neutral tones of the earth allow your mind to finally rest and reset.
Essential Elements:
- River rocks, pea gravel, or lava rocks
- Landscape fabric and staples
- Boulders for focal points
- Steel or plastic edging
- Shovel and rake
How to make it
- Clear all grass and weeds from the area and grade the soil slightly away from any structures to ensure proper water drainage.
- Lay down heavy-duty landscape fabric, overlapping the edges by 6 inches to prevent weeds from poking through your pristine rock beds.
- Install edging around the perimeter to keep the stones contained; professional tip: use steel edging for a modern, sharp line that won’t warp in the sun.
- Place your large focal boulders first, burying the bottom third of the stone in the ground so they look like natural outcroppings rather than just sitting on top of the soil.
- Spread your primary rock material (like grey river rock) in a layer at least 2-3 inches thick to ensure full coverage and a lush, dense appearance.
- Use a bow rake to level the surface, then hose down the rocks to wash away any dust and reveal their true, vibrant colors and textures.
How to Design a Hot Tub Area for Ultimate Weekend Relaxation

Why we love this
Nothing says luxury like a dedicated spa corner in your own backyard. Imagine the steam rising into the cool night air, the gentle hum of the jets, and the soft glow of LED lights reflecting off the water’s surface. Designing a specific area for your hot tub elevates it from a mere appliance to a destination—a private retreat where you can soak away the stresses of the week. By surrounding it with soft textures, privacy screens, and lush greenery, you create a boutique-hotel vibe that makes every Saturday night feel like a vacation.
Essential Elements:
- Reinforced concrete pad or heavy-duty deck
- Privacy screens (wood or lattice)
- Outdoor lighting (solar or low-voltage)
- Towel rack and side table
- Potted palms or tall bamboo
How to make it
- Ensure the foundation is perfectly level and rated for the weight of a filled tub (usually 3,000–5,000 lbs); professional tip: a 4-inch thick reinforced concrete pad is the gold standard for stability.
- Position the hot tub so the control panel is easily accessible but the most scenic view is facing the primary seating area within the tub.
- Construct a three-sided privacy surround using horizontal cedar slats; this provides a sense of seclusion while still allowing for breeze and airflow.
- Install low-voltage path lighting leading to the tub to ensure safe entry at night without the harshness of bright floodlights.
- Set up a “dry zone” nearby with a weather-resistant cabinet or rack for towels, robes, and a small table for drinks and snacks.
- Surround the base with large potted plants like bamboo or tall grasses to soften the hard lines of the tub and integrate it into the landscape.
How to Style a Teen Room for the Perfect Nostalgic Vibe

Why we love this
Teenagers today are embracing a beautiful blend of Y2K nostalgia and modern comfort, creating rooms that feel like a warm hug of self-expression. Think soft velvet textures, the warm amber glow of sunset lamps, and walls adorned with a curated collage of memories and art. It’s a space that prioritizes “vibes” over rigid rules, where a collection of vintage vinyl records sits comfortably next to high-tech gaming setups. This style is all about creating a cozy, safe cocoon where creativity can flourish and the personality of the occupant is the star of the show.
Essential Elements:
- Sunset lamps or RGB LED strips
- Wall collage kits or vinyl records
- Textured bedding (velvet, faux fur)
- Floating shelves
- Floor pillows or a bean bag chair
How to make it
- Start with a neutral base color on the walls to allow the colorful decor to pop without overwhelming the small space.
- Install LED light strips along the ceiling perimeter or behind the headboard; professional tip: use a diffuser channel for the LEDs to create a soft glow rather than visible “dots” of light.
- Create a gallery wall using a mix of personal photos, vintage magazine clippings, and vinyl covers, securing them with mounting putty to avoid damaging the paint.
- Layer the bed with different textures—a linen duvet, a velvet throw, and various knit pillows—to create that ultra-cozy, “cloud” look seen all over TikTok.
- Add a dedicated “chill zone” with a plush rug and floor seating, providing a space for friends to hang out that isn’t just the bed.
- Use floating shelves to display prized possessions like crystals, cameras, or sneakers, keeping the floor clear to make the room feel larger.
How to Plant Flower Beds for a Welcoming Home Entrance
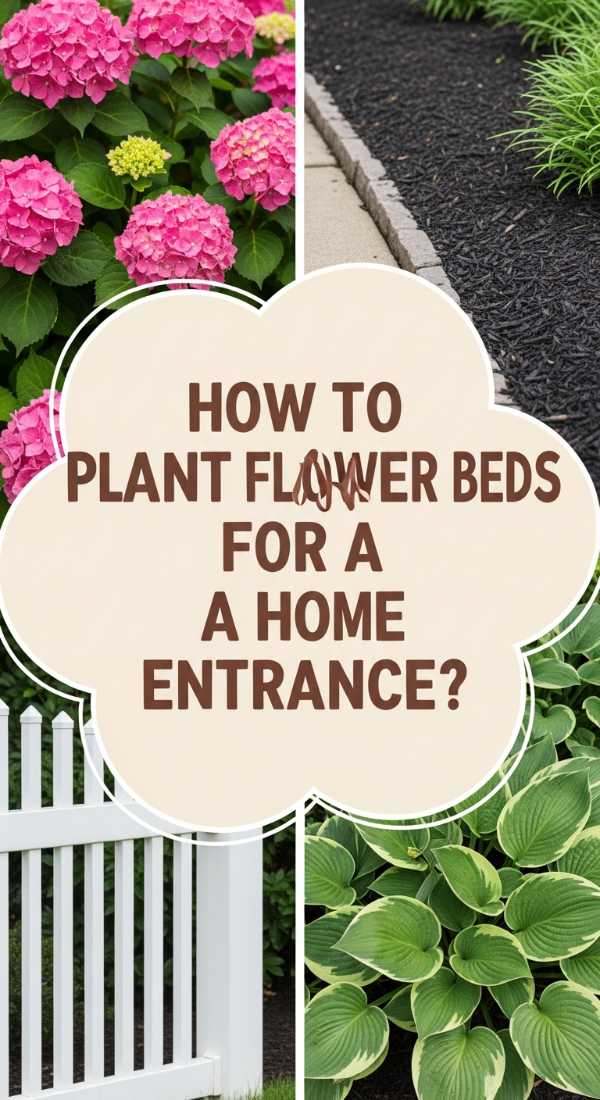
Why we love this
A well-designed flower bed is like a smile for your house. There is a sensory explosion that happens when you walk up to a front door framed by the bright faces of pansies, the deep purple of salvia, and the soft, silvery foliage of dusty miller. The hum of visiting bees and the delicate dance of butterflies add a layer of life to your home that no piece of furniture ever could. It’s the first thing guests see, signaling that the home inside is just as cared for and vibrant as the garden greeting them at the curb.
Essential Elements:
- Organic compost and garden soil
- Assorted perennials and annuals
- Mulch (shredded bark or pine straw)
- Hand trowel and garden fork
- Slow-release fertilizer
How to make it
- Identify the sun exposure of your entrance (North, South, East, West) and select plants that are specifically rated for those light conditions.
- Layout your plants while they are still in their nursery pots to visualize the arrangement; professional tip: place taller plants in the back, mid-sized in the center, and “spillers” or low-growers along the front edge.
- Dig holes twice as wide as the nursery pot and mix a handful of organic compost into the native soil to provide a nutrient-rich start for the roots.
- Gently tease the roots if they are circling the pot before placing the plant in the ground, ensuring the top of the root ball is level with the soil surface.
- Water each plant deeply immediately after planting to settle the air pockets around the roots, then apply a 2-inch layer of mulch to retain moisture.
- Deadhead (remove) spent blooms regularly throughout the season to encourage the plant to produce new flowers and keep the entrance looking tidy.
How to Create a Duck Enclosure for a Happy Farm Life
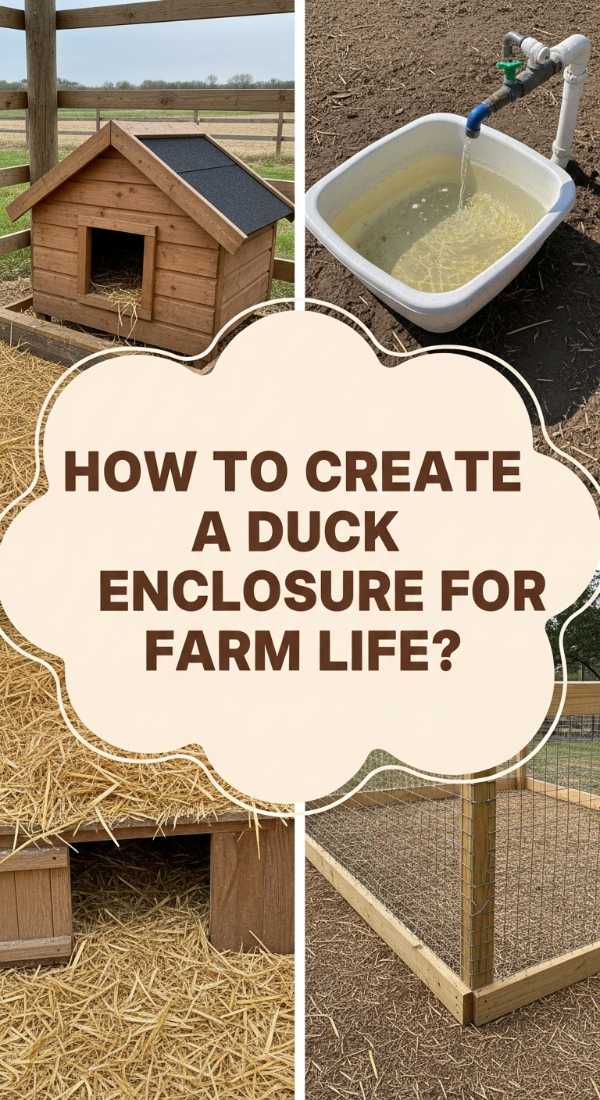
Why we love this
There is a rustic, whimsical charm to having ducks that brings a bit of the countryside to any backyard. Watching them waddle through the grass and hear their happy, rhythmic quacks as they splash in a fresh pool of water is instant therapy. A well-designed duck enclosure isn’t just a pen; it’s a tiny sanctuary that smells of fresh straw and damp earth. It offers a connection to the cycles of nature and the simple joy of caring for living creatures who reward you with playful antics and, if you’re lucky, fresh eggs for breakfast.
Essential Elements:
- Hardware cloth (not chicken wire)
- Secure wooden coop or shed
- Small pond or heavy-duty plastic pool
- Straw or wood shavings
- Automatic waterer and feeder
How to make it
- Construct a perimeter fence at least 4 feet high using hardware cloth; professional tip: bury the wire 12 inches into the ground to prevent predators like foxes or raccoons from digging underneath.
- Provide a draft-free but well-ventilated coop for nighttime safety, ensuring there is at least 4 square feet of space per duck.
- Install a water feature, such as a pre-formed pond liner or a sturdy kiddie pool, ensuring it has a ramp for easy entry and exit and a way to drain/clean it frequently.
- Line the floor of the coop with a thick layer of pine shavings or straw to absorb moisture, as ducks are much wetter than chickens.
- Create a shaded area within the run using a tarp or roof structure to protect them from the midday sun and avian predators.
- Check all latches and locks; use two-step carabiners or padlocks, as raccoons are notoriously good at opening simple slide-bolt latches.
How to Organize Art Rooms for Endless Creative Inspiration

Why we love this
A disorganized art room can stifle the very creativity it’s meant to house, but a perfectly organized one is a sanctuary of possibility. Imagine a wall of rainbow-ordered paints, brushes standing at attention in glass jars, and the smell of fresh paper and linseed oil inviting you to sit down and create. When every tool has a home, the friction between having an idea and executing it disappears. It’s a space where the organized surroundings act as a quiet support system for the beautiful, messy process of making art.
Essential Elements:
- Pegboards and hooks
- Clear acrylic bins
- Rolling utility carts
- Label maker
- Adjustable desk or easel
How to make it
- Sort your supplies by medium (watercolor, acrylic, sewing, scrapbooking) and purge any dried-out paints or broken tools.
- Install a large pegboard over your main workspace to keep frequently used tools like scissors, rulers, and tape at eye level and within arm’s reach.
- Use clear acrylic bins for smaller items like beads or tubes of paint; professional tip: clear bins allow you to see your inventory at a glance so you never buy duplicates.
- Utilize a three-tier rolling cart for “project-in-progress” supplies, allowing you to move your materials wherever the best light is hitting the room.
- Label every drawer and bin using a consistent font or style; this makes cleanup faster and ensures anyone else in the house knows where things go.
- Keep a “scrap bin” for leftover papers or fabrics, but limit its size to prevent it from becoming a clutter magnet.
How to Master Pantry Organization for a Stress Free Kitchen

Why we love this
There is a unique, quiet thrill in opening a pantry door to see rows of uniform glass jars, perfectly aligned labels, and a clear view of everything you own. The visual chaos of mismatched cardboard boxes is replaced by the satisfying texture of wooden lids and the transparency of glass. It turns the chore of cooking into a streamlined, joyful experience where you can find the cinnamon in seconds and see exactly when you’re running low on pasta. It’s about creating a sense of abundance and order in the heart of the home.
Essential Elements:
- Airtight glass or plastic canisters
- Tiered shelf risers
- Woven or wire baskets
- Waterproof labels
- Turntables (Lazy Susans)
How to make it
- Empty the entire pantry and wipe down the shelves; this is the only way to truly assess the space and get rid of expired items.
- Group like items together: baking supplies, snacks, pastas, and canned goods.
- Decant dry goods like flour, sugar, and cereal into airtight containers; professional tip: clip the cooking instructions or expiration date from the original box and tape it to the bottom of the jar.
- Use tiered risers for canned goods so you can see the labels of the back row without having to move the front row.
- Place oils, vinegars, and jars on a Lazy Susan in the corners or deep shelves to prevent items from getting lost in the back.
- Apply labels at the same height on every jar for a clean, cohesive look that mimics a high-end grocery boutique.
Wrapping Up Your DIY Journey
Transforming your home is a journey of a thousand small steps, each one bringing you closer to a space that truly resonates with your soul. Whether you’ve added a splash of color to your front door or organized your art supplies into a rainbow of inspiration, you’ve done more than just complete a task—you’ve invested in your own happiness and well-being. Remember, the goal isn’t perfection; it’s about creating a home that supports the life you want to lead. So, keep dreaming, keep building, and let your home be the beautiful, evolving story of who you are.