
Garden Goals: How to Achieve the Dreamy Outdoor Aesthetic Everyone is Saving
Have you ever found yourself scrolling through your ‘Dream Home’ Pinterest board at 11 PM, wondering how some people manage to make their outdoor spaces look like a scene from a Nancy Meyers movie? We’ve all been there—sighing over sun-drenched patios and perfectly manicured flower beds while looking out at our own patchy lawns. The truth is, that ‘viral’ aesthetic isn’t about having a professional landscaping crew or a million-dollar budget; it’s about intentional design choices and a little bit of dirt under your fingernails.
It’s time to stop saving those pins and start living in them. Whether you have a sprawling backyard or just a small concrete slab, there is so much potential waiting to be unearthed. This season, we’re focusing on creating spaces that don’t just look good in photos, but feel like a sanctuary for your soul—a place where the scent of blooming jasmine meets the quiet hum of a Sunday afternoon. Let’s dive into the projects that will turn your home into the neighborhood’s favorite view.
How to Design Rock Flower Beds for Stunning Curb Appeal
Why we love this
There is something incredibly grounding about the juxtaposition of rugged, earth-toned stones against the delicate, velvety petals of a fresh bloom. Rock flower beds offer a crisp, clean texture that doesn’t wash away in the rain or fade in the sun like traditional mulch does. Imagine the earthy scent of wet stone after a light drizzle, paired with the vibrant visual pop of purple salvia or bright yellow coreopsis. It creates a high-contrast, low-maintenance masterpiece that feels permanent and purposeful, giving your home an established, sophisticated ‘chef’s kiss’ of curb appeal.
Essential Elements:
- River rocks or crushed lava rock (various sizes)
- Heavy-duty landscape fabric
- Galvanized landscape staples
- Steel or heavy plastic edging
- A mix of drought-tolerant perennials and ornamental grasses
How to make it
- Start by clearing the area completely of weeds and old grass. Use a flat-head spade to define the perimeter, ensuring you reach a depth of at least 3 inches for the base layer.
- Install your edging material along the perimeter. If using steel, ensure the ‘heat level’ of the curve is smooth—use a mallet to gently tap it into the soil so it sits about an inch above the final rock line to prevent spillover.
- Roll out your heavy-duty landscape fabric, overlapping edges by at least 6 inches. This is the ‘prep’ phase that ensures your project remains weed-free; secure it tightly with galvanized staples every 12 inches.
- Cut ‘X’ shapes into the fabric where your plants will go. Dig your holes through these slits, amend the soil with compost, and set your plants. Ensure the root ball is level with the ground to prevent ‘overcooking’ the roots in the summer sun.
- Distribute your rocks starting from the back of the bed and moving forward. Aim for a thickness of 2-3 inches. The ‘visual cue for doneness’ is when no fabric is visible and the rocks form a seamless, textured carpet around the foliage.
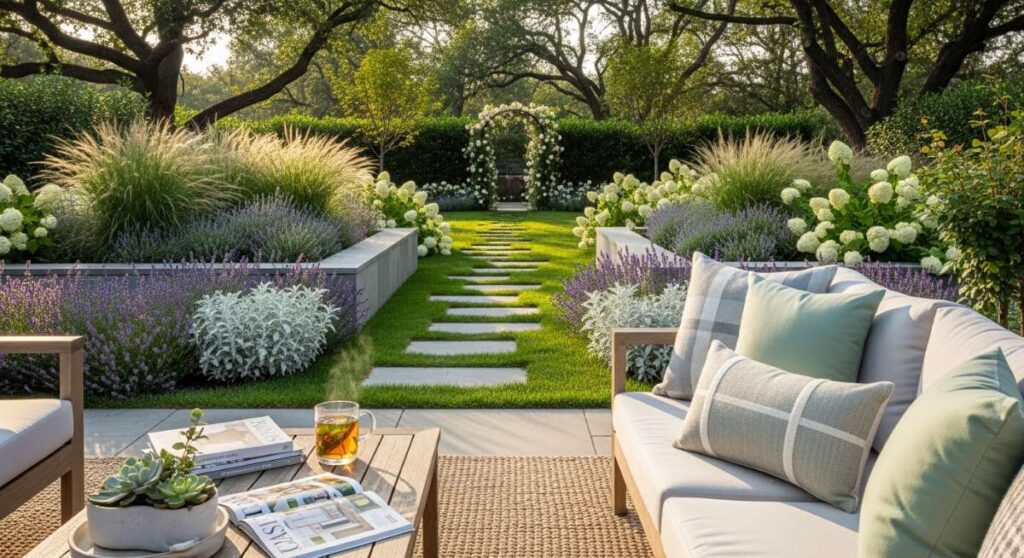
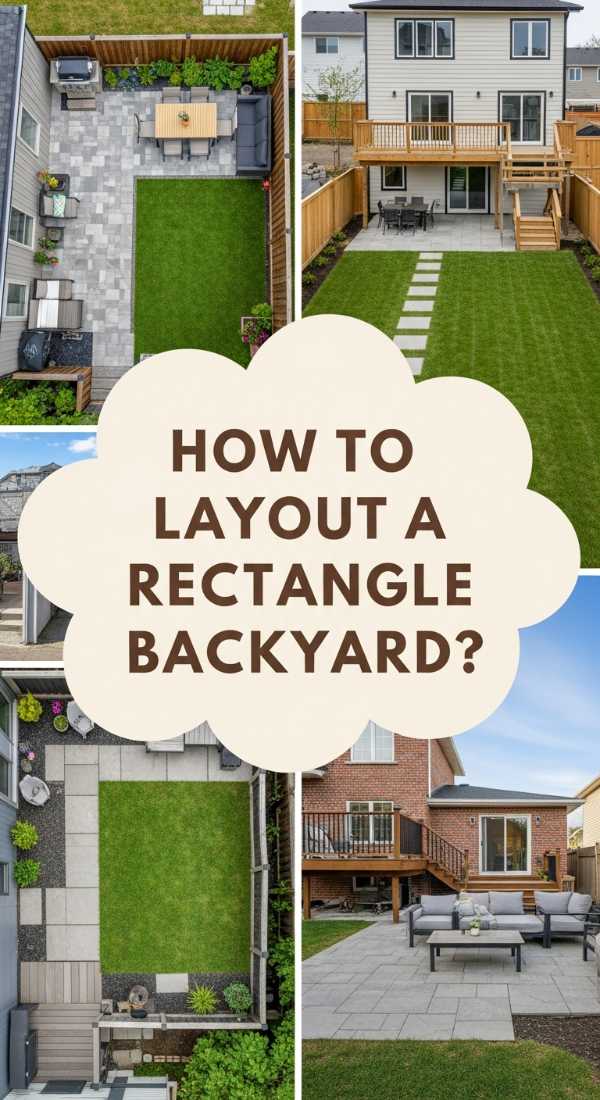
How to Arrange a Rectangular Backyard for Optimal Outdoor Living
Why we love this
A rectangular backyard is the perfect blank canvas, allowing you to create ‘rooms’ that flow together like a well-paced multi-course meal. We love how this layout emphasizes long sightlines, making even a modest yard feel expansive and airy. The texture of smooth pavers transitions into the soft, cool crunch of grass underfoot, while the aroma of woodsmoke from a fire pit area drifts toward the dining zone. It’s all about balance—mapping out zones for lounging, eating, and playing so that every square inch feels intentional and inviting.
Essential Elements:
- Large format outdoor pavers
- An outdoor area rug (weather-resistant)
- String lights (Edison bulbs)
- Zoned furniture (dining set vs. sectional)
- Tall planters for vertical interest
How to make it
- Measure your total square footage and divide it into thirds. The first third (closest to the house) should be your high-traffic ‘prep’ zone, typically for dining or grilling.
- Level the ground for your primary patio area. Use a base of crushed gravel followed by sand, compacting it firmly. Set your pavers with a 1/8 inch gap, checking frequently with a level to ensure a flat ‘cooking surface’ for your furniture.
- Create ‘visual walls’ using tall planters or a row of hedges. This separates the dining area from the lounging area, giving each space its own distinct ‘flavor’ and atmosphere.
- Install your lighting. Run a guide wire from the house to a sturdy post or tree at the back of the yard. String your lights along the wire, ensuring they sag just slightly for that relaxed, high-end resort aesthetic.
- Place your furniture to encourage flow. Leave at least 3 feet of ‘aisle space’ between zones. The ‘doneness’ indicator here is when you can walk from the back door to the far end of the yard without hitting a single obstacle.
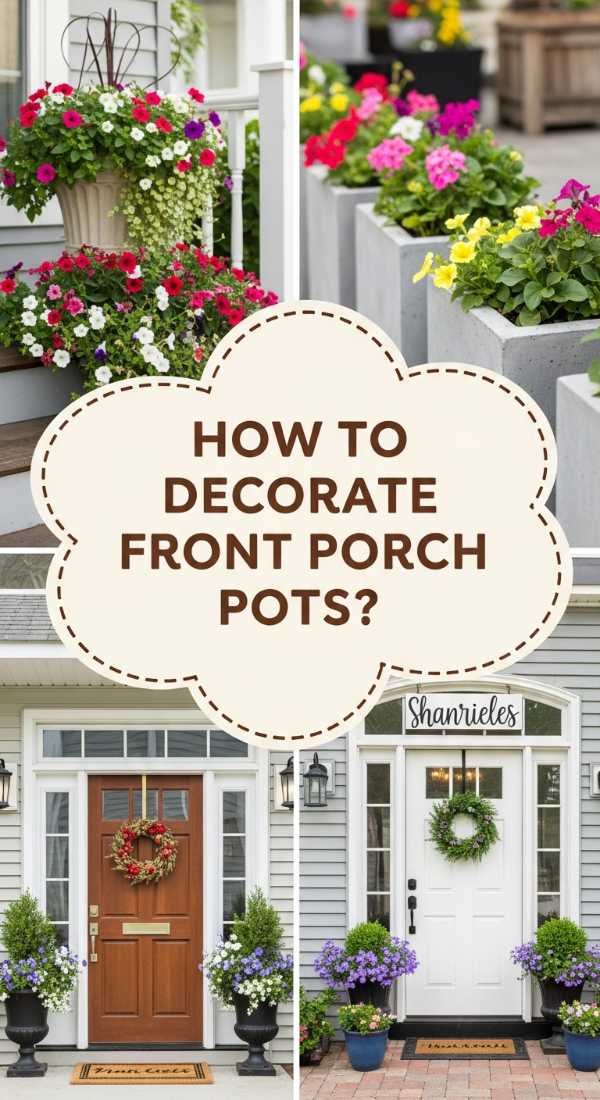
How to Style Front Porch Flower Pots for a Warm Welcome
Why we love this
The front porch is your home’s first impression, and nothing says ‘welcome’ quite like a curated collection of oversized pots. We love the sensory experience of walking through a cloud of fragrant lavender or citrusy geraniums as you reach for the door handle. The visual weight of heavy ceramic pots in shades of terracotta or navy provides a sense of stability, while the soft ‘spiller’ plants trail down like green lace. It’s a literal breath of fresh air that makes coming home the best part of your day.
Essential Elements:
- Large-scale ceramic or resin planters
- High-quality potting mix with perlite
- ‘Thriller’ plants (Dracaena or Canna Lily)
- ‘Filler’ plants (Petunias or Lantana)
- ‘Spiller’ plants (Sweet Potato Vine or Creeping Jenny)
How to make it
- Select your pots in odd numbers (groups of 3 work best for visual balance). Ensure every pot has a drainage hole to prevent root rot, which is the most common ‘prep’ mistake.
- Fill the bottom third of large pots with empty plastic water bottles or packing peanuts to save on weight and soil. Top with high-quality potting mix, leaving about 2 inches of space at the top.
- Plant your ‘Thriller’ in the center (or back, if the pot is against a wall). This is your focal point—the ‘main ingredient’ that provides height and drama.
- Tuck your ‘Fillers’ around the Thriller. These should be medium-height plants that add bulk and color. Space them about 4 inches apart to allow for growth ‘expansion’ as they mature.
- Add your ‘Spillers’ along the very edge of the pot. Angle them slightly outward so they are encouraged to drape over the sides. The ‘visual cue for doneness’ is a lush, overflowing look where the soil is completely hidden by foliage and flowers.
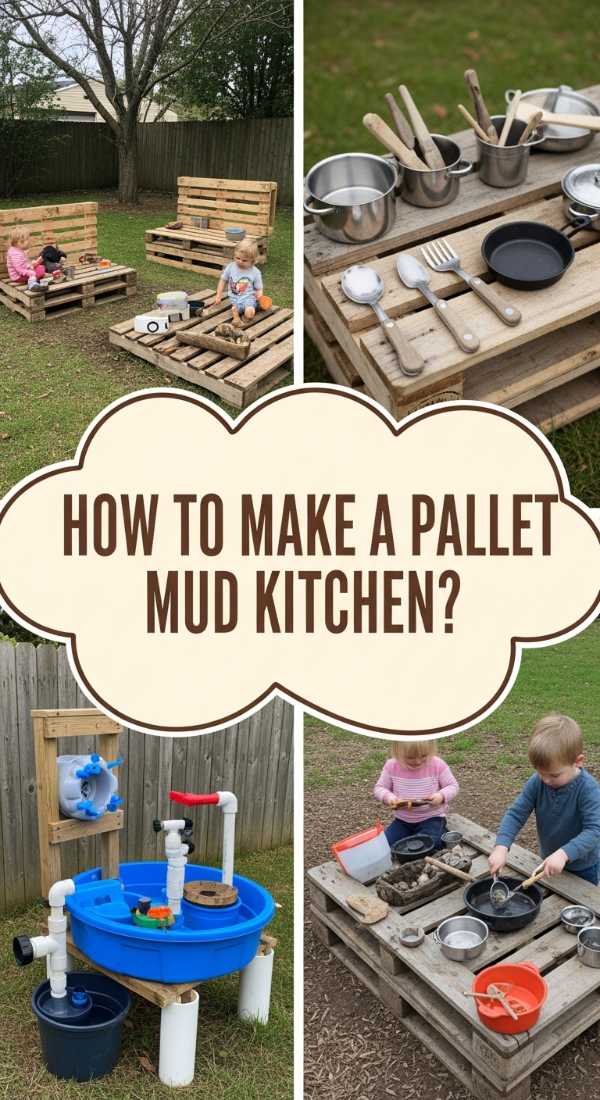
How to Build a Pallet Mud Kitchen for Messy Sensory Play
![]()
Why we love this
There is nothing more nostalgic and heartwarming than the sound of children ‘cooking’ with handfuls of dirt and dandelions. A pallet mud kitchen brings a rustic, tactile charm to the garden that encourages kids to engage with nature. We love the smell of damp earth and the woody aroma of the pallets, combined with the clinking of old metal spoons against tin bowls. It’s a dedicated space for imagination where the ‘mess’ is celebrated, keeping the dirt outside while providing hours of screen-free, sensory-rich joy.
Essential Elements:
- Heat-treated (HT) wooden pallets
- Stainless steel mixing bowls (for sinks)
- Outdoor-rated wood screws
- Old kitchen utensils (spoons, whisks, strainers)
- Waterproof wood sealant or exterior paint
How to make it
- Source two pallets marked ‘HT’ (Heat Treated) to ensure they are safe for children and haven’t been treated with harsh chemicals. Sand them thoroughly to remove all splinters—this is the most critical safety ‘prep’ phase.
- Stand one pallet vertically to act as the ‘backsplash.’ Attach the second pallet horizontally at a height of about 20-24 inches to serve as the ‘countertop’ using heavy-duty L-brackets.
- Use a jigsaw to cut holes in the top pallet that are slightly smaller than the lip of your stainless steel bowls. Drop the bowls in; these are your ‘sinks.’
- Install small hooks along the backsplash to hang your utensils. You can also screw on old plastic knobs to serve as ‘stove burners.’
- Apply two coats of clear waterproof sealant. Allow to ‘cure’ for 24 hours. The project is ‘done’ when the wood feels smooth to the touch and the bowls sit securely in their cutouts, ready for the first ‘mud pie’ to be served.
How to Transform a Concrete Slab Patio for Elegant Summer Hosting
Why we love this
That cold, grey concrete slab doesn’t have to be an eyesore; it’s actually a brilliant foundation for a high-end outdoor lounge. By adding layers of texture—like a woven jute rug and plush outdoor cushions—you can soften the hard lines and make the space feel incredibly cozy. We love the feeling of bare feet on a warm outdoor rug and the way ambient candlelight bounces off the grey stone. It’s an effortless way to create a ‘luxury hotel’ vibe right in your own backyard, perfect for sipping chilled rosé under the stars.
Essential Elements:
- Concrete-safe outdoor rug (oversized)
- Modular outdoor sectional or bistro set
- Floor lanterns and string lights
- Potted palms or tall bamboo
- Outdoor-rated throw pillows and blankets
How to make it
- Pressure wash the concrete slab to remove all grime and moss. This ‘prep’ phase is vital for the rug and furniture to sit cleanly. If the concrete is stained, consider a coat of specialized concrete paint in a neutral greige.
- Lay down your oversized rug first. It should be large enough that all furniture legs rest on it, which ‘anchors’ the room and prevents a ‘floating furniture’ look.
- Arrange your seating to face a focal point—either the garden view or a central coffee table. Choose fabrics with high UV resistance to prevent ‘fading’ in the high heat of summer.
- Add height using tall greenery in the corners. This breaks up the flat horizon of the slab and adds a lush, tropical ‘aroma’ to the air.
- Layer in lighting at different levels: overhead string lights, table-top candles, and floor lanterns. The ‘visual cue for doneness’ is when the space feels like an indoor living room that just happens to be outside.
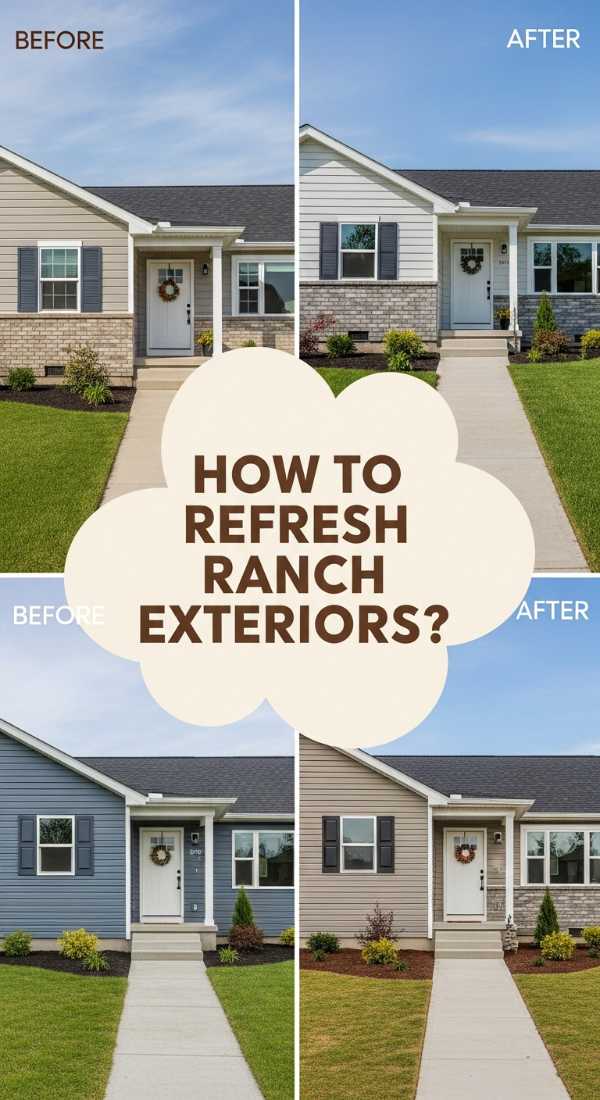
How to Remodel a Retro Ranch Exterior for Timeless Aesthetic Appeal
Why we love this
The low-slung, horizontal lines of a retro ranch offer a unique opportunity to play with modern-organic textures. We love the transformation from ‘dated’ to ‘dreamy’ by mixing crisp white painted brick with warm, honey-toned wood accents. There’s a certain nostalgia in these homes that, when updated, feels both fresh and timeless. The visual of a black-trimmed window framed by a cedar porch post is the ultimate aesthetic goal, offering a clean, ‘chef-prepared’ look that honors the home’s history while embracing modern style.
Essential Elements:
- High-quality exterior masonry paint (Matte finish)
- Cedar or pressure-treated wood for accents
- Modern black hardware (house numbers, mailboxes)
- Low-profile, modern lighting fixtures
- Simple, structural landscaping (boxwoods and grasses)
How to make it
- Clean the brick or siding thoroughly using a TSP (Trisodium Phosphate) solution. This ensures the paint ‘bonds’ correctly during the application phase.
- Apply a high-quality masonry primer, followed by two coats of exterior paint. For a viral aesthetic, stick to ‘creamy whites’ or ‘charcoal greys.’ Use a sprayer for a professional, even ‘glaze.’
- Replace old wrought-iron porch supports with thick cedar posts. The warm wood ‘flavors’ the cold paint, adding much-needed organic texture.
- Swap out old, ornate hardware for sleek, black-matte house numbers and a minimalist mailbox. This ‘prep’ for the details makes a massive impact.
- Update the landscaping with horizontal lines to match the house. The ‘doneness’ cue is a cohesive look where the house feels grounded, modern, and high-end.
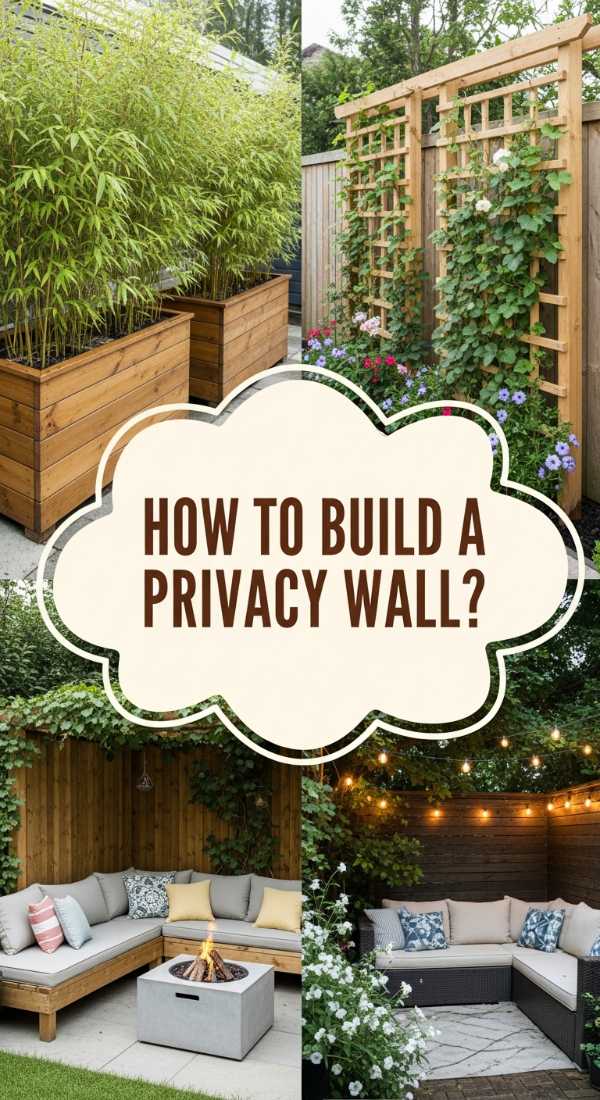
How to Install a Planter Privacy Wall for Ultimate Backyard Seclusion

Why we love this
There is nothing quite as luxury as true privacy. A planter privacy wall creates a living, breathing emerald screen that shields you from prying eyes while adding incredible vertical texture to your garden. We love the sound of wind rustling through tall grasses or bamboo, creating a natural white noise that blocks out the neighborhood hum. It’s like being wrapped in a green cocoon—the scent of fresh earth and the visual of dappled sunlight filtering through leaves make your backyard feel like a secret forest getaway.
Essential Elements:
- Long, rectangular trough planters (wood or metal)
- Tall, upright plants (Clumping Bamboo, Sky Pencil Holly, or Ornamental Grasses)
- Internal drainage system (gravel and landscape fabric)
- Weighted base (bricks or sandbags)
- Drip irrigation kit (optional but recommended)
How to make it
- Position your trough planters along the boundary where you need the most ‘seclusion.’ Ensure they are level; a slanted planter will ‘leak’ visual appeal and water unevenly.
- Add weight to the bottom. Use heavy bricks or sandbags to ensure the planters don’t tip over in high winds—this is the ‘stability prep’ phase.
- Install a layer of gravel for drainage, topped with landscape fabric, then fill with high-quality potting soil. Amend with slow-release fertilizer ‘seasoning’ to keep the plants vibrant.
- Space your tall plants closely. For bamboo or grasses, you want them almost touching so they grow into a solid green ‘curtain.’
- Mulch the top of the planters with dark wood chips to retain moisture. The project is ‘done’ when you can sit in your favorite chair and no longer see over the top of the foliage.
How to Use Beach Hacks for an Easy Family Day

Why we love this
The beach should be about the salt air in your hair and the rhythm of the waves, not the stress of hauling half your house across the sand. We love these ‘lifestyle recipes’ because they turn a chaotic outing into a streamlined, high-vibe experience. Think of the cool, refreshing feeling of a frozen sponge on your neck and the satisfaction of leaving the sand at the shore (and not in your car). It’s about working smarter so you can spend more time enjoying the ‘menu’ of sun, surf, and family memories.
Essential Elements:
- Cornstarch or baby powder (for sand removal)
- Mesh bags (for toys)
- Frozen sponges in Ziploc bags
- Fitted sheet (for a sand-free zone)
- Spray bottle with fresh water
How to make it
- ‘Prep’ your cooling system by soaking kitchen sponges in water and freezing them overnight in individual bags. They act as ice packs for your snacks and then become cold compresses as they melt.
- Create a ‘sand-free fortress’ by laying a fitted sheet on the sand and placing your cooler/bags in the four corners to hold the sides up. This ‘wall’ keeps the blowing sand out of your lounging area.
- Pack all sandy toys in mesh bags. Before you head to the car, shake the bags vigorously; the mesh allows the sand to ‘drain’ out while keeping the toys contained.
- Use cornstarch for easy cleanup. Rub a handful on sandy legs and arms; it absorbs the moisture, allowing the sand to slide right off without any ‘scrubbing’ or irritation.
- Keep a spray bottle of fresh water in the shade. Use it for a ‘final rinse’ of hands and faces before eating. The ‘doneness’ cue is a sand-free car ride home and a happy, sun-kissed family.
How to Manage a Realistic Pantry for Streamlined Meal Prep

Why we love this
A well-organized pantry is the ‘secret sauce’ of a happy home. We love the visual rhythm of matching glass jars filled with colorful lentils, grains, and pastas. There is a profound sense of calm that comes from knowing exactly what you have on hand, saving you from that frantic ‘what’s for dinner’ search. The aroma of dried herbs and the tactile satisfaction of a spinning turntable filled with spices make the ‘prep’ phase of any meal feel like a professional culinary experience rather than a chore.
Essential Elements:
- Clear, airtight glass or BPA-free plastic canisters
- A label maker or chalk markers
- Tiered ‘stadium’ shelving for cans
- Lazy Susans for oils and vinegars
- Woven baskets for ‘ugly’ packaging (chips, snacks)
How to make it
- Empty your entire pantry. This is the ‘deep-clean’ phase. Toss anything expired and wipe down every shelf until it sparkles.
- Group like-items together: ‘Baking,’ ‘Grains/Pasta,’ ‘Breakfast,’ and ‘Snacks.’ This ‘zoning’ ensures you never buy a third bag of flour by mistake.
- Decant dry goods into clear canisters. This not only looks ‘viral-ready’ but keeps food fresh longer. Ensure you label the bottom with the expiration date and ‘cooking time’ for grains.
- Utilize vertical space with tiered shelving for canned goods. This ensures you can see every label at a glance, preventing ‘hidden’ ingredients from going to waste.
- Place frequently used items (oils, salt, honey) on a Lazy Susan at eye level. The project is ‘done’ when you can find any ingredient in under five seconds and the space looks like a boutique grocery store.
How to Create a DIY Bird Bath for a Charming Garden Habitat
[IMAGE_10]
Why we love this
Adding a water feature to your garden is like adding the ‘garnish’ to a perfect dish—it completes the whole experience. We love the delicate, splashing sounds and the flashes of color as birds visit for a drink. A DIY bird bath adds a sculptural element that feels artistic and soulful. The sight of a blue jay bathing in a shallow stone basin, surrounded by the scent of blooming roses, creates a living postcard in your backyard. It’s a simple way to invite nature into your space, turning your garden into a thriving, peaceful habitat.
Essential Elements:
- Two large terracotta pots (one large, one medium)
- A large terracotta saucer
- Exterior-grade waterproof adhesive
- River stones or marbles
- Outdoor paint or sealant
How to make it
- Clean your terracotta pieces thoroughly. Flip the largest pot upside down to act as the base. Apply a thick bead of waterproof adhesive to the ‘rim’ (the bottom of the pot that is now facing up).
- Stack the medium pot upside down on top of the first. This creates a ‘pedestal’ look. Ensure it is perfectly centered—the ‘visual cue’ is a straight, sturdy column.
- Apply adhesive to the top of the second pot and press the saucer firmly into place. Let the glue ‘cure’ for at least 24 hours in a dry, shaded area.
- Paint or seal the bird bath. If painting, use a bird-safe, non-toxic exterior paint. A soft ‘sage green’ or ‘terracotta rose’ blends beautifully with the garden ‘ingredients.’
- Place a few river stones in the center of the saucer. This provides a ‘landing pad’ for smaller birds so they don’t feel ‘overcooked’ by deep water. Fill with fresh water and enjoy the show.
Conclusion
Achieving that dreamy outdoor aesthetic isn’t about perfection; it’s about creating a space that reflects the warmth and beauty of your own life. Whether you’re building a mud kitchen for your little ones or finally organizing that pantry into a work of art, these projects are the building blocks of a home that feels like a sanctuary. Remember, the best gardens—and the best lives—are grown with patience, a bit of planning, and plenty of love. Now, go grab your gloves and start creating your own viral-worthy view!