
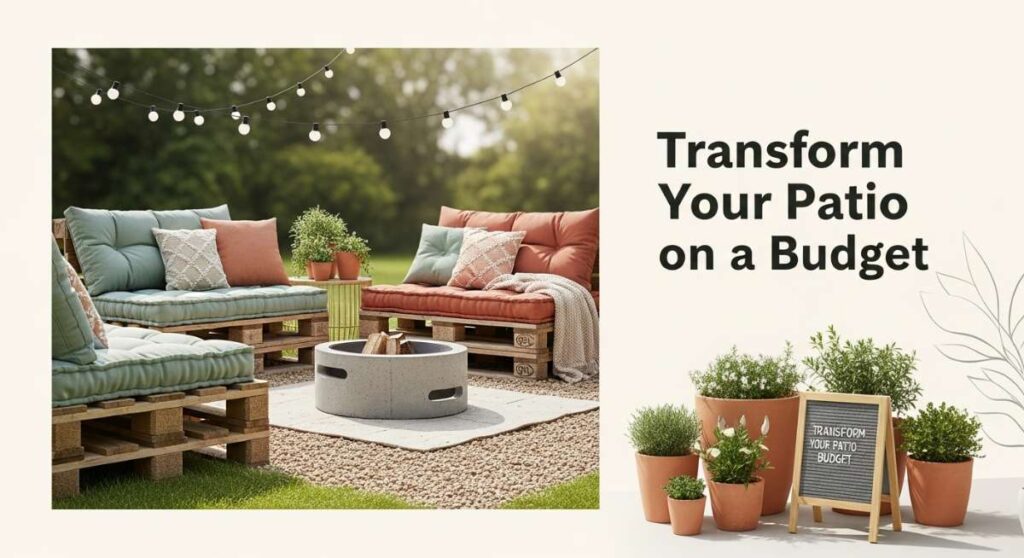
Transform Your Patio on a Budget: The Ultimate Outdoor Lifestyle Guide
There is a specific kind of magic that happens when the sun begins to dip below the horizon, casting a golden glow over a space you built with your own two hands. We’ve all been there—staring out the back window at a patch of patchy grass or a cluttered patio, dreaming of those Pinterest-perfect retreats that seem just out of reach. But what if I told you that the sanctuary you’re craving doesn’t require a professional contractor or a massive bank account? It’s about the soul you pour into the soil and the stories you create in the corners of your home.
This year, I decided to stop waiting for the ‘perfect time’ and started embracing the beauty of the ‘right now.’ Whether it’s the sound of ducks splashing in a handmade enclosure or the nostalgic hum of a retro-inspired room, transforming your lifestyle is about intentionality. In this guide, I’m sharing my favorite viral DIY projects that bring texture, warmth, and a whole lot of personality to your outdoor and indoor spaces. Let’s roll up our sleeves and turn those ‘someday’ dreams into our favorite Saturday afternoon reality.
How to Design Lush Front Yard Landscaping for Instant Curb Appeal
Why we love this
Walking up to a home that feels alive with greenery is like receiving a warm hug before you even reach the front door. We adore this approach because it combines the structural elegance of boxwoods with the wild, airy romance of lavender and ornamental grasses, creating a multi-dimensional sensory experience. The fragrance of damp earth mixed with floral notes greets you every afternoon, while the varied textures of waxy leaves and soft petals provide a visual feast that changes with the light. It’s an inviting, organic welcome that makes even the simplest ranch-style house feel like a grand estate.
Essential Elements:
- Evergreen foundation shrubs (Boxwoods or Hollies)
- Perennial flowering plants (Lavender, Salvia, or Coneflowers)
- Hardscape edging (Stone or treated timber)
- High-quality dark mulch or cedar chips
- Drought-tolerant ornamental grasses
How to make it
- Begin by sketching a curved bed design using a garden hose to mark the lines; curves feel more organic and high-end than sharp angles.
- Remove all existing sod and weeds from the marked area using a square-edged spade, ensuring you dig deep enough to remove the root systems.
- Amend your soil with organic compost and peat moss, tilling it to a depth of 12 inches to ensure proper drainage and nutrient availability for new roots.
- Place your ‘anchor’ plants—the larger evergreens—toward the back or center, spacing them according to their mature width to avoid overcrowding in three years.
- Layer in your perennials in groups of three or five (odd numbers look more natural), placing shorter plants at the front and taller ones behind.
- Install your edging material, ensuring it sits about 2 inches above the soil line to keep mulch from washing away during heavy rains.
- Apply a 3-inch layer of mulch across the entire bed, being careful not to pile it against the stems of the plants (the ‘mulch volcano’ effect), which can cause rot.
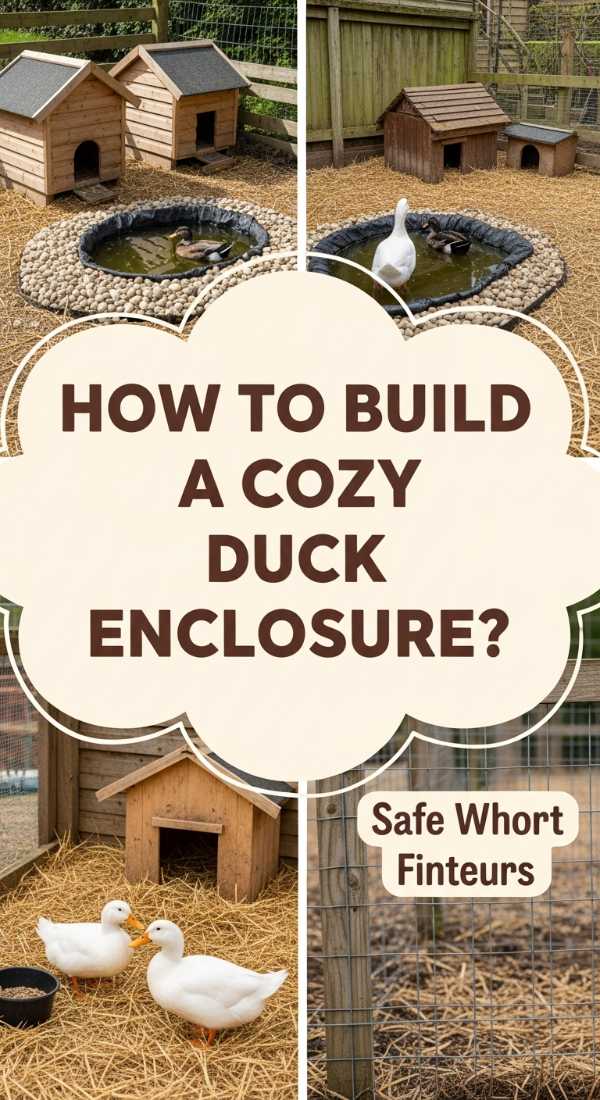
How to Build a Cozy Duck Enclosure for a Happy Homestead
Why we love this
There is something inherently peaceful about the soft chattering of ducks as they waddle through a space designed specifically for their happiness. This enclosure isn’t just a pen; it’s a rustic sanctuary that blends farmhouse aesthetics with practical homesteading needs, featuring the scent of fresh pine shavings and the sight of sunlight reflecting off a clean water basin. We love how the cedar wood weathers over time, gaining a silvery patina that looks gorgeous against the backdrop of a summer garden. It turns animal husbandry into a beautiful lifestyle feature rather than just a backyard chore.
Essential Elements:
- Pressure-treated 2×4 lumber and cedar siding
- Hardware cloth (1/2 inch gauge for predator protection)
- Heavy-duty door latches and hinges
- A pre-formed pond liner or large galvanized tub
- Corrugated roofing panels (metal or polycarbonate)
How to make it
- Frame out a 4×8 foot rectangular base using your 2x4s, ensuring the structure is level by using a line level or a 4-foot spirit level.
- Construct the vertical wall frames at a height of 4 feet, adding a slight pitch to the roof rafters (6-inch drop) to allow for rain and snow runoff.
- Secure the hardware cloth to the exterior of the frame using heavy-duty fencing staples, burying the mesh at least 12 inches into the ground to prevent digging predators like foxes.
- Install the cedar siding on the ‘sleeping’ side of the coop, leaving the ‘run’ side open with just the mesh for maximum ventilation and light.
- Attach the corrugated roofing panels using specialized roofing screws with rubber washers to ensure a completely watertight seal over the nesting area.
- Dig a shallow hole within the run to accommodate the galvanized tub, ensuring the rim is flush with the ground for easy entry and exit for the ducks.
- Construct a wide, sturdy door with a double-locking mechanism (carabiners are great for extra security) to provide easy access for cleaning.
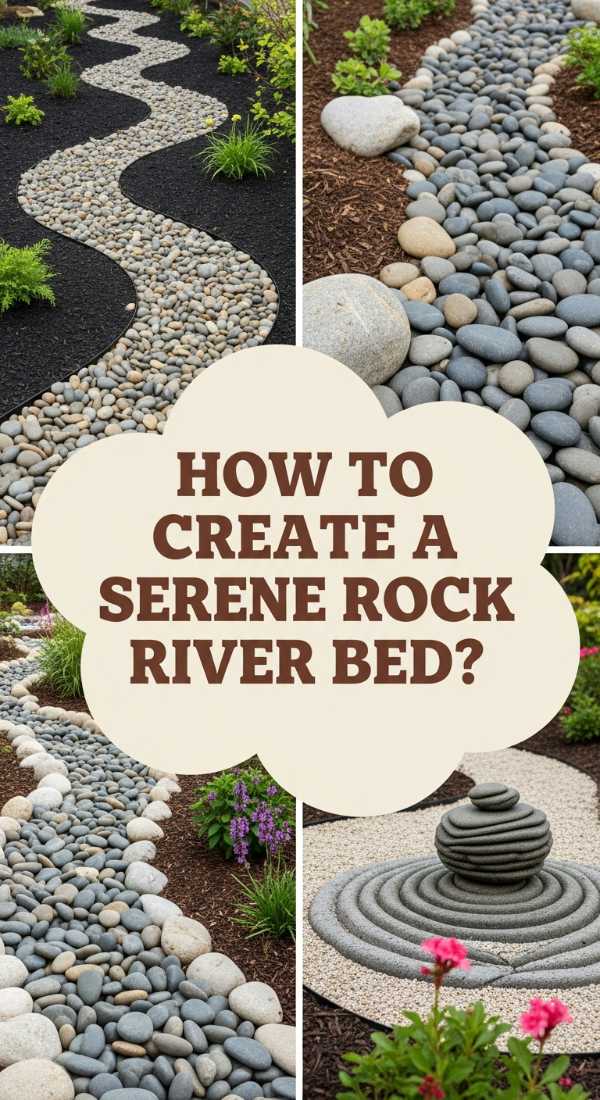
How to Create a Serene Rock River Bed for Natural Garden Flow
Why we love this
A dry creek bed is the ultimate solution for blending functionality with high-end landscaping, providing a beautiful way to manage drainage while looking like a natural geological feature. We love the cool, smooth feel of river rocks underfoot and the way they shimmer after a light rain, mimicking the flow of an ancient stream through your backyard. The mix of jagged boulders and rounded pebbles creates a rugged, earthy texture that anchors the softer elements of your garden, providing a sense of permanence and tranquility that is deeply grounding and visually captivating.
Essential Elements:
- Heavy-duty landscape fabric (pro-grade)
- River rocks in various sizes (pea gravel to 6-inch stones)
- Large accent boulders (limestone or granite)
- Steel landscape staples
- Native moisture-loving plants (Ferns or Hostas)
How to make it
- Trace the ‘river’ path through your yard, following the natural slope of the land to ensure water moves away from your home’s foundation.
- Excavate a trench 12 to 18 inches deep and 2 to 3 feet wide, making the center the deepest point to create a ‘V’ or ‘U’ shape.
- Line the entire trench with professional-grade landscape fabric, overlapping edges by 6 inches and pinning it down securely with steel staples.
- Place your largest accent boulders first along the ‘banks’ of the river to create a structural frame; these should look partially buried for a natural appearance.
- Fill the bottom of the trench with medium-sized river rocks (2-4 inches), ensuring they cover the fabric completely and support the base of the boulders.
- Scatter smaller pea gravel and river stones around the edges to soften the transition between the larger rocks and the surrounding soil.
- Tuck native plants into the ‘banks’ at irregular intervals to mimic a natural riparian environment, then water them in to settle the soil.
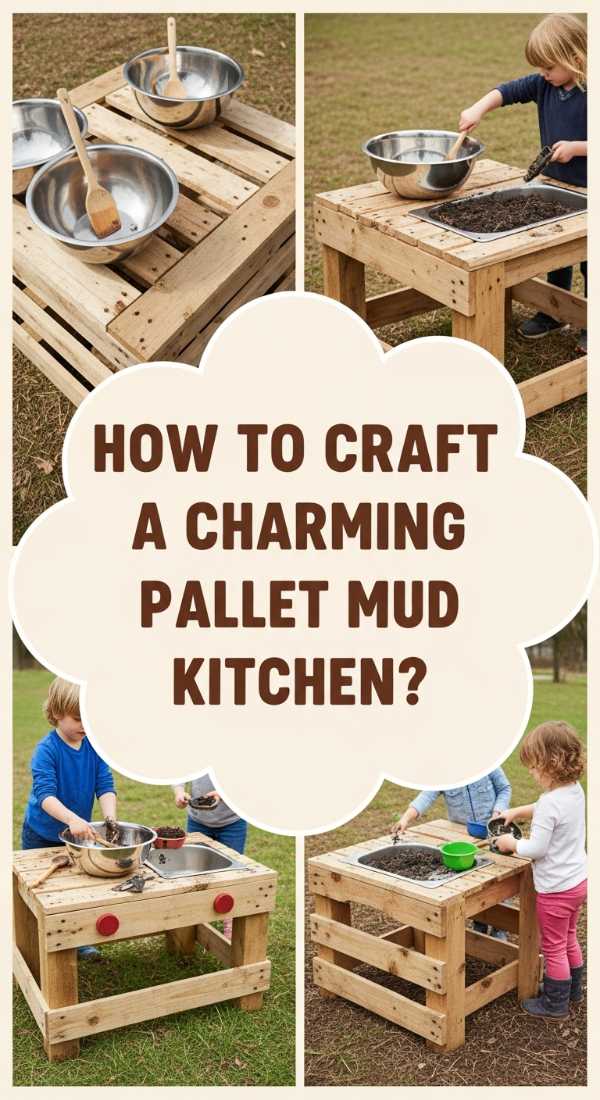
How to Craft a Charming Pallet Mud Kitchen for Endless Outdoor Play

Why we love this
There is no joy quite like the messy, creative abandon of a child making ‘mud pies’ in a kitchen built just for them. This project is a nostalgic nod to simpler times, utilizing reclaimed wood to create a tactile play space that smells of cedar and damp earth. We love the rustic, chunky aesthetic of the pallet wood and the way it encourages children to connect with nature using their hands and imagination. It’s a sustainable, budget-friendly addition to any patio that turns a corner of your yard into a whimsical laboratory for outdoor discovery and sensory play.
Essential Elements:
- 2-3 Heat-Treated (HT) wooden pallets
- Stainless steel mixing bowls (for sinks)
- Outdoor-rated wood screws and L-brackets
- Old kitchen faucets or knobs (repurposed)
- Weatherproof wood sealant or exterior paint
How to make it
- Select pallets marked with ‘HT’ (Heat Treated) to ensure they are safe for children and free from harmful chemical pesticides.
- Disassemble one pallet using a pry bar to harvest individual slats, and sand every inch thoroughly with 80-grit then 120-grit sandpaper to eliminate splinters.
- Use a second intact pallet as the back wall, and build a sturdy frame for the ‘countertop’ using 2x4s attached at a child-appropriate height (usually 20-24 inches).
- Trace the circumference of your stainless steel bowls onto the countertop slats and use a jigsaw to cut out circles slightly smaller than the rim.
- Drop the bowls into the holes to create ‘sinks’ and secure the countertop slats to the frame using countersunk wood screws.
- Attach repurposed knobs and a faucet using a drill; these don’t need to be functional to provide hours of imaginative play.
- Apply two coats of a clear, non-toxic exterior sealant to protect the wood from the elements while maintaining its rustic, weathered charm.
How to Style a Nostalgic Teen Room for Total Retro Vibes
Why we love this
Stepping into a retro-styled room feels like a trip through a time machine, blending the funky energy of the 70s with the neon-soaked aesthetics of the 90s. We love the mix of textures—think velvet floor pillows, shag rugs, and the smooth, cool surface of vinyl records. The atmosphere is warm and eclectic, filled with the soft hum of a record player and the amber glow of a lava lamp. It’s a space that celebrates individuality and creative expression, providing a cozy cocoon where vintage charm meets modern comfort in the most stylish way possible.
Essential Elements:
- Record player and vinyl display shelves
- Macramé wall hangings or beaded curtains
- Retro color palette (mustard yellow, burnt orange, avocado green)
- LED neon signs or lava lamps
- Vintage-inspired posters or tapestries
How to make it
- Choose a foundational color palette; start with a neutral cream wall and bring in pops of ‘harvest gold’ and ‘burnt orange’ through textiles and art.
- Install floating ‘U’ shelves to display a curated collection of vinyl records, making the album art a primary focal point of the room.
- Layer a high-pile shag rug over the existing flooring to add immediate warmth and that iconic 70s tactile sensation.
- Create a ‘chill zone’ in a corner using a papasan chair or a stack of oversized velvet floor cushions in contrasting jewel tones.
- Hang a string of warm-toned Edison bulbs or a custom neon sign to create a soft, moody lighting layer that replaces harsh overhead fixtures.
- Incorporate natural elements like spider plants or pothos in macramé hangers to bring in the ‘urban jungle’ vibe that was so prevalent in mid-century design.
- Frame a gallery wall of vintage-style band posters using consistent black frames to keep the eclectic mix looking intentional and curated.
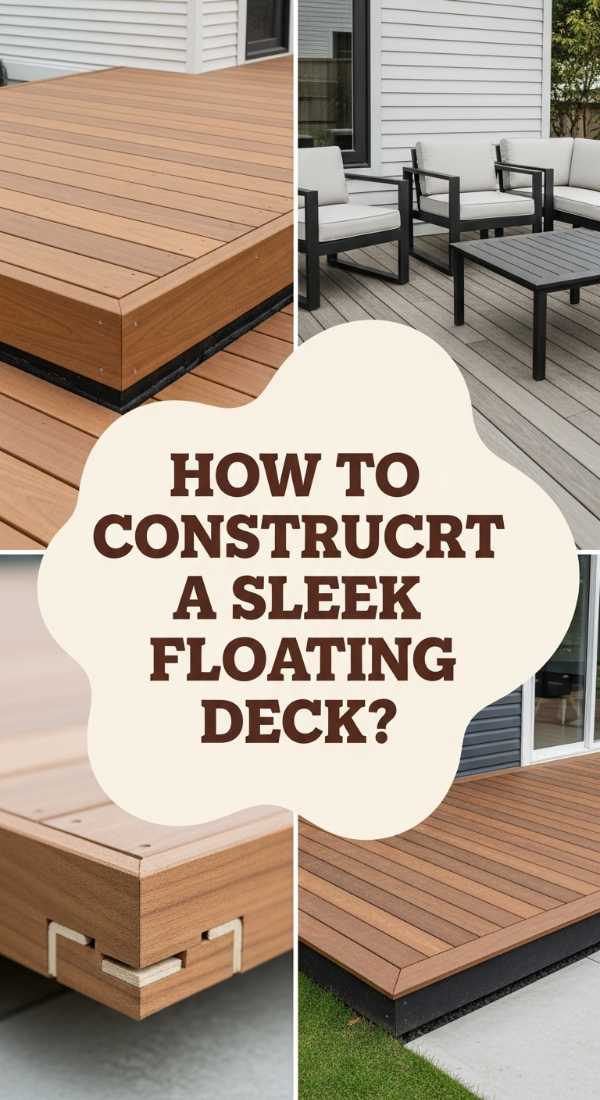
How to Construct a Sleek Floating Deck for the Ultimate Backyard Retreat

Why we love this
A floating deck offers a modern, architectural feel that instantly elevates a backyard from ‘just a yard’ to a luxury retreat. We love the low-profile design that sits just inches above the ground, creating a seamless transition between your home and the outdoors. The scent of freshly stained wood and the solid, sturdy feel underfoot provide a sense of refined craftsmanship. It’s the perfect stage for a morning coffee or an evening glass of wine, offering a clean-lined aesthetic that feels both expensive and incredibly cozy at the same time.
Essential Elements:
- Pressure-treated 2×6 joists for the frame
- Cedar or composite decking boards
- Pre-cast concrete deck blocks
- Hidden deck fasteners or 2.5-inch deck screws
- Leveling sand and landscape fabric
How to make it
- Clear the area and lay down a layer of landscape fabric topped with 2 inches of leveling sand to prevent weed growth and provide a stable base for the blocks.
- Position your pre-cast concrete deck blocks in a grid pattern, typically spaced 4 to 5 feet apart, ensuring they are perfectly level with one another using a long straight-edge and a level.
- Construct the outer frame using 2×6 pressure-treated lumber, checking for squareness by measuring the diagonals (they must be equal).
- Install the interior joists every 16 inches on center, securing them to the outer frame with galvanized joist hangers for maximum structural integrity.
- Lay your decking boards across the joists, starting from the outside and working inward; use 1/8-inch spacers to ensure consistent gaps for water drainage.
- Fasten the boards using hidden fasteners for a ‘pro’ look, or drive deck screws slightly below the wood surface to prevent tripping hazards.
- Sand the edges of the boards to a smooth finish and apply a high-quality oil-based stain to protect against UV rays and moisture penetration.
How to Use Simple Solar Lights for a Magical Evening Glow

Why we love this
There is a quiet, ethereal beauty in a garden that glows softly after the sun sets, and solar lighting is the most effortless way to achieve that magic. We love how these lights require no wiring, allowing you to scatter ‘stars’ across your landscaping without any electrical headaches. The gentle, warm flickering of a solar lantern or the focused beam of a path light creates a romantic, inviting ambiance that smells of night-blooming jasmine and cool evening dew. It’s a sustainable way to extend your outdoor living hours into the night with a flick of a switch—or rather, a sunset.
Essential Elements:
- Warm-white solar path lights
- Solar-powered string lights (Edison style)
- Solar spotlights for tree up-lighting
- Rechargeable NiMH batteries (high capacity)
- Decorative solar lanterns for tabletops
How to make it
- Identify the ‘focal points’ of your yard—a beautiful tree, a stone path, or a seating area—where light will have the most visual impact.
- Place your path lights every 4-6 feet along a walkway, staggering them on either side rather than in a straight line to create a more natural, inviting flow.
- Mount solar spotlights at the base of large trees or architectural features, angling them upward at a 45-degree angle to create dramatic shadows and depth.
- String Edison-style solar lights across your patio or deck using ‘eye’ hooks and a guide wire to prevent sagging over time.
- Ensure the solar panels for all lights are positioned in a location that receives at least 6-8 hours of direct, unobstructed sunlight during the day.
- Clean the solar panels monthly with a damp cloth to remove dust and pollen, which can significantly decrease charging efficiency and light duration.
- Replace the factory batteries with high-capacity rechargeable versions after the first year to ensure the lights stay bright well into the early morning hours.
How to Master Realistic Pantry Organization for a Stress-Free Kitchen
Why we love this
A perfectly organized pantry is a visual symphony that brings a sense of calm to the daily chaos of meal prep. We love the satisfying ‘click’ of airtight containers and the neat rows of uniform jars that make even a simple box of pasta look like a gourmet ingredient. The aroma of spices and dried herbs becomes more pronounced when they aren’t hidden behind cluttered boxes, and the sight of a clean, labeled space instantly lowers the heart rate. It’s a lifestyle shift that saves time, reduces waste, and makes your kitchen feel like a high-end boutique grocery store.
Essential Elements:
- Clear airtight canisters (various sizes)
- Woven or wire baskets for ‘bulky’ items
- A battery-operated label maker or chalk labels
- Tiered ‘stadium’ shelving for canned goods
- Lazy Susans for oils and vinegars
How to make it
- Empty the entire pantry completely; this is the ‘clean slate’ phase where you check expiration dates and wipe down every shelf with a mild vinegar solution.
- Categorize your items into groups: baking, grains, snacks, breakfast, and ‘backstock’ to determine how many containers of each size you actually need.
- Decant dry goods like flour, sugar, and pasta into clear, airtight containers to keep them fresh longer and allow you to see exactly when you’re running low.
- Place ‘like with like’ in woven baskets—use one for chips/snacks and another for baking mixes—to prevent small items from getting lost at the back of the shelf.
- Utilize a tiered riser for canned goods so you can see the labels of the back row without having to move the front row, following the ‘first in, first out’ rule.
- Install a Lazy Susan in the corner or on a high shelf for tall bottles of oil and vinegar, making them easily accessible with a quick spin.
- Label everything clearly at eye level using a consistent font or handwriting style to ensure every family member knows exactly where things belong.
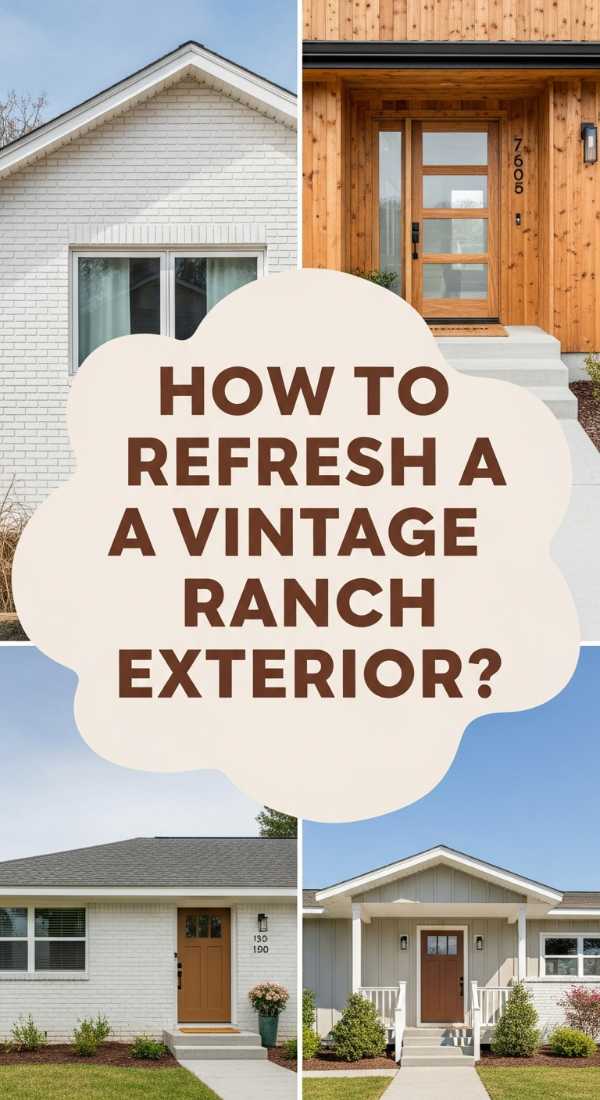
How to Refresh a Vintage Ranch Exterior for a Modern Organic Look

Why we love this
There is a profound satisfaction in honoring the bones of an older home while breathing new, modern life into its exterior. We love the ‘Modern Organic’ look because it balances the clean, sharp lines of black trim with the warmth of natural wood and stone textures. The result is a home that feels grounded and sophisticated, reflecting the colors of the surrounding landscape. It’s a transformation that takes a dated, 1960s structure and turns it into a contemporary masterpiece that feels fresh, airy, and deeply connected to nature.
Essential Elements:
- High-contrast paint (e.g., Swiss Coffee white and Iron Ore black)
- Natural wood accents (cedar shutters or porch pillars)
- Modern black hardware (house numbers and mailboxes)
- Contemporary outdoor sconces
- Native prairie-style landscaping
How to make it
- Pressure wash the entire exterior to remove decades of dirt and loose paint, then repair any cracks in the stucco or siding with exterior-grade caulk.
- Paint the main body of the house a warm, creamy white and use a deep charcoal or matte black for the window trim, soffits, and fascia for high-contrast drama.
- Replace dated, thin porch posts with thick 6×6 cedar beams, staining them with a clear or light oak finish to bring in that essential organic warmth.
- Install oversized, modern house numbers vertically near the front door and swap out old ‘carriage’ lights for sleek, black cylindrical sconces.
- Consider adding a section of horizontal cedar slat fencing near the entryway to create a ‘courtyard’ feel and add a touch of architectural interest.
- Update the front door with a bold pop of color—muted sage green or a deep navy—or strip it back to natural wood to match the new cedar pillars.
- Finish the look by replacing old foundation plantings with structural grasses and white-flowering perennials to maintain a clean, monochromatic garden palette.
How to Display Colorful Glass Yard Art for a Whimsical Garden Sanctuary
[IMAGE_10]
Why we love this
Glass yard art adds a playful, jewel-toned brilliance to a garden that no plant can replicate, catching the light in a way that feels almost supernatural. We love the way a cobalt blue orb or a hand-blown glass flower creates a focal point amidst the greenery, offering a splash of vibrant color even in the depths of winter. The smooth, cool surface of the glass contrasts beautifully with the rough bark of trees and the soft fuzz of lamb’s ear, creating a whimsical sanctuary that feels like a hidden treasure chest discovered in the middle of nature.
Essential Elements:
- Hand-blown glass garden stakes
- Reflective gazing balls (stainless steel or glass)
- Recycled glass ‘totems’
- Copper or rebar stakes for mounting
- Strategic accent lighting
How to make it
- Choose a color theme to keep the look cohesive; for example, use cool tones like blues and purples for a serene vibe, or warm oranges and reds for energy.
- Create ‘glass totems’ by stacking vintage glassware found at thrift stores (bowls, vases, plates) and securing them with high-strength, waterproof epoxy.
- Mount glass pieces on copper pipes or rebar stakes of varying heights to create a sense of movement and vertical interest within your flower beds.
- Place a large gazing ball in a shady corner to reflect light back into the darkness, making the space feel larger and more luminous.
- Group glass ‘flowers’ in clusters of three or five near the entrance of a path to act as a visual guide and a whimsical greeting for guests.
- Position glass art where it will catch the early morning or late afternoon ‘golden hour’ sun to maximize the prismatic light effects across your garden.
- Ensure all glass pieces are securely anchored into the ground at least 8 inches deep to prevent them from tipping over during high winds or heavy storms.
Creating Your Forever Oasis
Transforming your patio and lifestyle isn’t about achieving a static image of perfection; it’s about the ongoing process of creation. Each rock moved, each pallet sanded, and each light hung is a testament to your vision for a more beautiful, intentional life. As you look out over your refreshed space, remember that the most important element is the joy you feel while living in it. Happy DIY-ing!