
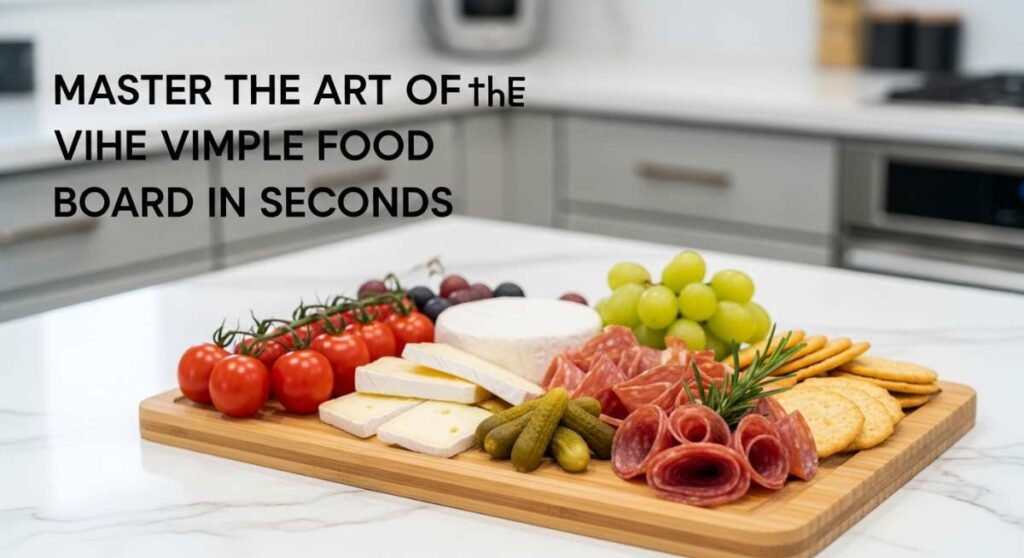
There is something almost meditative about a perfectly curated food board. You know the ones—the colors pop, the textures invite you to dive in, and it looks like a masterpiece without the three-hour kitchen cleanup. In our busy lives, we often sacrifice beauty for speed, but the ‘Viral Simple Food Board’ is here to change that narrative. It’s about taking those everyday staples and presenting them with intention, turning a Tuesday night dinner into a moment of genuine self-care and aesthetic joy.
I remember the first time I traded my plastic containers for a wooden board; the atmosphere in my kitchen shifted instantly. There’s a psychological magic in seeing your nourishment laid out clearly—vibrant roasted greens, golden proteins, and creamy grains. It invites you to linger over your meal, to appreciate the aroma of garlic and herbs, and to share that warmth with whoever happens to be sitting at the table with you. Let’s dive into the components that make these boards legendary.
How to make chicken bowls

Why we love this
Chicken bowls are the ultimate comfort food for the modern soul, offering a symphony of textures that range from the succulent, tender bite of perfectly seared poultry to the soft, fluffy cloud of jasmine rice. The aroma is intoxicating, a blend of toasted sesame and zesty citrus that fills the air as soon as the warm chicken hits the cool greens. It’s a meal that feels both grounding and light, providing that deep, savory satisfaction that only a well-balanced protein bowl can deliver after a long, demanding day.
Ingredients
- 2 boneless skinless chicken breasts
- 2 cups cooked white or brown rice
- 1 tablespoon olive oil
- 1 teaspoon smoked paprika
- Salt and cracked black pepper
- 1 avocado, sliced
- 1/4 cup pickled red onions
- Fresh cilantro for garnish
How to make it
- Begin by patting your chicken breasts completely dry with paper towels; this is the secret to getting a golden-brown crust rather than steaming the meat. Slice the chicken into uniform 1-inch cubes to ensure even cooking throughout.
- In a medium bowl, toss the chicken cubes with olive oil, smoked paprika, salt, and pepper. Use your hands or a spatula to ensure every surface is coated in the seasoning.
- Preheat a heavy-bottomed cast-iron or stainless steel skillet over medium-high heat. You will know it is ready when a drop of water dances and evaporates instantly. Add a thin layer of oil if needed.
- Place the chicken in the skillet in a single layer, ensuring they aren’t crowded. Let them sear undisturbed for 3 to 4 minutes until a deep golden crust forms on the bottom.
- Flip the pieces and cook for another 3 to 5 minutes. Use an instant-read thermometer to check that the internal temperature has reached exactly 165°F (74°C) to maintain juiciness.
- Assemble by placing a generous base of rice in a bowl, topping with the seared chicken, creamy avocado slices, and tangy pickled onions. Garnish with cilantro for a fresh, herbaceous finish.
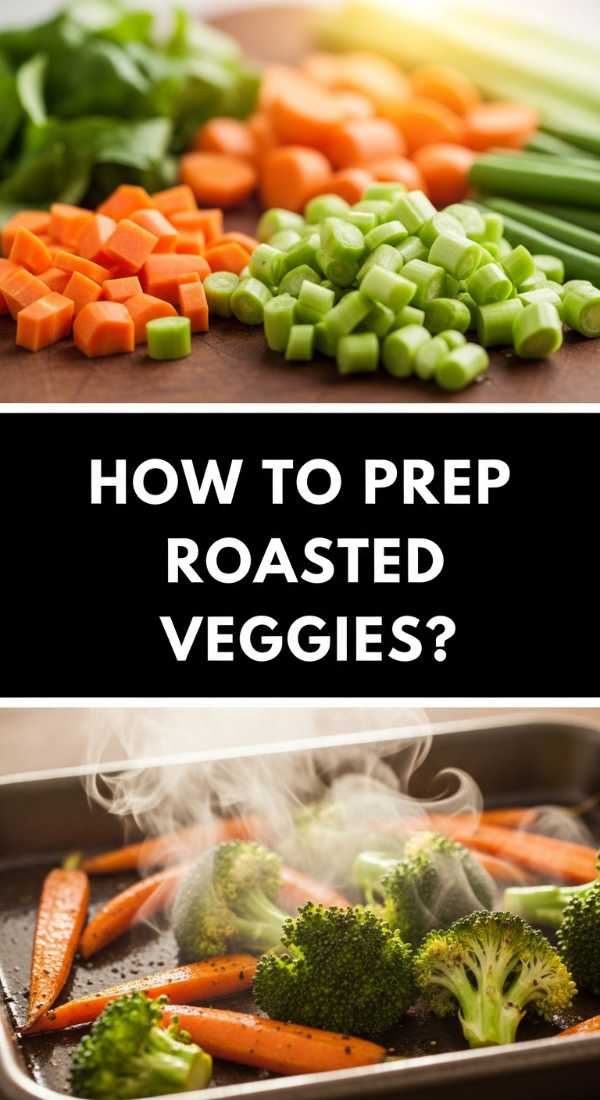
How to prep roasted veggies
Why we love this
There is an earthy, caramelized sweetness that only comes from roasting vegetables at a high temperature, turning humble roots and greens into candy-like bites of pure joy. The edges become delightfully crisp and charred, while the interiors remain buttery and soft, releasing a fragrant, roasted aroma that makes your kitchen feel like the heart of a rustic cottage. Every bite offers a satisfying crunch followed by a burst of concentrated flavor that raw vegetables simply cannot replicate, making them the star of any food board.
Ingredients
- 1 lb sweet potatoes, cubed
- 1 lb broccoli florets
- 3 tablespoons extra virgin olive oil
- 3 cloves garlic, minced
- 1 teaspoon dried thyme
- 1/2 teaspoon sea salt
How to make it
- Preheat your oven to 425°F (220°C). This high heat is crucial for achieving caramelization (the Maillard reaction) rather than just softening the vegetables.
- Cut your vegetables into uniform sizes; keep the sweet potato cubes around 1/2 inch so they cook at the same rate as the broccoli florets.
- On a large, rimmed baking sheet, toss the vegetables with olive oil, minced garlic, thyme, and salt. Ensure every piece has a light sheen of oil, which acts as a heat conductor for even browning.
- Spread the vegetables out in a single layer. If the pan is too crowded, the vegetables will steam instead of roast; use two pans if necessary to provide ‘breathing room’ between pieces.
- Roast for 20 to 25 minutes. At the halfway mark, use a wide spatula to flip the vegetables, ensuring the side touching the pan gets that beautiful golden-brown color.
- Remove when the potatoes are fork-tender and the broccoli tips are slightly charred and crispy. Let them rest for two minutes on the pan to firm up before serving.
How to make overnight oats

Why we love this
Overnight oats are like a morning love letter to your future self, waiting in the fridge with a creamy, velvety texture that feels incredibly indulgent yet nourishing. The way the oats absorb the milk creates a thick, custard-like consistency that carries the subtle sweetness of maple syrup and the warmth of vanilla. It’s a sensory delight to stir in fresh berries or a dollop of nut butter, watching the colors swirl together into a breakfast that looks as beautiful as it tastes, providing a calm and easy start to the day.
Ingredients
- 1/2 cup rolled oats (old fashioned)
- 1/2 cup almond milk or oat milk
- 1 tablespoon chia seeds
- 1 tablespoon maple syrup
- 1/2 teaspoon vanilla extract
- Toppings: Fresh berries, almond butter, or granola
How to make it
- Select a wide-mouth glass jar (like a Mason jar) which makes it easier to stir and eat from the next morning.
- Add the rolled oats and chia seeds to the jar. The chia seeds are vital as they act as a natural thickener, absorbing liquid and creating that signature pudding-like texture.
- Pour in your choice of milk, maple syrup, and vanilla extract. Use a long spoon to stir vigorously, ensuring there are no clumps of chia seeds at the bottom of the jar.
- Seal the jar tightly with a lid and place it in the refrigerator. For the best texture, let the oats soak for at least 6 hours, though overnight (8-10 hours) is the gold standard for maximum creaminess.
- In the morning, give the oats a quick stir. If the mixture is too thick for your preference, splash in an extra tablespoon of milk to loosen it up.
- Top with your desired textures—crunchy granola for contrast, or fresh, bursting blueberries for a hit of acidity.
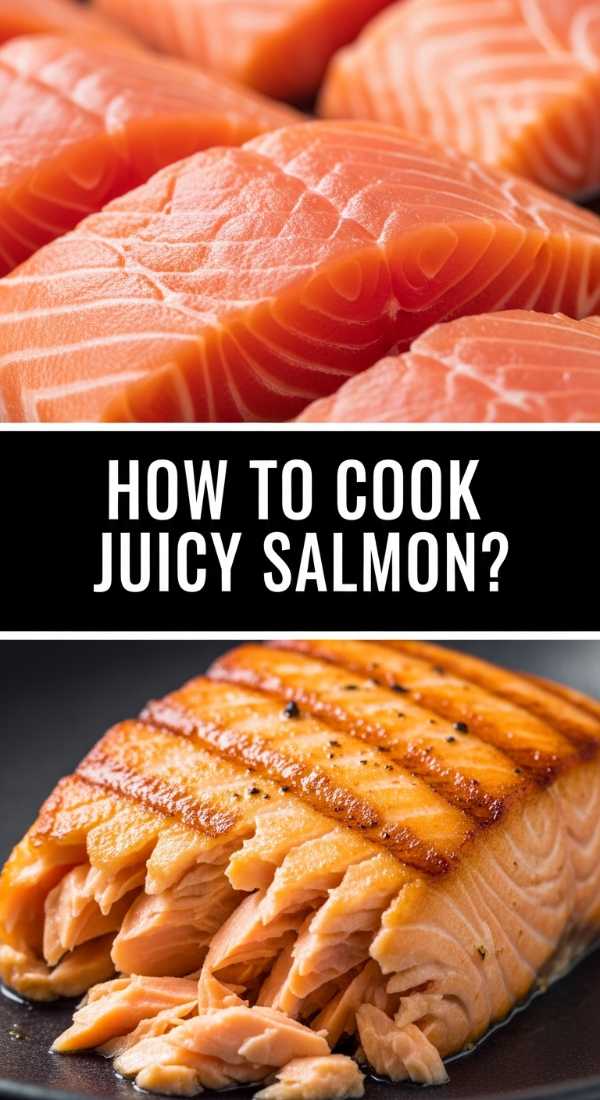
How to cook juicy salmon
Why we love this
A perfectly cooked piece of salmon is a masterpiece of culinary texture, featuring a skin so crisp it crackles under the fork and flesh that flakes away in tender, fatty ribbons of pink perfection. The aroma of searing fish combined with a squeeze of fresh lemon creates a bright, sophisticated scent that signals a high-quality meal is moments away. It’s the ultimate center-piece for a food board, offering a rich, buttery mouthfeel that pairs beautifully with zesty dips or crisp, fresh greens, making every bite feel like a gourmet experience.
Ingredients
- 2 salmon fillets (6 oz each)
- 1 tablespoon avocado oil (high smoke point)
- 1 tablespoon unsalted butter
- 1/2 lemon
- Salt and pepper
- Fresh dill for garnish
How to make it
- Remove the salmon from the refrigerator 15 minutes before cooking to bring it closer to room temperature; this prevents the outside from overcooking while the inside stays cold.
- Pat the skin side of the salmon extremely dry with a paper towel. Moisture is the enemy of a crispy skin. Season both sides generously with salt and pepper.
- Heat a stainless steel or non-stick skillet over medium-high heat. Add the avocado oil and wait until it begins to shimmer and smoke very lightly.
- Place the salmon fillets in the pan, skin-side down. Press down firmly with a spatula for 10 seconds to ensure the skin makes full contact with the heat and doesn’t curl.
- Lower the heat to medium and let the salmon cook undisturbed for about 5-6 minutes. You will see the color change from opaque pink to pale pink creeping up the sides of the fillet.
- Flip the fish carefully. Add the butter and a squeeze of lemon to the pan. Sauté for another 1-2 minutes while spooning the melted butter over the fish (basting) until the internal temperature hits 125-130°F for a perfect medium.
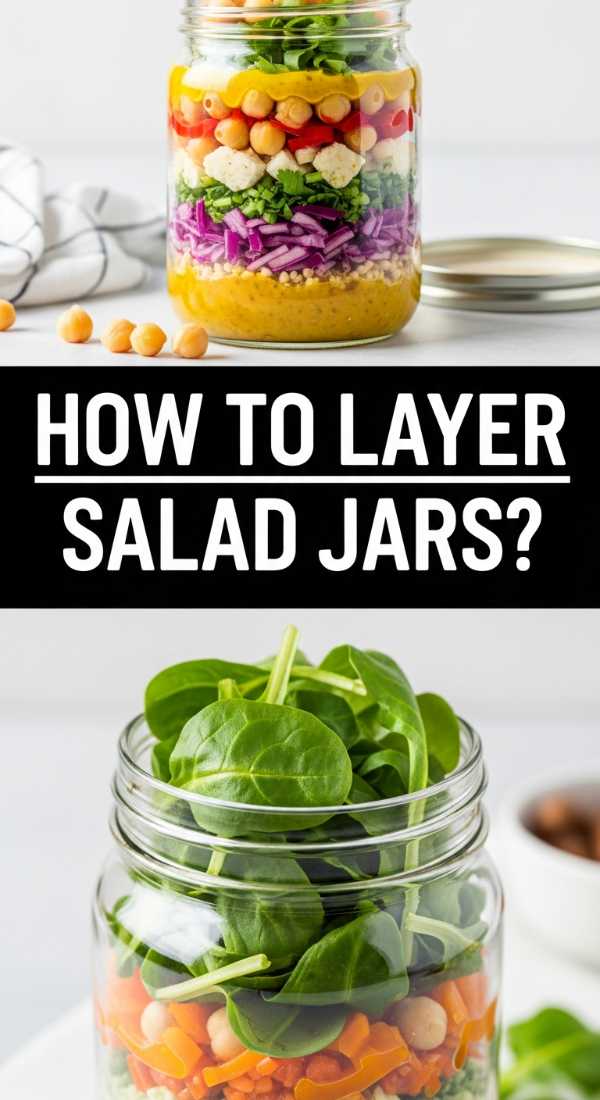
How to layer salad jars
Why we love this
The salad jar is a visual and culinary triumph, turning a standard lunch into a vibrant, vertical mosaic of garden-fresh ingredients. There is a specific joy in seeing the distinct layers—the pooling dressing at the base, the sturdy vegetables, and the delicate greens perched safely at the top. When you finally shake it out into a bowl, the ingredients tumble together in a fresh, crisp waterfall of flavor, maintaining their individual textures and bright, peppery aromas without ever becoming soggy or wilted before lunchtime.
Ingredients
- 3 tablespoons balsamic vinaigrette
- 1/2 cup cherry tomatoes, halved
- 1/2 cup cucumber, diced
- 1/4 cup chickpeas, rinsed
- 1/4 cup feta cheese, crumbled
- 2 cups chopped romaine lettuce
How to make it
- The Golden Rule of Jar Salads: Always put the dressing in first. This keeps the liquid at the bottom, away from the sensitive leaves, preventing sogginess.
- Add your ‘shield’ layer. These are hardy vegetables that actually benefit from marinating in the dressing, such as cherry tomatoes, cucumbers, or chickpeas.
- Layer in your proteins or grains next, like cooked quinoa or tofu. This creates a secondary barrier between the moisture and the greens.
- Add your delicate items like feta cheese, nuts, or dried fruit. This keeps them dry and maintains their specific textures (creamy or crunchy).
- Fill the remaining space to the very top with your greens (romaine, spinach, or arugula). Packing the greens tightly minimizes the amount of air in the jar, which keeps the leaves fresher for longer.
- Seal the jar and store upright in the fridge. When ready to eat, simply shake the jar vigorously or dump it into a large bowl to allow the dressing to coat everything evenly.
How to bake egg bites

Why we love this
Egg bites are the ultimate bite-sized luxury, offering a velvety, soufflé-like texture that practically melts on the tongue with a gentle, savory warmth. The subtle scent of melted Gruyère or sharp cheddar mingling with sautéed spinach creates a breakfast aroma that is both sophisticated and incredibly inviting. They are perfect for a food board because they hold their shape beautifully, offering a pop of yellow color and a rich, protein-packed punch that feels far more elegant than a standard scrambled egg, making them a favorite for brunch gatherings.
Ingredients
- 6 large eggs
- 1/2 cup cottage cheese (for the velvet texture)
- 1/2 cup shredded gruyère or cheddar cheese
- 1/2 cup chopped spinach
- 1/4 cup cooked bacon bits (optional)
- Salt and pepper
How to make it
- Preheat your oven to 300°F (150°C). A lower temperature is essential for preventing the eggs from puffing up and then collapsing, ensuring a dense, creamy texture.
- Place the eggs, cottage cheese, and salt/pepper in a blender. Blend on high for 30 seconds until the mixture is completely smooth and slightly frothy. The cottage cheese is the secret ingredient for that ‘sous-vide’ style silkiness.
- Grease a silicone muffin tin thoroughly with non-stick spray. Silicone is highly recommended over metal for easy removal without tearing the delicate bites.
- Divide your ‘add-ins’ (spinach, bacon, shredded cheese) evenly among the muffin cups first.
- Pour the egg mixture over the add-ins until each cup is about 3/4 full. Do not overfill, as they will expand slightly.
- Place the muffin tin inside a larger baking pan and fill the outer pan with an inch of hot water (a water bath). Bake for 30-35 minutes until the centers are set. Let them cool for 5 minutes before popping them out.
How to prep quinoa salad
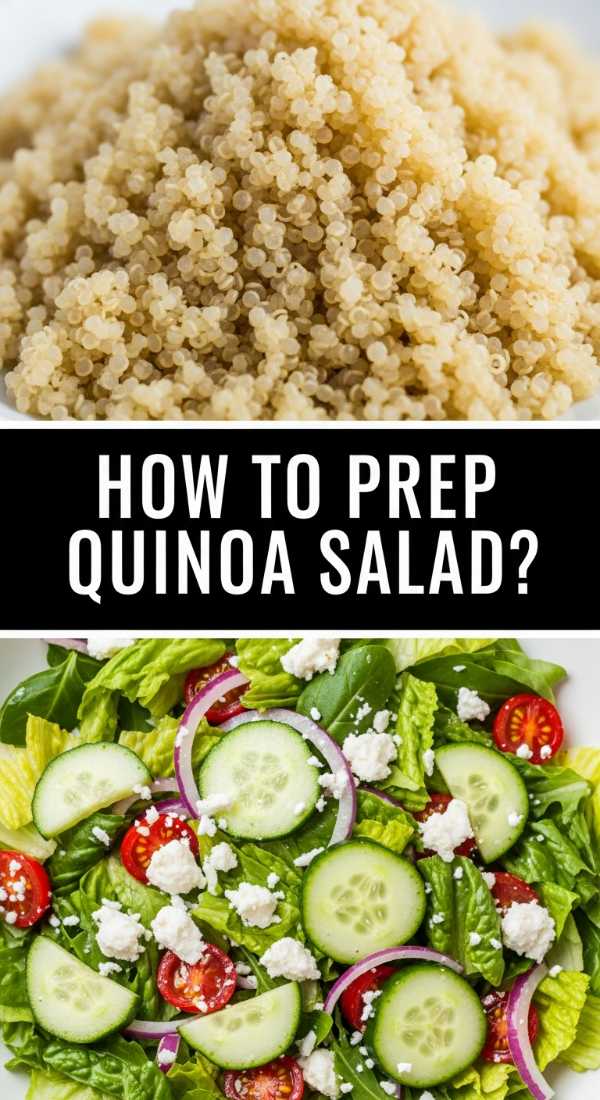
Why we love this
Quinoa salad is a celebration of brightness and crunch, a refreshing ensemble where nutty, protein-rich grains meet the sharp, citrusy zing of a lemon-herb dressing. The texture is a delightful contrast—tiny, pop-in-your-mouth quinoa pearls paired with the crisp snap of bell peppers and the creamy crumble of goat cheese. It smells like a summer garden, full of fresh parsley and mint, making it a revitalizing addition to any board that balances out heavier meats and provides a clean, energetic lift to your palate.
Ingredients
- 1 cup dry quinoa
- 2 cups water or vegetable broth
- 1 red bell pepper, finely diced
- 1/2 cup fresh parsley, chopped
- 3 tablespoons olive oil
- 1 tablespoon lemon juice
- Salt and pepper to taste
How to make it
- Rinse the dry quinoa in a fine-mesh strainer under cold water for at least 30 seconds. This removes the ‘saponin,’ a natural coating that can make quinoa taste bitter or soapy.
- Combine quinoa and liquid in a pot. Bring to a vigorous boil, then immediately reduce the heat to the lowest setting. Cover with a tight-fitting lid and simmer for 15 minutes.
- Once the liquid is absorbed, remove the pot from the heat but keep the lid on for 5 minutes. This ‘steaming’ phase allows the grains to fully open up and become fluffy.
- Fluff the quinoa with a fork and spread it out on a large plate or baking sheet to cool quickly. Adding dressing to hot quinoa can make it mushy.
- In a large bowl, whisk together the olive oil, lemon juice, salt, and pepper. Add the cooled quinoa, diced peppers, and parsley.
- Toss thoroughly so the grains absorb the dressing. For the best flavor, let it sit for 15 minutes before serving to allow the herbs to infuse into the quinoa.
How to saute fresh veggies
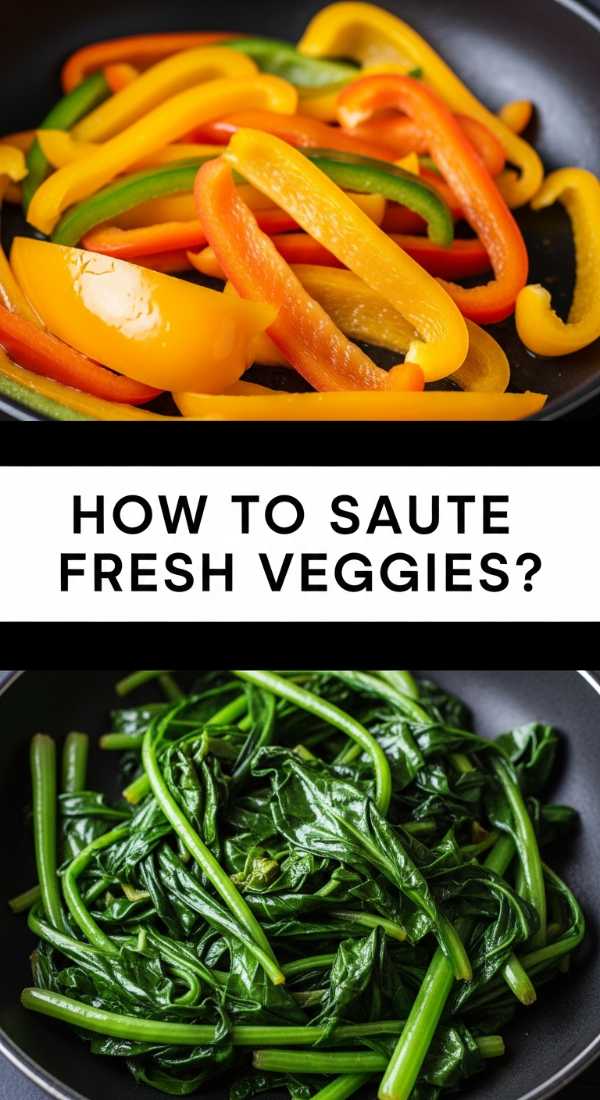
Why we love this
Sautéed vegetables are the quick-fire heroes of the kitchen, providing a vibrant, glossy finish to your food board that looks as healthy as it tastes. The sound of the sizzle as the greens hit the hot pan is instantly rewarding, followed by the pungent, sweet aroma of garlic browning in olive oil. These veggies maintain a gorgeous ‘al dente’ snap, offering a fresh, juicy bite that feels alive and full of nutrients, perfectly bridging the gap between raw freshness and cooked comfort.
Ingredients
- 2 cups asparagus or snap peas
- 1 tablespoon olive oil
- 2 cloves garlic, thinly sliced
- A pinch of red pepper flakes
- 1 teaspoon lemon zest
- Flaky sea salt
How to make it
- Prep your vegetables by trimming any woody ends (especially for asparagus) and ensuring they are dry. Wet vegetables will steam rather than sauté.
- Heat your skillet over medium-high heat. Add the olive oil and let it get hot enough that it moves fluidly like water across the pan.
- Add the garlic slices and red pepper flakes first. Cook for only 30 seconds—just until the garlic turns fragrant and golden around the edges. Watch closely so it doesn’t burn and turn bitter.
- Toss in the vegetables. Use tongs to keep them moving constantly. The goal is ‘flash-cooking’ where the outside gets a slight sear but the inside stays bright and crisp.
- Sauté for 3 to 5 minutes depending on the thickness of the vegetable. They should be vibrant green; if they turn a dull, olive color, they are overcooked.
- Remove from the heat immediately. Toss with lemon zest and flaky sea salt to brighten the flavors before arranging them artfully on your board.
How to bake crispy potatoes

Why we love this
There is perhaps no greater sensory pleasure than the crunch of a perfectly baked crispy potato. The exterior is a jagged, golden landscape of salt and starch, while the interior remains as soft and airy as mashed potatoes. The smell of roasting starch and rosemary is the ultimate olfactory hug, promising a side dish that is universally loved. These golden gems add a much-needed structural element to a food board, providing the perfect vehicle for dipping into aioli or hummus while delivering a satisfying, savory punch.
Ingredients
- 1.5 lbs Yukon Gold or Russet potatoes
- 4 tablespoons olive oil or duck fat
- 1 teaspoon garlic powder
- 1 teaspoon dried rosemary
- 1/2 teaspoon kosher salt
How to make it
- Peel and cut the potatoes into 1-inch chunks. Place them in a pot of cold salted water and bring to a boil. Parboil them for about 5-8 minutes until the edges are just starting to soften.
- Drain the potatoes and let the steam escape for a minute. Then, put them back in the pot, lid on, and shake vigorously. This ‘roughens’ the edges, creating a starchy mash on the surface that will turn into a super-crispy crust.
- Preheat your oven and a large baking sheet to 425°F (220°C). Heating the pan beforehand ensures the potatoes start sizzling the second they touch the metal.
- Carefully toss the parboiled potatoes with oil, garlic powder, rosemary, and salt in a bowl until they are coated in a thick, starchy paste.
- Spread the potatoes onto the hot baking sheet. You should hear a distinct sizzle. Ensure they are not touching each other.
- Bake for 35-45 minutes, flipping them every 15 minutes. They are done when they are deep mahogany gold and sound hollow/crunchy when tapped with a fork.
How to make zucchini noodles

Why we love this
Zucchini noodles, or ‘zoodles,’ are a refreshing, light-as-air alternative to traditional pasta that brings a vibrant splash of green to your board. They have a delicate, slightly sweet flavor and a tender-crisp texture that makes them feel incredibly sophisticated. When tossed with a bit of pesto or lemon oil, they release a clean, garden-fresh aroma that makes you feel energized. They are the perfect way to add volume and elegance to a meal without any of the heaviness, acting as a beautiful, spiraled bed for proteins like salmon or chicken.
Ingredients
- 2 large zucchinis
- 1 tablespoon olive oil
- 1 clove garlic, minced
- Salt and pepper
- Optional: Pesto or parmesan cheese
How to make it
- Use a spiralizer or a julienne peeler to turn the zucchinis into long, noodle-like strands. Stop when you reach the seedy core, as the seeds contain too much moisture and will make the noodles soggy.
- Place the raw zoodles in a colander and sprinkle with a pinch of salt. Let them sit for 10 minutes. This draws out excess water (osmosis), which is the key to preventing a watery dish.
- After 10 minutes, gently pat the zoodles dry with a clean kitchen towel or paper towels.
- Heat a large skillet over medium-high heat with a drizzle of olive oil. Add the minced garlic and sauté for 30 seconds until fragrant.
- Add the zoodles to the pan. Sauté for no more than 2 to 3 minutes. Zucchini noodles cook incredibly fast; you want them to be warmed through and slightly softened, but still holding their spiral shape.
- Remove from heat immediately. If you leave them in the hot pan, they will continue to release water. Toss with pesto or a squeeze of lemon and serve immediately on your food board.
The Art of the Finished Board
Creating a viral-worthy food board isn’t just about the individual recipes; it’s about the assembly. Start with your largest items first—the bowls of quinoa or the fillets of salmon—and then fill in the gaps with the vibrant roasted veggies and crispy potatoes. Use the zucchini noodles as a base to add height, and sprinkle your egg bites and salad jars around the edges for easy access. By combining these textures and colors, you turn a simple meal into an interactive experience that satisfies the eyes as much as the appetite. Remember, the ‘viral’ part comes from the love and care you put into the presentation. Happy plating is a form of gratitude for the food you’ve prepared.