

Stop Everything: This 3-Ingredient Board is Going Viral for a Reason
There is something almost magical about the way a single dish can transform a chaotic Tuesday evening into a moment of pure, unadulterated connection. I remember sitting in my sun-drenched kitchen last week, feeling the weight of a million tiny tasks, when I realized that the best memories aren’t made over five-course meals that take hours to prep; they are made over the simple, tactile joy of a shared board. This viral trend isn’t just about aesthetics; it is about reclaiming our time and focusing on the flavors that truly make our hearts sing.
We have all seen the perfectly curated photos on our feeds, but the real secret to a viral-worthy board lies in the soul of the food itself. It is about that perfect crust on a loaf of bread or the way a slow-cooked meat falls apart at the touch of a fork. Today, I am pulling back the curtain on the most requested recipes that have been lighting up my comments section. Whether you are looking for that nostalgic comfort of a hearty chili or the delicate tang of a sourdough starter, these are the techniques that will turn your next gathering into a core memory for everyone involved.
How to cook corned beef

Why we love this
There is an incredible, deep nostalgia that comes with a perfectly brined corned beef, filling the entire house with a warm, spicy aroma that promises comfort. When cooked correctly, the meat achieves a succulent, fork-tender texture that practically melts on the tongue, balanced by the sharp, vinegary pop of pickling spices. The vibrant pink hue of the slices looks stunning on a wooden serving board, especially when paired with a coarse grain mustard that cuts through the richness of the fat. It is the ultimate centerpiece for a rustic feast, offering a salty, savory depth that lingers long after the last bite is gone.
Ingredients
- 4-5 lb Corned beef brisket (with spice packet)
- 1 large yellow onion, quartered
- 3 cloves of garlic, smashed
- 2 cups beef broth
- Water to cover
How to make it
- Begin by removing the brisket from its packaging and rinsing it thoroughly under cool, running water to remove excess surface brine, which prevents the final dish from being overly salty.
- Place the brisket into a large, heavy-bottomed Dutch oven with the fat cap facing upwards; this allows the fat to render down through the meat during the long simmer, keeping it moist.
- Add the quartered onion, smashed garlic, and the contents of the included spice packet (usually mustard seeds, peppercorns, and bay leaves) into the pot.
- Pour in the beef broth and then add enough water so that the liquid sits about two inches above the top of the meat.
- Bring the liquid to a gentle boil over medium-high heat, then immediately reduce the heat to low, ensuring only a few lazy bubbles break the surface.
- Cover the pot with a tight-fitting lid and simmer for approximately 50 to 60 minutes per pound; you will know it is done when a meat fork slides in and out of the thickest part with zero resistance.
- Once tender, remove the brisket from the liquid and let it rest on a cutting board for at least 15 minutes to allow the juices to redistribute before slicing against the grain into thin, uniform strips.
How to bake lasagna

Why we love this
Lasagna is more than just a meal; it is a structural masterpiece of Mediterranean comfort that layers silky pasta with velvety cheeses and robust sauces. We love the way the edges of the noodles get that signature crispy, golden-brown crunch while the center remains a molten, gooey sanctuary of ricotta and herbs. The scent of bubbling tomato sauce and roasted garlic wafting from the oven is enough to bring anyone to the table, creating a sensory experience that feels like a warm hug. It is the kind of dish that looks impressive and complex, yet feels deeply grounded and homey with every cheesy, multi-textured forkful.
Ingredients
- 1 box lasagna noodles (boiled or no-boil)
- 1 lb ground Italian sausage or beef
- 24 oz marinara sauce
- 15 oz ricotta cheese
- 1 egg (to bind the cheese)
- 3 cups shredded mozzarella
- 1/2 cup grated Parmesan cheese
- Fresh basil for garnish
How to make it
- Preheat your oven to 375°F (190°C) and lightly grease a deep 9×13 inch baking dish to prevent the bottom layer of pasta from sticking.
- In a large skillet over medium heat, brown your meat of choice until no pink remains, breaking it into small crumbles, then stir in the marinara sauce and let it simmer for 10 minutes to develop depth.
- In a separate medium bowl, combine the ricotta cheese with one lightly beaten egg and a handful of Parmesan; the egg is crucial as it creates a stable, fluffy texture that won’t run when sliced.
- Spread a thin layer of the meat sauce on the bottom of the baking dish, then top with a layer of noodles, followed by a generous spread of the ricotta mixture and a sprinkle of mozzarella.
- Repeat these layers—sauce, noodles, ricotta, mozzarella—until you reach the top of the dish, finishing with a dense layer of mozzarella and Parmesan for that iconic crust.
- Cover the dish tightly with aluminum foil (tented so it doesn’t touch the cheese) and bake for 25 minutes to ensure the noodles are fully cooked and the flavors are melded.
- Remove the foil and bake for an additional 15 minutes, or until the cheese is bubbling vigorously and has developed deep golden-brown spots across the surface.
- Crucially, let the lasagna rest for 15-20 minutes before cutting; this allows the layers to set so you get clean, beautiful squares rather than a collapsed mess on the plate.
How to make fluffy pancakes

Why we love this
There is nothing quite like the airy, cloud-like texture of a pancake that has been perfected to a golden, uniform finish. We love the way the steam escapes when you cut into a stack, revealing a light-as-air interior that is just waiting to soak up pools of amber maple syrup. The subtle sweetness of the batter combined with the slight tang of buttermilk creates a flavor profile that is both sophisticated and nostalgic. These pancakes aren’t just breakfast; they are a soft, pillowy canvas for melted butter and fresh berries, providing a gentle, satisfying start to any morning with their delicate crumb and toasted aroma.
Ingredients
- 2 cups all-purpose flour
- 2 tbsp sugar
- 1 tbsp baking powder
- 1/2 tsp salt
- 1 1/2 cups buttermilk
- 1/4 cup melted butter (cooled slightly)
- 1 large egg
- 1 tsp vanilla extract
How to make it
- Whisk your dry ingredients—flour, sugar, baking powder, and salt—in a large bowl to ensure the leavening agents are evenly distributed, which prevents uneven rising.
- In a separate jug, whisk together the buttermilk, egg, vanilla, and melted butter; using room temperature ingredients will prevent the butter from re-solidifying into clumps.
- Pour the wet ingredients into the dry and fold them together using a spatula; the golden rule is to stop the moment the flour streaks disappear, as over-mixing develops gluten and makes the pancakes tough.
- Allow the batter to rest for at least 10 minutes; this allows the baking powder to activate and the flour to hydrate, resulting in a much fluffier rise.
- Heat a non-stick griddle or heavy cast-iron skillet over medium-low heat and lightly coat with a tiny bit of butter or oil, wiping away the excess so the pancakes brown evenly without frying.
- Pour about 1/4 cup of batter per pancake onto the hot surface, leaving space for them to spread without touching.
- Wait for bubbles to form on the surface and the edges to look set and matte (about 2-3 minutes) before flipping with a thin spatula.
- Cook the second side for another 1-2 minutes until golden brown; avoid pressing down on the pancakes with your spatula, as this collapses the delicate air pockets you’ve worked so hard to create.
How to bake chewy cookies

Why we love this
A truly chewy cookie is a masterpiece of chemistry and comfort, offering a dense, buttery center that yields softly to the bite while the edges remain slightly crisp. We love the intense caramel notes that come from browned butter and dark brown sugar, creating a complex sweetness that lingers on the palate. The sight of a warm cookie, with pools of melted chocolate still glistening on the surface, is a universal symbol of home-baked love. It is the contrast of textures—the soft doughiness against the snap of the rim—that makes these cookies absolutely addictive and a staple for any viral dessert board.
Ingredients
- 1 cup unsalted butter, softened
- 3/4 cup brown sugar (packed)
- 3/4 cup granulated sugar
- 2 large eggs (room temperature)
- 1 tsp vanilla extract
- 2 1/4 cups all-purpose flour
- 1 tsp baking soda
- 1/2 tsp sea salt
- 2 cups semi-sweet chocolate chips
How to make it
- Cream together the softened butter and both sugars using a stand mixer or hand mixer for at least 3-5 minutes until the mixture is pale, light, and incredibly fluffy.
- Add the eggs one at a time, beating well after each addition to ensure the emulsion is stable, then stir in the vanilla extract.
- In a medium bowl, sift the flour, baking soda, and salt together; slowly incorporate this into the wet ingredients on low speed until just combined.
- Fold in the chocolate chips by hand to ensure they are evenly distributed throughout the thick, tacky dough.
- For the ultimate chewiness, chill the dough in the refrigerator for at least 2 hours or even overnight; this prevents the cookies from spreading too thin and concentrates the sugars.
- Preheat your oven to 350°F (175°C) and line baking sheets with parchment paper or silicone mats.
- Scoop rounded tablespoons of dough onto the sheets, spacing them 2 inches apart to allow for controlled spreading.
- Bake for 9-11 minutes; the key is to remove them when the edges are just barely golden but the centers still look slightly underbaked and soft.
- Let the cookies cool on the hot baking sheet for 5 minutes to allow the residual heat to set the center without overcooking the edges.
How to make pasta salad

Why we love this
Pasta salad is the unsung hero of the viral board, bringing a bright, acidic, and crunchy element that balances out heavier, savory dishes. We love the way the ridged pasta captures the zesty vinaigrette, ensuring that every single bite is an explosion of herb-infused flavor. The combination of crisp vegetables, creamy cheeses, and cured meats creates a symphony of textures that keeps the palate excited and refreshed. It is a colorful, visually stunning addition that smells of fresh oregano and sun-ripened tomatoes, making it the perfect versatile side for any outdoor gathering or cozy indoor spread.
Ingredients
- 1 lb Rotini or Penne pasta
- 1 cup cherry tomatoes, halved
- 1 cup cucumber, diced
- 1/2 cup red onion, finely minced
- 1/2 cup kalamata olives, sliced
- 1 cup mozzarella pearls or cubed feta
- 1/2 cup Italian dressing (homemade or high-quality store-bought)
- Fresh parsley and dried oregano
How to make it
- Boil a large pot of heavily salted water and cook the pasta until it is slightly past al dente; for cold salads, you want the pasta a bit softer as it will firm up significantly once chilled.
- Immediately drain the pasta and rinse it under cold water to stop the cooking process and wash away excess starch, which prevents the noodles from clumping together.
- Transfer the cooled pasta to a large mixing bowl and drizzle with a tablespoon of olive oil to keep the pieces separate while you prep the vegetables.
- Add the halved cherry tomatoes, diced cucumbers, minced red onion, and sliced olives to the bowl, ensuring a vibrant mix of colors and textures.
- Gently toss in the mozzarella pearls or feta cheese, being careful not to break them apart.
- Pour the Italian dressing over the mixture and toss thoroughly until every nook and cranny of the pasta is coated in the vinaigrette.
- Season generously with dried oregano, salt, pepper, and a handful of chopped fresh parsley for a burst of color and earthiness.
- Refrigerate for at least 1 hour before serving; this time is essential for the pasta to absorb the flavors of the dressing, though you may need to add a splash more dressing just before serving as the pasta will soak it up.
How to cook hearty chili

Why we love this
A bowl of hearty chili is like a campfire for the soul, radiating warmth and a complex, smoky depth that only comes from slow-simmered ingredients. We love the thick, rich consistency where the spoon stands tall, surrounded by tender beans and perfectly browned meat that has soaked up a blend of cumin, chili powder, and cocoa. The aroma is intoxicating—a spicy, earthy cloud that fills the kitchen and promises a meal that is as filling as it is flavorful. Topped with a dollop of cool sour cream and a sprinkle of sharp cheddar, it provides a beautiful contrast of temperatures and textures that is impossible to resist.
Ingredients
- 2 lbs ground beef or chuck roast pieces
- 1 large onion, diced
- 3 cloves garlic, minced
- 2 cans kidney beans, drained and rinsed
- 1 can crushed tomatoes (28 oz)
- 1 cup beef broth
- 3 tbsp chili powder, 1 tbsp cumin, 1 tsp smoked paprika
- Salt and pepper to taste
How to make it
- In a large, heavy pot or Dutch oven, brown the ground beef over medium-high heat until it is thoroughly cooked and slightly caramelized on the edges for maximum flavor.
- Drain the excess fat, leaving about a tablespoon in the pot, and add the diced onions and minced garlic, sautéing until they are translucent and fragrant.
- Stir in the chili powder, cumin, and smoked paprika, allowing the spices to toast in the fat for about 60 seconds; this “blooming” technique unlocks the essential oils and intensifies the flavor.
- Add the crushed tomatoes, beef broth, and the drained kidney beans, stirring to combine all the ingredients into a thick stew.
- Bring the mixture to a gentle boil, then reduce the heat to its lowest setting and cover the pot partially with a lid.
- Simmer the chili for at least 45 to 60 minutes; the longer it cooks, the more the liquid reduces and the flavors meld into a singular, cohesive depth.
- Taste and adjust the seasoning with salt and pepper, adding a pinch of sugar or a square of dark chocolate if the tomatoes are too acidic.
- Serve hot in deep bowls, garnished with shredded cheese, sliced jalapeños, or fresh cilantro to add a bright finish to the rich base.
How to make banana bread
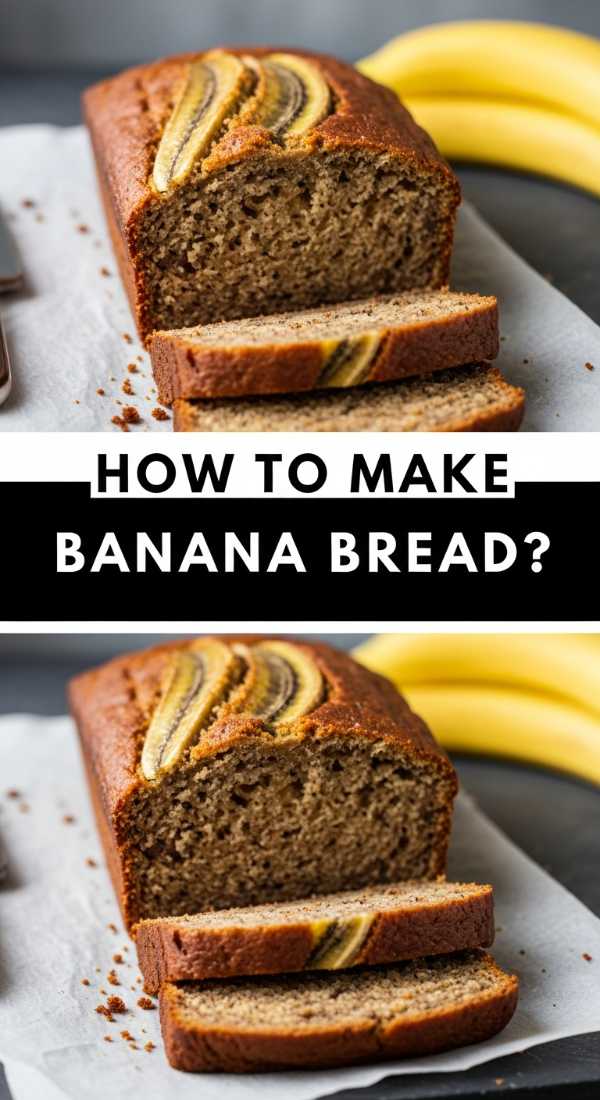
Why we love this
Banana bread is the ultimate comfort bake, turning overripe fruit into a dense, moist loaf that smells like caramelized sugar and warm vanilla. We love the way the dark, mahogany crust hides a pale, tender interior that is flecked with bits of sweet banana and perhaps a few toasted walnuts for crunch. There is something deeply satisfying about slicing into a warm loaf and watching a pat of butter melt instantly into the soft crumb. It is a humble yet sophisticated treat that brings a sense of coziness to any board, offering a sweet, fruity finish that pairs perfectly with a hot cup of coffee or tea.
Ingredients
- 3 very ripe bananas, mashed
- 1/2 cup melted butter
- 3/4 cup granulated sugar
- 1 large egg, beaten
- 1 tsp vanilla extract
- 1 tsp baking soda
- Pinch of salt
- 1 1/2 cups all-purpose flour
How to make it
- Preheat your oven to 350°F (175°C) and generously grease a 4×8 inch loaf pan with butter or non-stick spray to ensure an easy release.
- In a large mixing bowl, use a fork to mash the ripe bananas until they are smooth with just a few small lumps for texture.
- Stir the melted butter into the mashed bananas until fully incorporated, followed by the beaten egg, sugar, and vanilla extract.
- Sprinkle the baking soda and salt over the wet mixture and stir well to ensure the leavening agent is distributed throughout the liquid.
- Gently fold in the flour using a spatula, mixing only until the white streaks disappear; over-mixing will result in a rubbery loaf rather than a tender crumb.
- Pour the thick batter into the prepared loaf pan and smooth the top with your spatula.
- Bake for 50 to 60 minutes; check for doneness by inserting a toothpick into the center—it should come out clean or with just a few moist crumbs attached.
- Let the bread cool in the pan for 10 minutes before transferring it to a wire rack to cool completely, which prevents the bottom from becoming soggy from trapped steam.
How to bake sourdough bread
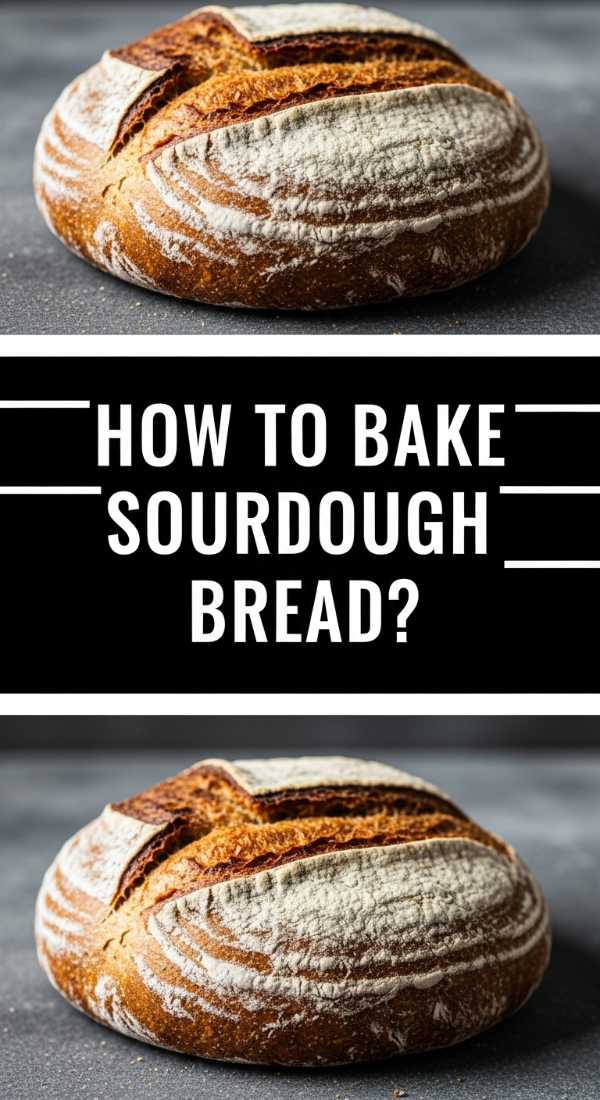
Why we love this
Sourdough is a labor of love that rewards the baker with a complex, tangy flavor and a crust that crackles beautifully when compressed. We love the wild, irregular air pockets of the crumb and the chewy, artisanal texture that only a natural fermentation process can provide. The scent of a sourdough loaf in the oven is distinct—yeasty, sharp, and deeply savory—signaling the arrival of a bread that is as much an art piece as it is a food staple. It is the perfect foundation for any viral board, providing a sturdy, flavorful base for creamy cheeses, salted butters, or vibrant fruit preserves.
Ingredients
- 100g active sourdough starter
- 350g warm water
- 500g bread flour
- 10g fine sea salt
How to make it
- In a large glass bowl, whisk together the active starter and warm water until the starter is mostly dissolved and the water looks milky.
- Add the bread flour and salt, then mix by hand until a shaggy, sticky dough forms and no dry flour remains.
- Cover the bowl with a damp cloth and let the dough rest for 30 minutes; this process, called autolyse, allows the flour to fully hydrate and starts gluten development.
- Perform a series of “stretch and folds” every 30 minutes for the next 2 hours: grab an edge of the dough, pull it upwards, and fold it over the center, rotating the bowl 90 degrees each time.
- Cover the dough and let it undergo “bulk fermentation” at room temperature for 6-10 hours, or until it has doubled in size and looks bubbly and jiggly.
- Gently turn the dough onto a floured surface, shape it into a tight ball (boule), and place it into a floured proofing basket or a bowl lined with a linen towel.
- Let it rise for another 2 hours at room temperature, or for a more developed flavor, place it in the fridge for 12-24 hours.
- Preheat a Dutch oven in a 450°F (230°C) oven, carefully score the top of the dough with a sharp blade, and bake inside the hot pot with the lid on for 20 minutes (to trap steam) and then 20-25 minutes with the lid off to achieve a deep, dark crust.
How to cook juicy chicken

Why we love this
Perfectly cooked chicken is a revelation, offering a succulent, moisture-rich meat that is seasoned to perfection and encased in a crisp, savory skin. We love the versatility of a well-prepared breast or thigh, which can be the star of the show or a high-protein accompaniment to a variety of dipping sauces. The secret lies in the balance of high-heat searing for a golden exterior and gentle finishing to ensure the inside remains tender and dripping with natural juices. It is a clean, satisfying protein that brings a sense of wholeness to a viral food board, looking elegant and tasting like the best version of home cooking.
Ingredients
- 2 large chicken breasts or 4 thighs (skin-on for best flavor)
- 2 tbsp olive oil
- 1 tsp garlic powder, 1 tsp onion powder
- 1/2 tsp smoked paprika
- Salt and cracked black pepper
- Fresh thyme or rosemary
How to make it
- Pat the chicken completely dry with paper towels; moisture on the surface is the enemy of a good sear and will cause the meat to steam rather than brown.
- Season the chicken generously on both sides with salt, pepper, garlic powder, onion powder, and smoked paprika, pressing the spices into the meat to ensure they stick.
- Heat the olive oil in a heavy stainless steel or cast-iron skillet over medium-high heat until the oil shimmers and just begins to wisps of smoke appear.
- Place the chicken in the pan (skin-side down if applicable) and press down lightly with a spatula to ensure even contact with the heat; cook undisturbed for 5-7 minutes until a deep golden crust forms.
- Flip the chicken over and add a sprig of fresh herbs to the pan, then reduce the heat to medium.
- Continue cooking for another 6-8 minutes, or until the internal temperature reaches 165°F (74°C) when measured with a meat thermometer in the thickest part.
- Remove the chicken from the pan and place it on a warm plate, tenting it loosely with foil for at least 5-8 minutes before slicing.
- This resting period is non-negotiable; it allows the muscle fibers to relax and reabsorb the juices, ensuring that every bite is moist rather than dry.
How to bake fudgy brownies

Why we love this
Fudgy brownies are the ultimate indulgence, offering a dense, almost truffle-like consistency that is decadently rich and intensely chocolatey. We love the signature papery, crinkle-top crust that shatters slightly when you bite into the soft, gooey center. The aroma of high-quality cocoa and melting butter is enough to make any dessert lover weak at the knees, creating a sensory experience that is pure bliss. These aren’t just cookies or cakes; they are a concentrated burst of chocolate flavor that anchors a dessert board with their deep, dark color and undeniable crowd-appeal.
Ingredients
- 1/2 cup unsalted butter, melted
- 1 cup granulated sugar
- 2 large eggs
- 1 tsp vanilla extract
- 1/3 cup high-quality unsweetened cocoa powder
- 1/2 cup all-purpose flour
- 1/4 tsp salt, 1/4 tsp baking powder
- 1/2 cup chocolate chunks
How to make it
- Preheat your oven to 350°F (175°C) and line an 8×8 inch baking pan with parchment paper, leaving an overhang on the sides for easy lifting.
- In a large bowl, whisk the melted butter and sugar together vigorously for about 2 minutes; this incorporates air and helps create that coveted shiny, crackly top.
- Add the eggs and vanilla extract, whisking again until the mixture is pale and smooth.
- Sift the cocoa powder, flour, salt, and baking powder directly into the wet ingredients to avoid any dry clumps.
- Fold the dry ingredients in with a rubber spatula until just barely combined—stop the moment you no longer see streaks of flour to keep the texture fudgy rather than cakey.
- Gently stir in the chocolate chunks for extra pockets of molten chocolate.
- Spread the thick batter evenly into the prepared pan and tap it on the counter once to release any large air bubbles.
- Bake for 20-25 minutes; the secret to fudgy brownies is pulling them out when a toothpick inserted into the center comes out with several moist, sticky crumbs (not clean, and not liquid batter).
- Allow the brownies to cool completely in the pan before lifting them out and slicing; for the cleanest cuts, use a sharp knife wiped clean between every single slice.
Conclusion: The Art of the Simple Board
As we have explored today, the magic of a viral food board isn’t about expensive ingredients or professional plating skills—it is about the care and technique poured into every component. Whether you are serving a slice of warm, tangy sourdough or a decadent, fudgy brownie, these recipes prove that the most simple foods can be the most extraordinary. I hope these guides inspire you to slow down, fire up the oven, and invite some loved ones over to share in the tactile, delicious joy of a perfectly curated board. Remember, the best ingredient you can add to any dish is the intention to enjoy it together.