

There is something truly magical about a gathering that centers around a beautifully curated food board. It’s more than just a meal; it’s a tactile, visual experience that invites conversation and creates memories. I remember the first time I set out a DIY board for my friends—the way the room filled with the scent of roasted garlic and sweet vanilla, and how everyone’s eyes lit up at the vibrant colors. It turned a simple Tuesday night into a celebration of flavor and connection that we still talk about today.
Building the perfect board doesn’t require a culinary degree or expensive specialty shops. It’s all about taking those reliable, cozy favorites and presenting them with a little bit of flair. From the golden crust of a perfectly seared salmon to the gooey, irresistible center of a warm chocolate chip cookie, these recipes are the building blocks of a viral food board that feels both approachable and incredibly gourmet. Let’s dive into these kitchen hacks that will make your next spread the talk of the town.
How to cook juicy chicken breast

Why we love this
There is nothing quite like the satisfaction of slicing into a chicken breast that is actually tender, releasing a savory steam that carries the aroma of herbs and browned butter. We love this because it transforms a humble protein into a succulent centerpiece with a golden-brown, caramelized exterior that yields to a moist, melt-in-your-mouth interior. The texture is smooth and firm yet juicy, making it the perfect versatile addition to any board, whether sliced thin for grazing or served in hearty chunks for dipping into a rich aioli.
Ingredients
- 2 boneless, skinless chicken breasts
- 2 tablespoons olive oil
- 1 tablespoon unsalted butter
- Salt and freshly cracked black pepper
- 1/2 teaspoon garlic powder
- 1/2 teaspoon dried oregano
- Fresh lemon wedges for finishing
How to make it
- Begin by patting the chicken breasts completely dry with paper towels; moisture on the surface is the enemy of a good sear. If the breasts are uneven in thickness, place them under plastic wrap and gently pound the thicker end with a meat mallet until they are uniform, ensuring even cooking throughout.
- Generously season both sides with salt, pepper, garlic powder, and oregano. Don’t be afraid to press the spices into the meat so they adhere during the cooking process.
- Heat a heavy-bottomed skillet or cast-iron pan over medium-high heat. Add the olive oil and let it shimmer. Once the oil is hot, carefully place the chicken breasts in the pan, laying them away from you to avoid splatters.
- Let the chicken sear undisturbed for 5 to 6 minutes. You are looking for a deep, golden-brown crust. If you try to flip it and it sticks, it’s not ready yet—the meat will naturally release when the crust has formed.
- Flip the chicken and immediately add the butter to the pan. As the butter melts and foams, tilt the pan and use a spoon to baste the chicken with the hot fat. This keeps the meat incredibly moist and adds a rich, nutty flavor.
- Reduce the heat to medium and cook for another 5-7 minutes, or until the internal temperature reaches 165°F (74°C). Remove the chicken from the pan and let it rest on a cutting board for at least 5 to 8 minutes before slicing; this allows the juices to redistribute throughout the meat.
How to make creamy pasta salad
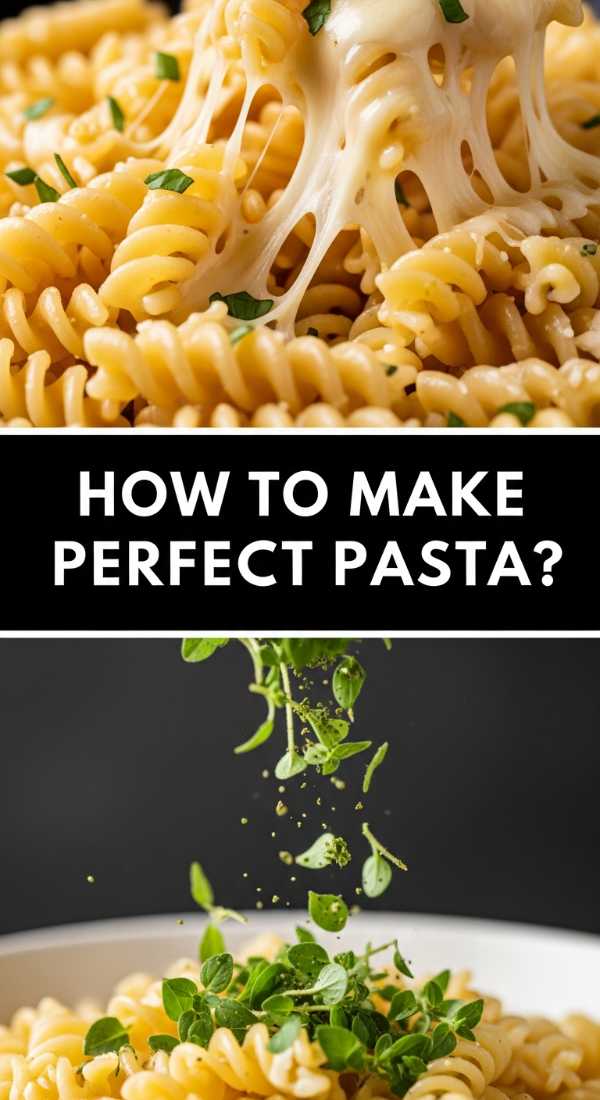
Why we love this
This creamy pasta salad is the ultimate comfort food hack for a crowd-pleasing board. It features al dente ridges of pasta that capture a silky, tangy dressing, punctuated by the crunch of fresh vegetables and the bite of sharp cheddar. The aroma is a refreshing blend of garden-fresh herbs and zesty vinegar, providing a cooling contrast to warmer board elements. It’s creamy without being heavy, offering a velvety mouthfeel that keeps guests coming back for second and third scoops.
Ingredients
- 16 oz fusilli or rotini pasta
- 1 cup mayonnaise
- 1/2 cup sour cream
- 2 tablespoons apple cider vinegar
- 1 tablespoon Dijon mustard
- 1 tablespoon honey
- 1 cup cherry tomatoes, halved
- 1/2 cup diced cucumber
- 1/2 cup cubed sharp cheddar cheese
- 1/4 cup red onion, finely minced
- Fresh parsley and dill, chopped
- Salt and pepper to taste
How to make it
- Boil a large pot of heavily salted water. Add the pasta and cook until it is just past al dente—slightly softer than usual is better here because the pasta will firm up once chilled and dressed. Drain and rinse immediately with cold water to stop the cooking process and remove excess starch.
- In a large mixing bowl, whisk together the mayonnaise, sour cream, apple cider vinegar, Dijon mustard, and honey. Whisk until the dressing is completely smooth and emulsified. Taste and adjust with salt and pepper.
- Once the pasta is completely cooled and drained, fold it into the dressing bowl. It’s crucial the pasta is cold so it doesn’t melt the mayonnaise base.
- Gently fold in the cherry tomatoes, cucumber, cheddar cheese cubes, and red onion. Use a rubber spatula to ensure the vegetables are evenly distributed and coated in the creamy sauce.
- Stir in the fresh parsley and dill. Cover the bowl tightly with plastic wrap and refrigerate for at least 2 hours, though overnight is best. The flavors need time to marry and the pasta needs to soak up some of that delicious tangy dressing.
- Before serving on your board, give it one final stir. If it seems too thick, add a tiny splash of milk or a teaspoon of vinegar to loosen the consistency.
How to bake gooey chocolate chip cookies

Why we love this
There is nothing more nostalgic or inviting than the scent of brown sugar and vanilla wafting through the house as cookies bake. These cookies are the star of any dessert board, featuring crisp, buttery edges that transition into a soft, doughy, and intensely chocolatey center. Every bite offers a contrast of textures—the snap of the edge and the gooey, warm melt of semi-sweet chocolate pools. They are a decadent, sensory-rich treat that feels like a warm hug in dessert form.
Ingredients
- 1 cup unsalted butter, softened to room temperature
- 3/4 cup granulated sugar
- 3/4 cup packed light brown sugar
- 1 teaspoon vanilla extract
- 2 large eggs
- 2 1/4 cups all-purpose flour
- 1 teaspoon baking soda
- 1/2 teaspoon salt
- 2 cups semi-sweet chocolate chips
- Flaky sea salt for topping
How to make it
- Preheat your oven to 375°F (190°C). Line two large baking sheets with parchment paper or silicone baking mats. High heat is key for getting those crisp edges while keeping the centers soft.
- In a large bowl, cream together the softened butter, granulated sugar, and brown sugar using a hand mixer or stand mixer on medium speed. Beat for about 2-3 minutes until the mixture is light, fluffy, and pale in color.
- Add the eggs one at a time, beating well after each addition, then stir in the vanilla extract. Scrape down the sides of the bowl to ensure everything is incorporated.
- In a separate bowl, whisk together the flour, baking soda, and salt. Gradually add the dry ingredients to the wet ingredients on low speed, mixing just until no streaks of flour remain. Do not overmix, or the cookies will become tough.
- Fold in the chocolate chips by hand using a spatula. For a truly viral look, reserve a handful of chips to press into the tops of the dough balls later.
- Scoop rounded tablespoons of dough onto the prepared baking sheets, spacing them 2 inches apart. Bake for 9 to 11 minutes. The secret is to pull them out when the edges are golden brown but the centers still look slightly underbaked and soft.
- Let them cool on the pan for 5 minutes to set, then sprinkle with flaky sea salt. This enhances the chocolate flavor and adds a professional touch to your board.
How to bake moist banana bread
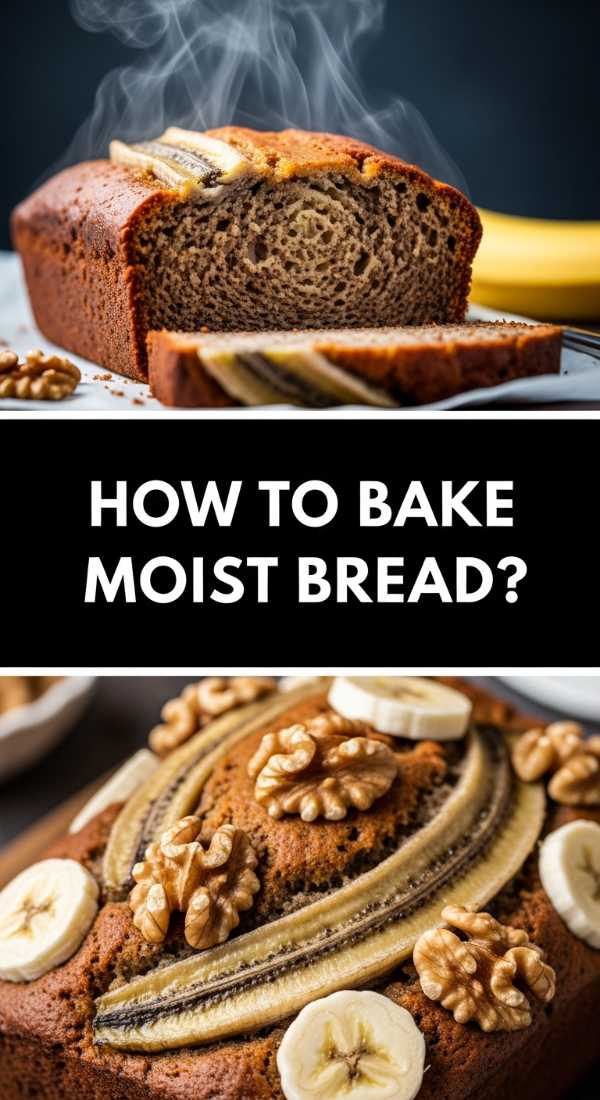
Why we love this
Banana bread is the ultimate board staple because of its incredible aroma and dense, cake-like texture. This recipe produces a loaf with a deep mahogany crust that is slightly caramelized and chewy, hiding a pale, tender interior that is bursting with the natural sweetness of overripe bananas. It feels rustic and artisanal, especially when served in thick, warm slices that slightly crumble when buttered. The scent of cinnamon and nutmeg provides a cozy, comforting backdrop that makes any food board feel like home.
Ingredients
- 3 very overripe bananas, mashed
- 1/2 cup melted unsalted butter
- 3/4 cup granulated sugar
- 1 egg, beaten
- 1 teaspoon vanilla extract
- 1 teaspoon baking soda
- Pinch of salt
- 1 1/2 cups all-purpose flour
- 1/2 teaspoon ground cinnamon
How to make it
- Preheat your oven to 350°F (175°C) and grease a 4×8 inch loaf pan thoroughly with butter or non-stick spray. For extra safety, line the bottom with a strip of parchment paper.
- In a large mixing bowl, mash the peeled overripe bananas with a fork or potato masher until they are mostly smooth with just a few small chunks for texture.
- Stir the melted butter into the mashed bananas using a wooden spoon. Add the sugar, beaten egg, and vanilla extract. Mix until the batter is well combined and glossy.
- Sprinkle the baking soda, salt, and cinnamon over the mixture and stir. Finally, gently fold in the flour. Mix only until the flour disappears; over-mixing will activate the gluten and result in a rubbery loaf rather than a moist one.
- Pour the batter into the prepared loaf pan and smooth the top with a spatula. If you want a gourmet look, slice an extra banana lengthwise and lay the halves on top of the batter before baking.
- Bake for 50 to 60 minutes. To check for doneness, insert a toothpick into the center; it should come out clean or with just a few moist crumbs.
- Let the bread cool in the pan for 10 minutes before transferring it to a wire rack. For the best experience on a food board, slice it while still slightly warm so it remains incredibly tender.
How to sear fresh salmon fillets

Why we love this
A perfectly seared salmon fillet is the epitome of elegance on a viral food board. We love the dramatic contrast between the crackling, salty skin and the buttery, flake-apart pink flesh. The aroma of citrus and fresh herbs dancing over the heat is intoxicating. When done right, the salmon has a sophisticated, rich flavor that feels luxurious but light. It’s a showstopper that provides a healthy, vibrant protein option that looks stunning nestled among fresh greens and lemon slices.
Ingredients
- 2 fresh salmon fillets (6 oz each), skin on
- 1 tablespoon avocado oil (high smoke point)
- 1 tablespoon unsalted butter
- Salt and black pepper
- 1/2 teaspoon paprika
- Fresh dill and lemon slices for garnish
How to make it
- Remove the salmon from the refrigerator 15 minutes before cooking to take the chill off; this ensures the middle cooks at the same rate as the exterior. Pat the skin and flesh side extremely dry with paper towels.
- Season the flesh side with salt, pepper, and a light dusting of paprika for color. Press the seasoning in gently.
- Heat a stainless steel or cast-iron skillet over medium-high heat. Add the avocado oil and wait until it is shimmering and just starting to produce a faint wisp of smoke.
- Place the salmon fillets in the pan, skin-side down. Use a spatula to press down firmly on each fillet for about 10-15 seconds. This prevents the skin from curling and ensures maximum contact with the heat for a crispy result.
- Lower the heat slightly to medium and let the salmon cook skin-side down for about 5-6 minutes. Watch the side of the fillet; you will see the color change from translucent pink to opaque beige moving upwards. When the cooked color reaches about 3/4 of the way up the side, it’s time to flip.
- Flip the fillets carefully. Add the butter to the pan and let it bubble around the fish for just 1 to 2 minutes. This finishes the cooking while adding a silkiness to the flesh.
- Remove from the pan immediately. The skin should be shatteringly crisp. Serve on your board with fresh dill and a squeeze of lemon to cut through the richness.
How to make cheesy beef lasagna

Why we love this
Lasagna is the king of hearty board additions, offering layers of savory depth and architectural beauty. We love the way the bubbling mozzarella browns into lace-like patterns on top, concealing layers of rich, herby tomato sauce and creamy ricotta. The aroma is a warm embrace of garlic, basil, and slow-simmered beef. Each bite is a textural journey through tender pasta sheets and melted cheese, making it the ultimate crowd-pleaser that provides a substantial, satisfying anchor to any food spread.
Ingredients
- 1 lb ground beef
- 1 jar (24 oz) high-quality marinara sauce
- 15 oz ricotta cheese
- 1 egg, lightly beaten
- 1/4 cup grated Parmesan
- 1 tablespoon dried Italian seasoning
- 9 to 12 lasagna noodles, oven-ready or par-boiled
- 3 cups shredded mozzarella cheese
- Fresh basil for garnish
How to make it
- Preheat your oven to 375°F (190°C). In a large skillet, brown the ground beef over medium-high heat until no pink remains. Drain the excess fat carefully, then stir in the marinara sauce and Italian seasoning. Simmer for 10 minutes to let the flavors concentrate.
- In a medium bowl, combine the ricotta cheese, beaten egg, and grated Parmesan. The egg acts as a binder, ensuring your lasagna layers stay distinct and don’t slide apart when sliced.
- Spread a thin layer of the meat sauce on the bottom of a 9×13 inch baking dish to prevent the noodles from sticking.
- Place a layer of noodles over the sauce. Spread about one-third of the ricotta mixture over the noodles, followed by a layer of meat sauce and a generous handful of mozzarella.
- Repeat the layers (noodles, ricotta, sauce, mozzarella) until you reach the top of the dish, ending with a heavy layer of mozzarella and an extra sprinkle of Parmesan for a golden crust.
- Cover the dish tightly with foil, making sure the foil doesn’t touch the cheese (you can use toothpicks to prop it up). Bake for 25 minutes.
- Remove the foil and bake for another 15-20 minutes until the cheese is bubbly and starting to brown in spots. Let it rest for at least 15 minutes before slicing; this is the pro secret to getting those perfect, clean squares for your board.
How to make slow cooker crockpot chicken

Why we love this
Slow cooker chicken is the ultimate “set it and forget it” hack for a viral board, delivering meat so tender it practically falls apart at the touch of a fork. The slow, gentle heat allows the chicken to bathe in its own juices and seasonings, creating a deep, concentrated flavor and a succulent texture that is impossible to achieve with high-heat methods. The aroma that fills your kitchen throughout the day is savory and homey, promising a meal that is both nourishing and effortless. It’s perfect for piling high on a board for sliders or tacos.
Ingredients
- 2 lbs boneless skinless chicken thighs or breasts
- 1 cup chicken broth
- 1 onion, sliced
- 3 cloves garlic, smashed
- 1 tablespoon smoked paprika
- 1 teaspoon onion powder
- Salt and pepper to taste
- Optional: 1 cup of your favorite BBQ sauce or salsa
How to make it
- Place the sliced onions and smashed garlic at the bottom of the slow cooker to create a flavor base and keep the chicken from sitting directly on the heating element.
- Season the chicken generously on all sides with salt, pepper, smoked paprika, and onion powder. Place the chicken on top of the onions.
- Pour the chicken broth around the sides of the chicken—don’t pour it directly over the meat or you’ll wash off the spices you just applied.
- Cover and cook on LOW for 6 to 7 hours or on HIGH for 3 to 4 hours. Low and slow is always preferred for the most tender, “shreddable” results.
- Check the chicken for doneness; it should be very easy to pierce with a fork. If you want shredded chicken, remove the meat from the pot and use two forks to pull it apart. It should glide through the meat with zero resistance.
- Toss the shredded meat back into the pot for 10 minutes to soak up the remaining juices, or stir in your BBQ sauce/salsa at this stage for added flavor.
- Serve in a rustic bowl on your board, garnished with fresh herbs to brighten up the slow-cooked colors.
How to prep healthy overnight oats
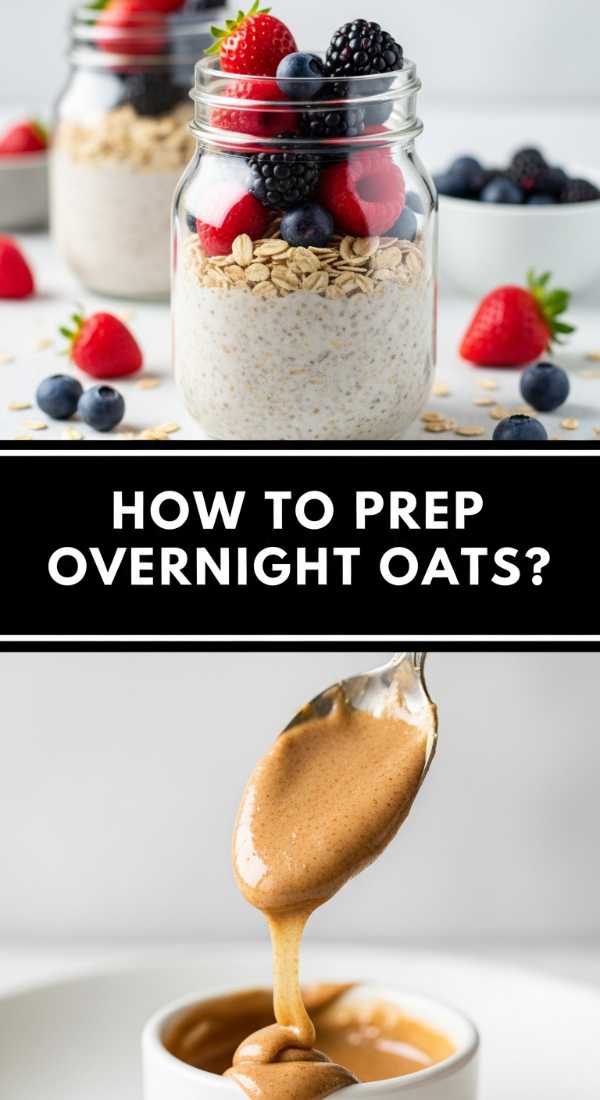
Why we love this
Overnight oats are the cool, refreshing aesthetic that every breakfast or brunch board needs. We love the creamy, pudding-like consistency that develops as the oats soak, creating a base that is both hearty and silky. The aroma is sweet and earthy, reminiscent of fresh grain and vanilla. They are incredibly customizable, looking like little jars of art when layered with colorful berries, seeds, and nut butters. It’s a grab-and-go convenience that feels like a gourmet treat, offering a satisfying chew and a burst of freshness in every spoonful.
Ingredients
- 1/2 cup rolled oats (old fashioned)
- 1/2 cup milk of choice (almond, oat, or dairy)
- 1/4 cup Greek yogurt (plain or vanilla)
- 1 tablespoon chia seeds
- 1 tablespoon maple syrup or honey
- 1/2 teaspoon vanilla extract
- Toppings: Fresh berries, sliced almonds, or almond butter
How to make it
- In a small mason jar or airtight container, combine the rolled oats and chia seeds. Chia seeds are essential as they absorb liquid and create that signature thick, creamy texture.
- Pour in the milk of your choice and add the Greek yogurt. The yogurt adds a boost of protein and a pleasant tang that balances the sweetness.
- Add the maple syrup and vanilla extract. Stir the mixture vigorously with a spoon, ensuring that all the oats are submerged and there are no dry pockets at the bottom of the jar.
- Seal the container tightly and place it in the refrigerator for at least 6 hours, though 8-12 hours is ideal for the oats to fully soften and the flavors to meld.
- In the morning, give the oats a quick stir. If they are too thick for your liking, add a tiny splash more milk to reach your desired consistency.
- Top with your favorite fruits and nuts right before serving on your board. This keeps the toppings crunchy and the fruit looking vibrant and fresh for your guests.
How to bake a strawberry shortcake
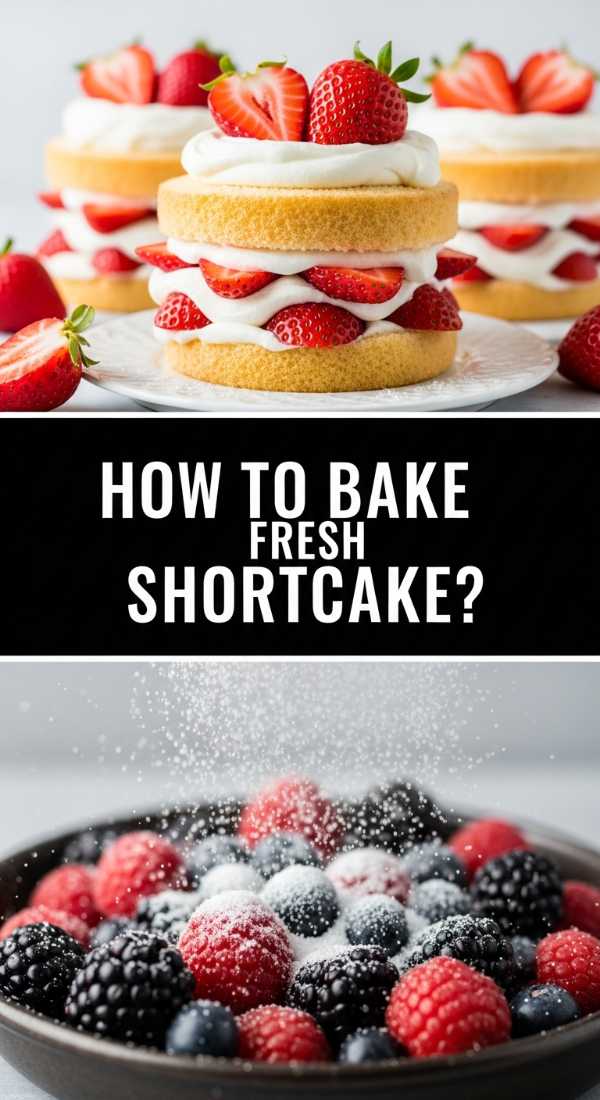
Why we love this
Strawberry shortcake is the definition of a bright, summery viral food board addition. We love the visual of the ruby-red macerated berries bleeding their sweet nectar into fluffy, golden biscuits. The scent of sweet cream and sun-ripened fruit is purely nostalgic. The texture is a delightful play between the slight crunch of a sugar-topped biscuit, the airy softness of whipped cream, and the juicy tenderness of the berries. It’s a refreshing, light dessert that feels sophisticated yet delightfully messy and fun to eat.
Ingredients
- 2 cups all-purpose flour
- 1 tablespoon baking powder
- 3 tablespoons sugar (plus extra for topping)
- 1/2 cup cold unsalted butter, cubed
- 2/3 cup heavy cream (plus extra for brushing)
- 1 lb fresh strawberries, sliced
- 2 tablespoons sugar (for berries)
- 1 cup heavy whipping cream (for topping)
- 1 teaspoon vanilla extract
How to make it
- Start by prepping the berries: toss the sliced strawberries with 2 tablespoons of sugar in a bowl. Let them sit at room temperature for at least 30 minutes. This process, called maceration, draws out the juices to create a natural syrup.
- Preheat your oven to 425°F (220°C). In a large bowl, whisk together the flour, baking powder, and 3 tablespoons of sugar.
- Use a pastry cutter or two forks to work the cold, cubed butter into the dry ingredients until the mixture resembles coarse crumbs. Having cold butter is vital for a flaky biscuit.
- Stir in the 2/3 cup of heavy cream until just combined. Turn the dough onto a floured surface and gently pat it into a 1-inch thick circle. Cut into rounds using a biscuit cutter.
- Place the rounds on a baking sheet, brush the tops with a little extra cream, and sprinkle with sugar. Bake for 12-15 minutes until golden brown.
- While the biscuits cool, beat the remaining 1 cup of heavy cream with vanilla and a little sugar until soft peaks form.
- To serve on a board, split the warm biscuits in half. Pile high with strawberries and a massive dollop of whipped cream, letting the juices run down the sides.
How to cook tender corned beef
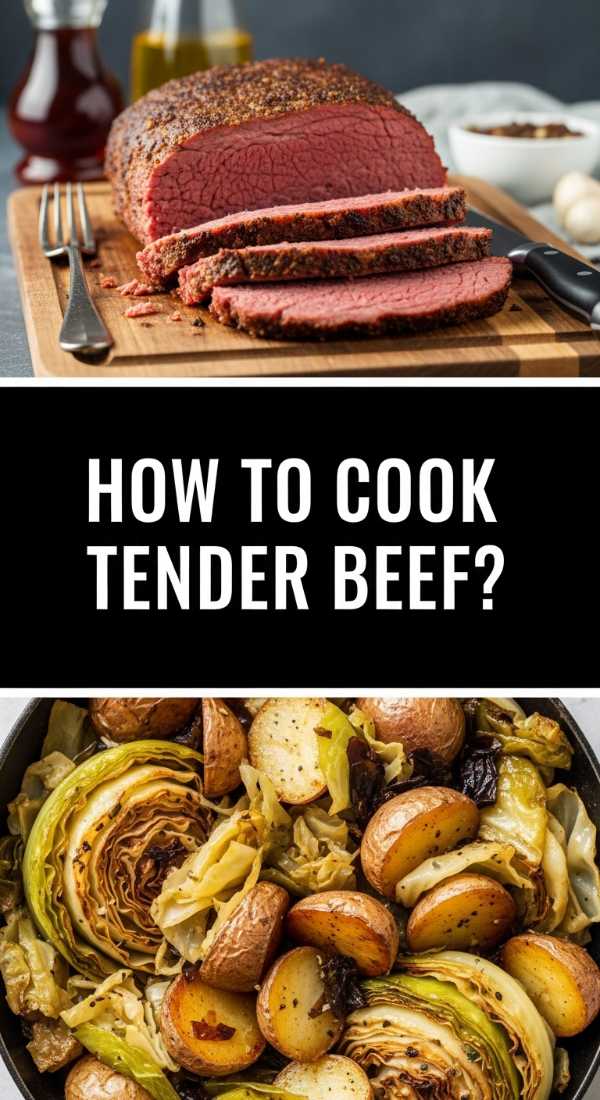
Why we love this
Corned beef offers a savory, brine-cured depth of flavor that adds a rustic, masculine energy to a food board. We love the transformation of a tough cut of meat into something that is fork-tender and pulls apart in succulent, salty ribbons. The aroma is complex—a mix of pickling spices like peppercorns, mustard seeds, and bay leaves. It’s a hearty, flavorful addition that provides a wonderful salty contrast to sweeter board items, and its deep pink hue adds a beautiful pop of color to your presentation.
Ingredients
- 3 lb corned beef brisket (with spice packet)
- 1 onion, quartered
- 3 cloves garlic, minced
- 2 bay leaves
- Water to cover
- Optional: Cabbage wedges and carrots for the final hour
How to make it
- Place the corned beef brisket in a large Dutch oven or heavy-bottomed pot. If the meat came with a spice packet, sprinkle it directly over the beef.
- Add the quartered onion, minced garlic, and bay leaves to the pot. These aromatic vegetables will infuse the cooking liquid and the meat with a classic savory profile.
- Cover the beef with water, ensuring there is at least an inch of liquid above the meat. This prevents the beef from drying out during the long simmer.
- Bring the water to a boil over high heat, then immediately reduce the heat to low. Cover the pot with a tight-fitting lid.
- Simmer gently for about 50 to 60 minutes per pound. For a 3lb brisket, this means 2.5 to 3 hours. Do not rush this process; the low temperature is what breaks down the tough connective tissues.
- In the last 45 minutes of cooking, you can add cabbage wedges and carrots to the pot to cook in the flavored broth, providing perfect side elements for your board.
- Once the meat is fork-tender, remove it from the liquid and let it rest for 15 minutes. Slice across the grain (perpendicular to the muscle fibers) to ensure every piece is tender and easy to chew.
Conclusion
Creating a viral food board is all about balancing textures, flavors, and a little bit of kitchen confidence. Whether you’re serving up the perfectly seared salmon or the gooey goodness of homemade cookies, the secret lies in the details—the baste of the butter, the rest of the meat, and the freshness of the ingredients. Now that you have these hacks in your culinary toolkit, you’re ready to host a gathering that is as delicious as it is beautiful. Happy plating!