

From TikTok to Table: This Aesthetic Food Board Is a Total Game Changer
There is something undeniably magical about the way a perfectly curated food board brings people together. We’ve all seen them scrolling through our feeds—those vibrant, overflowing displays of color and texture that look almost too good to eat. But beyond the aesthetic appeal, these boards represent a shift back to slow, intentional gathering. It’s about more than just a meal; it’s about the conversation that flows while everyone reaches for a shared bite, the laughter over a glass of wine, and the simple joy of trying a bit of everything.
I remember the first time I set out a massive board for my friends; the room instantly felt warmer. Instead of everyone sitting stiffly at a formal table, we huddled around the kitchen island, sampling spicy dips and fresh fruits. This ‘TikTok-to-Table’ trend isn’t just about the photos—it’s about creating a vibe that is relaxed, inclusive, and incredibly delicious. Whether you’re hosting a backyard bash or a cozy Sunday brunch, these recipes are designed to turn your board into a show-stopping centerpiece that your guests will be talking about for weeks.
How to make creamy rotel dip?

Why we love this
This dip is the ultimate comfort food, striking that perfect balance between velvety smoothness and a spicy, zesty kick that keeps you coming back for more. As it melts together, the aroma of browned sausage and melted cheese fills the kitchen, promising a savory experience that is both nostalgic and indulgent. The texture is thick enough to cling to a sturdy tortilla chip, yet light enough to drizzle over nachos, offering a satisfying mouthfeel that dances between the richness of the dairy and the bright acidity of the diced tomatoes and green chilies.
Ingredients
- 1 lb ground breakfast sausage (hot or mild)
- 1 block (16 oz) Velveeta cheese, cubed
- 1 can (10 oz) RoTel diced tomatoes and green chilies
- 1/2 cup heavy cream
- 1/4 cup chopped fresh cilantro
- 1 tsp smoked paprika
How to make it
- Begin by placing a large skillet over medium-high heat. Add the ground sausage and use a wooden spoon to break it into small, uniform crumbles. Cook until the meat is thoroughly browned and no pink remains, which usually takes about 7-10 minutes.
- Drain the excess grease from the skillet to ensure your dip isn’t oily. Reduce the heat to low.
- Add the cubed Velveeta cheese to the skillet. Stir constantly to prevent the cheese from scorching on the bottom. Once the cheese begins to melt and look glossy, pour in the heavy cream to thin it out to your desired consistency.
- Pour in the entire can of RoTel (do not drain the liquid, as this provides essential flavor and acidity). Continue stirring until the mixture is completely homogenous and smooth.
- Add the smoked paprika and stir. Once the dip is bubbling gently, remove it from the heat. Garnish with fresh cilantro and serve immediately in a heated bowl to maintain that gooey texture.
How to cook dirty spaghetti?

Why we love this
Dirty spaghetti is the soulful, deep-flavored cousin of your standard marinara, bringing an earthy richness that feels like a warm hug in a bowl. The combination of savory meats and aromatic spices creates a complex sauce that coats every strand of pasta in a glossy, dark mahogany sheen. As you twirl your fork, you’ll catch the scents of toasted garlic and caramelized onions, while the texture remains rustic and hearty, making every bite a robust celebration of home-cooked goodness that satisfies the deepest cravings.
Ingredients
- 1 lb spaghetti noodles
- 1 lb ground beef or pork
- 1/2 lb chicken livers, finely chopped (optional for authentic depth)
- 1 large onion, finely diced
- 1 green bell pepper, diced
- 2 stalks celery, minced
- 3 cloves garlic, minced
- 2 tbsp Worcestershire sauce
- 1 tsp Cajun seasoning
How to make it
- Bring a large pot of salted water to a rolling boil. Add the spaghetti and cook according to package directions until just al dente—usually 1-2 minutes less than the full cook time—as the pasta will finish cooking in the sauce later. Drain, reserving 1 cup of pasta water.
- In a large Dutch oven or deep skillet, brown the ground meat and chopped livers over medium-high heat. Cook until deeply browned and slightly crispy around the edges to build a fond on the bottom of the pan.
- Add the ‘holy trinity’ (onion, bell pepper, and celery). Sauté these vegetables in the meat fat until they are soft and translucent, about 8 minutes. Add the garlic and cook for another 60 seconds until fragrant.
- Stir in the Worcestershire sauce and Cajun seasoning, scraping the bottom of the pan to release all the flavorful browned bits.
- Add the cooked spaghetti to the skillet along with half of the reserved pasta water. Toss vigorously with tongs over medium heat for 2-3 minutes, allowing the starch in the water to emulsify with the fats, creating a rich, ‘dirty’ sauce that clings to the noodles. Adjust consistency with more water if needed.
How to toss summer salads?

Why we love this
A true summer salad is a masterclass in contrast, pairing the crisp, cool snap of garden-fresh greens with the juicy sweetness of sun-ripened fruits and the creamy tang of artisan cheeses. When tossed correctly, every leaf is kissed by a delicate film of vinaigrette, ensuring that the flavors are bright and refreshing rather than heavy or soggy. The aroma is a blend of torn herbs and citrus zest, evoking memories of sunny afternoons and outdoor picnics, providing a light yet revitalizing meal that celebrates the peak of the season’s bounty.
Ingredients
- 4 cups mixed baby greens or arugula
- 1 cup fresh strawberries or peaches, sliced
- 1/2 cup crumbled goat cheese or feta
- 1/4 cup toasted pecans or walnuts
- 3 tbsp extra virgin olive oil
- 1 tbsp white balsamic vinegar
- 1 tsp honey
- Pinch of flaky sea salt
How to make it
- Start by prepping your greens; ensure they are thoroughly washed and, most importantly, completely dry. Use a salad spinner or pat them gently with paper towels. Wet greens will repel the dressing.
- In a small glass jar or bowl, whisk together the olive oil, balsamic vinegar, honey, and a pinch of salt until the dressing is fully emulsified and slightly thickened.
- Place the dried greens in a very large mixing bowl—much larger than you think you need—to allow for proper aeration while tossing.
- Drizzle the dressing around the sides of the bowl rather than directly onto the leaves. Use your hands or large salad tongs to lift and turn the greens gently from the bottom up, ensuring a thin, even coat on every leaf.
- Top the greens with your sliced fruit, nuts, and cheese. Give it one final, very gentle toss just to distribute the toppings without crushing the delicate fruit or breaking up the cheese too much. Serve immediately to maintain the crunch.
How to bake spring cookies?

Why we love this
Spring cookies are like a bite of sunshine, featuring a tender, buttery crumb that practically melts on the tongue, often accented by the bright notes of lemon or the floral sweetness of vanilla. These treats are visually stunning, with soft pastel hues and delicate patterns that mirror the blooming garden outside your window. The kitchen fills with the scent of sugar and citrus as they bake, creating an atmosphere of lightness and renewal that makes these cookies the perfect accompaniment to a cup of herbal tea on a breezy afternoon.
Ingredients
- 2 1/2 cups all-purpose flour
- 1 cup unsalted butter, softened
- 1 cup granulated sugar
- 1 large egg
- 1 tsp vanilla extract
- Zest of one lemon
- 1/2 tsp baking powder
- Pastel royal icing for decorating
How to make it
- In a large bowl, cream together the softened butter and granulated sugar using an electric mixer on medium speed. Beat for at least 3-5 minutes until the mixture is pale, light, and fluffy—this aeration is key for a tender spring cookie.
- Add the egg, vanilla extract, and lemon zest. Beat again until well combined.
- In a separate bowl, whisk the flour and baking powder. Gradually add the dry ingredients to the wet ingredients on low speed, mixing just until the flour streaks disappear. Do not overmix, as this develops gluten and results in a tough cookie.
- Wrap the dough in plastic and chill in the refrigerator for at least 1 hour. This prevents the cookies from spreading too much in the oven.
- Preheat your oven to 350°F (175°C). Roll the dough out on a floured surface to 1/4 inch thickness and cut into spring shapes like flowers or butterflies. Bake on a parchment-lined sheet for 8-10 minutes. The edges should be barely golden, and the centers should still look soft. Let them cool completely before applying any icing.
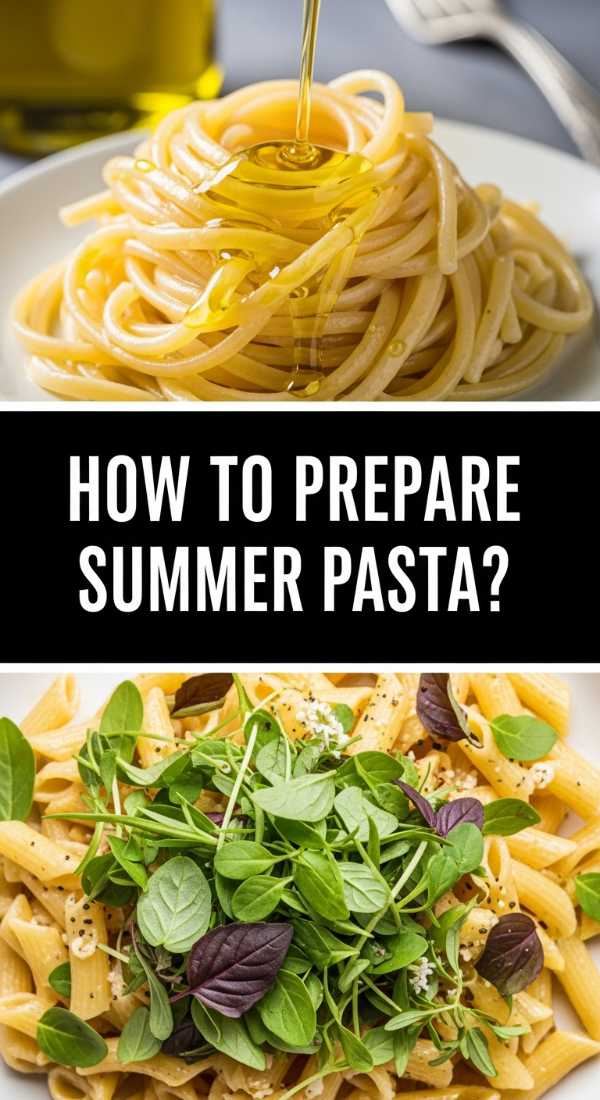
How to prepare summer pasta?
Why we love this
Summer pasta is defined by its simplicity and the use of ‘raw’ or barely-cooked sauces that let the natural sweetness of vine-ripened tomatoes and the peppery bite of fresh basil shine. The dish feels incredibly light on the palate, with a silky olive oil base that carries the flavors of garlic and chili flakes without the heaviness of a long-simmered ragu. It’s a vibrant, colorful meal that captures the essence of a warm evening, offering a refreshing way to enjoy pasta while utilizing the abundance of a summer garden.
Ingredients
- 1 lb linguine or angel hair pasta
- 2 lbs cherry tomatoes, halved
- 3 cloves garlic, thinly sliced
- 1/2 cup high-quality extra virgin olive oil
- 1 cup fresh basil leaves, torn
- 1/2 tsp red pepper flakes
- Freshly grated Parmesan cheese
How to make it
- In a large mixing bowl, combine the halved cherry tomatoes, sliced garlic, olive oil, red pepper flakes, and half of the torn basil. Let this sit at room temperature for at least 30 minutes. This ‘marinating’ process allows the salt to draw out the juices from the tomatoes, creating a natural sauce.
- Bring a pot of heavily salted water to a boil. Cook the pasta until it is perfectly al dente.
- Before draining, scoop out about 1/2 cup of the starchy pasta water.
- Drain the pasta and immediately add it to the bowl with the raw tomato mixture. The residual heat from the pasta will slightly soften the tomatoes and take the raw edge off the garlic without losing their fresh flavor.
- Add the reserved pasta water and toss vigorously. The oil and tomato juices will emulsify into a light, glossy sauce. Top with the remaining fresh basil and a generous dusting of Parmesan cheese.
How to make spring dinners?

Why we love this
Spring dinners are all about elegance and freshness, moving away from the heavy stews of winter toward lighter proteins and vibrant green vegetables like asparagus, peas, and leeks. These meals feel sophisticated yet effortless, featuring clean flavors and bright acidic finishes from lemon or white wine. The visual appeal of a spring plate—filled with bright greens and pale pinks—is matched by the crisp, tender textures of seasonal produce, creating a dining experience that feels healthy, rejuvenating, and perfectly in sync with the awakening world.
Ingredients
- 2 large chicken breasts or salmon fillets
- 1 bunch thin asparagus, woody ends trimmed
- 1 cup fresh or frozen peas
- 2 tbsp butter
- 1 lemon, sliced into rounds
- 2 sprigs fresh thyme
- 1/4 cup dry white wine
How to make it
- Season your protein (chicken or salmon) generously with salt and pepper. Heat a large skillet over medium-high heat with a tablespoon of oil.
- Sear the protein until golden brown on both sides. If using chicken, ensure it reaches an internal temperature of 165°F. Remove the protein from the pan and set it aside to rest.
- In the same skillet, melt the butter. Add the asparagus and peas, sautéing for 3-4 minutes until they are bright green and crisp-tender. You want them to have a slight ‘snap’ when bitten.
- Deglaze the pan by pouring in the white wine, scraping the bottom to incorporate the savory bits. Add the lemon slices and thyme sprigs.
- Nestle the protein back into the pan with the vegetables. Cover with a lid for 2 minutes to let the steam infuse everything with the lemon and herb aromatics. Serve drizzled with the pan juices.
How to use sourdough discard?

Why we love this
Using sourdough discard is a beautiful way to minimize waste while adding a unique, tangy depth to your everyday baking that you simply can’t get from commercial yeast alone. The discard lends a complex, slightly sour fermented note and a moist, tender crumb to everything from pancakes to crackers. There is a rustic, artisanal satisfaction in turning what would have been kitchen scraps into a golden-brown, crispy-edged delight that smells of toasted grain and yeast, making your kitchen feel like a professional bakery.
Ingredients
- 1 cup sourdough discard (unfed)
- 1 cup all-purpose flour
- 1/2 tsp sea salt
- 2 tbsp dried herbs (rosemary or thyme)
- 3 tbsp olive oil (for brushing)
- Maldon salt for finishing
How to make it
- In a medium bowl, mix the sourdough discard, flour, sea salt, and dried herbs together until a stiff dough forms.
- Turn the dough onto a piece of parchment paper and knead it gently a few times until it is smooth. If it’s too sticky, add a tablespoon of flour at a time.
- Place another sheet of parchment on top and roll the dough out as thin as humanly possible—ideally about 1/16th of an inch. Thinner dough means crispier crackers.
- Remove the top sheet of parchment. Brush the surface lightly with olive oil and sprinkle with flaky Maldon salt. Use a pizza cutter or a knife to score the dough into squares or rectangles.
- Bake at 350°F (175°C) for 20-25 minutes. Watch closely toward the end; you want them to be a deep golden brown. If the edges brown faster than the center, remove the edge pieces and continue baking the rest until crunchy.
How to mix hummingbird nectar?

Why we love this
Mixing your own hummingbird nectar is a simple yet rewarding act of stewardship that brings vibrant life and movement to your garden or balcony. This homemade solution is much healthier for the birds than store-bought versions containing red dyes, as it perfectly mimics the natural sucrose found in flowers. Watching these tiny, iridescent creatures hover and dart around a feeder you’ve prepared is a peaceful, meditative experience that connects you to the rhythms of nature, all for the cost of a little sugar and water.
Ingredients
- 1 cup refined white granulated sugar
- 4 cups filtered water
- Note: Never use honey, brown sugar, or artificial sweeteners.
How to make it
- Combine the sugar and water in a medium saucepan. It is crucial to use a 1:4 ratio (one part sugar to four parts water) to ensure the nectar is the correct concentration for a hummingbird’s metabolism.
- Heat the mixture over medium heat, stirring constantly until the sugar is completely dissolved. Bring the solution to a low boil for 1-2 minutes. This helps to kill any bacteria or fungi that might be in the water or sugar.
- Remove the pan from the heat and allow the nectar to cool completely to room temperature. Never put hot nectar into a feeder, as it can warp the plastic or harm the birds.
- Clean your hummingbird feeder thoroughly with hot water and vinegar (no soap) before filling it with the fresh nectar.
- Store any extra nectar in a clean, airtight jar in the refrigerator for up to two weeks. Change the nectar in your feeder every 3-5 days—more often in hot weather—to prevent fermentation and mold growth.
How to grill healthy meals?

Why we love this
Grilling healthy meals is the ultimate way to lock in intense, smoky flavors without the need for heavy fats or creams, resulting in food that is as nutritious as it is delicious. The high heat of the grill caramelizes the natural sugars in vegetables and creates a beautiful, charred crust on lean proteins, while keeping the interiors succulent and tender. The outdoor cooking process infuses everything with a nostalgic woodsy aroma, turning a simple Tuesday night dinner into a sensory-rich event that feels light, clean, and energizing.
Ingredients
- 2 lbs lean protein (chicken breast, shrimp, or tofu)
- 2 bell peppers, cut into chunks
- 1 red onion, quartered
- 1 zucchini, sliced into rounds
- 1/4 cup olive oil mixed with lemon juice
- 1 tbsp garlic powder and 1 tsp dried oregano
How to make it
- Preheat your grill to medium-high heat (about 400°F). Ensure the grates are scraped clean and lightly oiled to prevent sticking.
- In a large bowl, toss your protein and vegetables with the olive oil, lemon juice, garlic powder, and oregano. Let them marinate for at least 15-30 minutes to allow the flavors to penetrate.
- For smaller items like shrimp or chopped veggies, use skewers or a grill basket to prevent them from falling through the grates.
- Place the items on the grill. Cook the protein first, as it generally takes longer. For chicken, cook for 6-8 minutes per side. For vegetables, look for distinct char marks and a slight softening, usually taking about 5-7 minutes total.
- Use the ‘indirect heat’ method if things are browning too fast: move the food to a cooler part of the grill and close the lid to finish cooking through without burning the exterior. Rest the meat for 5 minutes before serving to retain juices.
How to decorate spring cakes?

Why we love this
Decorating a spring cake is an exercise in soft aesthetics, where the goal is to create a dessert that looks like it was plucked from a meadow. Using botanical elements, whipped textures, and a palette of creams and pastels, these cakes become edible art pieces that celebrate the lightness of the season. The process of smoothing on a cloud-like frosting and carefully placing edible flowers or candied zest is incredibly satisfying, resulting in a centerpiece that is airy, fragrant, and almost too beautiful to slice into.
Ingredients
- 1 double-layer sponge cake (lemon or vanilla)
- 3 cups Swiss meringue buttercream (light and stable)
- Fresh edible flowers (pansies or violets)
- Fresh berries
- Offset spatula and piping bag
How to make it
- Start with completely cooled cake layers. A warm cake will melt your buttercream instantly. Place your first layer on a cake stand and apply a ‘crumb coat’—a very thin layer of frosting that traps any loose crumbs. Chill in the fridge for 20 minutes.
- Apply a second, thicker layer of buttercream. Use an offset spatula to create a ‘rustic’ finish by making gentle swooping motions, or use a bench scraper for a perfectly smooth, modern look.
- For a spring vibe, try the ‘pressed flower’ technique. Take clean, organic edible flowers and gently press them into the sides of the frosting.
- Pipe small, delicate mounds of frosting on the top edge using a star tip, then nestle fresh raspberries or blueberries between the peaks for a pop of natural color.
- Finish with a light dusting of powdered sugar or a few strands of lemon zest to mimic falling blossoms. Store in a cool place until the moment you serve to keep the decorations crisp.
Bringing the Board Together
Whether you choose to focus on the savory richness of a rotel dip or the delicate beauty of a spring-themed cake, the secret to a viral-worthy food board is variety. Mix your textures, keep your colors bright, and don’t be afraid to let things look a little ‘perfectly imperfect.’ These recipes aren’t just instructions; they are invitations to slow down and enjoy the process of making something beautiful. So, grab a tray, gather your favorite people, and let the table tell a story of good food and even better company.