

The Mani Edit: Everything You Need for Perfect Spring & Summer Nails
Hello, my loves. There is something so incredibly soul-soothing about the way the light changes as we transition into the warmer months. It’s like the world is finally taking a deep, floral-scented breath, and I want our self-care rituals to feel exactly like that—a soft, warm embrace. For me, a fresh manicure is more than just a beauty routine; it is a tiny, joyful celebration of the season right at my fingertips.
As we pack away our heavy knits and welcome the sun, I’ve curated this ultimate guide to help you find your perfect spring and summer vibe. Whether you are craving the whisper-light touch of a classic French tip or the vibrant energy of a summer vacation neon, I’ve gathered all my favorite secrets just for you. Let’s dive into these beautiful designs together, shall we?
5 Simple Steps for Perfect Almond Spring French Nails
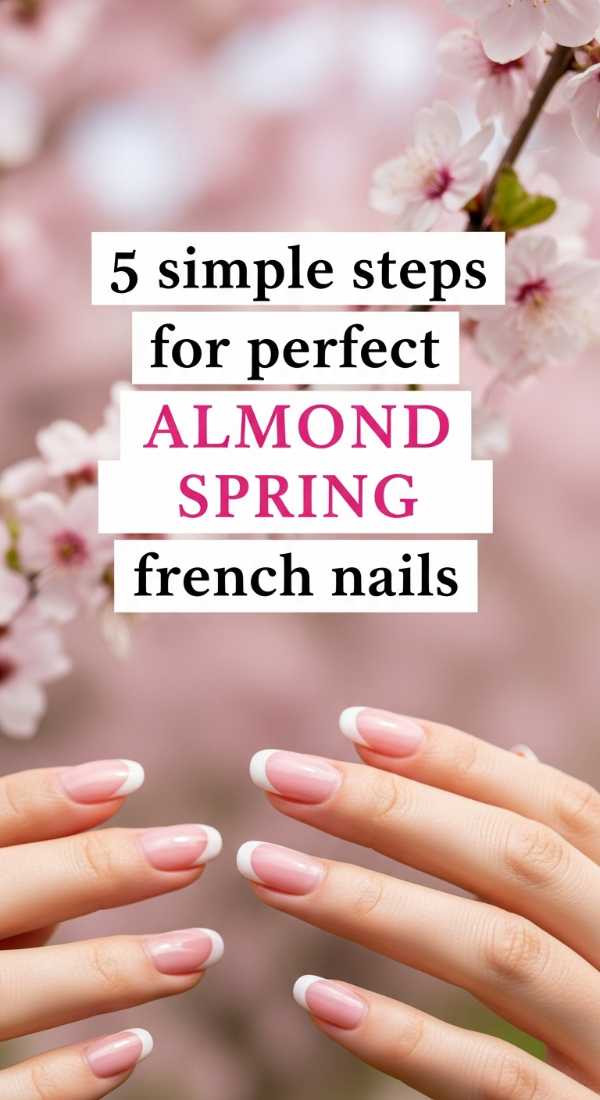
Why to love this Design:
The almond French manicure is the ultimate ‘soft girl’ aesthetic. It elongates the fingers beautifully while maintaining a clean, sophisticated look that mirrors the budding blossoms of April. It’s effortless, timeless, and feels like a gentle hug for your hands.
Essential Elements:
- Almond-shaped nail tips
- Sheer petal pink base
- Crisp white or pastel tip polish
- Ultra-fine liner brush
- High-shine top coat
How to Prepare:
- Shape nails into a soft almond point using a fine-grit file.
- Apply two thin layers of a sheer pink base to mimic a natural nail bed.
- Using a liner brush, map out the ‘smile line’ from the edges to the center.
- Fill in the tip with your chosen spring shade (white or soft lavender).
- Seal with a thick top coat to blur any imperfections.
Budget Range
- Essie Mademoiselle ($10)
- Zoya Purity ($12)
- Beetles Liner Brush Set ($8)
4 Quick Ways to Style Short Square Spring Nails
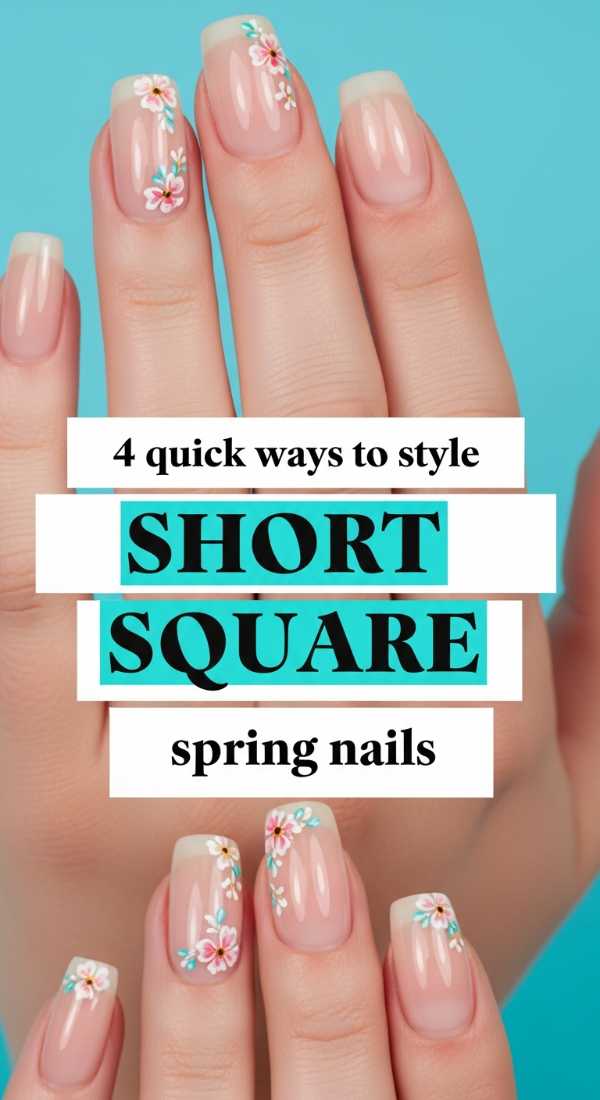
Why to love this Design:
Short square nails are for my loves who need practicality without sacrificing an ounce of chic. They are sturdy, clean, and provide the perfect canvas for those bright, punchy spring colors that make your heart skip a beat every time you type or text.
Essential Elements:
- Straight-edge nail clippers
- Pastel crème polishes
- Matte top coat option
- Cuticle oil for a hydrated look
How to Prepare:
- Clip nails straight across and lightly soften the very corners with a file.
- Choose a singular monochromatic pastel theme for all ten fingers.
- Experiment with a ‘velvet’ matte finish on the ring finger for texture.
- Apply a ‘dotted’ accent near the cuticle for a minimalist pop.
Budget Range
- Olive & June ‘The Poppy’ Tool ($16)
- OPI ‘It’s a Girl’ ($11)
- Sally Hansen Matte Top Coat ($7)
Mix 3 DND Colors for Cute Spring Nail Ideas

Why to love this Design:
DND gel colors are legendary for their pigment and shine. Mixing three harmonious shades allows you to create a sunset or garden-inspired palette that feels curated and artistic. It’s a playful way to express your mood through color-blocking or soft gradients.
Essential Elements:
- DND DC Gel Polish (3 shades)
- UV/LED Lamp
- Gel Base and Top Coat
- Mixing palette or piece of foil
How to Prepare:
- Select three complementary DND shades (e.g., Soft Peach, Mint, and Lemon).
- Apply each color to different nails for a ‘skittle’ mani effect.
- Alternatively, dot all three colors onto a sponge to create a soft spring ombre.
- Cure each layer for 60 seconds to ensure a rock-hard, glossy finish.
Budget Range
- DND Duo Set ($13 per set)
- SunUV LED Lamp ($25)
- Isopropyl Alcohol for cleaning ($5)
Apply Spring Red Nails in 6 Easy Strokes
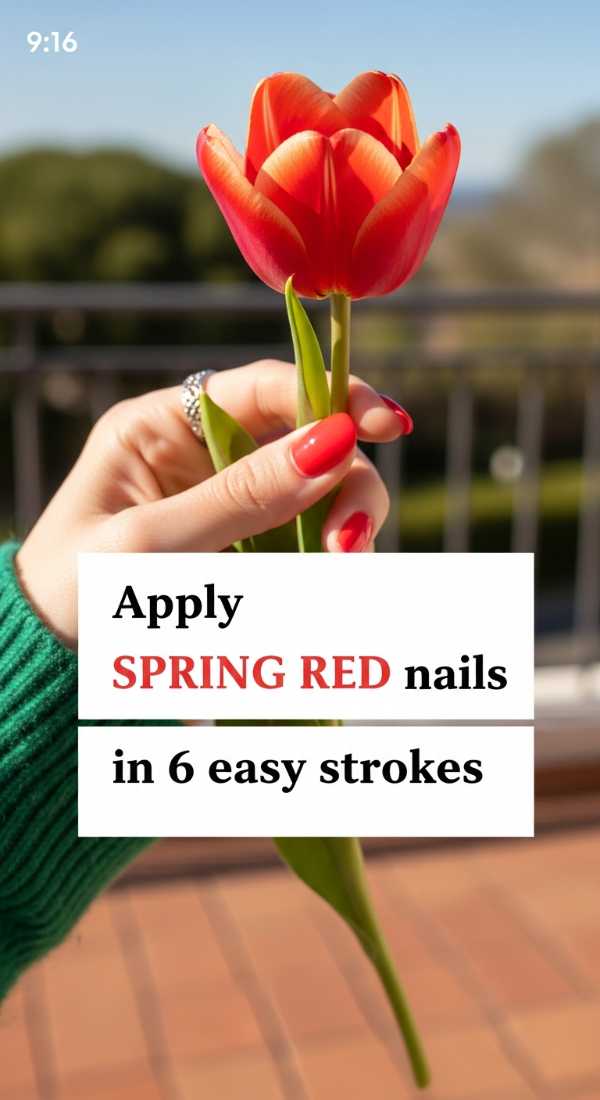
Why to love this Design:
Red isn’t just for winter, darlings. A spring red is bright, poppy, and carries an orange undertone that mimics a blooming tulip. It’s a power move that feels fresh and energetic under the bright sun.
Essential Elements:
- Poppy red crème polish
- Base coat to prevent staining
- Wide-fanned application brush
- Corrective pen for edges
How to Prepare:
- Apply a nourishing base coat; red pigments love to cling to the natural nail.
- Stroke 1: Place the brush in the center, slightly away from the cuticle, and push up.
- Stroke 2: Pull the brush down the center to the tip.
- Stroke 3 & 4: Glide down the left and right sides to cover the curves.
- Stroke 5 & 6: A second thin coat following the same path for full opacity.
Budget Range
- Chanel Le Vernis in ‘Incendiaire’ ($32)
- Revlon ‘Red’ ($6)
- Orly Bonder Base ($12)
7 Tips to Master Retro Pucci Nails This Season
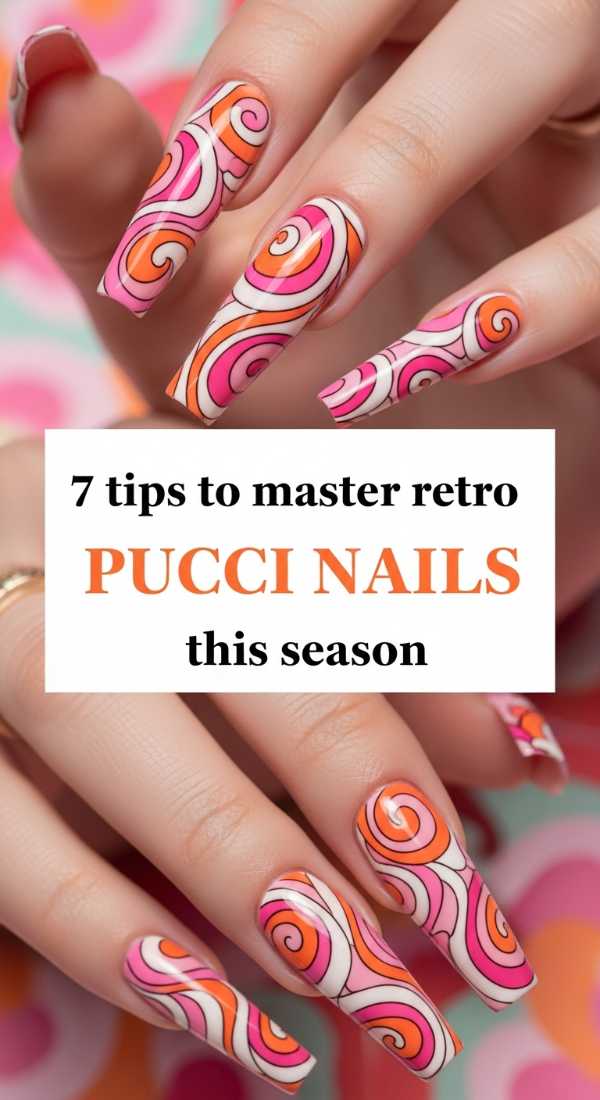
Why to love this Design:
The 70s are calling, and they bring such joy! Pucci-inspired swirls are all about movement and vibrant color combinations. It’s a design that celebrates imperfection and artistic flow, making your nails look like a piece of wearable vintage art.
Essential Elements:
- Detailing brushes
- Contrasting polish colors (pink, orange, teal)
- Steady hand or a hand-rest
- Gel paint (for better control than regular polish)
How to Prepare:
- Start with a neutral cream base to make the colors pop.
- Draw organic, wavy ‘S’ shapes across the nail.
- Fill in sections between lines with different colors.
- Keep lines thin using a dedicated striper brush.
- Use a dotting tool to add ‘bubbles’ within the swirls.
- Flash cure between colors to prevent bleeding.
- Apply a leveling top coat to smooth out the layers.
Budget Range
- Modelones Liner Gel Kit ($15)
- Cirque Colors Neons ($12)
- Winstonia Detail Brushes ($10)
3 Ways to Achieve Glowing Spring Chrome Nail Designs

Why to love this Design:
Chrome is the ‘it’ girl of the season. It catches the light in a way that feels magical—like fairy dust or a morning dew drop. It adds a futuristic yet ethereal glow to even the simplest base colors.
Essential Elements:
- Pearl or iridescent chrome powder
- No-wipe gel top coat
- Sponge applicator
- Soft dusting brush
How to Prepare:
- The Classic Rub: Apply chrome over a cured no-wipe top coat using a sponge.
- The Milky Mix: Mix a tiny bit of powder into your top coat for a subtle shimmer.
- The Accent Tip: Apply chrome only to the French tips for a ‘Glazed French’ look.
Budget Range
- Born Pretty Chrome Powder ($8)
- Gelish No-Wipe Top Coat ($14)
- Eyeshadow applicators ($2)
5 Dark Techniques for Edgy Goth Spring Nails
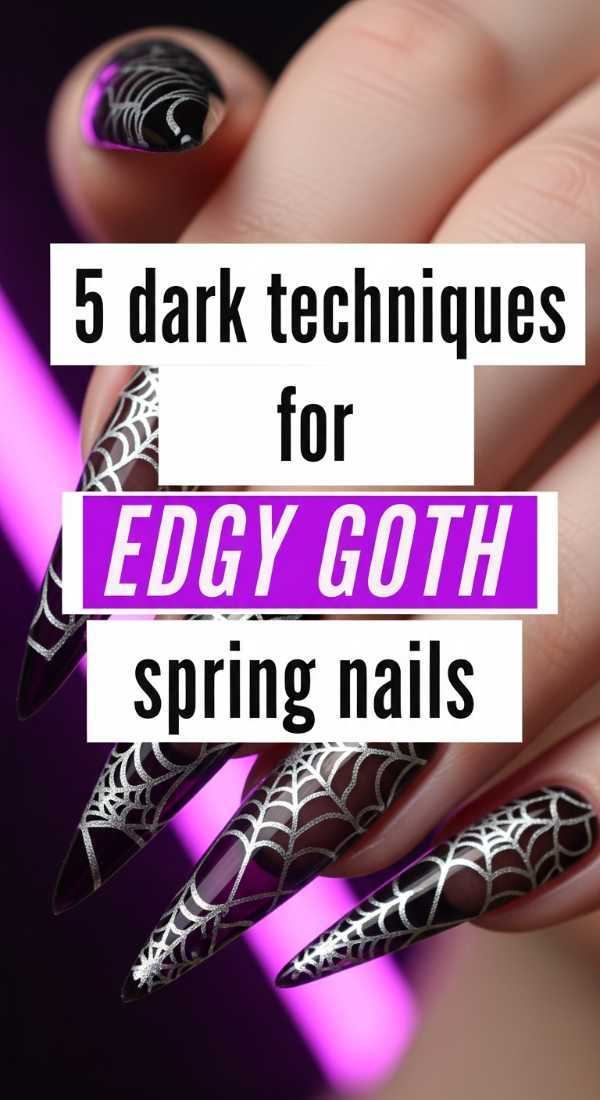
Why to love this Design:
Who says spring has to be all pastels? Edgy goth nails for spring use ‘sheer black’ or ‘smoke’ effects combined with floral accents. It’s moody, romantic, and perfect for those who find beauty in the shadows even when the flowers are in bloom.
Essential Elements:
- Sheer black ‘tint’ polish
- Matte black studs
- Fine detail brush for ‘thorny’ lines
- Dark plum or forest green accents
How to Prepare:
- Apply a sheer black base to create a ‘tights’ or ‘veil’ effect.
- Hand-paint tiny black roses or thorns using a matte polish.
- Use a dry brush technique to create a ‘distressed’ look.
- Incorporate negative space to keep the look light enough for spring.
- Finish with a velvet matte top coat for a sophisticated edge.
Budget Range
- Lights Lacquer ‘Moonstone’ ($13)
- Maniology Stamping Plate ($8)
- Essie ‘Licorice’ ($10)
4 Methods for Clean White Natural Spring Nails
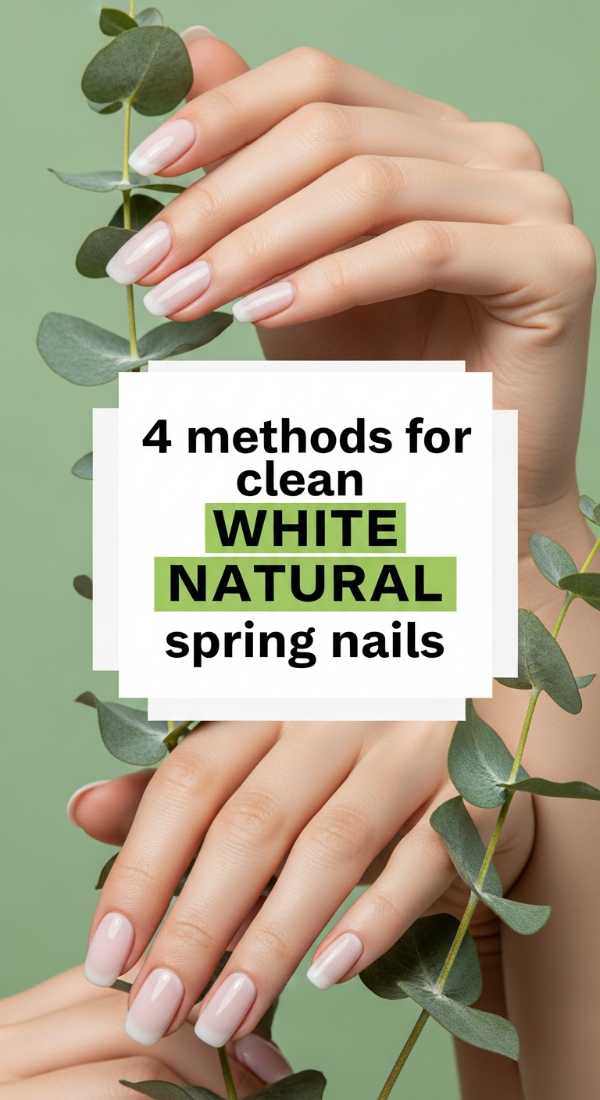
Why to love this Design:
The ‘clean girl’ aesthetic is personified in a milky white manicure. It looks incredibly healthy, clean, and bright. It’s the ultimate palate cleanser that matches every single outfit in your spring wardrobe.
Essential Elements:
- Semi-sheer milky white polish
- Ridge-filling base coat
- Buffer block
- High-gloss top coat
How to Prepare:
- The Layering Method: Two coats of sheer white followed by one coat of sheer pink.
- The Sponge Method: Dab white onto the tips and fade toward the center for a ‘Baby Boomer’ look.
- The Jelly Method: Use a heavily thinned out white for a ‘glass’ effect.
- The Full Opaque: Three very thin coats of a chalk-white for a bold, clean statement.
Budget Range
- DND ‘Funny Bunny’ Dupe ($10)
- Londontown Illuminating Nail Veil ($20)
- Cuccio Naturale Cuticle Oil ($14)
Get 8 Fresh Looks with Almond Spring Nail Inspo
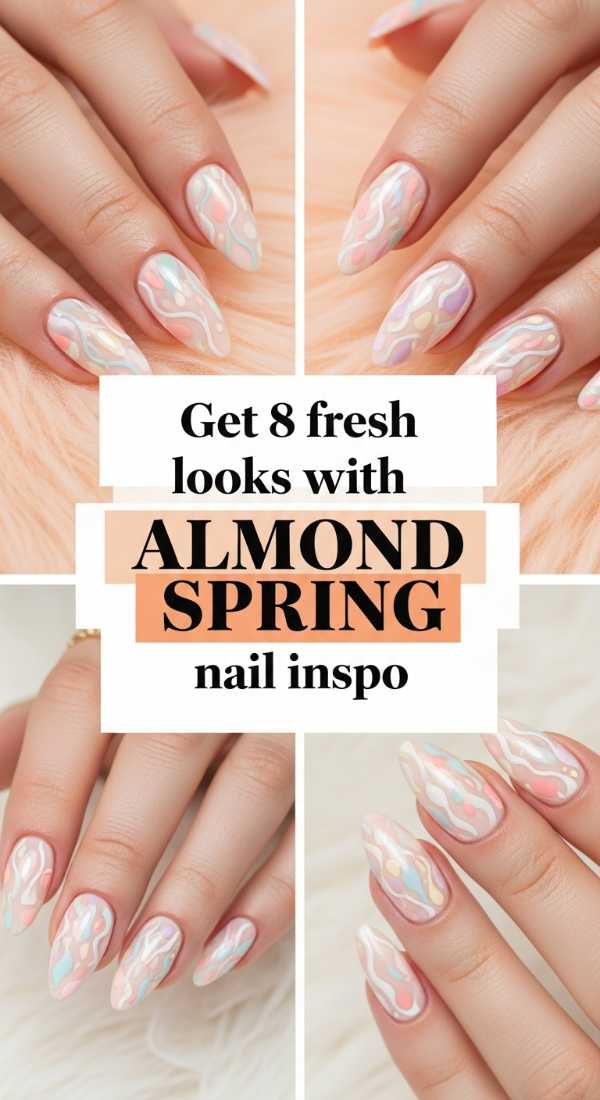
Why to love this Design:
Almond nails provide the perfect canvas for versatility. This shape is the gold standard for spring because it feels feminine and elongated. It allows for enough space for art while remaining incredibly flattering on all hand shapes.
Essential Elements:
- Medium-length almond extensions or natural growth
- Nail glue (if using tips)
- Variety of pastel liners
- Dried flower decals
How to Prepare:
- Look 1: Daisy accents on the ring finger.
- Look 2: Multi-colored pastel tips.
- Look 3: Vertical half-and-half color blocking.
- Look 4: Tiny gold foil flakes on a nude base.
- Look 5: Soft lavender marble.
- Look 6: Peach fuzz (color of the year) solid creme.
- Look 7: Thin silver metallic smile lines.
- Look 8: ‘Aura’ nails using an eyeshadow sponge.
Budget Range
- Aprés Gel-X Tips ($30)
- Nail Art Dried Flowers ($6)
- Holler and Glow Stickers ($4)
Prep 5 Vibrant Summer Nail Designs for Vacation
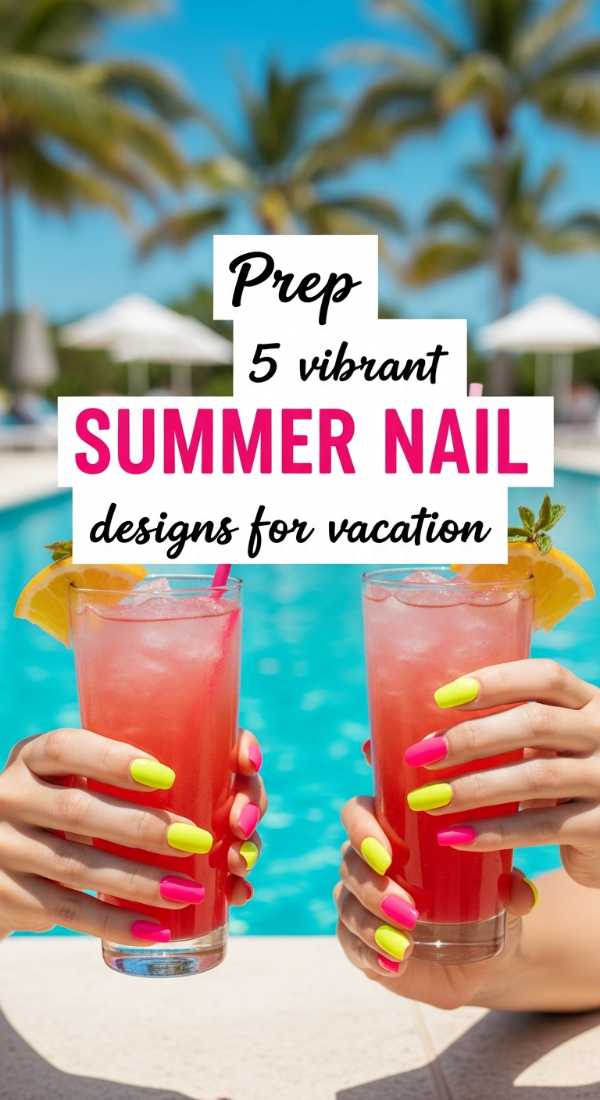
Why to love this Design:
When the sun is blazing and the ocean is calling, your nails should be just as loud! Vibrant summer designs are all about high energy, neon hues, and durability to withstand sand, salt, and chlorine.
Essential Elements:
- Neon pigments
- Long-wear gel formulas
- Tropical decals (palm trees, hibiscus)
- Extra-strength top coat
How to Prepare:
- The Electric Sunset: A neon orange and pink gradient.
- The Pool Side: A turquoise ‘water ripple’ effect using blooming gel.
- The Fruit Salad: Hand-painted cherries or lemons.
- The Chrome Hibiscus: 3D gel flowers topped with chrome powder.
- The Neon French: Hot pink tips with a bright yellow ‘smile’ line.
Budget Range
- Kiara Sky Neon Collection ($15/bottle)
- Blooming Gel ($12)
- Sunscreen-resistant Top Coat ($15)
Wrapping Your Nails in Sunshine
I hope this guide leaves you feeling inspired to treat yourself to a little bit of color and joy. Remember, my loves, your nails are just another way to tell your story to the world without saying a word. Whether you choose a quiet, milky white or a loud, retro Pucci swirl, wear it with confidence and a smile. May your spring be soft and your summer be vibrantly bright. I can’t wait to see what you create!