

Forget Charcuterie: This Simple Viral Food Board is a Game Changer
We’ve all been there: standing over a kitchen island, meticulously folding salami into roses and trying to find the perfect spot for a rogue apricot. Charcuterie boards have been the undisputed queens of hosting for years, but let’s be honest—sometimes you want something a bit more substantial than cold cuts and crackers. There is a new trend taking over our feeds, and it’s all about the ‘Meal Board.’ It’s the cozy, warm, and inviting sister to the traditional grazing platter, focusing on one star dish surrounded by its perfect accompaniments.
Imagine a long wooden board placed in the center of your table, steam rising from a mountain of perfectly seasoned pasta or a pile of golden, grilled proteins. It’s communal, it’s unpretentious, and it invites your guests to dig in with gusto rather than polite nibbling. This approach takes the stress out of plated dinners and replaces it with a tactile, shared experience that feels like a warm hug for your soul. Whether it’s a humid summer evening or a crisp spring afternoon, these boards are the ultimate hosting hack.
Today, I’m sharing ten incredible recipes that serve as the perfect focal point for your next viral food board. From savory pasta variations to sweet, decorated treats, these dishes are designed to be the centerpiece of your gathering. Let’s dive into how you can elevate your hosting game and create a meal your friends will be talking about for weeks.
How to make creamy rotel dip?

Why we love this
There is something undeniably nostalgic and comforting about a warm, velvety cheese dip bubbling in a bowl. This creamy Rotel dip is the ultimate crowd-pleaser, offering a perfect balance of smoky heat from the green chilies and the rich, melt-in-your-mouth texture of high-quality cheese. As you dip a salty, crunchy tortilla chip into the bowl, you get that satisfying cheese pull combined with the bright acidity of the tomatoes. It’s the kind of appetizer that disappears in minutes because the aroma of browned meat and melted cheese is simply irresistible.
Ingredients
- 1 lb Ground breakfast sausage or lean ground beef
- 1 block (16 oz) Velveeta or high-quality melting cheese, cubed
- 2 cans (10 oz each) Ro-Tel Diced Tomatoes and Green Chilies
- 1/2 cup Heavy cream or whole milk
- 1 tsp Garlic powder
- 1/2 tsp Smoked paprika
- Fresh cilantro and sliced jalapeños for garnish
How to make it
- Place a large skillet over medium-high heat. Once the pan is hot, add your ground meat, breaking it apart with a wooden spoon. Cook until the meat is thoroughly browned and no longer pink, ensuring you get some crispy edges for extra flavor. Drain the excess fat.
- Turn the heat down to medium-low. Add the cubed cheese to the skillet along with the two cans of Ro-Tel (do not drain the liquid from the cans, as this provides essential flavor and moisture).
- Slowly pour in the heavy cream and sprinkle in the garlic powder and smoked paprika. Stir continuously with a heat-resistant spatula.
- Keep stirring as the cheese begins to melt. The goal is a completely smooth, lava-like consistency. If the dip feels too thick, add an extra tablespoon of milk until it reaches your desired silkiness.
- Once the dip is fully melted and steaming, transfer it to a warm serving bowl. Garnish with fresh cilantro and jalapeños, and place it in the center of a board surrounded by various chips and crackers.
How to cook fresh spring pasta?
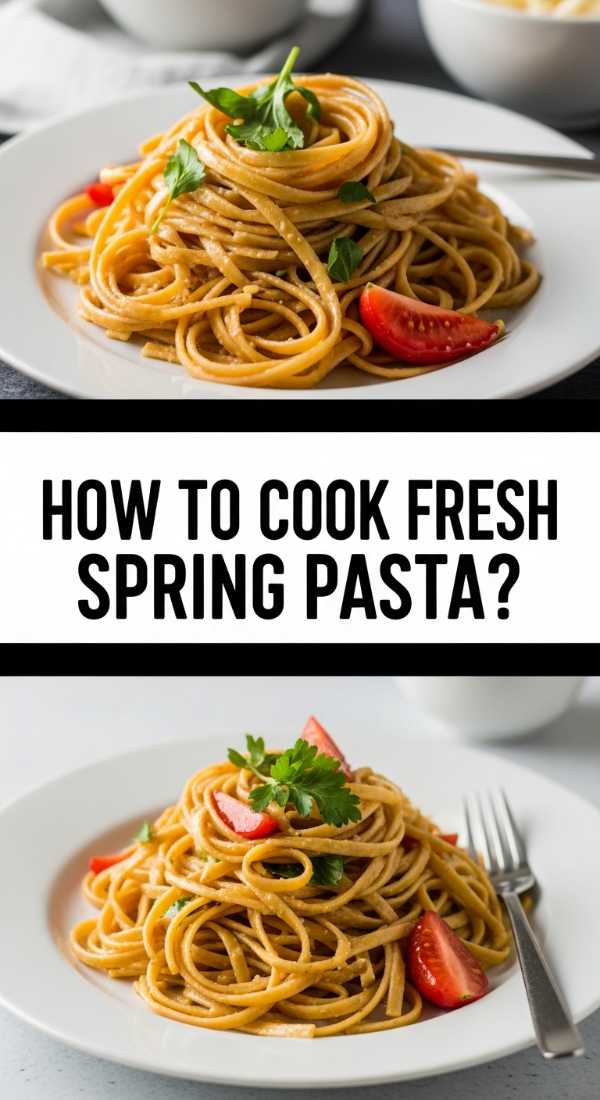
Why we love this
This pasta is like a garden on a plate, capturing the very essence of spring. We love the way the bright green of the snap peas and asparagus pops against the pale gold of the noodles, all tied together by a light, silky lemon-butter sauce. Every bite offers a medley of textures: the tender al dente pasta, the snap of the fresh vegetables, and the creamy finish of shaved parmesan. The scent of fresh lemon zest and torn basil leaves fills the air, making it feel like a refreshing breeze in culinary form.
Ingredients
- 1 lb Linguine or Tagliatelle
- 1 bunch Thin asparagus, trimmed and cut into 2-inch pieces
- 1 cup Sugar snap peas, halved
- 3 tbsp Salted butter
- 2 tbsp Extra virgin olive oil
- 3 cloves Garlic, thinly sliced
- Zest and juice of 1 large lemon
- 1/2 cup Freshly grated Parmesan cheese
- Handful of fresh basil leaves
How to make it
- Bring a large pot of heavily salted water to a rolling boil. Add your pasta and cook according to the package directions, but aim for ‘al dente’—about 1-2 minutes less than the full cook time.
- During the last 3 minutes of the pasta’s boiling time, toss the asparagus and snap peas directly into the pasta water. This blanches them perfectly without needing an extra pan.
- Before draining, reserve exactly 1 cup of the starchy pasta water. Drain the pasta and veggies.
- In the same pot (now empty), melt the butter and olive oil over medium heat. Add the sliced garlic and sauté for about 1 minute until fragrant and translucent, but not browned.
- Add the pasta, veggies, lemon zest, lemon juice, and half of the reserved pasta water back into the pot. Toss vigorously with tongs.
- Gradually sprinkle in the Parmesan cheese while tossing, adding more pasta water as needed to create a light, glossy sauce that coats every strand. Serve immediately on a large platter garnished with fresh basil.
How to make dirty spaghetti?

Why we love this
Dirty spaghetti is a soulful, flavor-packed twist on traditional pasta that brings deep, savory notes to your table. We love the richness of the seasoned meat sauce, which is traditionally ‘dirtied’ with finely minced aromatics and spices that create a complex, earthy profile. It’s a hearty, ‘stick-to-your-ribs’ kind of meal that feels incredibly indulgent. The aroma of sautéed bell peppers, onions, and Cajun spices simmering together creates a magnetic pull toward the kitchen that no guest can resist.
Ingredients
- 1 lb Spaghetti noodles
- 1 lb Ground beef or a mix of beef and pork
- 1 small Onion, finely diced
- 1 Green bell pepper, finely diced
- 2 stalks Celery, finely diced
- 3 cloves Garlic, minced
- 2 tbsp Tomato paste
- 1 tbsp Cajun or Creole seasoning
- 1 cup Beef broth
- Fresh parsley for garnish
How to make it
- Boil your spaghetti in salted water until al dente. Drain and set aside, tossing with a tiny bit of oil to prevent sticking.
- In a deep skillet or Dutch oven, brown the ground meat over medium-high heat until fully cooked. Use a spatula to crumble it into very small pieces.
- Add the onion, bell pepper, and celery (the ‘holy trinity’) to the meat. Sauté for about 5-7 minutes until the vegetables are soft and the onions are translucent.
- Stir in the minced garlic and tomato paste. Cook for another 2 minutes, allowing the tomato paste to darken slightly to develop a deep umami flavor.
- Sprinkle the Cajun seasoning over the mixture and pour in the beef broth. Reduce the heat to low and let it simmer for 10 minutes until the liquid has reduced and formed a thick, concentrated sauce.
- Add the cooked spaghetti to the skillet. Toss thoroughly so every strand is coated in the ‘dirty’ meat mixture. Serve on a large board with extra seasoning and fresh parsley on top.
How to prepare refreshing summer salads?
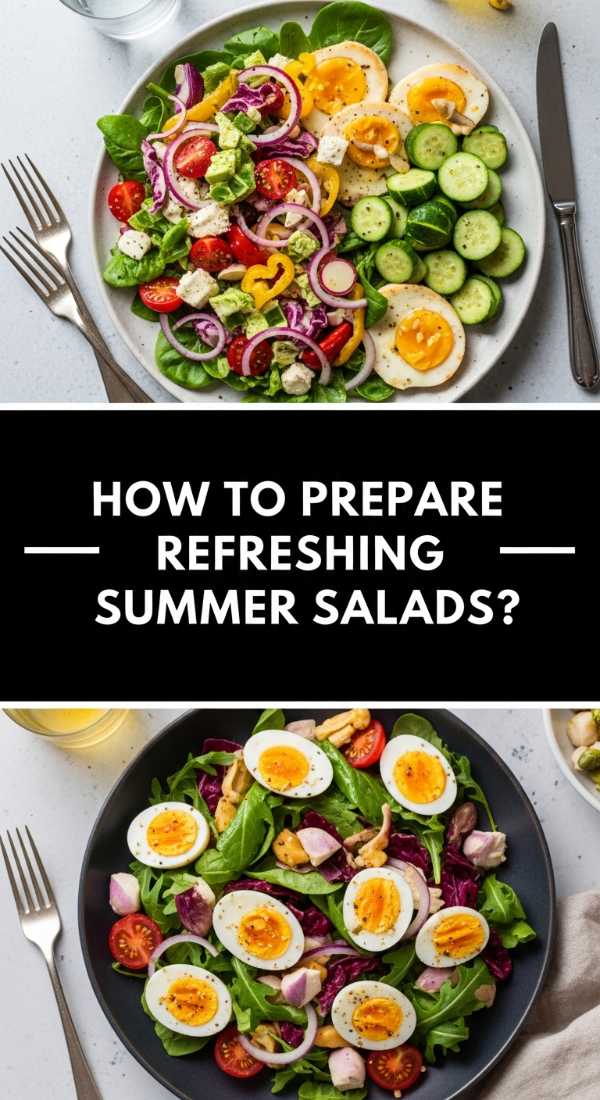
Why we love this
When the sun is blazing, a heavy meal is the last thing anyone wants. That’s why we adore refreshing summer salads that lean into the sweetness of seasonal fruit and the crispness of cold greens. The contrast of salty feta cheese against juicy watermelon or ripe peaches is a revelation for the palate. These salads aren’t just food; they are a sensory cool-down, featuring vibrant colors and zesty vinaigrettes that wake up your taste buds and leave you feeling energized and light.
Ingredients
- 4 cups Arugula or baby spinach
- 2 cups Watermelon cubes or sliced peaches
- 1/2 cup Feta cheese, crumbled
- 1/4 red onion, very thinly sliced
- 1/2 cup Cucumber, sliced into half-moons
- 1/4 cup Toasted pepitas or walnuts
- Dressing: 3 tbsp olive oil, 1 tbsp balsamic glaze, salt, and pepper
How to make it
- Start by prepping your fruit and vegetables. Ensure the watermelon or peaches are chilled before slicing; this temperature contrast is key to the ‘refreshing’ feel of the salad.
- In a small jar, whisk together the olive oil, balsamic glaze, salt, and pepper until emulsified.
- Layer the greens in a very wide, shallow bowl or directly onto a section of your food board. This prevents the heavy ingredients from sinking to the bottom.
- Scatter the cucumber and red onion over the greens. If the red onion is too sharp, soak the slices in cold water for 5 minutes before adding to the salad to mellow the flavor.
- Top with the fruit and crumbled feta. Just before serving, drizzle the dressing over the top.
- Finish with a sprinkle of toasted seeds or nuts for that essential crunch. Serve immediately to keep the greens from wilting under the acidity of the dressing.
How to bake decorated spring cookies?

Why we love this
There is a whimsical joy in baking and decorating spring cookies that makes them the perfect addition to a dessert board. We love the buttery, tender crumb of a well-baked sugar cookie paired with the sweet, smooth snap of royal icing. Decorating them in pastel shades of lilac, mint, and soft yellow feels like an artistic expression of the season. They are almost too pretty to eat, but the scent of vanilla and almond extract wafting from the oven makes it impossible to resist taking a bite.
Ingredients
- 3 cups All-purpose flour
- 1 cup Unsalted butter, softened
- 1 cup Granulated sugar
- 1 Egg
- 1 tsp Vanilla extract
- 1/2 tsp Almond extract
- Royal Icing: 4 cups powdered sugar, 3 tbsp meringue powder, 6-8 tbsp warm water
- Gel food coloring
How to make it
- Cream the softened butter and sugar in a stand mixer until light and fluffy, about 3 minutes. Add the egg and extracts, mixing until combined.
- Gradually add the flour on low speed. Once a dough forms, roll it into a disk, wrap in plastic, and chill in the fridge for at least 1 hour. Chilling is vital to prevent the cookies from spreading.
- Preheat your oven to 350°F (175°C). Roll the dough to 1/4 inch thickness on a floured surface. Cut into floral or bird shapes using cookie cutters.
- Bake for 8-10 minutes. The edges should be set but not browned. Let them cool completely on a wire rack.
- Make the icing by whisking powdered sugar, meringue powder, and water until it reaches ‘honey’ consistency. Divide and color with gel dyes.
- Pipe a border around each cookie, then ‘flood’ the center with slightly thinner icing. Use a toothpick to pop any bubbles. Let them dry for 6-12 hours before stacking on your board.
How to design beautiful spring cakes?

Why we love this
A beautiful spring cake is the crowning jewel of any viral food board. We love the airy, light texture of a sponge cake layered with fresh fruit preserves or light whipped creams. Designing these cakes is all about embracing the ‘cottagecore’ aesthetic—using edible flowers, fresh berries, and rustic frosting techniques. The sight of a tall, elegantly decorated cake creates an instant sense of celebration, while the flavor profile of lemon, lavender, or strawberry keeps it feeling sophisticated and seasonally appropriate.
Ingredients
- 2 1/2 cups Cake flour
- 1 1/2 cups Sugar
- 1 tbsp Baking powder
- 1/2 cup Salted butter, softened
- 1 cup Whole milk
- 1 tsp Vanilla bean paste
- 4 Egg whites
- Frosting: 2 cups heavy cream, 1/2 cup powdered sugar, zest of 1 lemon
- Edible flowers and fresh berries for garnish
How to make it
- Preheat your oven to 350°F (175°C). Grease and flour two 8-inch cake pans.
- In a large bowl, whisk the flour, sugar, and baking powder. Add the softened butter and half of the milk, mixing on low until the dry ingredients are moistened.
- In a separate bowl, whisk the remaining milk, vanilla, and egg whites. Gradually add this to the batter in three batches, beating well after each addition to incorporate air.
- Divide the batter between the pans and bake for 25-30 minutes, or until a toothpick comes out clean. Cool in the pans for 10 minutes, then invert onto racks.
- Whip the heavy cream, powdered sugar, and lemon zest until stiff peaks form. The peaks should stand straight up when the whisk is lifted.
- Place one layer on a stand, cover with a thick layer of cream and sliced berries. Top with the second layer. Apply a thin ‘crumb coat’ of frosting, then a final rustic layer. Decorate the top with a crescent of edible flowers and whole berries.
How to make summer pasta salad?

Why we love this
Summer pasta salad is the ultimate versatile side dish that actually tastes better as it sits. We love how the rotini or bow-tie pasta acts as a vessel for a zesty, herbaceous vinaigrette, soaking up all the flavors. It’s a riot of color and crunch, featuring everything from juicy cherry tomatoes to briny olives and sharp red onions. It’s the perfect ‘make-ahead’ dish for a board because it’s served cold, providing a refreshing contrast to grilled meats or warm appetizers.
Ingredients
- 1 lb Rotini or Fusilli pasta
- 1 cup Cherry tomatoes, halved
- 1/2 cup English cucumber, diced
- 1/2 cup Kalamata olives, pitted and sliced
- 1/2 cup Red bell pepper, diced
- 1/4 cup Red onion, finely minced
- 1/2 cup Cubed mozzarella or feta
- Dressing: 1/2 cup olive oil, 1/4 cup red wine vinegar, 1 tsp dried oregano, 1 clove minced garlic
How to make it
- Cook the pasta in boiling salted water until it is slightly past al dente. For cold salads, you want the pasta a little softer as it firms up once chilled.
- Drain the pasta and immediately rinse it under cold running water. This stops the cooking process and removes excess starch, preventing the salad from becoming gummy.
- In a large mixing bowl, whisk together the olive oil, red wine vinegar, oregano, and minced garlic.
- Add the cooled pasta to the bowl and toss to coat thoroughly while the pasta is still slightly damp; this helps it absorb the dressing.
- Add the tomatoes, cucumbers, olives, peppers, onions, and cheese. Toss gently to combine.
- Cover and refrigerate for at least 2 hours before serving. This ‘resting’ period allows the flavors to marry and the pasta to become fully infused with the vinaigrette. Toss again just before placing on your board.
How to bake sourdough discard recipes?

Why we love this
There is a special kind of satisfaction in turning ‘waste’ into something delicious. Sourdough discard recipes are a favorite because they bring that signature tang and depth of flavor to baked goods without the long fermentation times. Whether it’s crackers, pancakes, or a rustic loaf, the discard adds a unique texture—often more tender and complex than standard recipes. We love the rustic, artisanal feel these items bring to a board, offering a homemade touch that feels deeply personal and sustainable.
Ingredients
- 1 cup Sourdough discard (unfed)
- 2 cups All-purpose flour
- 1 tsp Baking soda
- 1 tsp Salt
- 1/2 cup Melted butter or oil
- Optional: Dried herbs (rosemary or thyme) and sea salt for topping
How to make it
- For sourdough discard crackers (the perfect board addition): Preheat your oven to 350°F (175°C).
- In a medium bowl, mix the sourdough discard with the melted butter until smooth. Stir in the flour, salt, and baking soda. The dough should be soft but not sticky.
- Divide the dough in half. Place one half on a sheet of parchment paper and roll it out until it is paper-thin (about 1/16th of an inch). Thinness is the key to a loud, satisfying crunch.
- Brush the top lightly with water or oil and sprinkle with your choice of dried herbs and flaky sea salt.
- Use a pizza cutter to score the dough into squares or rectangles. Do not worry about separating them yet.
- Bake for 15-20 minutes until the edges are golden brown and the centers are crisp. Let them cool completely on the pan; they will continue to crisp up as they cool. Break along the score lines and pile them high on your board.
How to master healthy grilling recipes?

Why we love this
Mastering the grill is about unlocking the magic of fire and smoke. We love healthy grilling because it coaxes out the natural sugars in vegetables and creates a charred, caramelized exterior on lean proteins without the need for heavy oils. The sight of perfect grill marks on a piece of lemon-herb chicken or a thick slice of zucchini is incredibly appetizing. It’s a clean, vibrant way to eat that highlights the quality of your ingredients while adding a rustic, outdoor element to your food board.
Ingredients
- 1 lb Chicken breast or firm Tofu, sliced into strips
- 2 Zucchini, sliced into rounds
- 1 bunch Asparagus, woody ends removed
- 2 tbsp Olive oil
- Juice of 1 lemon
- 2 cloves Garlic, smashed
- 1 tsp Dried oregano
- Salt and cracked black pepper
How to make it
- Whisk together the olive oil, lemon juice, garlic, oregano, salt, and pepper in a large bowl. Add your protein and vegetables, tossing to coat. Let marinate for at least 30 minutes.
- Preheat your grill to medium-high heat (about 400°F/200°C). Clean the grates thoroughly and lightly oil them to prevent sticking.
- Place the protein on the hottest part of the grill. Leave it undisturbed for 4-5 minutes. Visual cue: The meat should release easily from the grates once a proper sear has formed. If it sticks, give it another minute.
- Flip the protein and move the vegetables to the grill. Zucchini and asparagus cook quickly—usually 2-3 minutes per side. Look for distinct char marks and a slight softening in texture.
- Ensure the chicken reaches an internal temperature of 165°F (74°C) using a meat thermometer.
- Remove everything from the grill and let the meat rest for 5 minutes before slicing. Arrange the grilled components in neat rows on your board for a structured, healthy look.
How to make delicious summer desserts?

Why we love this
Summer desserts are all about celebrating the harvest. We love recipes that don’t hide the fruit behind heavy crusts or overly sweet fillings. A simple berry galette or a peach crumble is the perfect way to end a meal because it feels light and celebratory. The aroma of bubbling fruit juices and golden-brown pastry is the ultimate summer scent. These desserts are best served family-style on a board, perhaps with a bowl of cold whipped cream or a pint of melting vanilla bean ice cream for guests to help themselves.
Ingredients
- 4 cups Fresh berries (blueberries, raspberries, blackberries)
- 1/4 cup Granulated sugar
- 1 tbsp Cornstarch
- 1 tsp Lemon juice
- 1 Store-bought or homemade pie crust
- 1 Egg (for egg wash)
- Coarse sparkling sugar for topping
How to make it
- Preheat your oven to 400°F (200°C) and line a baking sheet with parchment paper.
- In a large bowl, gently toss the fresh berries with the sugar, cornstarch, and lemon juice. Be careful not to crush the berries; you want them to hold their shape during baking.
- Roll out your pie crust on the parchment paper into a rough 12-inch circle. It doesn’t need to be perfect—the ‘rustic’ look is part of the charm.
- Mound the berry mixture in the center of the crust, leaving a 2-inch border all the way around.
- Fold the edges of the crust over the berries, pleating the dough as you go. The center will remain open.
- Brush the crust with a beaten egg and sprinkle generously with coarse sugar. Bake for 25-30 minutes until the crust is a deep golden brown and the fruit juices are thick and bubbling. Let it cool for 15 minutes before sliding it onto your dessert board.
Conclusion
The beauty of moving away from traditional charcuterie and toward these viral food boards is the freedom it gives you as a host. You aren’t just serving snacks; you’re serving a curated experience that centers around warmth, flavor, and community. Whether you choose to focus on a savory ‘Dirty Spaghetti’ board or a sweet ‘Spring Cookie’ platter, the goal is the same: to bring people together over incredible food. So, put away the tiny cheese knives and clear some space on your counter—it’s time to build a board that truly satisfies.