
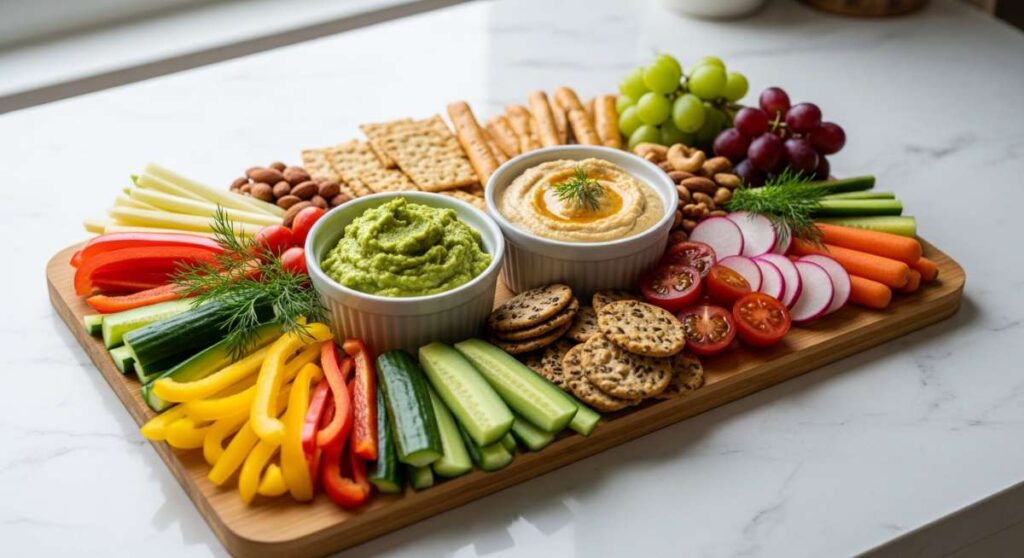
There is something inherently magical about a gathering where the food isn’t just a meal, but the center of the conversation. I remember the first time I set out a large wooden board overflowing with different textures and colors; the room shifted from polite small talk to a vibrant, shared experience. This viral simple food board concept is more than just a trend—it’s a lifestyle choice that prioritizes connection over complicated plating.
We live in a world that moves so fast, and sometimes we forget the tactile joy of picking up a warm dumpling or dipping a salty chip into a creamy, spicy dip. These boards represent the ultimate ‘low-stress, high-reward’ entertaining. Whether you are hosting a breezy spring brunch or a cozy summer evening on the patio, these recipes are designed to be served together, creating a visual and culinary feast that your friends will be talking about for weeks.
How to make creamy rotel dip

Why we love this
This dip is the ultimate nostalgia in a bowl, offering a rich, velvety texture that coats every chip with warmth. The aroma of melted cheese mingled with the zesty kick of green chilies and savory browned meat creates an irresistible scent that fills the kitchen instantly. It’s the kind of dish that feels like a hug, providing a comforting, gooey mouthfeel that balances perfectly with the sharp crunch of a tortilla chip.
Ingredients
- 1 lb ground beef or sausage
- 16 oz Velveeta or processed cheese, cubed
- 1 can (10 oz) Ro-Tel diced tomatoes and green chilies
- 1/2 cup whole milk (for creaminess)
- 1 tsp garlic powder
- 1/2 tsp smoked paprika
How to make it
- Place a large skillet over medium-high heat. Add your ground meat and cook until it is fully browned and crumbly, ensuring no pink remains. Drain the excess fat thoroughly to prevent the dip from becoming oily.
- Reduce the heat to low. Add the cubed cheese to the skillet. It is vital to keep the heat low during this phase to avoid scorching the dairy, which can lead to a grainy texture.
- Pour in the entire can of Ro-Tel (including the juices) and the milk. The juices provide that signature acidity and spice.
- Stir constantly with a silicone spatula. Continue stirring until the cheese is completely melted and the mixture is silk-smooth.
- Add the garlic powder and smoked paprika. Allow the mixture to simmer on low for another 5 minutes, which lets the flavors meld together into a cohesive, creamy dip.
How to make dirty spaghetti

Why we love this
Dirty spaghetti is a soulful, umami-packed twist on a classic Italian staple that brings a deep, earthy richness to your board. Every strand of pasta is coated in a dark, savory sauce infused with Cajun-style aromatics and hearty proteins, offering a complex flavor profile that is both rustic and refined. The scent of sautéed onions, bell peppers, and celery—the holy trinity—sizzling in meat juices is enough to make anyone’s mouth water.
Ingredients
- 1 lb spaghetti noodles
- 1 lb ground beef or pork
- 1 small onion, finely diced
- 1 green bell pepper, diced
- 2 stalks celery, minced
- 3 cloves garlic, minced
- 2 tbsp Worcestershire sauce
- 1 tbsp Cajun seasoning
How to make it
- Bring a large pot of heavily salted water to a rolling boil. Cook the spaghetti until it is just shy of al dente; it should still have a firm bite, as it will finish cooking in the sauce. Reserve 1 cup of pasta water before draining.
- In a wide pan over medium heat, brown the ground meat until it develops a deep brown crust. This ‘fond’ on the bottom of the pan is essential for the ‘dirty’ color and flavor.
- Add the onions, bell pepper, and celery to the meat. Sauté for 6-8 minutes until the vegetables are soft and translucent, picking up the browned bits from the pan.
- Stir in the garlic, Cajun seasoning, and Worcestershire sauce. Cook for 2 minutes until fragrant.
- Add the cooked spaghetti and half of the reserved pasta water to the pan. Toss vigorously over medium heat, allowing the starch in the water to emulsify with the meat juices and seasonings, coating the pasta perfectly.
How to cook spring pasta
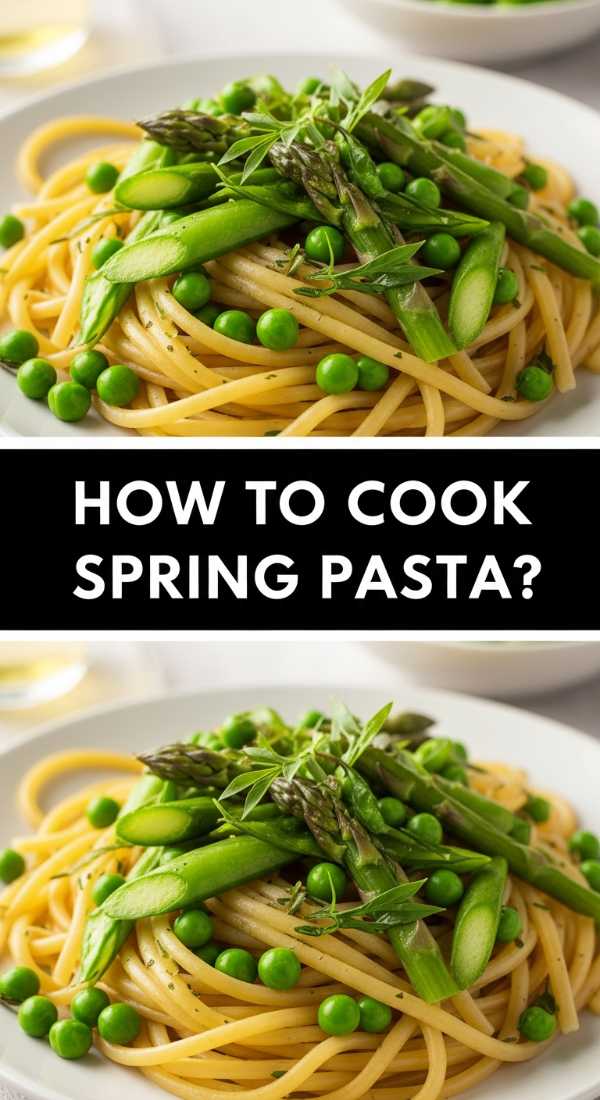
Why we love this
This dish is a celebration of renewal, featuring the bright, crisp flavors of early-season vegetables like peas and asparagus. The texture is light and airy, contrasted by the snap of fresh greens and a silky lemon-butter sauce that feels elegant yet simple. It carries the scent of fresh herbs and citrus, making it the perfect refreshing addition to a food board that needs a pop of vibrant green.
Ingredients
- 12 oz short pasta (like fusilli or gemelli)
- 1 cup fresh peas
- 1 bunch asparagus, trimmed and cut into 1-inch pieces
- 3 tbsp unsalted butter
- Zest and juice of 1 lemon
- 1/2 cup grated Parmesan cheese
- Fresh mint or basil leaves
How to make it
- Boil your pasta in salted water according to the package instructions. During the final 3 minutes of boiling, toss the asparagus and peas directly into the pasta pot to blanch them.
- Drain the pasta and vegetables together, reserving a small amount of the cooking liquid.
- In the same pot (now empty), melt the butter over medium-low heat until it begins to foam and turn slightly golden.
- Return the pasta and vegetables to the pot. Add the lemon zest, lemon juice, and Parmesan cheese.
- Toss everything together gently. If the sauce feels too thick, add a splash of the reserved pasta water. Finish with torn mint or basil leaves for a burst of aromatic freshness.
How to make summer salad

Why we love this
Summer in a bowl, this salad is all about the juxtaposition of sweet sun-ripened fruit and salty, creamy cheese. The crunch of toasted nuts and the snap of fresh greens create a symphony of textures that feel incredibly cooling on a warm afternoon. Drizzled with a sharp balsamic glaze, the aroma is sweet and tangy, cutting through the richness of other board items with a bright, clean finish.
Ingredients
- 5 oz mixed baby greens or arugula
- 1 cup fresh strawberries or peaches, sliced
- 1/2 cup crumbled feta or goat cheese
- 1/4 cup toasted pecans or walnuts
- Balsamic glaze for drizzling
- Extra virgin olive oil
How to make it
- Begin by chilling your serving bowl; a cold bowl keeps the greens crisp for longer. Place the mixed greens into the bowl and lightly drizzle with high-quality olive oil and a pinch of sea salt.
- Gently toss the greens to ensure every leaf is lightly coated—this prevents the salad from wilting too quickly.
- Layer the sliced fruit over the top of the greens. Do not over-mix, as you want the fruit to remain visible and intact for presentation.
- Sprinkle the crumbled cheese and toasted nuts evenly across the surface. The nuts should be toasted in a dry pan for 2-3 minutes until they smell nutty and look glossy.
- Just before serving, drizzle the balsamic glaze in a decorative zigzag pattern. This ensures the acidity doesn’t break down the greens before the guests dive in.
How to bake spring cookies

Why we love this
These cookies are like biting into a soft, floral cloud, often infused with lemon or lavender to mimic the scents of a blooming garden. They have a delicate, melt-in-your-mouth crumb that isn’t overly sweet, making them a sophisticated treat for an afternoon board. The pale, pastel aesthetic adds a touch of whimsy and elegance to your spread, inviting guests to enjoy a light, sugary finish.
Ingredients
- 2 1/2 cups all-purpose flour
- 1 cup unsalted butter, softened
- 3/4 cup granulated sugar
- 1 egg
- 1 tsp vanilla extract
- 1 tbsp lemon zest
- 1/2 tsp baking powder
How to make it
- In a large bowl, cream together the softened butter and sugar using an electric mixer on medium-high speed. Continue for at least 3-4 minutes until the mixture is pale, light, and fluffy.
- Add the egg, vanilla extract, and lemon zest. Beat until just combined. The lemon zest releases essential oils that provide a deep, natural citrus aroma.
- Whisk the dry ingredients (flour and baking powder) in a separate bowl, then gradually add them to the wet mixture on low speed. Do not overmix; stop as soon as the flour disappears.
- Chill the dough in the refrigerator for at least 30 minutes. This prevents the cookies from spreading too much and keeps the texture tender.
- Preheat your oven to 350°F (175°C). Scoop rounded tablespoons onto a parchment-lined sheet and bake for 10-12 minutes. The edges should be just barely golden, while the centers remain soft.
How to make pasta salad
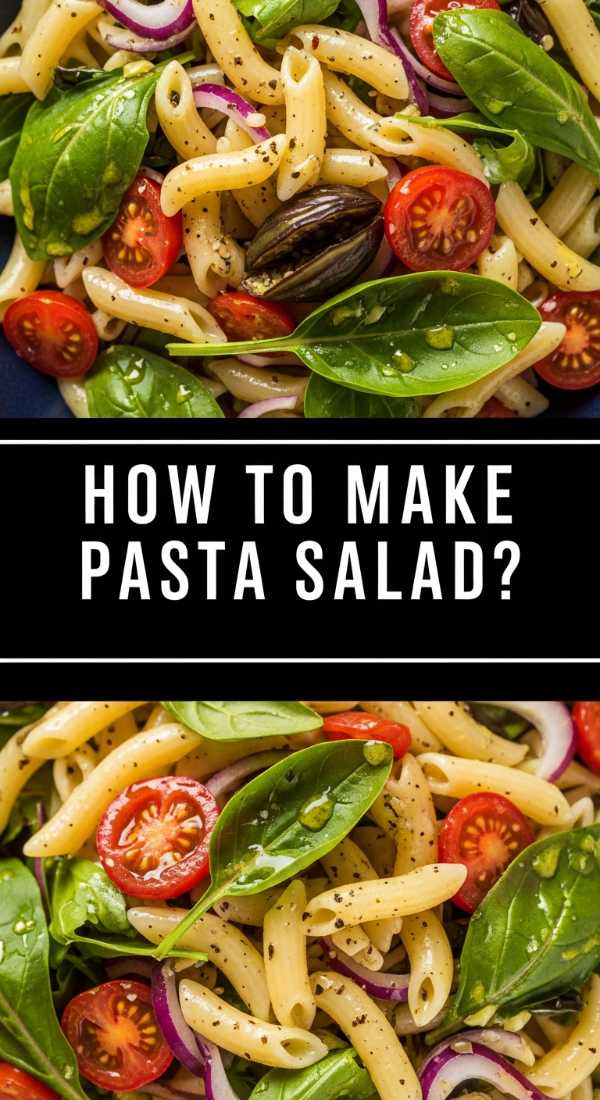
Why we love this
A true staple of communal eating, pasta salad is a masterclass in marinated flavor. As it sits, the pasta absorbs the tangy vinaigrette, becoming a savory vessel for crunchy peppers, juicy tomatoes, and sharp olives. It provides a hearty, satisfying chew that contrasts beautifully with the softer elements on your board, and its colorful appearance makes it a visual centerpiece that screams ‘picnic perfection.’
Ingredients
- 1 lb rotini or tri-color pasta
- 1/2 cup Italian vinaigrette
- 1 cup cherry tomatoes, halved
- 1/2 cup cucumber, diced
- 1/4 cup red onion, finely minced
- 1/2 cup mozzarella pearls
- Fresh parsley, chopped
How to make it
- Cook the pasta in salted water until it is fully tender. Unlike hot pasta dishes, pasta salad noodles should be cooked slightly longer so they don’t become hard when chilled.
- Drain and immediately rinse the pasta under cold running water. This stops the cooking process and removes excess starch, preventing the noodles from sticking together.
- In a large mixing bowl, combine the cooled pasta with half of the dressing. Tossing while the pasta is still slightly damp helps the flavors penetrate deeper.
- Fold in the tomatoes, cucumbers, onions, and mozzarella pearls. These ingredients add the necessary crunch and creaminess.
- Cover and refrigerate for at least 2 hours. Before serving, add the remaining dressing and fresh parsley to refresh the moisture and appearance.
How to bake spring cakes

Why we love this
Spring cakes are all about lightness and the ethereal beauty of whipped cream and fresh berries. The texture is a soft, airy sponge that feels like eating a sweetened breeze, paired with a frosting that is barely-there and not at all heavy. The aroma is purely vanilla and sugar, evoking a sense of celebration and joy that makes any simple food board feel like a special occasion.
Ingredients
- 1 1/2 cups cake flour
- 1 cup sugar
- 1 1/2 tsp baking powder
- 1/2 cup whole milk
- 2 large eggs
- 1/2 cup butter, melted
- Fresh strawberries and whipped cream for topping
How to make it
- Preheat your oven to 350°F (175°C) and grease a round cake pan or cupcake tin. Using cake flour specifically ensures a finer, softer crumb than all-purpose flour.
- Sift the flour, sugar, and baking powder together into a large bowl. Sifting is a critical step for spring cakes to incorporate air and prevent lumps.
- In a separate bowl, whisk the milk, eggs, and melted butter. Slowly pour the wet ingredients into the dry, folding gently with a spatula. Do not beat the batter; you want to preserve the air bubbles.
- Pour the batter into the pan and bake for 20-25 minutes. Test the center with a toothpick; it should come out clean with a few moist crumbs attached.
- Allow the cake to cool completely on a wire rack. Top with a generous layer of freshly whipped cream and halved strawberries just before placing it on your board.
How to grill healthy meals

Why we love this
Grilling brings a smoky, charred depth to food that simply cannot be replicated indoors. This method transforms simple proteins and vegetables into flavor-dense masterpieces with a rustic, outdoor aroma that draws everyone to the table. The texture is a perfect balance of a crisp, caramelized exterior and a tender, juicy interior, providing a wholesome and satisfying element to your viral board.
Ingredients
- 2 chicken breasts or thick slices of cauliflower
- 2 bell peppers, sliced into thick strips
- 1 zucchini, sliced into rounds
- 2 tbsp olive oil
- 1 tsp dried oregano
- Salt and black pepper
How to make it
- Preheat your grill to medium-high heat (about 400°F). A hot grill is essential to achieve those iconic sear marks without overcooking the inside of your food.
- Toss your protein and vegetables in a bowl with olive oil, oregano, salt, and pepper. Ensure everything is evenly coated to prevent sticking.
- Place the protein on the hottest part of the grill. Let it sear undisturbed for 5-6 minutes per side. Resist the urge to flip repeatedly; one good flip ensures a better crust.
- Place the vegetables on the outer edges of the grill where the heat is slightly lower. Grill for 3-4 minutes per side until they show char marks but still retain some ‘snap.’
- Remove everything from the grill and let the meat rest for 5 minutes before slicing. Resting allows the juices to redistribute, ensuring every bite is moist.
How to make soft dumplings

Why we love this
There is a profound comfort in a soft, pillowy dumpling that yields to a savory, ginger-scented filling. The steam rising from a fresh batch carries the fragrance of soy and sesame, creating an inviting atmosphere around the food board. Each bite offers a delicate chewiness followed by a burst of flavorful juices, making them a high-impact finger food that disappears in seconds.
Ingredients
- 1 pack gyoza or dumpling wrappers
- 1/2 lb ground pork or finely chopped mushrooms
- 2 cups shredded cabbage
- 1 tbsp grated ginger
- 2 tbsp soy sauce
- 1 tsp sesame oil
How to make it
- Mix the filling ingredients (pork/mushrooms, cabbage, ginger, soy, and sesame oil) in a bowl until well combined. The cabbage provides moisture, so ensure it is finely shredded.
- Place a small spoonful of filling in the center of a wrapper. Wet the edges of the wrapper with a dip of water on your finger.
- Fold the wrapper in half and pleat the edges together tightly. A tight seal is crucial to keep the juices inside during the cooking process.
- Heat 1 tablespoon of oil in a non-stick skillet over medium heat. Place the dumplings in the pan and fry for 2 minutes until the bottoms are golden brown.
- Pour 1/4 cup of water into the pan and immediately cover with a lid. The steam will cook the wrappers and filling to a perfectly soft texture. Steam for 5-6 minutes until the water has evaporated.
How to use sourdough discard

Why we love this
Sourdough discard crackers are the unsung heroes of the snack board, providing a sharp, tangy crunch that cuts through rich cheeses and dips. They have a rustic, artisanal feel and a toasted grain aroma that makes your kitchen smell like a professional bakery. Using discard is not only sustainable but results in a flaky, layered texture that is far superior to any store-bought cracker.
Ingredients
- 1 cup sourdough discard (unfed)
- 1/4 cup unsalted butter, melted
- 1 cup all-purpose flour
- 1/2 tsp sea salt
- 1 tbsp dried herbs (rosemary or thyme)
- Coarse salt for topping
How to make it
- In a medium bowl, mix the sourdough discard and melted butter until smooth. Stir in the flour, salt, and herbs to form a stiff dough.
- Wrap the dough and let it rest in the fridge for 30 minutes. This relaxes the gluten, making it much easier to roll out thinly.
- Preheat your oven to 350°F (175°C). Place the dough on a large piece of parchment paper and roll it out until it is paper-thin—about 1/16th of an inch. The thinner the dough, the crispier the cracker.
- Brush the top lightly with water and sprinkle with coarse salt. Use a pizza cutter to score the dough into squares or diamonds.
- Slide the parchment onto a baking sheet and bake for 15-20 minutes. Watch closely; they are done when they are golden brown and firm to the touch. Let them cool completely to reach maximum crunch.
Conclusion
Building a viral simple food board is about more than just aesthetics; it’s about bringing people together through a variety of flavors and textures. From the spicy warmth of Rotel dip to the delicate crunch of sourdough crackers, each element adds a new layer to the experience. Don’t be afraid to mix and match these recipes to suit your season or your mood. The best boards are the ones that are eaten with joy and shared with love. Happy snacking!