
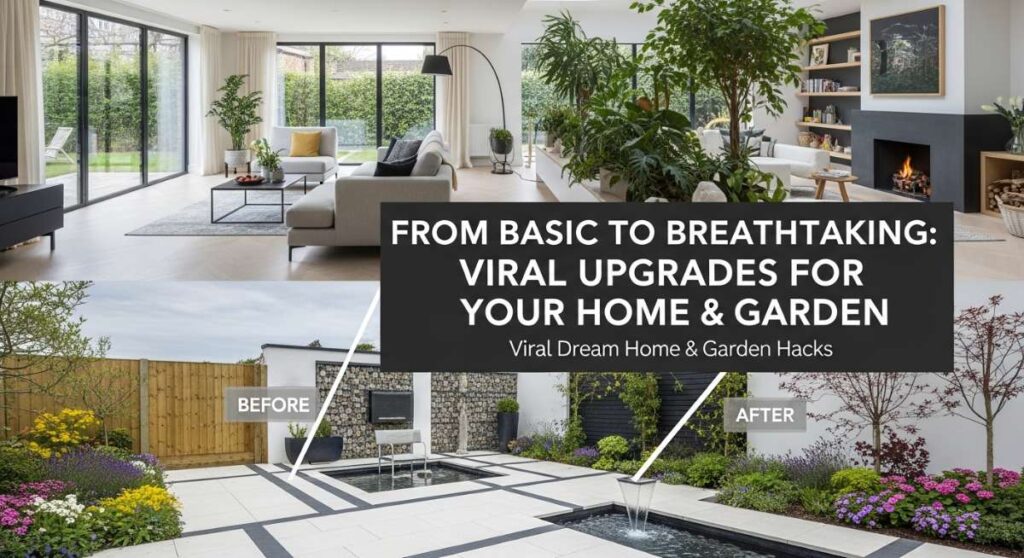
Have you ever pulled into your driveway after a long day and felt just a little bit ‘meh’ about what you saw? We’ve all been there, scrolling through Pinterest or TikTok, staring at those impossibly perfect outdoor oases and organized kitchens, wondering if our homes could ever have that same spark. The good news? You don’t need a reality-TV budget to turn your living space into a breathtaking sanctuary. It’s all about those clever, viral-worthy upgrades that bridge the gap between basic functionality and pure, blissful aesthetic.
In this guide, we are diving deep into the most coveted home and garden hacks that are currently taking the internet by storm. From the soothing steam of a backyard zen retreat to the satisfying ‘click’ of a perfectly organized pantry, these projects are designed to evoke emotion and create a sense of peace. We’re going beyond the surface level to give you the exact techniques needed to execute these transformations with professional-grade results. Let’s roll up our sleeves and start your home’s spectacular glow-up journey together.
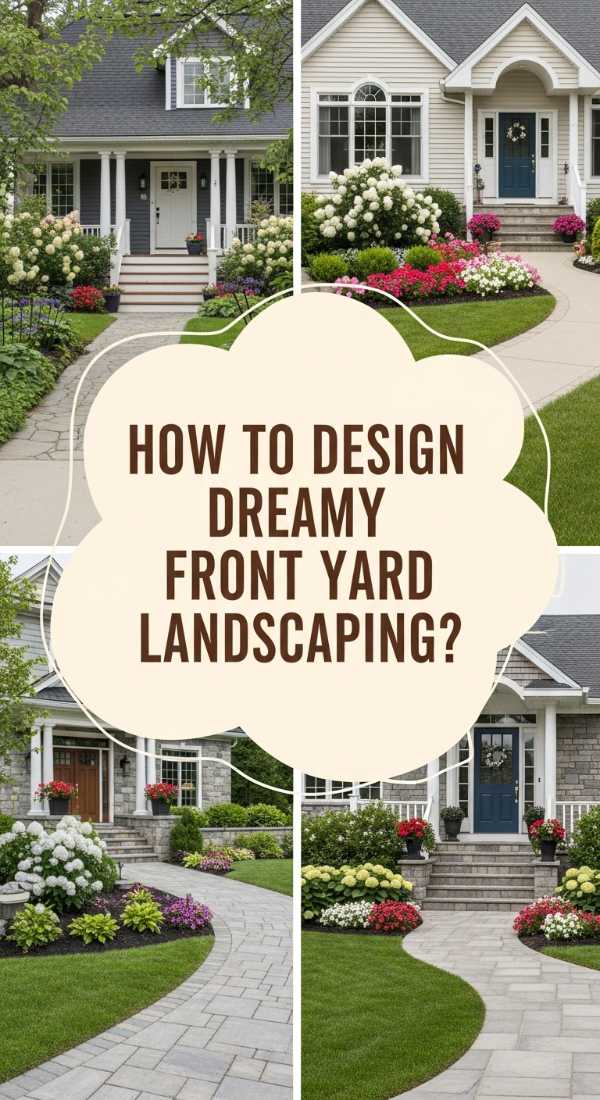
How to Design Dreamy Front Yard Landscaping for Instant Curb Appeal
Why we love this
There is nothing quite like the intoxicating scent of blooming jasmine or the soft, velvety texture of hydrangea petals welcoming you home at sunset. Dreamy landscaping transforms a standard front yard into a romantic narrative, where layers of varying heights and colors create a visual symphony that stops neighbors in their tracks. It’s about the feeling of soft grass underfoot, the gentle rustle of ornamental grasses in the breeze, and that immense sense of pride you feel when your home finally reflects the beauty you’ve always imagined inside.
Essential Elements:
- Layered perennials (Lavender, Hydrangeas, Hostas)
- Defined stone or brick edging
- Premium dark wood mulch
- Solar-powered warm LED path lights
- A focal point tree (like a Japanese Maple or Dogwood)
How to make it
- Start by sketching a bird’s-eye view of your yard to identify ‘anchor points’ near the foundation and the walkway.
- Remove all existing weeds and debris, then use a garden hose to outline curved, organic bed shapes that break up the harsh straight lines of the house.
- Improve your soil quality by tilling in three inches of organic compost to ensure your new plants have the nutrients they need to thrive.
- Place your tallest plants (shrubs or small trees) closest to the house, then layer mid-sized flowering plants in the center, and finish with groundcovers or short flowers at the very front for a tiered look.
- Dig holes twice as wide as the root ball of each plant, gently loosen the roots, and plant them at the same depth they were in their nursery pots.
- Install your edging stones to create a crisp barrier, then apply a 3-inch layer of mulch, being careful not to pile it directly against plant stems.
- Water deeply immediately after planting and install solar lights at 4-foot intervals to illuminate the new textures at night.
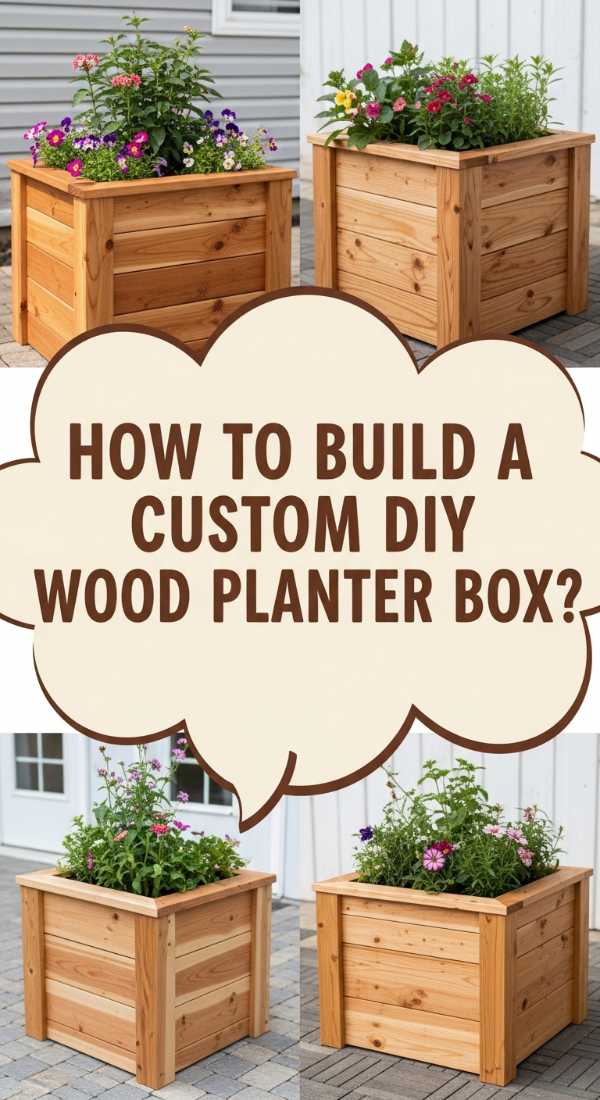
How to Build a Custom DIY Wood Planter Box for a Lush Balcony
Why we love this
Imagine the smell of fresh-cut cedar and the grounding, tactile sensation of smooth wood grain under your fingertips as you create a home for your favorite greenery. These custom planter boxes bring a touch of the forest to even the smallest urban balcony, providing a warm, organic contrast to cold concrete or metal railings. There’s a specific kind of magic in seeing vibrant green herbs or trailing vines spilling over the sides of a box you built with your own two hands, turning a simple balcony into a private, fragrant escape.
Essential Elements:
- Cedar or Redwood 1×6 boards (naturally rot-resistant)
- Exterior-grade wood screws
- Waterproof wood glue
- Landscape fabric liner
- Electric drill and miter saw
How to make it
- Measure your balcony space and cut four side panels from your cedar boards; for a standard box, aim for two 24-inch long pieces and two 10-inch short pieces.
- Cut a bottom panel slightly smaller than the inner dimensions of your assembled box to allow for drainage gaps.
- Apply a thin bead of waterproof wood glue to the ends of the shorter boards, then press them against the longer boards to form a rectangle.
- Pre-drill pilot holes to prevent the wood from splitting, then drive two screws into each corner to secure the frame.
- Insert the bottom panel, leaving 1/8-inch gaps on either side for water to escape, and screw it through the sides of the box.
- Staple landscape fabric to the interior walls to protect the wood from direct soil moisture while still allowing it to breathe.
- Fill with a high-quality potting mix and your favorite trailing plants like Creeping Jenny or Petunias for a lush, overflowing look.
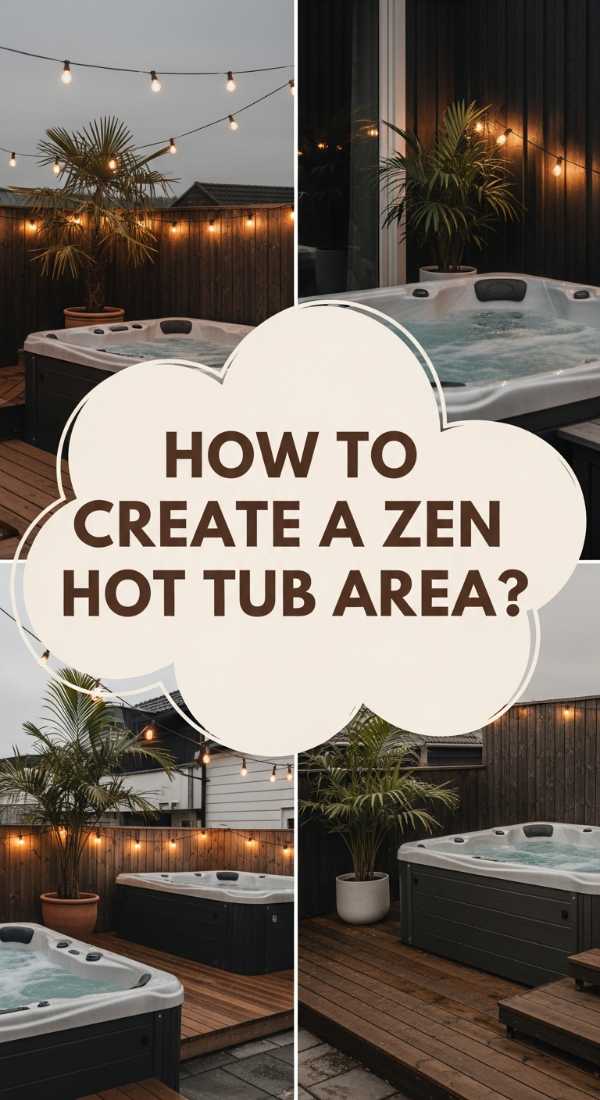
How to Create a Zen Hot Tub Area for the Ultimate Backyard Escape
Why we love this
The gentle hum of bubbling water and the sight of steam rising into the cool night air create an immediate sense of tranquility that melts away the stress of the day. A Zen hot tub area isn’t just about the tub itself; it’s about the surrounding atmosphere—the soft glow of lanterns, the privacy provided by bamboo screens, and the scent of eucalyptus hanging in the air. It’s a sensory retreat that turns your backyard into a five-star spa, offering a tactile experience of warmth and weightlessness that rejuvenates the soul.
Essential Elements:
- Privacy screens (Bamboo or slatted wood)
- Smooth river rock perimeter
- Outdoor rug with a natural fiber texture
- Weatherproof floor cushions and lanterns
- Potted palms or tall grasses for greenery
How to make it
- Select a level spot in your yard that is close to a power source but tucked away from direct view of neighbors.
- Install tall privacy screens or a DIY pergola around the area to create a sense of enclosure and intimacy.
- Lay down a heavy-duty weed barrier and cover the surrounding ground with 2-3 inches of smooth grey river rocks to create a ‘dry garden’ aesthetic.
- Position your hot tub and ensure the ground is perfectly level to prevent structural stress on the unit.
- Hang dimmable string lights overhead, ensuring they are high enough to be safe from water splashes, to create a soft, golden ambiance.
- Arrange large potted plants like Areca Palms around the perimeter to soften the edges of the tub and add a tropical, lush feel.
- Add a small outdoor side table for towels and aromatherapy oils, completing the transition from a simple yard to a luxury sanctuary.
How to Master Realistic Pantry Organization for a Stress-Free Kitchen

Why we love this
There is a profound sense of calm that comes from opening a pantry door to see rows of perfectly aligned glass jars, the colors of grains and pastas creating a beautiful, natural mosaic. This isn’t just about looking good for social media; it’s about the tactile satisfaction of a lid snapping shut and the ease of finding exactly what you need without a frantic search. The visual clarity reduces mental clutter, making the act of cooking feel like a creative joy rather than a chore, all while the faint scent of cinnamon and dried herbs lingers in the air.
Essential Elements:
- Airtight glass or BPA-free plastic canisters
- Uniform minimalist labels
- Woven wicker or wire baskets for bulk items
- Tiered shelves for canned goods
- Lazy Susans for oils and vinegars
How to make it
- Empty your entire pantry and wipe down the shelves with a mild lavender or citrus cleaner to create a fresh, inviting base.
- Categorize all items into groups: baking, snacks, dinner staples, and breakfast, discarding anything that is past its prime.
- Transfer dry goods like flour, sugar, and pasta into uniform airtight containers; this prevents pests and keeps food fresher for much longer.
- Apply labels at the same height on every jar to create a professional, streamlined look that is pleasing to the eye.
- Place heavy or bulk items in large woven baskets on the floor or bottom shelf to hide messy packaging and add organic texture.
- Use tiered risers for cans so you can see every label at a glance, and place a Lazy Susan in the corner to make reaching back-row bottles effortless.
- Maintain the system by ‘facing’ your items (turning labels forward) every time you come home from the grocery store.
How to Layer Rock Flower Beds in Front of House for Modern Texture
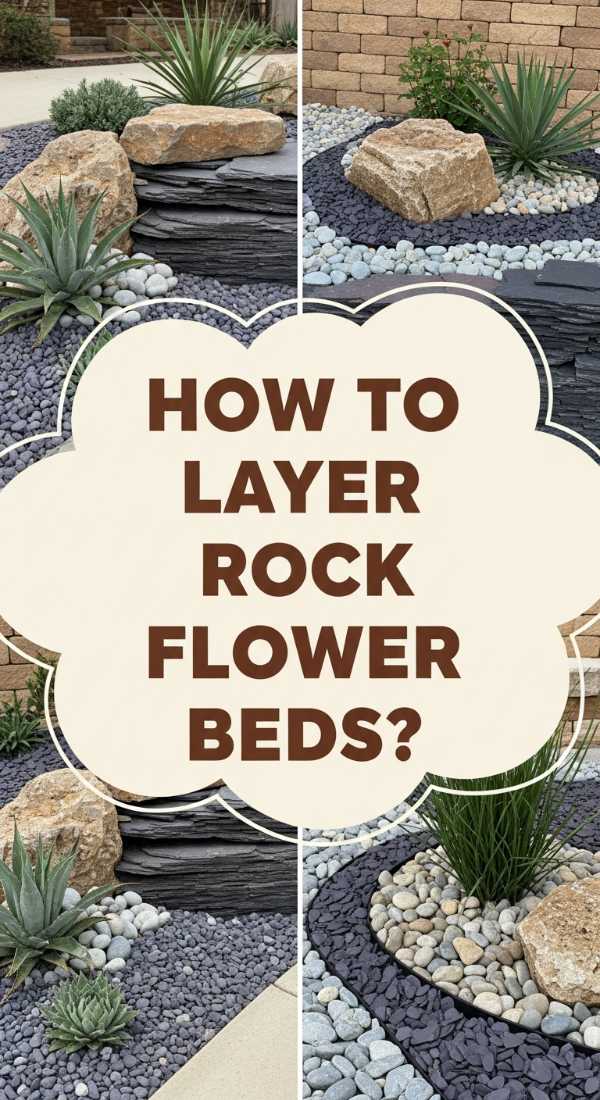
Why we love this
Modern landscaping is all about the contrast between the rugged, cold texture of stone and the soft, vibrant life of ornamental plants. Layering rock flower beds provides a clean, architectural look that feels both grounded and sophisticated, with different sizes and shades of gravel catching the light in unique ways throughout the day. It’s a low-maintenance solution that offers a satisfying crunch underfoot and a visual ‘pop’ that makes the colors of your succulents or grasses look more intense against the neutral grey or white stones.
Essential Elements:
- Large accent boulders
- Medium-sized river rocks
- Fine pea gravel or crushed granite
- Heavy-duty commercial grade weed fabric
- Steel or aluminum landscape edging
How to make it
- Excavate the area to a depth of 4 inches, ensuring the soil slopes slightly away from your home’s foundation for proper drainage.
- Install professional-grade steel edging to keep the different rock sizes from mixing over time; use a mallet to secure it firmly into the ground.
- Lay down a double layer of weed fabric, overlapping the seams by 6 inches and securing it with landscape staples every 12 inches.
- Place your ‘anchor’ plants—like Blue Fescue or Agave—by cutting ‘X’ shapes in the fabric and digging small holes directly into the soil.
- Position 2-3 large accent boulders first to create a natural, asymmetrical focal point within the bed.
- Spread a 2-inch base layer of medium river rocks around the plants and boulders to provide structure and depth.
- Top the remaining areas with fine pea gravel or crushed granite, using a rake to smooth the surface into a perfectly level, modern finish.
How to Assemble a Stylish DIY Grill Station for Epic Summer Cookouts
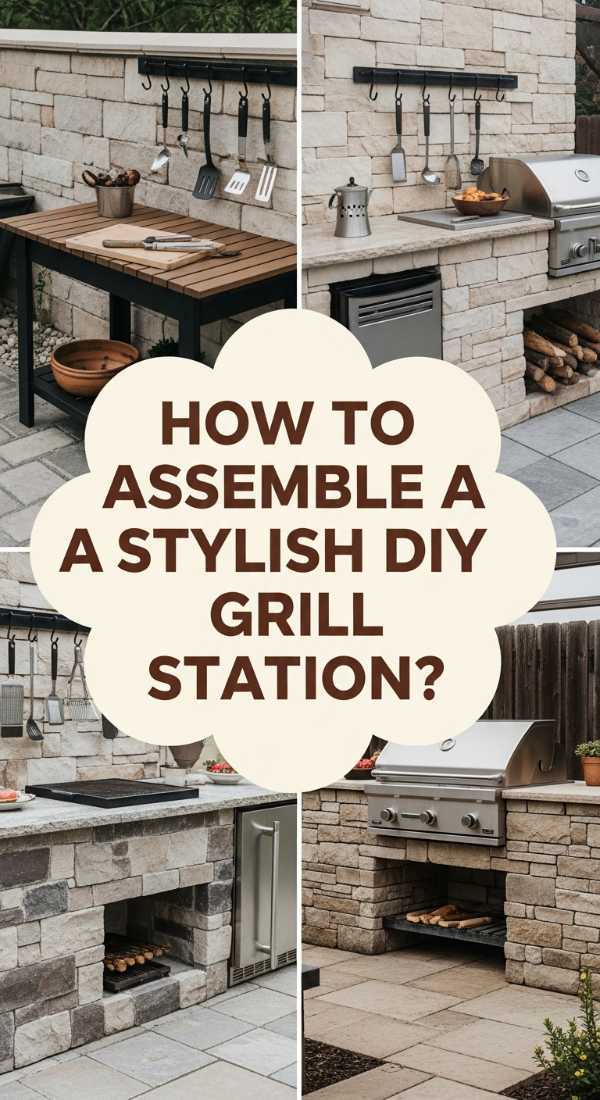
Why we love this
The smell of charcoal smoke mingling with grilled rosemary and the sound of a cold drink being cracked open define the perfect summer evening. A DIY grill station takes the ‘chef’ out of the corner and puts them at the center of the action, providing a warm, wooden workspace that feels like a professional outdoor kitchen. It’s about the tactile joy of prep work on a smooth cedar countertop and the convenience of having every tool within arm’s reach, turning a simple barbecue into a curated culinary event for friends and family.
Essential Elements:
- Pressure-treated 4×4 posts for the frame
- Cedar planks for the countertop
- Stainless steel hooks for utensils
- A built-in bottle opener
- Outdoor-rated wood stain or sealant
How to make it
- Build a sturdy rectangular frame using 4×4 posts and 2×4 cross-beams, ensuring the height is a comfortable 36 inches for food prep.
- Install a lower shelf using 1×4 slats, leaving small gaps between them to allow rain and debris to fall through.
- Measure the dimensions of your grill and leave an appropriately sized opening in the frame, or build the station as a standalone ‘sidecar’ island.
- Secure the cedar countertop planks from underneath using pocket holes to ensure no screws are visible on the beautiful top surface.
- Sanding is crucial; use progressively finer grits (80 to 220) until the wood feels like silk to the touch, preventing splinters during cooking.
- Apply two coats of a high-quality, food-safe outdoor sealant to protect the wood from grease stains and UV damage.
- Screw in heavy-duty magnetic strips or hooks on the sides for your tongs and spatulas, and add a bottle opener for the ultimate hosting convenience.
How to Cultivate Low Maintenance Flower Beds for a Year-Round Glow

Why we love this
The dream of a garden that looks stunning without requiring hours of back-breaking labor every weekend is finally within reach. We love low-maintenance flower beds because they rely on the natural resilience of perennials that return year after year, offering a shifting palette of colors and textures from the first spring bud to the last autumn leaf. There’s a deep sense of peace in watching your garden thrive on its own, with the earthy scent of healthy soil and the buzz of pollinators creating a living, breathing ecosystem that asks for very little but gives so much in return.
Essential Elements:
- Native perennial plants (Coneflowers, Black-eyed Susans)
- Slow-release organic fertilizer
- Soaker hoses for efficient watering
- Pre-emergent weed preventer
- High-quality shredded bark mulch
How to make it
- Research and select plants that are native to your specific hardiness zone; these are naturally adapted to your climate and require less water and fuss.
- Group plants with similar water needs together (hydro-zoning) to ensure no one is over-watered or left thirsty.
- Install a simple soaker hose system hidden beneath the mulch; this delivers water directly to the roots, reducing evaporation and fungal diseases.
- Apply a slow-release fertilizer in early spring to provide a steady ‘diet’ of nutrients throughout the growing season without the need for constant feeding.
- Mulch heavily—3 to 4 inches—to suppress 90% of weed growth and retain the moisture that your plants crave.
- In the fall, instead of cutting everything back, leave seed heads for birds and winter interest; this also protects the plant’s crown from frost.
- In early spring, simply clear away the dead stems to make way for the vibrant new growth already pushing through the soil.
How to Style a Nostalgic Teen Room for a Y2K Aesthetic Vibe

Why we love this
Stepping into a Y2K-inspired room is like a joyful time-travel experience, filled with the glow of neon lights, the playful texture of faux fur, and a palette of candy-bright colors. This aesthetic is all about self-expression and ‘more-is-more’ energy, blending futuristic metallic accents with cozy, nostalgic elements like butterfly clips and inflatable furniture. It’s a space that feels electric and alive, providing a tactile sanctuary of plush pillows and holographic surfaces that celebrate the quirky, optimistic spirit of the turn of the millennium.
Essential Elements:
- LED neon signs and ‘galaxy’ projectors
- Sheer beaded curtains
- Faux fur rugs and heart-shaped pillows
- Inflatable chairs or bean bags
- Wall collage kit with a mix of gloss and matte prints
How to make it
- Start with a neutral wall color like soft lilac or crisp white to let the colorful decor and lights truly stand out.
- Layer your lighting: place a galaxy projector on the nightstand and string ‘curtain’ fairy lights behind a sheer bed canopy for a dreamy glow.
- Create a floor-to-ceiling wall collage using a mix of magazine clippings, 90s-style posters, and personal photos for a textured, lived-in feel.
- Introduce varied textures like a shaggy pink rug, velvet bedding, and a clear acrylic side table to capture that futuristic-meets-cozy vibe.
- Incorporate ‘tech’ as decor by displaying an old transparent phone or using a retro-style Bluetooth speaker that looks like a vintage radio.
- Use beaded curtains in the doorway to create a rhythmic, tactile sound every time someone enters the room.
- Finalize the look with a signature neon sign—like a lightning bolt or a cloud—to act as the room’s glowing heartbeat.
How to Hack Dollar Tree Solar Lights for an Enchanted Garden Pathway

Why we love this
There is something incredibly satisfying about taking an affordable, basic item and transforming it into something that looks like it belongs in a high-end boutique catalog. These enchanted solar light hacks turn a dark garden path into a shimmering, magical trail that glows with a soft, warm amber light. It’s the thrill of the DIY ‘win’—the smell of spray paint, the click of a glass jar being tightened, and the eventual evening reward when the sun goes down and your garden transforms into a fairy-tale landscape on a shoestring budget.
Essential Elements:
- Standard plastic solar stake lights
- Glass mason jars or decorative lanterns
- Metallic gold or matte black spray paint
- Frosted glass spray or Epsom salts (for a ‘glow’ effect)
- Industrial strength adhesive (E6000)
How to make it
- Disassemble the solar light by removing the top solar puck from the plastic stake and lens.
- Spray paint the plastic housing and the stakes in a high-end metallic or matte finish to instantly hide the ‘cheap’ plastic look.
- Spray the inside of a glass mason jar with ‘frosted glass’ paint; this diffuses the light, hiding the harsh LED bulb and creating a soft, romantic glow.
- Apply a bead of E6000 adhesive to the underside of the solar puck and press it firmly onto the lid of the jar (or inside the rim, depending on the jar size).
- For an extra ‘enchanted’ look, add a handful of clear glass gems to the bottom of the jar to reflect the light upwards.
- Reattach the stakes to the ground along your walkway, then screw the jars onto the pucks once the adhesive has fully cured.
- Allow them to charge in direct sunlight for 8 hours, then enjoy the high-end, custom look as they automatically flicker to life at dusk.
How to Plan a Rectangular Backyard Layout for Perfect Flow and Function
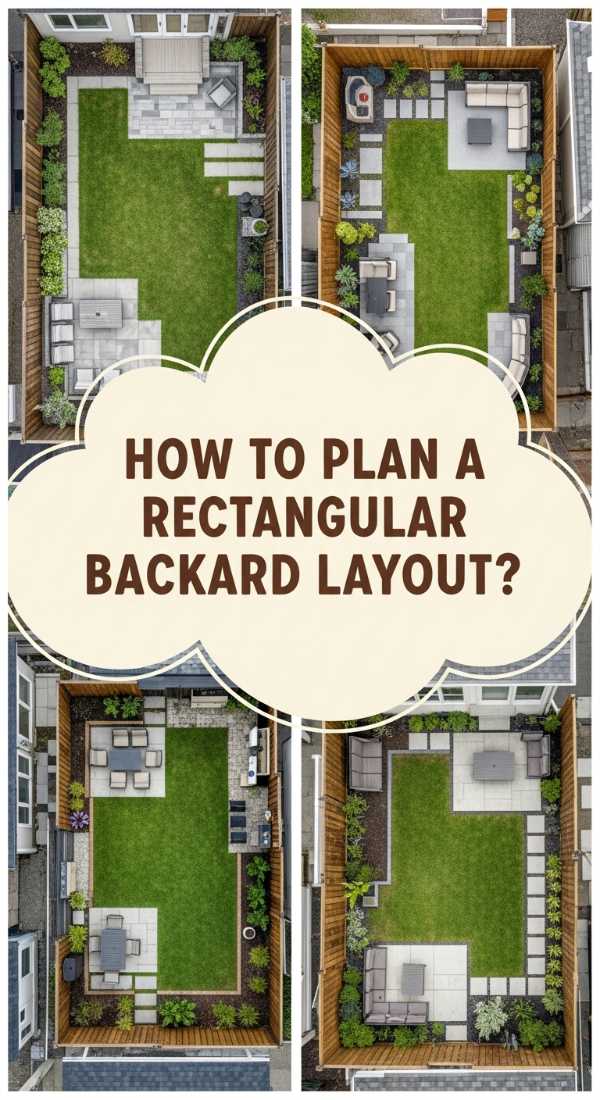
Why we love this
A well-planned rectangular backyard is a masterpiece of balance and geometry, where every square inch serves a purpose without feeling crowded. We love the feeling of walking from a crisp, stone dining patio into a soft, lush lawn ‘room,’ with the clean lines providing a sense of order and serenity. It’s about creating a flow that feels natural—where the scent of the grill leads seamlessly to the dining area, and the visual lines of the flower beds pull your gaze toward a cozy fire pit at the far end, making a simple yard feel like a series of luxury outdoor suites.
Essential Elements:
- Graph paper or digital design software
- Defined ‘zones’ (Dining, Lounging, Play)
- Geometric pavers or decking material
- Vertical elements like pergolas or tall hedges
- Consistent color palette for all outdoor furniture
- Strategic lighting for each zone
How to make it
- Measure the exact dimensions of your yard and plot them on graph paper, noting the location of windows, doors, and the sun’s path.
- Divide the rectangle into thirds: use one third for a hardscaped dining area, the middle third for a lush lawn or garden, and the final third for a focal point like a fire pit or shed.
- Create ‘hallways’ by using different ground materials—like a gravel path connecting a wood deck to a stone patio—to guide movement through the space.
- Use vertical structures like a pergola over the dining area to create a sense of ‘ceiling,’ making the outdoor space feel like a true extension of the home.
- Install long, linear flower beds along the side fences to draw the eye toward the back of the property, making the yard feel deeper and more spacious.
- Ensure each ‘room’ has its own light source, such as a pendant light over the table and low-voltage well-lights beneath the trees in the garden zone.
- Incorporate a consistent trim color or material across all zones (like black metal or natural cedar) to tie the entire rectangular layout together into a cohesive whole.
Conclusion: Your Home, Only Better
Transforming your home from ‘basic’ to ‘breathtaking’ isn’t about how much money you spend, but the intention and creativity you pour into every corner. Whether you’re layering textures in your front yard or organizing your pantry for ultimate peace of mind, these viral-inspired upgrades are designed to make your everyday life feel more special. Remember that the best homes are never truly ‘finished’—they are living, breathing spaces that evolve with you. So pick one project, grab your tools, and start creating the sanctuary you deserve. Your future, more relaxed self will thank you.