

From Patio to Paradise: Viral DIYs for the Perfect Outdoor Living Space
We’ve all been there—staring out the window at a patch of brown grass or a tired, cracked concrete slab, dreaming of that Pinterest-perfect oasis where the golden hour feels like a warm hug. There’s something deeply soul-soothing about turning a ‘house’ into a ‘home’ through the labor of your own hands. It’s not just about the aesthetic; it’s about the memories created in the spaces we curate, from the laughter of children playing in the dirt to the quiet hum of a Friday evening spent under flickering string lights with a cold drink in hand.
The magic of a DIY project isn’t just in the final reveal; it’s in the transformation of the mundane into the extraordinary. Whether you’re working with a sprawling backyard or a tiny urban balcony, the potential for paradise is already there, hidden under a bit of dust and a lot of ‘someday’ plans. This guide is your invitation to stop waiting for the perfect moment and start building it. Let’s dive into the viral projects that are turning ordinary yards into the ultimate lifestyle escapes.
How to Build a Creative Pallet Mud Kitchen for Endless Outdoor Play
Why we love this
There is nothing quite like the earthy, grounding scent of damp garden soil mixed with the sweet fragrance of crushed mint and marigolds. A mud kitchen is a tactile wonderland where the grainy texture of sand and the cool, slick sensation of mud allow a child’s imagination to run wild. We love this project because it transforms reclaimed wood into a hub of sensory exploration, where every ‘mud pie’ served feels like a Michelin-starred creation. It encourages messy, screen-free play that connects our little ones back to the rhythm of nature, all while looking absolutely charming tucked into a garden corner.
Essential Elements:
- Two heat-treated (HT) wooden pallets
- Stainless steel mixing bowl (for the sink)
- Outdoor-rated wood screws
- Battery-operated water pump or a simple garden hose attachment
- Assorted hooks for hanging utensils
- Exterior wood stain or sealant
- Old pots, pans, and wooden spoons
How to make it
- Begin by sourcing two heat-treated pallets; ensure they are marked with ‘HT’ so they are safe for children. Sand them thoroughly with 80-grit sandpaper followed by 120-grit to remove all splinters and rough edges, focusing especially on the corners.
- Set one pallet vertically to act as the backsplash. Position the second pallet horizontally in front of it to serve as the countertop. You may need to cut the second pallet to your desired height—typically 20 to 24 inches for toddlers—using a circular saw.
- Using a jigsaw, cut a circular hole in the top pallet that is slightly smaller than the lip of your stainless steel bowl. Drop the bowl in to ensure a snug, flush fit.
- Secure the two pallets together using heavy-duty outdoor wood screws, reinforcing the joints with scrap wood blocks for stability. Ensure the structure is level and doesn’t wobble on the ground.
- Apply two coats of an exterior-grade wood stain or a clear waterproof sealant. This is crucial for protecting the wood from the inevitable water splashes and mud splatters that come with play.
- Install your hardware: screw in hooks for whisks and spoons, and mount a small shelf for ‘spices’ (jars of pebbles and petals). If you want a functional tap, mount a simple hand-pump or secure a garden hose to a vintage-style faucet handle for that extra touch of magic.
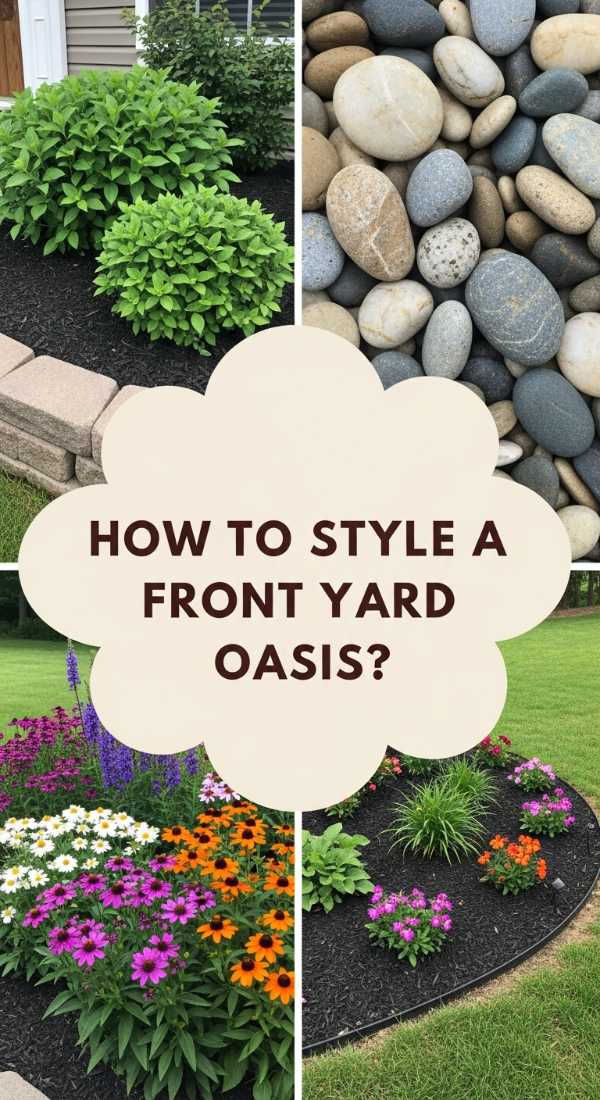
How to Design Front Yard Landscaping for Instant Curb Appeal
Why we love this
The first impression of a home is like the cover of a cherished book; it sets the tone for everything inside. We love front yard landscaping because it is an evolving art piece that breathes life into architecture. Imagine walking up a path lined with the velvety texture of silver carpet lamb’s ear, the vibrant pop of purple salvia, and the delicate, honeyed aroma of sweet alyssum floating on the breeze. It creates a sense of pride every time you pull into the driveway, turning a transition space into a welcoming sanctuary that greets you before you even reach the front door.
Essential Elements:
- A mix of perennial flowers and evergreen shrubs
- Hardwood mulch or decorative river stones
- Solar-powered pathway lights
- Steel or plastic landscape edging
- Garden soil and slow-release fertilizer
- Decorative focal point (like a large planter or birdbath)
How to make it
- Start by sketching a ‘bird’s eye view’ of your yard. Define your planting beds with soft, organic curves rather than rigid straight lines to create a more natural, inviting flow. Use a garden hose to lay out these curves on the grass before you start digging.
- Remove the existing sod within your designated areas using a flat-edged spade. Dig down at least 4 inches to ensure you have removed the roots of the grass and any stubborn weeds.
- Amend the soil by mixing in high-quality garden soil and compost. This provides a nutrient-dense foundation for your new plants. Use a garden rake to level the surface and break up any large clumps of earth.
- Place your plants while they are still in their nursery pots. Follow the ‘thriller, filler, spiller’ rule: place tall, dramatic plants in the back or center, mid-sized flowering plants around them, and low-growing groundcover near the edges. Space them according to their mature size to avoid overcrowding in two years.
- Once satisfied with the layout, dig holes twice as wide as the root balls. Gently tease the roots, place the plant, and backfill with soil, pressing down firmly to eliminate air pockets. Water each plant deeply immediately after planting.
- Install landscape edging to keep the beds looking crisp. Finish by spreading a 3-inch layer of mulch or stone over the soil to retain moisture and suppress weeds. Finally, tuck solar lights along the path to highlight your work at night.
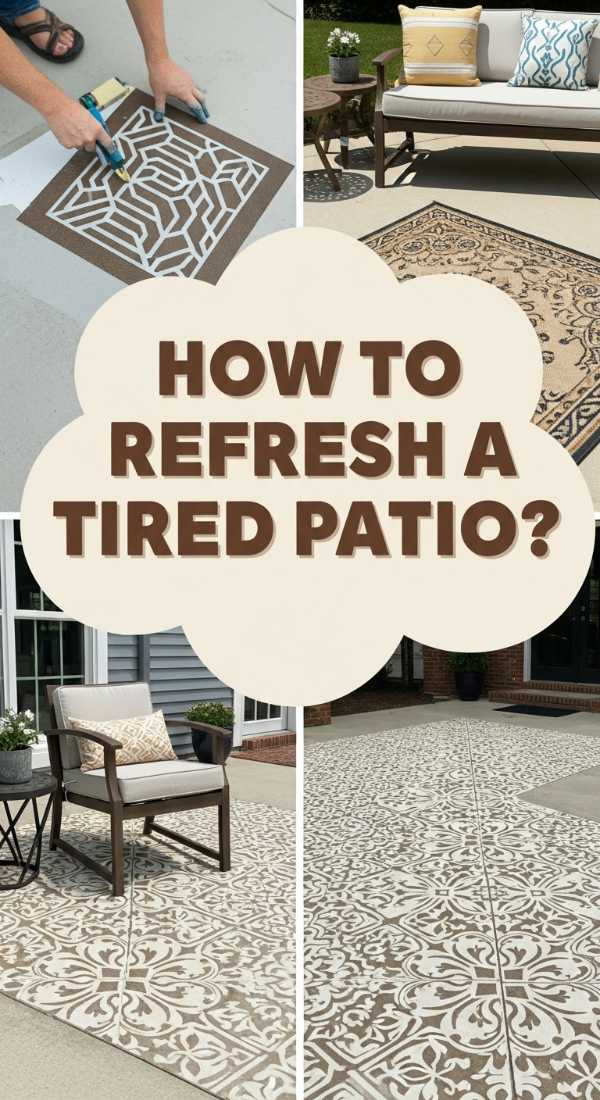
How to Finish a Concrete Slab Patio Makeover for Cheap Outdoor Luxury

Why we love this
There’s a specific kind of frustration that comes with a gray, stained concrete patio—it’s functional but lacks any soul. We love this makeover because it feels like a high-end interior renovation brought outdoors. By using stencils or specialized stains, you can mimic the sophisticated look of Moroccan tile or expensive slate for a fraction of the cost. The feeling of stepping out onto a clean, patterned floor that stays cool underfoot, surrounded by plush outdoor rugs and flickering candles, transforms a utilitarian slab into a luxurious lounge that rivals any boutique hotel terrace.
Essential Elements:
- Heavy-duty concrete cleaner and a stiff scrub brush
- Concrete primer and specialized porch & floor paint
- Large-scale floor stencil (if doing a pattern)
- High-density foam rollers and painter’s tape
- Concrete sealer (UV-resistant)
- Pressure washer
How to make it
- Thoroughly clear the patio and use a pressure washer to blast away years of dirt, moss, and loose debris. Scrub stubborn oil stains with a degreaser. This step is non-negotiable; paint will not stick to a dirty surface.
- Check for cracks. If you find any, fill them with a concrete patch compound and allow it to cure completely according to the package directions. Sand the patched areas smooth so they don’t ghost through the paint.
- Apply a high-quality concrete primer using a long-handle roller. This creates a ‘bridge’ between the porous concrete and your paint. Let it dry for at least 24 hours.
- Roll on two thin, even coats of your base color. Avoid thick layers, which are prone to peeling. Use a 3/8-inch nap roller for a smooth finish and let the base coat dry for 48 hours before the next step.
- If stenciling, secure your stencil with painter’s tape. Use a ‘dry brush’ technique with a high-density foam roller; load the roller with paint and then roll most of it off onto a paper towel. This prevents the paint from bleeding under the stencil edges. Work in small sections and lift the stencil carefully.
- Once the entire design is dry, apply two coats of clear, slip-resistant outdoor concrete sealer. This protects your hard work from hot tires, rain, and UV fading. Allow 72 hours of ‘cure time’ before moving heavy furniture back.
How to Create a Relaxing Hot Tub Area for the Ultimate Backyard Escape

Why we love this
The quiet hum of bubbling water, the rising steam catching the moonlight, and the absolute weightlessness of a warm soak—creating a dedicated hot tub area is the pinnacle of backyard luxury. It’s more than just a place to sit; it’s a nightly ritual that melts away the stress of the day. We love how a well-designed hot tub nook feels like a private grotto, especially when surrounded by the soft glow of Edison bulbs and the privacy of lush greenery or cedar slats. It’s an investment in your own well-being that makes every Tuesday feel like a spa retreat.
Essential Elements:
- Inflatable or hard-shell hot tub
- Level foundation (concrete pad or reinforced deck)
- Privacy screens (cedar lattices or outdoor curtains)
- Weatherproof outdoor rug
- Submersible LED lights
- Side table for drinks and towels
How to make it
- Choose a location that is close enough to the house for easy access but far enough away to feel like a getaway. Ensure the ground is perfectly level; even a slight slope can cause uneven water pressure and damage the tub over time.
- Prepare the base. If using an inflatable tub, a level patch of ground with a heavy-duty ground cloth and foam tiles is sufficient. For hard-shell tubs, you must have a 4-inch reinforced concrete slab or a deck rated for the ‘wet weight’ (which can be over 3,000 lbs).
- Set up the tub and begin the filling process. While it fills (which can take several hours), focus on privacy. Install tall wooden lattice panels or plant a row of ‘Green Giant’ arborvitae to create a living wall.
- Manage your power. Ensure you have a dedicated GFCI outlet nearby. For inflatable tubs, these are often ‘plug-and-play,’ but hard-shell tubs usually require a licensed electrician to run a 240V line.
- Focus on the ambiance. String heavy-duty outdoor café lights from the house to a nearby tree or post. Add a weatherproof storage bench nearby to keep chemicals hidden but accessible, and to provide a place to store dry towels.
- Balance the water chemistry. Once the water is heated (usually 12-24 hours), use test strips to check the pH and alkalinity. Add chlorine or bromine as needed to ensure the water stays crystal clear and safe for soaking.
How to Master Realistic Pantry Organization for a Stress Free Kitchen
Why we love this
While often hidden behind closed doors, a perfectly organized pantry is the heartbeat of a calm home. We love the visual rhythm of uniform glass jars filled with the textures of pearled couscous, colorful lentils, and golden pastas. There is a profound sense of peace that comes from knowing exactly what you have at a glance, eliminating the ‘clutter-blindness’ that leads to double-buying. The soft ‘clink’ of a glass lid and the smell of organized spices make meal prep feel less like a chore and more like a creative ritual in a high-end gourmet kitchen.
Essential Elements:
- Airtight clear glass or BPA-free plastic bins
- Uniform labels (vinyl or chalk-style)
- Tiered shelf risers for canned goods
- Lazy Susans for oils and vinegars
- Woven baskets for bulky items (chips, potatoes)
- Over-the-door rack for extra storage
How to make it
- Empty the entire pantry. Every. Single. Thing. Use this opportunity to check expiration dates and wipe down the shelves with a warm microfiber cloth and all-purpose cleaner. A fresh start is essential for a lasting system.
- Categorize your items on your countertop. Group things by ‘Breakfast,’ ‘Baking,’ ‘Dinner Grains,’ ‘Snacks,’ and ‘Backstock.’ This allows you to see the volume of each category so you can choose the right size containers.
- Decant your dry goods. Remove pasta, flour, sugar, and cereals from their messy cardboard boxes and move them into airtight clear containers. This keeps food fresher for longer and creates that iconic ‘viral’ look. Clip the ‘use-by’ date and cooking instructions from the box and tape them to the back of the jar.
- Utilize vertical space and corners. Place tiered risers on shelves so you can see the labels of the back row of cans. Use a Lazy Susan (turntable) in the corners or for tall bottles of oils and sauces to ensure nothing gets lost in the ‘dark zone.’
- Label everything. Even if you think you’ll remember which white powder is bread flour and which is all-purpose, you won’t. Use a consistent font or handwriting style for a cohesive, professional appearance.
- Establish a ‘Zone System.’ Keep kid-friendly snacks on lower shelves where they can reach them, and put baking supplies or holiday platters on the highest shelves since they are used less frequently.
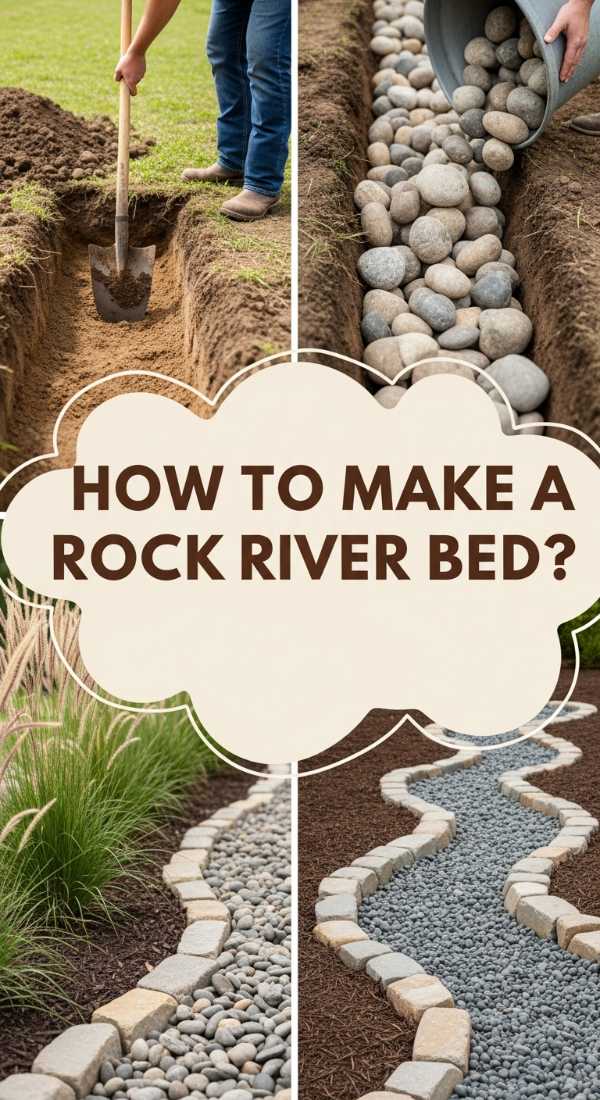
How to Install a Rock River Bed Landscape Design for Better Drainage

Why we love this
A rock river bed is the perfect marriage of form and function. We love how it mimics the rugged beauty of a natural mountain stream, with varying sizes of smooth river stones and jagged boulders creating a visual ‘anchor’ in the garden. Beyond the aesthetics, there is a deep satisfaction in watching a heavy rainstorm be gracefully channeled away from your foundation through a beautiful, dry creek bed rather than creating a muddy swamp. The sound of rain hitting the stones is therapeutic, and the lack of maintenance makes it a win for any busy homeowner.
Essential Elements:
- Heavy-duty landscape fabric (non-woven)
- Landscape staples
- River rock (various sizes: 1″ to 5″)
- Large ‘anchor’ boulders
- Small pea gravel or crushed stone for filling gaps
- Spade and wheelbarrow
How to make it
- Identify the natural path water takes through your yard during a storm. Mark a wide, meandering path with spray paint. Avoid straight lines; a natural river bed should have gentle ‘S’ curves.
- Dig a trench along your marked path. It should be deepest in the middle (about 8-12 inches) and shallow at the edges, creating a shallow ‘U’ shape. Slope the trench slightly downward (at least 1 inch for every 10 feet) away from your home.
- Lay down heavy-duty non-woven landscape fabric to prevent weeds and keep the rocks from sinking into the mud over time. Secure the fabric with landscape staples every 12 inches, overlapping any seams by at least 6 inches.
- Place your largest ‘anchor’ boulders first. Position them at the ‘bends’ of your river or in small clusters. Bury the bottom third of the boulders to make them look like they’ve been there for centuries.
- Fill in the rest of the trench with your medium-sized river rocks. Mix the colors and shapes to avoid a look that is too uniform. Use smaller pea gravel to fill in the gaps between the larger stones and the edges of the fabric.
- Add ‘accent’ plants along the edges, such as ornamental grasses or ferns, which thrive in moist areas and help soften the transition between the rock and the rest of your garden.
How to Style a Nostalgic Teen Room for an Iconic Retro Aesthetic

Why we love this
There is a powerful, comforting magic in the ‘retro-revival’ aesthetic. We love this look because it blends the vibrant, saturated colors of the 70s with the playful, tech-free vibes of the 90s. Think velvet textures, the warm glow of a lava lamp, and the crackle of a vinyl record playing in the corner. It creates a cocoon-like environment that feels deeply personal and expressive. It’s a space that celebrates personality over perfection, where mismatched patterns and nostalgic posters make the room feel like a curated time capsule of cool.
Essential Elements:
- Warm-toned LED strip lights or sunset lamps
- Record player and vinyl display
- Checkerboard or shag area rug
- Gallery wall of vintage-style posters
- Macramé or beaded curtains
- Inflatable furniture or floor pillows
How to make it
- Choose a color palette that feels ‘muted-bright.’ Think mustard yellow, sage green, burnt orange, and cream. Use these colors for the bedding and curtains to set the foundation for the room.
- Create a focal point with a gallery wall. Instead of expensive frames, use colorful washi tape to hang a mix of vintage magazine clippings, vinyl record sleeves, and botanical prints in a purposeful, slightly chaotic grid.
- Incorporate varied lighting layers. Avoid the ‘big light’ at all costs. Instead, use a sunset lamp to cast a warm glow across the walls, a lava lamp for motion, and string lights to highlight the ceiling perimeter.
- Add texture through textiles. Layer a small checkerboard rug over a neutral carpet. Toss a few oversized corduroy or velvet floor pillows into a corner to create a ‘low-profile’ lounge area for reading or gaming.
- Integrate ‘analog’ technology. Set up a dedicated station for a record player or a film camera collection. Displaying physical media adds a tactile, nostalgic element that digital devices simply can’t replicate.
- Add greenery in ‘retro’ vessels. Place a spider plant or a pothos in a macramé hanger or a bright orange ceramic pot to bring a bit of life into the space while staying true to the 70s vibe.
How to Construct a Floating Deck for a Professional Garden Foundation
Why we love this
A floating deck is the ultimate ‘level-up’ for a DIYer. We love the way it sits just slightly above the ground, creating a defined ‘island’ in the sea of your lawn. The smell of freshly cut cedar or pressure-treated pine, the smooth feel of sanded wood under bare feet, and the rhythmic sound of a drill all lead to a structure that feels incredibly professional. It’s the perfect foundation for a dining set or a lounge area, providing a flat, stable surface that instantly makes your backyard look more structured and intentional.
Essential Elements:
- Pressure-treated 2×6 lumber for the frame
- Decking boards (wood or composite)
- Concrete deck blocks (Tuf-Tred or similar)
- Joist hangers and deck screws
- Level and speed square
- Gravel or weed barrier
How to make it
- Clear the area and lay down a weed barrier covered with a thin layer of gravel. This prevents plants from growing up through your deck and helps with drainage.
- Place your concrete deck blocks in a grid pattern. For a standard 10×10 deck, you’ll want a block at each corner and every 4-5 feet in between. Use a long straight board and a level to ensure all blocks are perfectly even with one another.
- Build the outer ‘rim’ frame first using 2×6 pressure-treated boards. Use a speed square to ensure every corner is a perfect 90-degree angle. Secure the corners with heavy-duty lag screws.
- Install the interior joists every 12 or 16 inches ‘on center.’ This provides the structural integrity needed to prevent the deck boards from sagging. Use joist hangers for a secure, professional connection.
- Lay your decking boards across the joists. Use a spacer (like a 1/4-inch drill bit) between boards to allow for wood expansion and water drainage. Screw the boards into every joist they cross, ensuring the screw heads are slightly countersunk.
- Trim the edges of the decking boards with a circular saw for a perfectly flush finish. Sand the entire surface to prevent splinters and apply an exterior deck stain or oil to protect it from the elements.
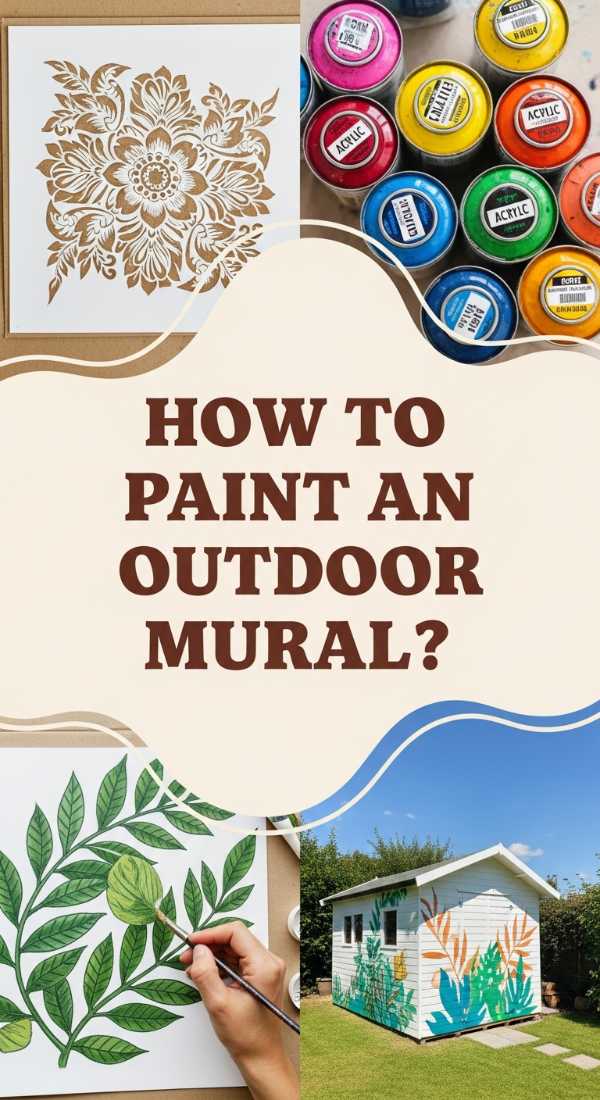
How to Paint a Vibrant Shed Mural for a Whimsical Garden Vibe
Why we love this
Garden sheds are often the forgotten ‘eye-sores’ of the backyard, but a mural turns them into a canvas for pure joy. We love this project because it allows for total creative freedom—from bold, oversized botanical illustrations to abstract splashes of color. The sight of a hand-painted floral mural peeking through the rose bushes adds a whimsical, storybook quality to the yard. It’s a way to inject personality and a ‘human touch’ into the landscape, turning a storage box into a piece of fine art that makes you smile every time you look out the window.
Essential Elements:
- Exterior primer (stain-blocking)
- Assorted exterior latex paints (sample pots work well!)
- Chalk for sketching
- Quality synthetic brushes and small rollers
- UV-resistant clear topcoat
- Step ladder
How to make it
- Prep the shed surface by cleaning it with soapy water and a scrub brush. If the wood is old, sand down any peeling paint. Apply a high-quality exterior primer; this is especially important if you are painting over dark or treated wood.
- Use a piece of sidewalk chalk to sketch your design onto the shed. Chalk is much better than pencil because it wipes away easily with a damp cloth if you make a mistake. Go big—large shapes and bold lines look best from across the yard.
- Start with your ‘background’ colors or largest shapes. Use a small roller to fill in large areas quickly. Don’t worry about perfect edges yet; you will clean those up in the next step.
- Once the base layer is dry, use smaller brushes to add details and outlines. If you’re doing flowers, add highlights to the petals and dark centers to create depth. Layers are what make a mural look professional.
- Don’t forget the trim and the door. Painting the shed door a contrasting bright color can make the mural pop even more.
- After the paint has cured for at least 48 hours, apply a clear, UV-resistant exterior topcoat. This prevents your vibrant colors from fading in the sun and protects the mural from rain and humidity.
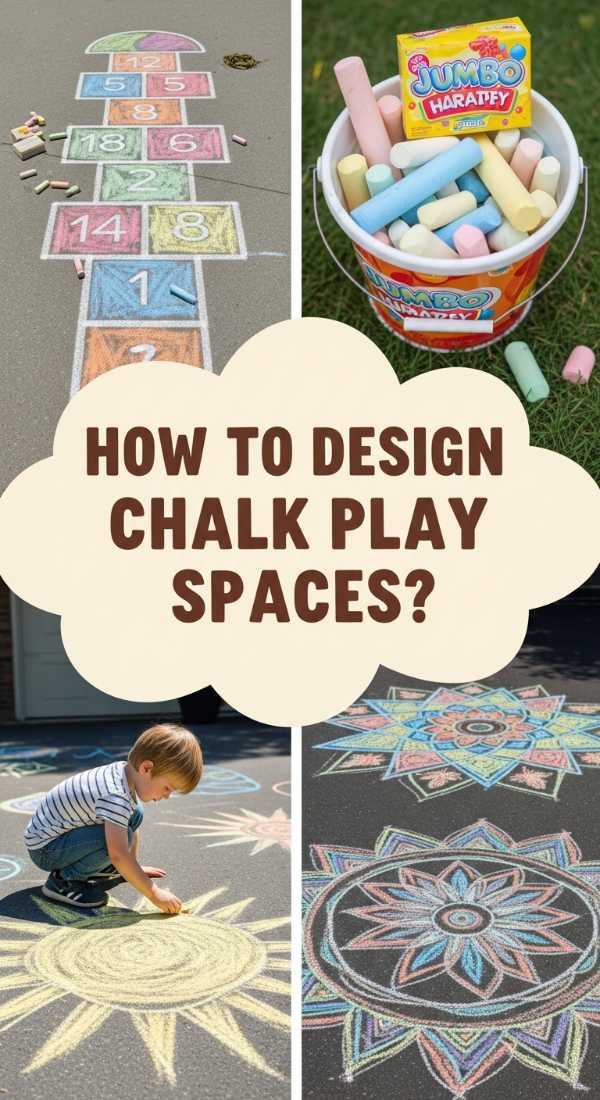
How to Create a Fun Sidewalk Chalk Playground for Active Kids
[IMAGE_10]
Why we love this
There is a fleeting, beautiful simplicity in sidewalk chalk. We love this project because it’s low-stakes, high-reward, and completely temporary, meaning the ‘playground’ can evolve every single day. The dusty texture of the chalk on your fingers, the bright neon pigments against the gray pavement, and the sound of kids’ sneakers as they jump from one ‘lava’ stone to another create an atmosphere of pure, unadulterated fun. It turns a boring driveway into an interactive obstacle course that challenges the body and the mind.
Essential Elements:
- Large box of multi-colored sidewalk chalk
- Painter’s tape (for crisp geometric lines)
- Small buckets of water and old paintbrushes (for ‘chalk paint’)
- A flat driveway or sidewalk surface
- Stopwatch for ‘racing’ through the course
How to make it
- Sweep the driveway thoroughly. Chalk sticks best to a clean, dry surface without loose sand or pebbles.
- Design an ‘Obstacle Course.’ Use different colors for different actions. For example: Blue circles mean ‘Jump,’ a long yellow zigzag line means ‘Balance Beam,’ and red squares mean ‘Spin 3 times.’
- Create ‘Chalk Mosaics’ using painter’s tape. Lay down strips of tape in a random geometric pattern on the ground. Color in each ‘shape’ with a different color of chalk, then peel up the tape to reveal crisp, professional-looking gray lines between the colors.
- Make ‘Chalk Paint’ for more vibrant, lasting color. Dip the chalk sticks into a small bucket of water before drawing, or crush old chalk stubs into water and apply with a paintbrush. This creates a much more saturated, paint-like effect.
- Add educational elements. Draw a giant clock face for time-telling games, or a long ‘number line’ for jumping addition and subtraction games.
- Incorporate ‘Interactive Art.’ Draw things like giant wings, a bunch of balloons, or a crown so that when someone lays down on the ground, they become part of the picture for a fun photo op.
Creating Your Own Slice of Heaven
Transforming your home and garden isn’t about spending thousands of dollars or having a professional degree in landscaping; it’s about the willingness to get your hands dirty and the vision to see what ‘could be.’ Each of these projects, from the smallest chalk drawing to the most structural floating deck, adds a layer of personality and joy to your living space. Remember that the best homes are never truly ‘finished’—they are constantly evolving landscapes that reflect the people who live within them. So, pick a project, grab your tools, and start turning your patio into the paradise you deserve.