
From Basic Yard to Five-Star Oasis: The Ultimate Garden Design Guide
Have you ever looked out your window at a patch of patchy grass and felt a pang of ‘backyard envy’ while scrolling through Pinterest? We’ve all been there. Your home is your sanctuary, but often the outdoor space feels like the forgotten sibling. Transforming a basic yard into a five-star oasis isn’t just about spending money; it’s about creating a lifestyle where your morning coffee feels like a vacation and your evening breeze carries the scent of blooming jasmine. It’s about building a place where memories are made under the stars.
Today, we are diving deep into the art of the ‘Viral Outdoor Living’ look. From the technical necessities like drainage to the purely aesthetic joys of styled porch pots and designer duck enclosures, we are covering everything you need to curate a garden that stops traffic and heals the soul. Let’s roll up our sleeves and turn those outdoor dreams into a lush, living reality that you’ll never want to leave.
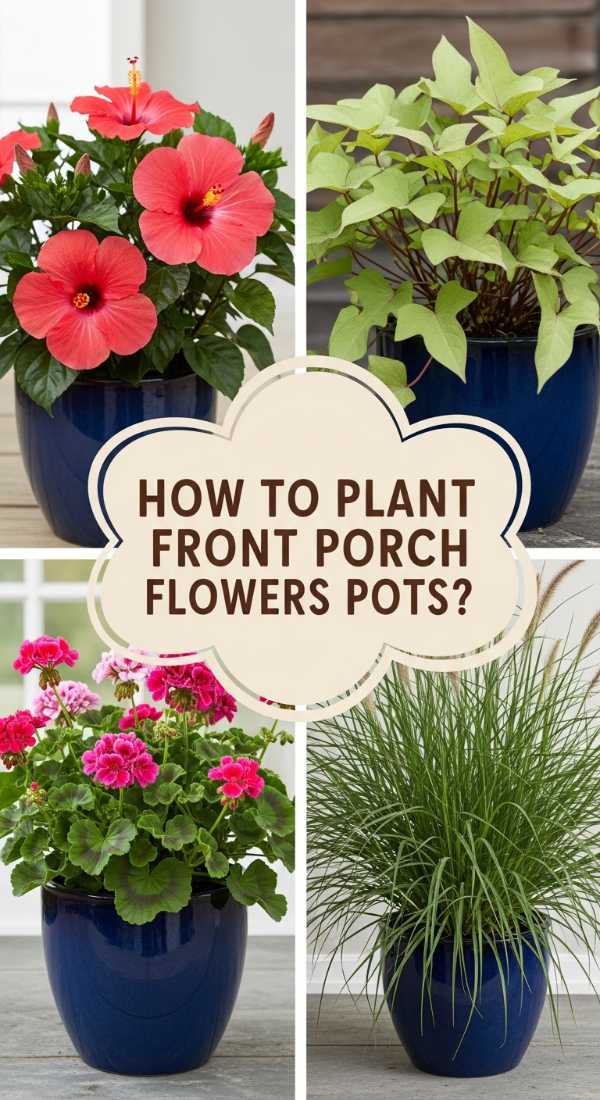
How to Style Front Porch Flower Pots for Instant Curb Appeal
Why we love this
There is nothing quite like the welcoming embrace of a perfectly styled front porch to make a house feel like a home. We love this because it creates an immediate sensory experience; the vibrant petals dance in the wind while the earthy fragrance of damp soil greets you at the door. It adds a layer of curated texture and vertical interest that softens the hard lines of your home’s architecture, making the entrance feel intentional, expensive, and deeply inviting for every guest who walks up the path.
Essential Elements:
- Staggered height planters (set of 3)
- The ‘Thriller’ (a tall focal plant like Dracaena or Grass)
- The ‘Filler’ (mounding plants like Petunias or Geraniums)
- The ‘Spiller’ (trailing plants like Sweet Potato Vine or Creeping Jenny)
- High-quality potting mix with perlite
- Slow-release fertilizer beads
How to make it
- Select three pots of varying heights but matching materials (like matte black ceramic or aged terracotta) to create a cohesive ‘staircase’ effect.
- Fill the bottom third of your largest pot with lightweight filler or drainage rocks if it’s excessively deep, then top with premium potting soil until about 4 inches from the rim.
- Plant your ‘Thriller’ exactly in the center or slightly toward the back; ensure the root ball is level with the soil line to prevent stem rot.
- Surround the central plant with ‘Fillers,’ packing them tightly enough that no soil is visible but leaving enough room for them to breath and expand.
- Place your ‘Spillers’ along the very edge of the pot, angling them slightly outward so they immediately begin to drape over the sides for that lush, overflowing look.
- Water deeply until liquid runs out of the drainage holes, then finish with a top layer of decorative moss or pine bark to lock in moisture and provide a polished finish.
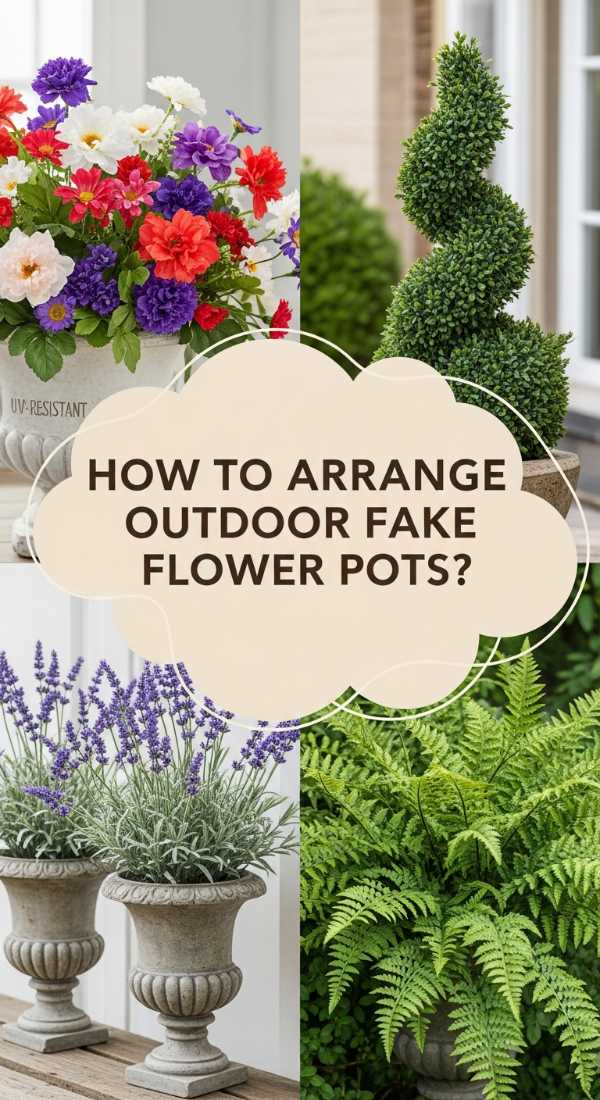
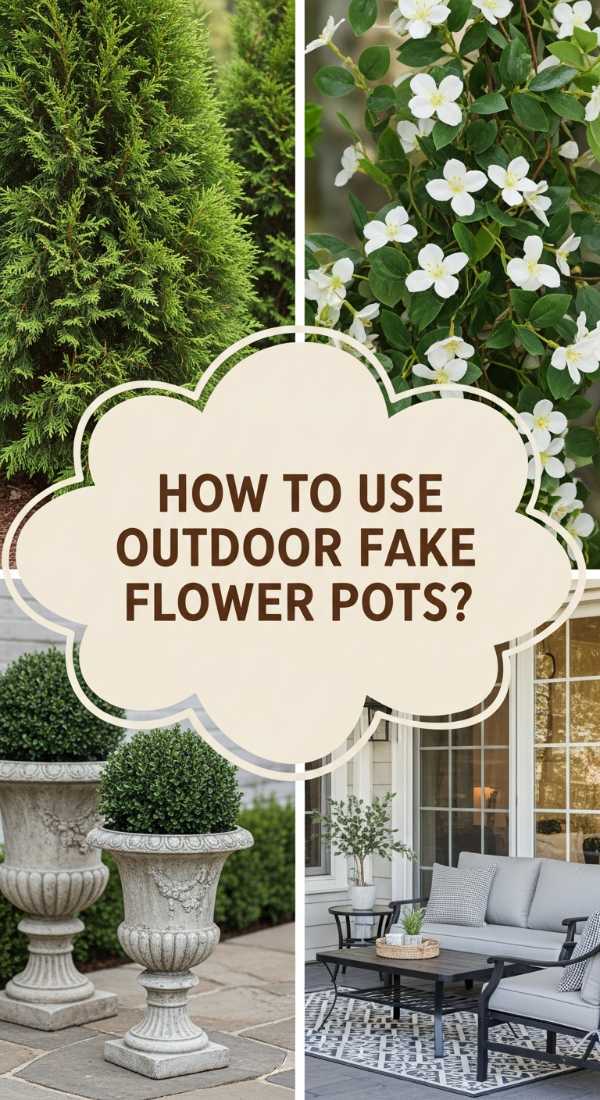
How to Arrange Outdoor Fake Flower Pots for Effortless Garden Beauty
Why we love this
Let’s be honest: sometimes life gets too busy for a watering schedule, and that’s where the magic of high-quality faux florals comes in. We love this because it offers the eternal ‘Golden Hour’ look without the stress of wilting leaves or seasonal brown-outs. High-end outdoor silks provide a consistent pop of color that looks remarkably realistic from the sidewalk, offering a crisp, manicured aesthetic that stays pristine through heatwaves and frost alike, giving you a beautiful view every single day of the year.
Essential Elements:
- UV-resistant outdoor artificial flowers
- UV-rated faux boxwood or greenery stems
- Heavy-duty planters
- Expanding spray foam or floral foam blocks
- Real river rocks or decorative gravel
- UV protectant spray (optional for extra longevity)
How to make it
- Start by securing a block of dense floral foam or using expanding spray foam inside your planter to create a solid, heavy base that won’t tip over in the wind.
- Begin with your largest faux greenery stems (like boxwood or eucalyptus) to create a structural ‘skeleton’ for the arrangement, bending the wired stems to mimic the natural growth patterns of real plants.
- Insert your primary ‘blooms’ into the center, varying the heights slightly so they don’t look too uniform or ‘store-bought’—natural flowers rarely grow at the exact same level.
- Fill in any gaps with smaller filler stems and wispy grasses to add movement; movement is the key to making fake plants look real.
- Cover the foam base with a 2-inch layer of real river rocks or dark mulch; this trick fools the eye into thinking the plants are rooted in real earth.
- Give the entire arrangement a light misting of UV-protectant spray to prevent the sun from fading the vibrant pigments over the coming months.
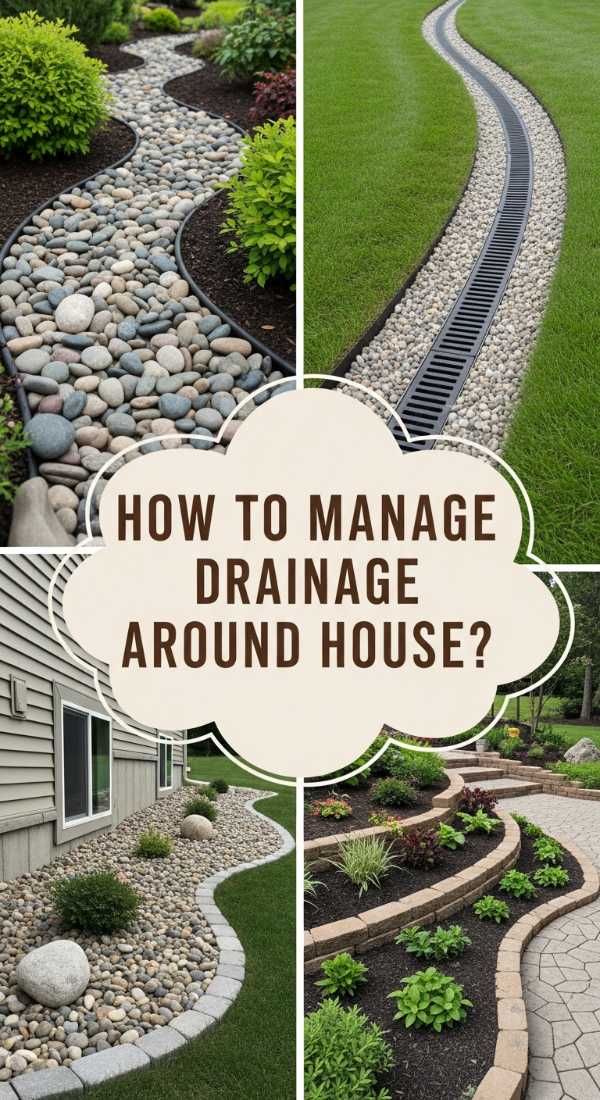
How to Manage Drainage Around House for a Protected Foundation
Why we love this
While not as glamorous as flowers, proper drainage is the unsung hero of a beautiful yard. We love this because it provides the ultimate peace of mind, knowing your sanctuary is safe from the invisible threats of erosion and foundation damage. There is something deeply satisfying about watching a heavy rainstorm and seeing the water channeled away in a clean, controlled manner, leaving your garden beds intact and your basement dry. It is the foundation—literally—of a high-end landscape design.
Essential Elements:
- Perforated PVC drainage pipe
- Filter fabric (to prevent silt clogs)
- Drainage gravel (¾ inch crushed stone)
- Catch basins or decorative grates
- Downspout extensions
- Laser level or string level
How to make it
- Identify the lowest points in your yard where water pools and use a laser level to plan a trench path that slopes away from the house at a minimum of 1 inch of drop for every 8 feet of length.
- Dig a trench roughly 12 inches deep and 6 inches wide, ensuring the bottom is smooth and consistently sloped toward a safe discharge point like a dry well or the street.
- Line the trench with non-woven filter fabric, leaving plenty of excess on the sides to wrap over the top later.
- Pour a 2-inch ‘bedding’ layer of gravel, then lay your perforated pipe with the holes facing *downward* (contrary to popular belief, this allows water to rise into the pipe and flow away).
- Fill the remaining space with gravel to within 2 inches of the surface, wrap the filter fabric over the top like a burrito, and cover with topsoil or decorative river rock.
- Install a pop-up emitter at the end of the line so the water can exit the system safely without leaving an open, ugly pipe end in your lawn.
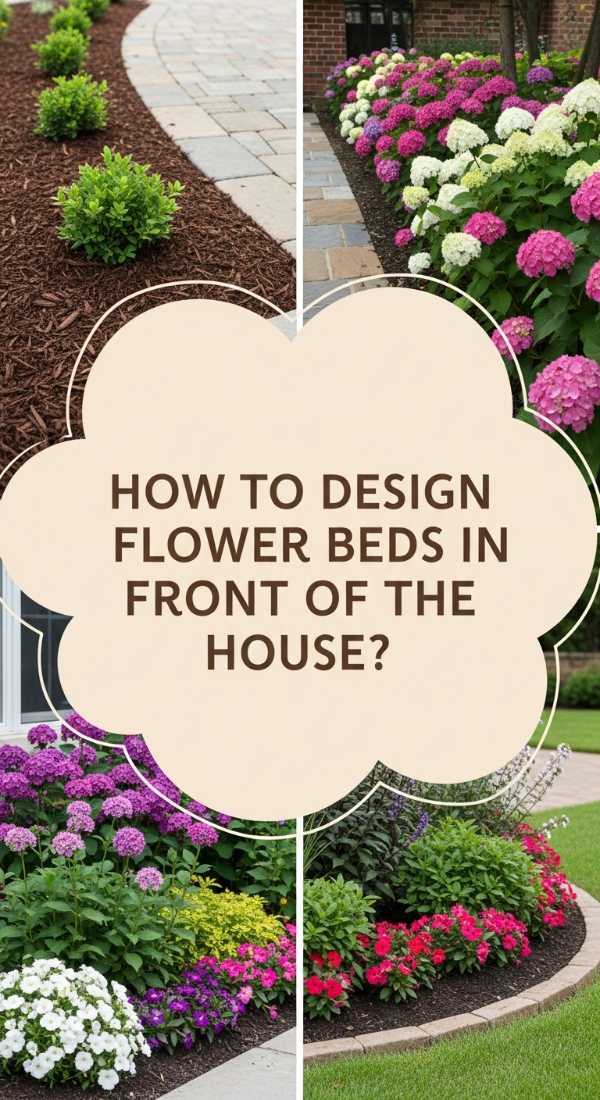
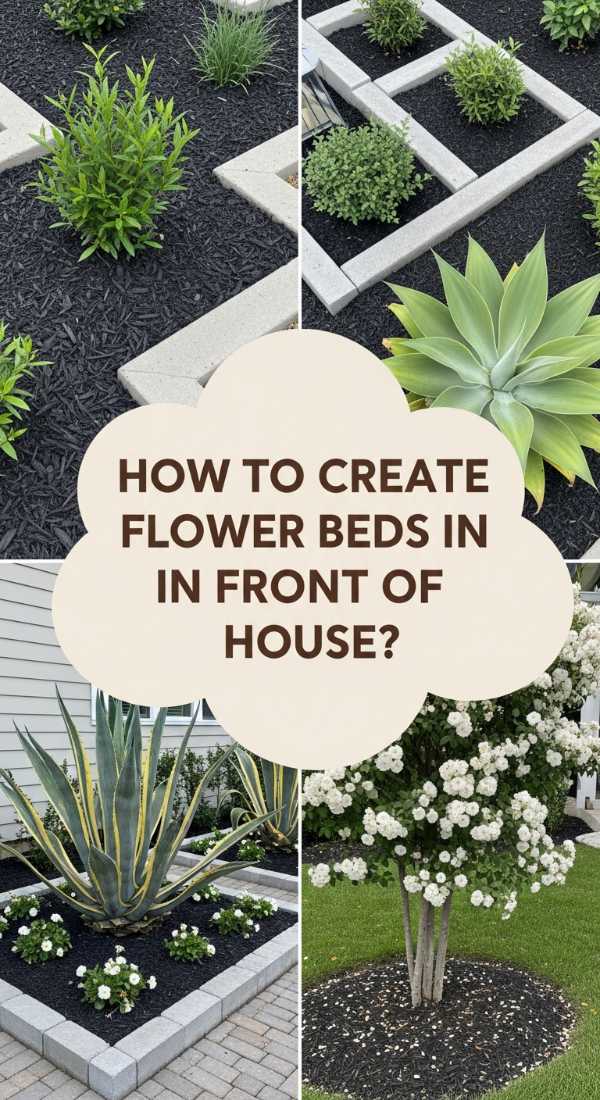
How to Design Flower Beds in Front of House for a Welcoming Entrance
Why we love this
A well-designed flower bed is like a beautifully tailored suit for your home—it highlights the best features while hiding the awkward bits. We love this because it allows for a personal expression of style, from wild English cottage vibes to sleek, structured modernism. The way the soft petals contrast against the hard brick or siding creates a visual harmony that tells the world: ‘Someone who cares lives here.’ It’s the ultimate way to frame your daily life in beauty and fragrance.
Essential Elements:
- Evergreen foundation shrubs (Boxwood, Yew)
- Perennial flowering plants (Lavender, Salvia)
- Annual ‘color’ pops
- Hardwood mulch (dark brown or black)
- Natural stone or metal edging
- Compost-rich topsoil
How to make it
- Use a garden hose to ‘draw’ the shape of your beds on the ground; aim for wide, sweeping curves rather than tight angles to create a more natural, professional flow.
- Remove all grass and weeds from the area, then till in 3 inches of organic compost to ensure your plants have the nutrients they need to thrive.
- Place your largest ‘anchor’ plants—usually evergreens—near the back of the bed (closest to the house) to provide year-round structure and hide the foundation.
- Layer your medium-sized perennials in the middle ground, staggering them in a ‘zigzag’ pattern rather than a straight line to create depth and fullness.
- Place your shortest annuals and groundcovers along the very front edge, ensuring they have enough room to spread without spilling over your edging.
- Apply a 3-inch layer of mulch, being careful not to pile it against the stems of the plants (the ‘mulch volcano’ mistake), which can lead to rot and pest issues.
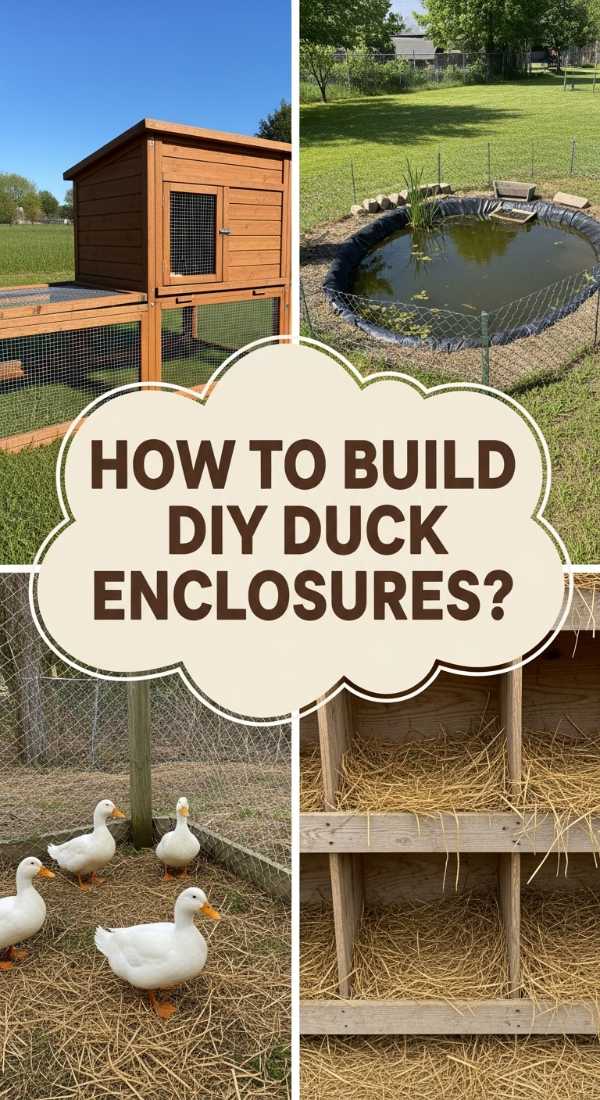
How to Build DIY Duck Enclosures for Happy Backyard Poultry
Why we love this
There is a whimsical, farm-to-table joy in keeping ducks that regular gardening just can’t match. We love this because a well-designed enclosure transforms a chore into a hobby; the sound of happy quacks and the sight of wagging tails adds a layer of ‘living theater’ to your backyard. An aesthetic enclosure proves that animal husbandry can be beautiful, blending seamlessly into your landscape while providing a safe, predator-proof haven for your feathered friends to splash and play.
Essential Elements:
- Hardware cloth (1/2 inch mesh)
- Pressure-treated lumber frame
- Corrugated roofing panels
- Secure locking latches (predator-proof)
- Pea gravel or sand floor base
- Nesting boxes and a ramp
How to make it
- Level the ground where the enclosure will sit and lay a perimeter of hardware cloth 12 inches deep into the earth to prevent burrowing predators like foxes or raccoons.
- Build a sturdy wooden frame (at least 4×8 feet for a small flock) using 2×4 pressure-treated lumber, ensuring the height allows you to comfortably enter for cleaning.
- Attach the hardware cloth to the frame using heavy-duty staples every 2 inches; do not use standard chicken wire, as predators can tear through it easily.
- Install a sloped roof using corrugated panels to ensure rain runs off away from the ‘house’ area, keeping the ducks’ sleeping quarters dry and rot-free.
- Create a dedicated ‘house’ section inside with plenty of straw for nesting and a small ramp that leads to the outdoor run area.
- Finish the floor with a 4-inch layer of coarse sand or pea gravel; this allows for easy hose-downs and prevents the area from turning into a muddy mess during wet seasons.
How to Plant Front Porch Flower Pots for Vibrant Summer Vibes
Why we love this
Summer is the season of high-octane color and explosive growth, and your front porch should reflect that energy. We love this because summer pots are a masterclass in saturation; think neon pinks, deep purples, and sun-kissed yellows that thrive in the heat. There’s a certain magic in the way these plants soak up the sun and provide a lush, tropical feeling right at your doorstep, turning even a suburban entryway into a vibrant, sun-drenched getaway that feels like a permanent vacation.
Essential Elements:
- Heat-tolerant annuals (Lantana, Angelonia, Vinca)
- Water-retaining soil crystals
- Self-watering pots (optional but recommended)
- Liquid bloom-booster fertilizer
- Decorative pebbles or moss
How to make it
- Select a pot with excellent drainage and mix water-retaining crystals into your potting soil; this is the secret to keeping plants perky during 90-degree afternoons.
- Choose a ‘centerpiece’ plant that loves the sun, such as a Mandevilla vine on a small trellis or a bold Canna Lily, to give the pot height and drama.
- Pack the mid-section with heat-seekers like Lantana or Zinnia; these plants actually bloom *more* as the temperature rises, ensuring a consistent show.
- Tuck in ‘Silver Falls’ Dichondra or trailing Verbena around the edges; the silvery foliage of the Dichondra reflects light and stays cool, providing a stunning contrast.
- Water your pots early in the morning (before 8 AM) to ensure the roots are hydrated before the sun reaches its peak intensity.
- Apply a liquid fertilizer every two weeks to replace nutrients that are washed away by frequent summer watering, focusing on ‘bloom booster’ formulas high in phosphorus.
How to Use Outdoor Fake Flower Pots for Year Round Greenery

Why we love this
Maintaining a green thumb in the dead of winter or the height of a drought is a tall order, which is why we adore the ‘always-on’ beauty of year-round faux greenery. We love this because it provides a structural backbone to your decor that never fades. Imagine a crisp, green topiary flanking your door while the rest of the neighborhood is dormant and brown. It offers a sense of permanence and order that keeps your home’s exterior looking polished and professional 365 days a year without a single drop of water.
Essential Elements:
- UV-stabilized faux Boxwood or Cedar topiaries
- Heavy ceramic or stone planters
- Construction sand (for weight)
- Landscape fabric
- Natural mulch or decorative stones
How to make it
- Choose a heavy, weather-resistant planter (like concrete or thick resin) to act as a permanent anchor for your faux greens through all four seasons.
- Fill the bottom half of the pot with construction sand; this provides the necessary weight to prevent the pot from blowing over during autumn windstorms.
- Place your faux topiary or cedar tree into the center, ensuring it is perfectly vertical, and pack more sand or gravel around the base to lock it in place.
- Cut a circle of landscape fabric to fit the top of the sand; this prevents the filler from splashing out during heavy rains.
- Top the fabric with a layer of real wood mulch or dark river stones to provide the organic texture that tricks the brain into seeing a live plant.
- Once a quarter, use a leaf blower or a damp cloth to remove dust and spiderwebs from the leaves, keeping the ‘greenery’ looking fresh and realistic.
How to Improve Drainage Around House for an Eco Friendly Landscape
Why we love this
Eco-friendly drainage is where engineering meets environmental stewardship, and we are obsessed with this sustainable approach. We love this because it treats rainwater as a resource rather than a waste product. Instead of simply piping water away, an eco-friendly system uses rain gardens and permeable surfaces to filter pollutants and recharge the local water table. It’s a sophisticated way to protect your foundation while creating a lush, self-sustaining habitat for birds and butterflies right in your own front yard.
Essential Elements:
- Native water-loving plants (Iris, Sedges, Ferns)
- Permeable pavers or ‘grass-crete’
- Bio-swale compost mix
- River rock and boulders
- Rain barrels with diverters
How to make it
- Identify the natural runoff path of your property and excavate a shallow ‘bowl’ or rain garden area at least 10 feet away from your foundation.
- Replace the heavy clay soil in this area with a 50/50 mix of sandy soil and organic compost to allow for rapid infiltration of rainwater.
- Line the center ‘channel’ with varying sizes of river rock to slow the water’s velocity and prevent soil erosion during heavy downpours.
- Plant native, deep-rooted species along the edges of the rain garden; these plants act as biological filters, cleaning the water as it sinks into the earth.
- Replace solid concrete walkways with permeable pavers or gravel paths that allow rain to soak directly into the ground rather than running off toward the house.
- Install a rain barrel at your main downspout to capture overflow, which can then be used to water your garden beds during dry spells, completing the eco-friendly cycle.
How to Create Flower Beds in Front of House for Modern Minimalist Style
Why we love this
There is a profound sense of calm that comes with a modern minimalist garden. We love this because it values ‘quality over quantity,’ using a limited palette of plants and clean lines to create a high-impact, architectural look. It’s about the play of light and shadow on a simple concrete wall or the way a single, perfectly placed ornamental grass sways in the wind. This style feels incredibly curated and expensive, providing a serene, clutter-free welcome that instantly lowers your heart rate when you pull into the driveway.
Essential Elements:
- Structural plants (Agave, Horsetail Reed, Boxwood)
- Steel or aluminum edging
- Uniform groundcover (Black Mondo Grass or Dichondra)
- Light-colored gravel or slate chips
- Subtle LED uplighting
How to make it
- Start with a perfectly straight or sharply geometric bed layout; use a string line and stakes to ensure your edges are razor-sharp and intentional.
- Install black steel edging to create a thin, nearly invisible border that keeps the soil and gravel strictly separated for that signature ‘clean line’ look.
- Choose a ‘limited palette’ of only 2 or 3 plant species; for example, a row of identical Boxwood spheres contrasted against a backdrop of tall, vertical Horsetail reeds.
- Space the plants with military precision, leaving plenty of ‘negative space’ between them to highlight their individual forms rather than creating a tangled mass.
- Cover the soil with a uniform layer of dark grey slate or white quartz chips; the monochromatic background makes the green of the plants pop with intensity.
- Add low-voltage LED spotlights at the base of your structural plants to cast dramatic shadows against the house at night, extending the minimalist beauty into the evening hours.
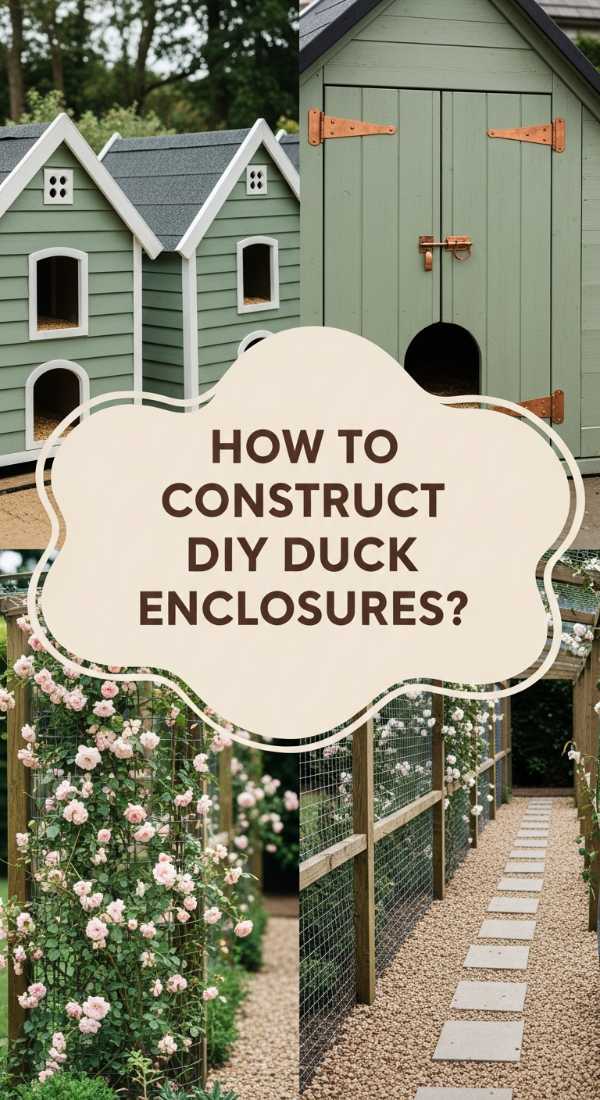
How to Construct DIY Duck Enclosures for an Aesthetic Backyard Farm
[IMAGE_10]
Why we love this
Who says a duck coop has to look like a scrap-heap project? We love the ‘aesthetic backyard farm’ trend because it treats animal housing as a beautiful outbuilding that complements your home’s design. Imagine a miniature version of your own house—complete with matching paint, cedar shingles, and maybe even a tiny window box—filled with happy ducks. It turns poultry keeping into a design statement, proving that you can have fresh eggs and a gorgeous, ‘Instagram-worthy’ backyard simultaneously.
Essential Elements:
- Exterior grade plywood and siding
- Cedar shingles or metal roofing
- Designer paint colors (Sage, Navy, or Charcoal)
- Decorative hardware (window latches, hinges)
- A ‘duck pond’ (repurposed sunken stock tank)
- Solar-powered lighting
How to make it
- Design the enclosure to mirror the architectural style of your main home; if you have a farmhouse, use board-and-batten siding; if you have a modern home, go with sleek horizontal slats.
- Frame the structure with 2x4s, ensuring the floor is elevated at least 6 inches off the ground on concrete blocks to prevent rot and keep the ducks away from damp earth.
- Apply high-quality exterior paint and trim; this not only looks incredible but protects the wood from the elements, ensuring the enclosure lasts for a decade or more.
- Integrate a ‘pond’ using a black stock tank buried flush with the ground; surround it with smooth river stones to create a ‘natural spring’ look that is easy to drain and clean.
- Add ‘lifestyle’ touches like a solar-powered light over the door for evening checks and a small flower box under the window planted with duck-safe herbs like mint or lavender.
- Ensure the interior is ventilated with high-placed windows (covered in hardware cloth) to allow for airflow without creating drafts, keeping your aesthetic farm both beautiful and healthy.
The Final Flourish: Your Oasis Awaits
Transforming your yard into a five-star oasis is a journey of layers. It starts with the invisible work of drainage and foundation, builds through the structural beauty of well-designed beds and enclosures, and finishes with the curated details of styled pots and greenery. Whether you choose the low-maintenance path of faux florals or the rewarding challenge of a backyard duck farm, the goal is the same: to create a space that reflects your soul and invites you to slow down. Your garden is an extension of your home—make it a place where you truly love to live. Now, grab a shovel (or a glue gun!) and let’s get growing.