
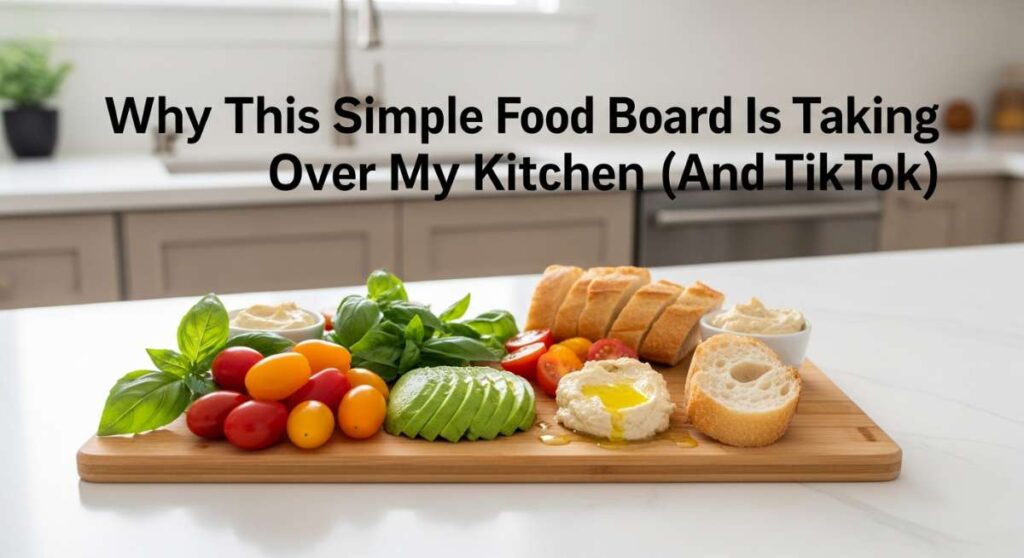
Why This Simple Food Board Is Taking Over My Kitchen (And TikTok)
If you’ve spent more than five minutes scrolling through your FYP lately, you’ve probably seen it: the ‘Board’ aesthetic. It started with charcuterie, then butter, then tinned fish. But what if I told you there’s a new way to feed your family that’s less about tiny crackers and more about hearty, vibrant, and incredibly easy meals? I’ve officially swapped my traditional dinner plates for a giant wooden board, and honestly, my kitchen has never felt more alive.
There is something inherently communal and warm about gathering around a board. It breaks down the formality of a seated dinner and invites everyone to pick, share, and customize their bites. Whether it’s the sizzle of a perfectly seared steak or the bright pop of a summer salad, these recipes are designed to be beautiful, shareable, and—most importantly—viral-worthy for your next post. Let’s dive into the dishes that are making my board the star of the show.
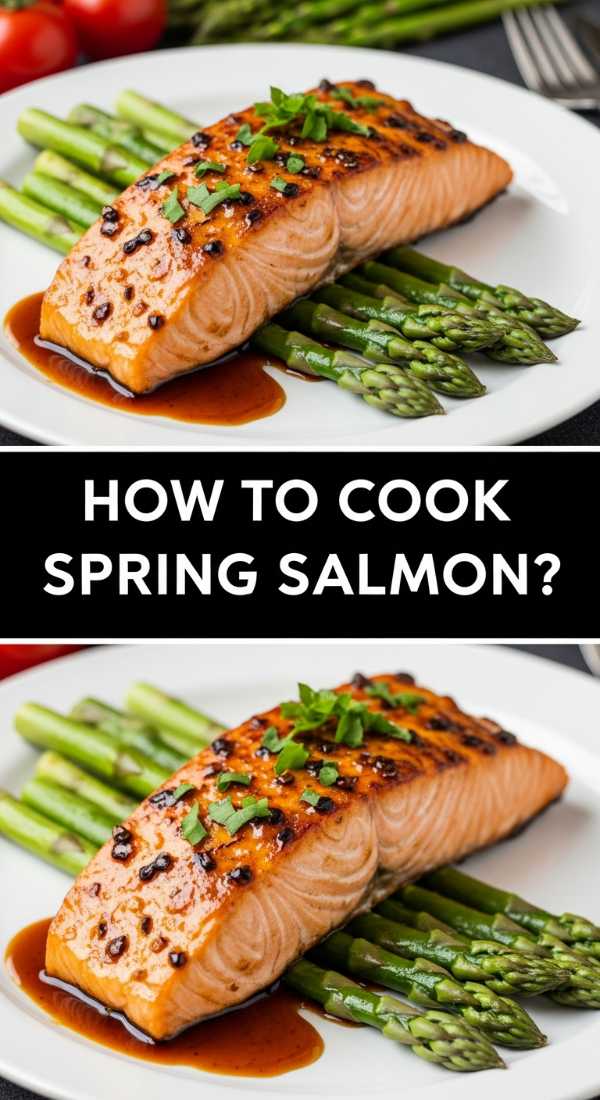
How to cook spring salmon
Why we love this
There is nothing quite like the first bite of a perfectly cooked spring salmon; the way the fork glides through the buttery, pink flesh while the skin offers a satisfying, salty crackle. The aroma of fresh dill and bright lemon zest wafts through the kitchen, signaling that the cold months are finally behind us. It’s light, restorative, and looks like a work of art when placed in the center of a board, surrounded by vibrant greens and holistic vibes.
Ingredients
- 2 large salmon fillets (skin-on)
- 2 tablespoons olive oil
- 1 tablespoon fresh dill, chopped
- 1 lemon, sliced into rounds
- Sea salt and cracked black pepper
How to make it
- Pat the salmon fillets extremely dry with paper towels; moisture is the enemy of crispy skin, so ensure they are bone-dry before seasoning.
- Season the flesh side generously with sea salt, black pepper, and the chopped dill, pressing the herbs into the meat so they stick.
- Heat a heavy stainless steel or cast-iron skillet over medium-high heat for 2 minutes, then add the olive oil until it shimmers and just begins to smoke.
- Place the salmon fillets skin-side down in the pan; you should hear a loud sizzle immediately. Use a spatula to press down firmly on the fillets for 30 seconds to prevent the skin from curling.
- Lower the heat to medium and cook for 5-6 minutes without moving the fish, watching the side of the fillet as the opaque color creeps up from the bottom.
- Flip the fillets carefully and cook for only 1-2 minutes on the flesh side for a perfect medium-rare center.
- Remove from heat, let it rest for 3 minutes, and serve with charred lemon rounds for that signature TikTok aesthetic.
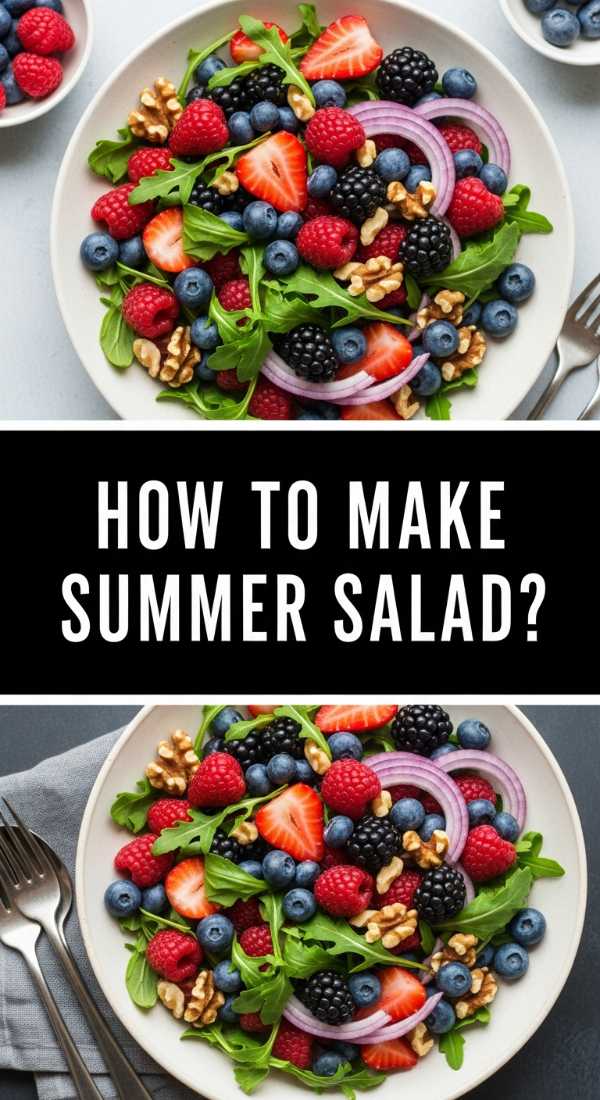
How to make summer salad
Why we love this
This summer salad is a masterclass in textures and contrasting flavors, hitting every sensory note you could desire on a hot afternoon. Imagine the crunch of fresh cucumber against the creamy tang of goat cheese, all tied together by a zesty vinaigrette that makes the berries practically sing. It smells like a sun-drenched garden and feels like a refreshing breeze, making it the ultimate palate cleanser for your communal board.
Ingredients
- 4 cups baby arugula
- 1 cup fresh strawberries, sliced
- 1/2 cup blueberries
- 1/4 cup toasted walnuts
- 2 oz goat cheese crumbles
- Balsamic glaze for drizzling
How to make it
- Start by chilling your serving bowl or board in the fridge for 10 minutes to ensure the greens stay crisp throughout the meal.
- Wash the arugula and berries thoroughly, then spin the greens in a salad spinner until they are completely dry to prevent a soggy base.
- In a small bowl, whisk together 3 parts olive oil to 1 part balsamic vinegar, adding a pinch of salt and a teaspoon of honey to emulsify the dressing.
- Place the arugula in a large mixing bowl and drizzle with half of the dressing, tossing gently with your hands to ensure every leaf is lightly coated but not weighted down.
- Transfer the dressed greens to your board, then artistically scatter the sliced strawberries and whole blueberries over the top.
- Sprinkle the toasted walnuts and goat cheese crumbles evenly, ensuring every potential bite has a bit of everything.
- Finish with a dramatic drizzle of thick balsamic glaze just before serving to catch the light for your photos.
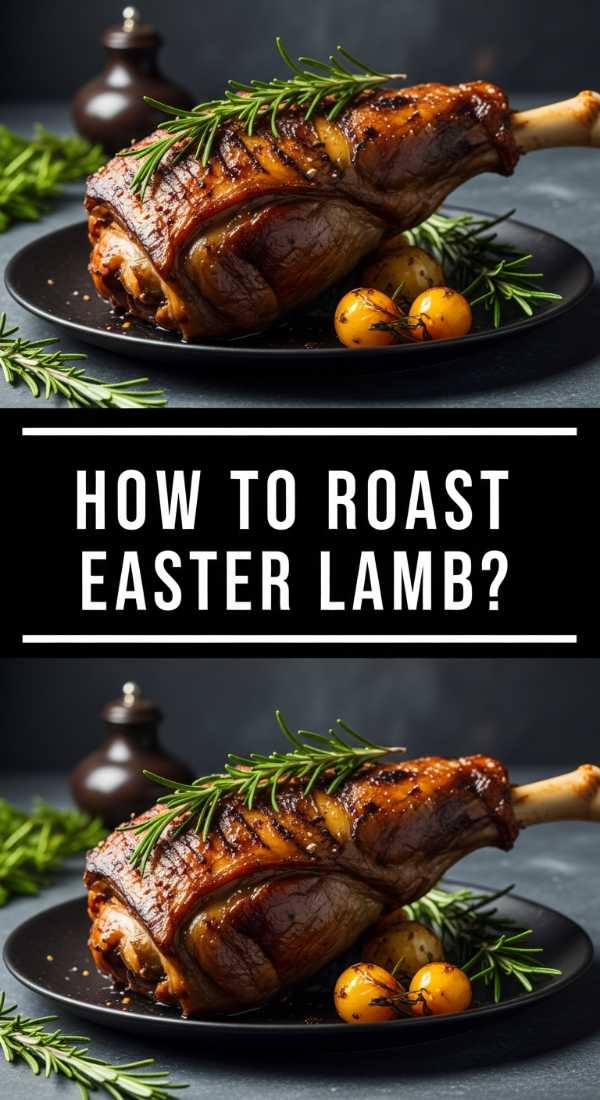
How to roast easter lamb
Why we love this
Roasting lamb is a culinary ritual that fills the entire house with the rich, earthy scent of rosemary and garlic, creating a sense of celebration before the food even hits the table. When done right, the exterior forms a deep, savory crust while the inside remains tender, succulent, and perfectly pink. It’s the kind of show-stopping centerpiece that demands attention, offering a rustic elegance that feels both traditional and modern on a shared food board.
Ingredients
- 3 lb leg of lamb (bone-in)
- 6 cloves garlic, slivered
- 1/4 cup fresh rosemary, chopped
- 2 tablespoons Dijon mustard
- 3 tablespoons olive oil
- Coarse kosher salt
How to make it
- Remove the lamb from the refrigerator at least 1 hour before cooking to allow it to reach room temperature for even roasting.
- Use a sharp paring knife to make small, 1-inch deep slits all over the surface of the lamb, then stuff each slit with a sliver of garlic and a pinch of rosemary.
- In a small bowl, mix the Dijon mustard, olive oil, remaining rosemary, and a generous amount of salt and pepper to create a thick paste.
- Rub the paste over the entire surface of the meat, massaging it into the nooks and crannies for maximum flavor penetration.
- Preheat your oven to 425°F (220°C) and place the lamb on a wire rack set over a roasting pan to allow hot air to circulate underneath.
- Roast at the high temperature for 15 minutes to sear the exterior, then lower the heat to 325°F (165°C) and continue roasting for about 15-20 minutes per pound.
- Use a meat thermometer to check for doneness; remove the lamb when it reaches 135°F (57°C) for medium-rare, then tent with foil and let it rest for a full 20 minutes before carving.
How to fry spam bowls

Why we love this
The humble spam bowl has undergone a viral transformation, and for good reason—it’s the ultimate salty, crispy comfort food that hits all the right nostalgic notes. The magic happens when the spam cubes caramelize in the pan, creating sweet and savory edges that pop against fluffy white rice and creamy avocado. It’s a sensory explosion of umami and crunch that feels incredibly satisfying, making it a trendy favorite for quick, flavorful lunches.
Ingredients
- 1 can Spam, cubed into 1/2 inch pieces
- 2 cups cooked jasmine rice
- 1 tablespoon soy sauce
- 1 teaspoon sugar
- 1/2 avocado, sliced
- Spicy mayo and furikake for topping
How to make it
- Heat a non-stick skillet over medium-high heat; there is no need for oil as the Spam contains enough fat to fry itself to a crisp.
- Add the cubed Spam to the hot pan in a single layer, allowing them to sear undisturbed for 2-3 minutes until a deep golden-brown crust forms on the bottom.
- Toss the cubes and continue frying for another 3-4 minutes, shaking the pan frequently to ensure all sides are equally crispy and caramelized.
- In a small cup, whisk together the soy sauce and sugar, then pour it over the Spam in the final minute of cooking, stirring rapidly as the sauce thickens and glazes the meat.
- Prepare your bowls (or board layout) by portioning out the warm jasmine rice and topping it with the glazed Spam cubes.
- Add the sliced avocado for a creamy contrast, then drizzle generously with spicy mayo (sriracha mixed with Japanese mayo).
- Finish with a heavy dusting of furikake or toasted sesame seeds for that authentic, high-contrast look.
How to bake vegan pasta
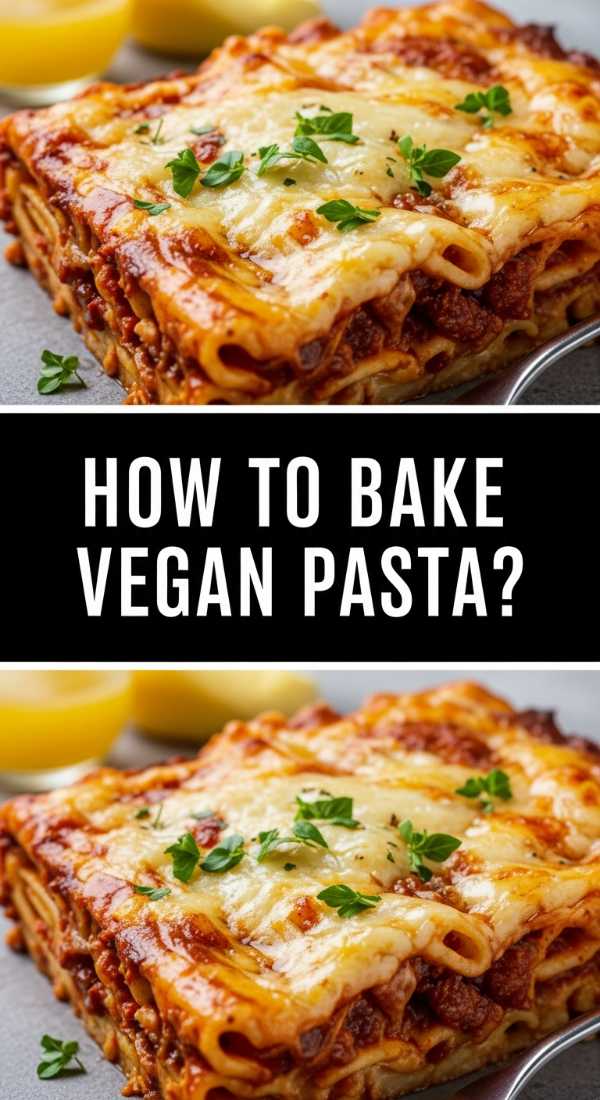
Why we love this
Baking vegan pasta allows the flavors to meld together in a way that stove-top cooking simply can’t match, resulting in a dish that is deeply comforting and surprisingly rich. The aroma of roasted tomatoes and garlic fills the air, while the pasta absorbs the creamy, plant-based sauce to create a velvety texture that defies its dairy-free label. It’s a warm, bubbling hug of a meal that looks stunning on a board, garnished with fresh basil and a sprinkle of nutritional yeast.
Ingredients
- 1 lb rigatoni or penne pasta
- 2 cans crushed tomatoes
- 1 cup raw cashews (soaked and blended with water)
- 4 cloves garlic, minced
- 1 teaspoon dried oregano
- Fresh basil for garnish
How to make it
- Boil your pasta in heavily salted water, but stop the cooking process 2 minutes before the package directions suggest; the pasta will finish cooking in the oven.
- In a large baking dish, combine the crushed tomatoes, minced garlic, oregano, and the blended cashew cream (which should have the consistency of heavy cream).
- Stir the par-boiled pasta into the sauce until every tube is thoroughly coated, adding a splash of pasta water if the mixture looks too thick.
- Taste the sauce and adjust the seasoning with salt and pepper, ensuring it is slightly over-seasoned as the pasta will soak up the salt during baking.
- Cover the dish with foil and bake at 375°F (190°C) for 20 minutes to allow the flavors to penetrate the pasta.
- Remove the foil and bake for an additional 10 minutes until the edges are bubbling and the top has slightly darkened and concentrated in flavor.
- Let the pasta sit for 5 minutes after removing from the oven to allow the sauce to set before transferring it to your serving board.
How to grill paleo steak

Why we love this
There is a primal satisfaction in a perfectly grilled paleo steak, with its charred, smoky exterior and tender, juicy center that practically melts in your mouth. The sound of the sear as the meat hits the hot grates is pure kitchen music, promising a high-protein feast that feels both indulgent and clean. Served on a board with roasted tubers and chimichurri, it becomes a rustic centerpiece that celebrates the beauty of high-quality, simple ingredients.
Ingredients
- 2 ribeye or New York strip steaks (grass-fed)
- 1 tablespoon avocado oil
- 2 tablespoons grass-fed ghee
- 3 sprigs fresh thyme
- Coarse sea salt and cracked pepper
How to make it
- Generously season the steaks with sea salt and pepper at least 40 minutes before grilling to allow the salt to draw out moisture and then reabsorb, tenderizing the fibers.
- Preheat your grill to high heat (around 450-500°F) and clean the grates thoroughly to prevent sticking and ensure clean grill marks.
- Lightly coat the steaks with avocado oil, which has a high smoke point, to facilitate a crust without burning the meat.
- Place the steaks on the grill and sear for 3-4 minutes on the first side without moving them; you want a dark, caramelized crust to form.
- Flip the steaks and immediately place a small dollop of ghee and the thyme sprigs on top of each steak, letting the fat melt down into the meat as it finishes.
- Cook for another 3-4 minutes until the internal temperature reaches 130°F for medium-rare, keeping in mind the temperature will rise during the rest.
- Transfer the steaks to a wooden board and let them rest for at least 10 minutes before slicing against the grain to maintain maximum juiciness.
How to make retro casseroles
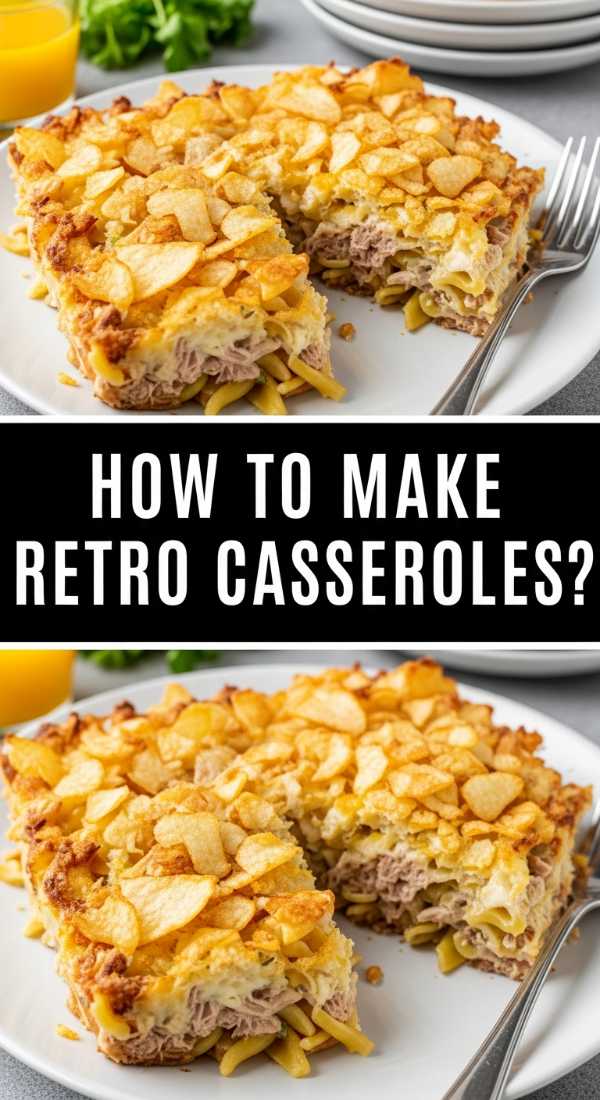
Why we love this
Retro casseroles are making a massive comeback because they evoke a sense of nostalgia and home-cooked warmth that is impossible to ignore. The combination of bubbly cheese, soft noodles or vegetables, and a golden, crunchy topping creates a symphony of textures that feels like a cozy Sunday evening at grandma’s. It’s the ultimate “ugly-delicious” food that looks incredibly inviting when served family-style on a large board, surrounded by crusty bread for dipping.
Ingredients
- 3 cups cooked chicken or turkey, shredded
- 1 bag frozen peas and carrots
- 1 can cream of mushroom soup (or homemade roux)
- 2 cups shredded cheddar cheese
- 1 cup crushed Ritz crackers or cornflakes
- 2 tablespoons melted butter
How to make it
- In a large mixing bowl, combine the shredded protein, frozen vegetables, and the creamy soup base, stirring until the mixture is uniform and thick.
- Fold in half of the shredded cheese, which will act as the binding agent and provide that classic “cheese pull” texture once baked.
- Transfer the mixture to a greased 9×13 baking dish, spreading it out evenly with a spatula to ensure it cooks at a consistent rate.
- In a separate small bowl, toss the crushed crackers or cornflakes with melted butter until they are evenly coated and resemble wet sand.
- Top the casserole with the remaining cheese, then sprinkle the buttered cracker crumbs over the very top in an even layer.
- Bake at 350°F (175°C) for 25-30 minutes; you are looking for the edges to bubble vigorously and the cracker topping to turn a deep, golden brown.
- Let the casserole cool for 10 minutes to allow the sauce to thicken slightly, making it easier to scoop onto your serving board or plates.
How to cook low carb chicken
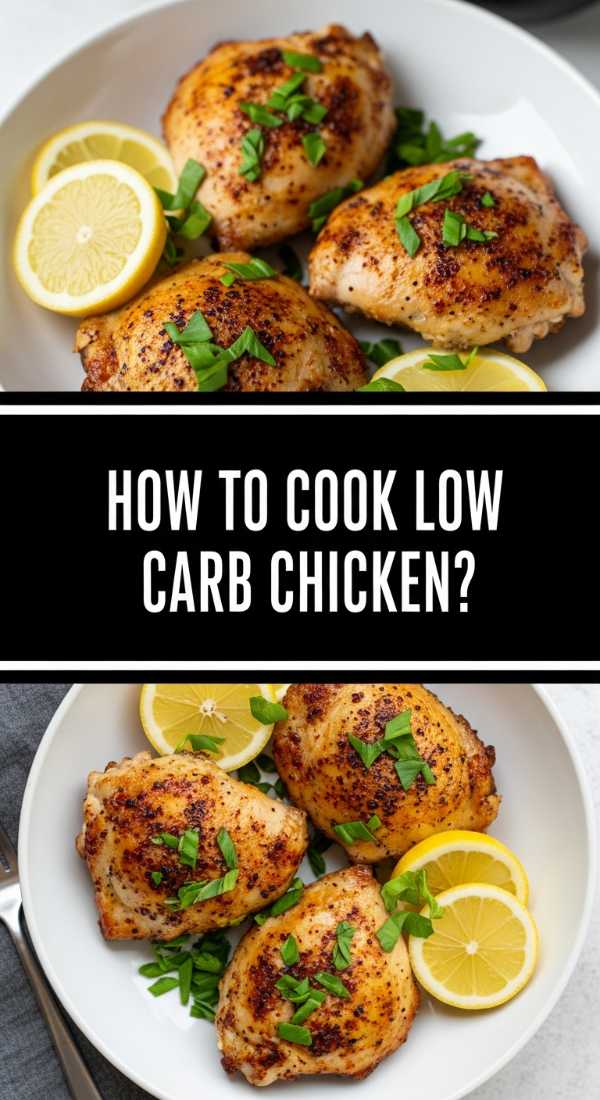
Why we love this
Low carb chicken doesn’t have to be boring; when prepared with fresh herbs and a hard sear, it becomes a succulent, flavor-packed protein that fits perfectly into a healthy lifestyle. The skin becomes thin and crisp, while the meat remains incredibly moist, infused with the bright scents of lemon and rosemary. It’s a versatile board staple that pairs beautifully with roasted radishes or zoodles, offering a guilt-free feast that feels totally gourmet.
Ingredients
- 4 boneless, skin-on chicken thighs
- 2 tablespoons olive oil
- 1 teaspoon garlic powder
- 1/2 teaspoon paprika
- Fresh parsley, chopped
- Lemon wedges
How to make it
- Season the chicken thighs on both sides with salt, pepper, garlic powder, and paprika, ensuring you get under the skin for maximum flavor.
- Heat olive oil in a large oven-safe skillet over medium-high heat until it begins to shimmer, then place the chicken skin-side down.
- Weight the chicken down with a second heavy pan or a foil-wrapped brick to ensure maximum contact between the skin and the hot surface; sear for 5-7 minutes.
- Once the skin is deep gold and crispy, flip the thighs over and add a few lemon wedges to the pan to caramelize.
- Transfer the entire skillet into a preheated oven at 400°F (200°C) and roast for 10-12 minutes until the internal temperature hits 165°F.
- Remove from the oven and let the chicken rest in the pan for 5 minutes, allowing it to soak up the juices and lemon oil.
- Garnish with a generous handful of fresh parsley and serve directly on the board for a rustic, low-carb centerpiece.
How to prepare mediterranean bowls

Why we love this
Mediterranean bowls are a celebration of sunshine and sea, bringing together a vibrant array of colors and fresh, zesty flavors that make every bite feel like a vacation. The creaminess of the hummus, the brine of the olives, and the crunch of fresh cucumber create a sensory balance that is both light and incredibly filling. It’s a visually stunning addition to any food board, allowing guests to build their own perfect bite while enjoying the wholesome, earthy aromas of the Mediterranean.
Ingredients
- 1 cup cooked quinoa or farro
- 1/2 cup hummus
- 1/4 cup feta cheese, crumbled
- 1/2 cup cherry tomatoes, halved
- 1/4 cup kalamata olives
- Cucumber slices and pickled red onions
How to make it
- Start with a base of room-temperature grain like quinoa or farro, spreading it across one section of your board to act as the foundation for the other ingredients.
- Create a “well” in the center of the grains and dollop a generous amount of high-quality hummus into it, drizzling with a little extra virgin olive oil and a pinch of paprika.
- Arrange the cherry tomatoes, cucumber slices, and olives in distinct clusters around the grains, creating a rainbow of colors that pop against the neutral wood.
- Add the pickled red onions for a bright pink accent and a hit of acidity that cuts through the richness of the hummus and feta.
- Sprinkle the crumbled feta cheese over the top, ensuring it’s distributed enough to provide a salty kick to every portion.
- Finish the presentation with a few sprigs of fresh mint or parsley tucked into the edges of the bowl or board section.
- Serve with warm pita bread or cucumber spears for dipping, keeping everything accessible for easy, communal snacking.
How to make fast dinners
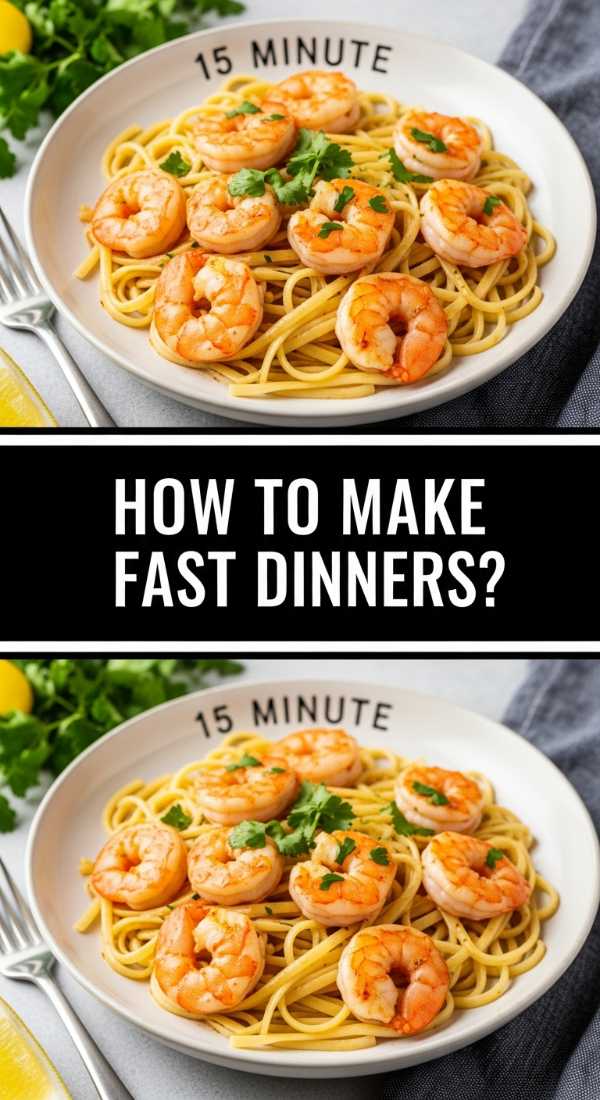
Why we love this
Fast dinners are the unsung heroes of the modern kitchen, proving that you don’t need hours of prep to create a meal that is both healthy and deeply satisfying. The beauty of a quick stir-fry or sheet pan meal is the high-heat caramelization that locks in flavor and maintains the snap of fresh vegetables. It smells like ginger, garlic, and success, providing a warm, steaming pile of goodness that looks fantastic piled high on a board for a mid-week family treat.
Ingredients
- 1 lb thin-sliced flank steak or chicken breast
- 2 cups broccoli florets
- 1 bell pepper, sliced
- 2 tablespoons soy sauce
- 1 tablespoon sesame oil
- 1 teaspoon grated ginger
How to make it
- The key to speed is ‘mise en place’; chop all your vegetables and meat before you even turn on the stove, as the cooking process will move very quickly.
- Whisk together the soy sauce, sesame oil, and grated ginger in a small bowl to create an instant, punchy sauce.
- Heat a wok or large skillet over high heat until it is smoking slightly, then add a high-smoke-point oil like peanut or vegetable oil.
- Add the protein in a single layer and sear for only 1-2 minutes per side until browned but not fully cooked through; remove and set aside.
- Toss in the broccoli and peppers, adding a tablespoon of water to the pan to create steam that will cook the vegetables through while keeping them crisp.
- Return the meat to the pan and pour over the sauce, tossing everything together for 60 seconds until the sauce glazes the ingredients and thickens.
- Slide the entire meal onto your board, garnishing with sesame seeds and green onions for a restaurant-quality look in under 15 minutes.
The New Way to Eat
Switching to the food board method isn’t just about the aesthetics—though the TikTok likes certainly don’t hurt. It’s about a shift in how we experience our meals. It’s slower, more intentional, and far more social. Whether you’re roasting a lamb for a holiday or just throwing together some spam bowls for a Tuesday night, putting it all out on a board says that the meal is meant to be shared. So, clear off your counter, grab your biggest wooden board, and start creating your own viral kitchen moments.