
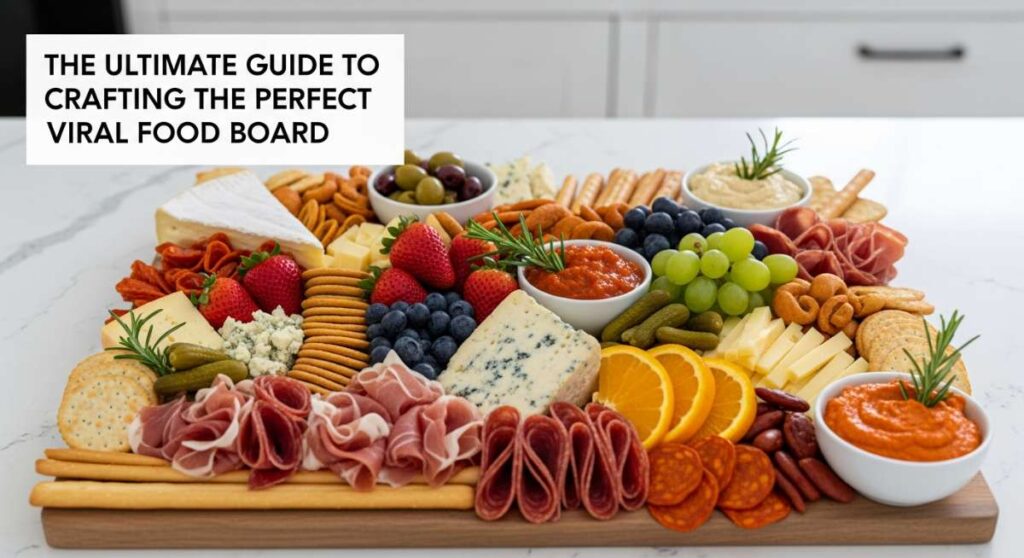
The Ultimate Guide to Crafting the Perfect Viral Food Board
There is something inherently soul-soothing about a grazing board that brings people together. It’s more than just a meal; it’s a shared experience, a tapestry of textures and flavors laid out for everyone to dive into at their own pace. I remember the first time I set a massive board down in the center of my dining table—the way my friends’ eyes lit up, the immediate chatter, and the effortless way we all connected over small bites and big laughs. It’s about creating an atmosphere where the food is the centerpiece of connection.
Creating a ‘Viral Simple Food Board’ isn’t about being a professional chef; it’s about the art of assembly and the love of good ingredients. Whether you are hosting a cozy movie night or a vibrant weekend brunch, these components are designed to be the stars of your show. We’re going to walk through ten incredible elements that will make your board the talk of the town, focusing on those perfect, crowd-pleasing classics that never go out of style.
How to make crispy potatoes?

Why we love this
There is nothing quite like the auditory satisfaction of a perfectly crispy potato. Imagine biting through a golden, glass-like exterior into a center that is as light and fluffy as a cloud. The aroma of roasted rosemary and garlic wafts through the kitchen, promising a savory treat that feels both indulgent and comforting. These potatoes catch the light on your board, their craggy edges practically begging to be dipped into a cool aioli or spicy ketchup, providing that essential crunch that every grazing platter needs.
Ingredients
- 2 lbs Yukon Gold potatoes, peeled and chopped into 1-inch chunks
- 1/2 cup extra virgin olive oil
- 1 tsp baking soda
- 4 cloves garlic, minced
- 2 sprigs fresh rosemary, finely chopped
- Flaky sea salt and cracked black pepper
How to make it
- Place your potato chunks in a large pot of cold water and add a generous tablespoon of salt and the baking soda; the baking soda breaks down the potato’s exterior, creating more surface area for maximum crunch.
- Bring the water to a boil, then reduce to a simmer for about 10-15 minutes until the potatoes are tender but not falling apart.
- Drain the potatoes and let them steam-dry in the colander for 2 minutes, then shake them vigorously to roughen up the edges until a starchy paste forms on the outside.
- While the potatoes dry, heat the olive oil in a small skillet over medium heat with the garlic and rosemary for 3 minutes to infuse the oil, then strain the oil into a large roasting pan, reserving the garlic and herbs for later.
- Toss the fluffed potatoes into the hot oil in the roasting pan and roast at 450°F (230°C) for 20 minutes, then turn them and continue roasting for another 30-40 minutes until deep brown and incredibly loud when shaken.
- In the final 2 minutes, toss the reserved garlic and rosemary back in, season with flaky salt, and serve immediately while they are at their peak crispness.
How to cook creamy pasta?

Why we love this
Creamy pasta is the ultimate culinary hug, a velvety embrace that coats the palate in rich, buttery goodness. When done right, the sauce isn’t just sitting on the pasta; it’s emulsified into a glossy sheen that clings to every ridge and curve of the noodle. The scent of toasted black pepper and aged parmesan creates an atmosphere of sophisticated comfort. It brings a luxurious weight to your food board, offering a warm, satisfying contrast to fresher, crispier elements, making every forkful feel like a celebration.
Ingredients
- 12 oz Bucatini or Fettuccine
- 1 cup heavy cream
- 4 tbsp unsalted butter
- 1.5 cups freshly grated Parmesan cheese
- 2 cloves garlic, grated
- 1/2 cup reserved pasta water
- Nutmeg, salt, and black pepper
How to make it
- Boil a large pot of heavily salted water—it should taste like the sea—and cook your pasta for 2 minutes less than the package directions to ensure a perfect ‘al dente’ bite.
- In a large, wide skillet, melt the butter over medium-low heat until it begins to foam slightly, then add the grated garlic and cook for only 30 seconds to release the aroma without browning.
- Pour in the heavy cream and bring to a gentle simmer, whisking constantly for about 3-4 minutes until the cream has slightly thickened and reduced.
- Using tongs, transfer the pasta directly from the boiling water into the cream sauce, bringing some of that starchy water along with it to help the sauce bind.
- Turn the heat to low and gradually whisk in the Parmesan cheese in small handfuls, stirring vigorously to ensure a smooth, clump-free emulsion.
- Add small splashes of the reserved pasta water as needed to achieve a silky, pourable consistency that coats the back of a spoon, and finish with a pinch of nutmeg and plenty of freshly cracked black pepper.
How to bake fudgy brownies?

Why we love this
A truly fudgy brownie is a masterclass in decadence, boasting a crackly, tissue-paper-thin top that gives way to a dense, almost truffle-like center. The aroma of high-quality dark chocolate and browned butter fills the room, signaling a treat that is as sophisticated as it is nostalgic. As you break one open, you see that moist, dark interior that sticks slightly to the roof of your mouth, delivering an intense cocoa hit that lingers beautifully. They add a dark, sultry visual and a rich sweetness that balances the savory notes on your board.
Ingredients
- 1 cup unsalted butter, melted and browned
- 2 cups granulated sugar
- 3 large eggs, room temperature
- 1 cup Dutch-process cocoa powder
- 1/2 cup all-purpose flour
- 1 cup dark chocolate chunks
- 1 tsp vanilla bean paste
- 1/2 tsp sea salt
How to make it
- Preheat your oven to 325°F (165°C) and line an 8×8 inch pan with parchment paper, leaving an overhang for easy removal.
- In a large bowl, whisk the melted browned butter and granulated sugar vigorously for at least 2 minutes; this high-sugar-to-fat ratio is what creates the coveted shiny, crackly top.
- Add the eggs one at a time, whisking each for 30 seconds until the batter becomes pale and voluminous, then stir in the vanilla bean paste.
- Sift in the cocoa powder, flour, and salt, then fold the dry ingredients into the wet using a rubber spatula just until no streaks of flour remain—over-mixing will lead to a cakey texture instead of fudgy.
- Fold in the dark chocolate chunks and pour the batter into the prepared pan, smoothing the top with your spatula.
- Bake for 35-40 minutes; use the visual cue of the edges being set but the center still having a slight wobble when the pan is nudged. A toothpick inserted should come out with a few moist crumbs, never clean.
How to sear juicy burgers?

Why we love this
There is a primal joy in a perfectly seared burger, with its deeply caramelized crust hiding a tender, juice-dripping interior. The smell of high-quality beef hitting a screaming-hot skillet is the hallmark of a great meal, creating a smoky, savory perfume that draws everyone to the kitchen. On a food board, mini sliders or quartered burgers provide a hearty, protein-packed anchor, their savory richness cutting through the brightness of pickles and fresh greens, making every bite feel like a backyard summer party.
Ingredients
- 1 lb ground chuck (80/20 fat ratio for maximum juiciness)
- 4 brioche buns, buttered
- 4 slices sharp cheddar cheese
- Kosher salt and coarse black pepper
- 1 tbsp neutral oil (like grapeseed)
How to make it
- Shape your cold ground beef into thick patties about 1 inch wider than your buns, as they will shrink during cooking, and use your thumb to create a deep indent in the center to prevent the burger from puffing up.
- Season both sides extremely generously with salt and pepper right before they hit the pan; salting too early draws out moisture and can make the meat tough.
- Heat a heavy cast-iron skillet over high heat until the oil is shimmering and just starting to smoke.
- Place the patties in the pan and sear undisturbed for 3-4 minutes to develop a dark, crusty ‘Maillard reaction’ surface.
- Flip the burgers and immediately place a slice of cheese on top, then cover the pan with a lid for 1 minute to allow the steam to melt the cheese perfectly while the burger reaches medium-rare (135°F/57°C internal).
- Remove the burgers and let them rest for at least 3 minutes on a warm plate to allow the juices to redistribute back into the meat fibers rather than running out on the board.
How to roll fresh sushi?

Why we love this
Fresh sushi is a visual and textural masterpiece, offering a clean, bright contrast to cooked dishes with its cooling cucumber, creamy avocado, and toothsome vinegared rice. The snap of the roasted nori seaweed followed by the subtle tang of the rice creates a refreshing palate cleanser on a diverse food board. It looks like jewelry on the platter, with its vibrant colors and precise shapes, inviting guests to enjoy a bite that feels light yet deeply satisfying, perfect for a modern, elevated grazing experience.
Ingredients
- 2 cups sushi rice, rinsed and cooked
- 3 tbsp rice vinegar mixed with 1 tbsp sugar and 1 tsp salt
- Nori sheets
- Sushi-grade salmon or cucumber and avocado strips
- Wasabi and pickled ginger
- Soy sauce for dipping
How to make it
- While the cooked rice is still hot, gently fold in the rice vinegar mixture using a wooden paddle in a slicing motion to avoid mashing the grains, then let it cool to room temperature.
- Place a sheet of nori, shiny side down, on a bamboo rolling mat, and keep a small bowl of water nearby to dip your fingers in so the rice doesn’t stick to your skin.
- Spread a thin, even layer of rice over the nori, leaving a 1-inch border at the top edge.
- Lay your fillings (fish or vegetables) in a straight horizontal line about one-third of the way up from the bottom.
- Using the mat, lift the bottom edge of the nori and roll it over the filling, tucking it tightly as you go and applying even pressure across the entire roll.
- Moisten the top border of the nori with a tiny bit of water to seal the roll, then use a very sharp, wet knife to slice the roll into 8 equal pieces, wiping the blade between each cut for a clean finish.
How to bake cheesy pizza?

Why we love this
Pizza is the ultimate universal language of deliciousness, featuring a charred, bubbly crust and strings of molten mozzarella that stretch for miles. The aroma of toasted dough and herbaceous tomato sauce is intoxicating, instantly making any gathering feel more festive. It provides a warm, rustic base for your food board, offering a canvas of melted cheese and savory toppings that provide a satisfying chew and a comforting, salty finish that keeps everyone coming back for “just one more slice.”
Ingredients
- 1 ball of pizza dough (room temperature)
- 1/2 cup San Marzano tomato sauce
- 8 oz fresh mozzarella, torn into pieces
- Fresh basil leaves
- Extra virgin olive oil and cornmeal for the pan
How to make it
- Preheat your oven to its highest possible setting (usually 500°F/260°C) and place a pizza stone or inverted baking sheet inside for at least 45 minutes to get intensely hot.
- On a floured surface, gently stretch your dough by hand rather than using a rolling pin; this preserves the air bubbles in the crust for a light, airy result.
- Sprinkle a pizza peel or another baking sheet with cornmeal and transfer the stretched dough onto it.
- Spread a very thin layer of tomato sauce over the dough, leaving a 1-inch border for the crust, and dot with the pieces of fresh mozzarella.
- Slide the pizza onto the preheated stone and bake for 8-12 minutes until the crust is charred in spots (the ‘leopard spotting’) and the cheese is bubbling and slightly browned.
- Immediately after removing from the oven, garnish with fresh basil and a drizzle of olive oil, and let it sit for 2 minutes before slicing to let the cheese set.
How to assemble breakfast tacos?

Why we love this
Breakfast tacos are a vibrant explosion of morning joy, combining the fluffiness of soft-scrambled eggs with the punchy heat of salsa and the richness of avocado. The scent of toasted corn tortillas and sizzling chorizo provides an energizing wake-up call for the senses. On a board, they offer a customizable, handheld feast that looks stunning with its pops of green cilantro and red radishes, ensuring your brunch board feels abundant, fresh, and perfectly balanced between savory and spicy.
Ingredients
- 8 small corn tortillas
- 6 large eggs, whisked
- 1/2 cup cooked chorizo or black beans
- 1 avocado, sliced
- Crumbled cotija cheese and fresh cilantro
- Lime wedges and hot sauce
How to make it
- Char your corn tortillas directly over a gas flame for 20 seconds per side until they have slight blackened marks and become pliable; keep them warm in a clean kitchen towel.
- In a non-stick skillet over medium-low heat, melt a small knob of butter and add the whisked eggs, using a silicone spatula to constantly push the eggs from the edges to the center.
- Remove the eggs from the heat while they still look slightly wet and glossy—they will continue to cook from residual heat and stay incredibly soft.
- To assemble, place a generous spoonful of eggs into the center of each warm tortilla, followed by the chorizo or beans.
- Top with avocado slices, a sprinkle of cotija cheese, and a handful of fresh cilantro for brightness.
- Arrange them on the board with lime wedges on the side for squeezing, which provides the essential acidity needed to cut through the richness of the eggs and avocado.
How to grill tender steak?
Why we love this
A perfectly grilled steak is the pinnacle of savory indulgence, with a smoky, charred exterior that protects a succulent, melt-in-your-mouth interior. The aroma of rendered fat and toasted peppercorns is deeply appetizing, signaling a high-protein treat that feels truly special. When sliced thinly against the grain and fanned out on a board, steak looks incredibly elegant, its deep pink hue contrasting beautifully with bright chimichurri or roasted vegetables, providing a luxurious bite for your guests.
Ingredients
- 2 Ribeye or New York Strip steaks (1.5 inches thick)
- 2 tbsp softened butter
- 2 cloves garlic, smashed
- Fresh thyme and rosemary
- Kosher salt and coarse black pepper
How to make it
- Remove the steaks from the fridge at least 45 minutes before cooking to bring them to room temperature, which ensures even cooking from edge to center.
- Pat the steaks extremely dry with paper towels—moisture is the enemy of a good sear—and season aggressively with salt and pepper.
- Preheat your grill or a heavy skillet to high heat and sear the steaks for 4-5 minutes on the first side without moving them to develop a thick, dark crust.
- Flip the steaks and add the butter, garlic, and herbs to the pan (if using a skillet), spooning the melting butter over the meat repeatedly for the final 3-4 minutes.
- Use a meat thermometer to pull the steaks at 130°F (54°C) for a perfect medium-rare.
- This is the most critical step: let the steak rest on a cutting board for at least 10 minutes before slicing; this allows the muscle fibers to relax and reabsorb the juices so they don’t run out when you cut.
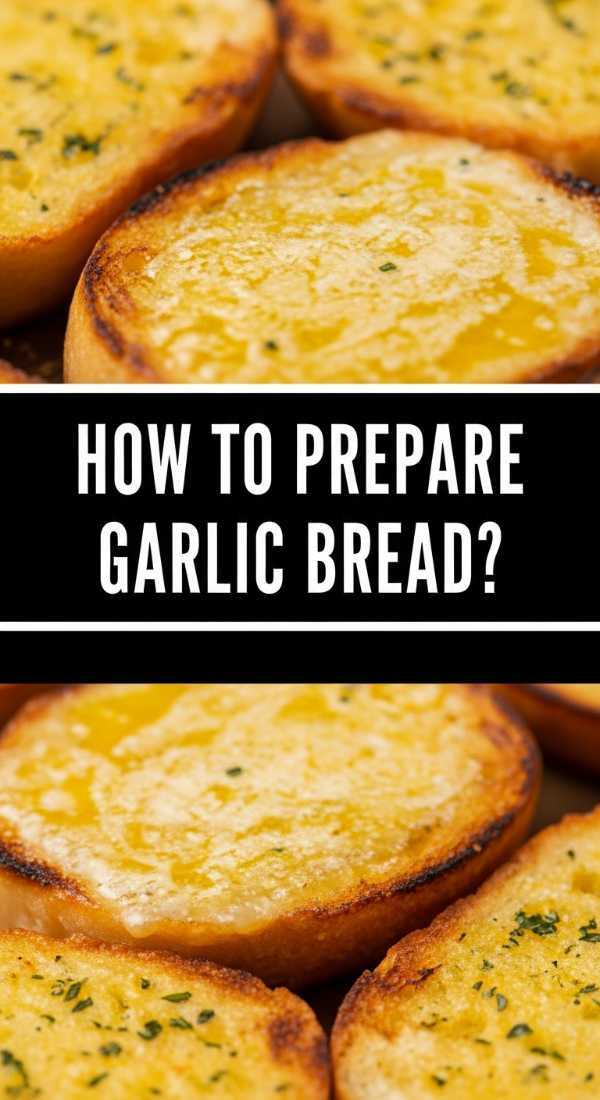
How to prepare garlic bread?

Why we love this
Garlic bread is the ultimate supporting actor that often steals the show, offering a buttery, aromatic crunch that is impossible to resist. The combination of pungent garlic, sweet butter, and fresh parsley creates a flavor profile that is both simple and profoundly satisfying. It acts as the perfect vessel for soaking up sauces on your food board, adding a golden-brown visual appeal and a texture that ranges from a crisp, toasted edge to a soft, pillowy center soaked in garlic goodness.
Ingredients
- 1 large loaf of French or Italian bread
- 1/2 cup unsalted butter, softened
- 4 cloves garlic, minced into a paste
- 1/4 cup chopped fresh parsley
- 1/4 cup grated Parmesan cheese
- Pinch of salt
How to make it
- Preheat your oven to 375°F (190°C) and slice the bread loaf in half lengthwise.
- In a small bowl, combine the softened butter, garlic paste, parsley, and salt, mashing them together with a fork until a uniform, green-flecked spread is formed.
- Spread the garlic butter generously over both cut sides of the bread, ensuring you reach all the way to the very edges for maximum flavor.
- Place the bread halves back together, wrap the entire loaf in aluminum foil, and bake for 15 minutes to allow the butter to melt deep into the crumb of the bread.
- Open the foil and sprinkle the Parmesan cheese over the buttery surfaces, then place the halves cut-side up on a baking sheet.
- Broil on high for 2-3 minutes, watching extremely closely, until the edges are golden brown and the cheese is bubbling and slightly crispy.
How to make berry smoothies?
[IMAGE_10]
Why we love this
Berry smoothies are a vibrant, refreshing burst of color and nutrition that brighten up any board, especially in the morning or as a sweet afternoon treat. The combination of tart berries and creamy base creates a thick, frosty texture that feels like a healthy milkshake. Their deep purples and bright pinks add a stunning visual pop, and the cool, fruit-forward flavor provides a necessary contrast to the heavier, savory items, leaving the palate feeling refreshed and energized.
Ingredients
- 2 cups frozen mixed berries (blueberries, raspberries, strawberries)
- 1 cup Greek yogurt or almond milk
- 1 ripe banana (frozen for extra creaminess)
- 1 tbsp honey or maple syrup
- 1 tsp chia seeds (optional for texture)
How to make it
- Add your liquid base (yogurt or milk) to the blender first; having the liquid at the bottom helps the blades create a vortex, pulling the frozen fruit down for a smoother blend.
- Add the frozen berries and the banana on top of the liquid.
- Start the blender on the lowest speed to break up the large frozen chunks, then gradually increase to high speed.
- Blend for a full 60 seconds to ensure all the berry skins and seeds are completely pulverized into a velvety, consistent texture.
- If the smoothie is too thick, add an extra splash of liquid; if too thin, add more frozen fruit or a few ice cubes and blend again.
- Pour into small glass jars or bowls for your food board and garnish with a few fresh berries or a sprig of mint for a professional, viral-worthy finish.
The Final Flourish
Building a food board is an act of creativity and love. Don’t worry about making it look perfect; the beauty lies in the abundance and the variety of flavors you’ve prepared. When you set this down in front of your favorite people, you’re not just serving food—you’re serving a reason to slow down and enjoy the moment. So, grab your biggest platter, pick a few of these recipes, and get crafting. Your kitchen is about to become the most popular spot in the house!