
We’ve all had those afternoons where the kitchen feels like a chore, but our souls crave something that feels intentional, beautiful, and deeply satisfying. It started as a humble ‘fridge-raid’ on a rainy Tuesday, but once I laid it all out on my favorite wooden board and shared a quick snap online, the response was overwhelming. There is something about the communal, ‘pick-as-you-go’ nature of a food board that resonates with our desire for slow living and honest flavors.
This isn’t just about feeding yourself; it’s about the ritual of assembly and the joy of seeing vibrant colors and textures come together in a way that feels like a celebration. Whether you are hosting a last-minute gathering or just treating yourself to an elevated solo lunch, these viral-inspired components are designed to turn basic ingredients into a masterpiece. Let’s dive into the elements that make this board the ultimate lazy-day hero.
How to make crispy potatoes?

Why we love this
There is a specific kind of magic in the sound of a potato skin shattering under your teeth, revealing a center as fluffy as a cloud. These crispy potatoes are the ultimate comfort food, seasoned with flaky sea salt and aromatic rosemary that fills your kitchen with a cozy, earthy scent. As they roast, the edges caramelize into deep amber shards of joy, making them the most addictive element on any platter. Eating them warm, straight from the oven, feels like a warm hug for your taste buds.
Ingredients
- 1 lb baby Yukon Gold potatoes
- 3 tbsp extra virgin olive oil
- 2 tsp flaky sea salt
- 1 tsp garlic powder
- 1 sprig fresh rosemary, chopped
How to make it
- Begin by washing the potatoes and placing them in a large pot of cold, heavily salted water. Bring to a rolling boil and cook for 15-20 minutes until they are fork-tender but not falling apart.
- Drain the potatoes and let them sit in the colander for 5 minutes to steam dry; removing excess moisture is the secret to achieving that professional-grade crunch.
- Preheat your oven to 425°F (220°C) and line a heavy baking sheet with parchment paper to prevent sticking.
- Place the potatoes on the sheet and use the bottom of a heavy glass or a potato masher to gently flatten them until they are about half an inch thick.
- Drizzle generously with olive oil, ensuring every nook and cranny is coated. Sprinkle with garlic powder, rosemary, and salt.
- Roast for 25-30 minutes, flipping halfway through, until the edges are golden brown and audibly crisp when tapped with a fork.
How to cook spicy pasta?
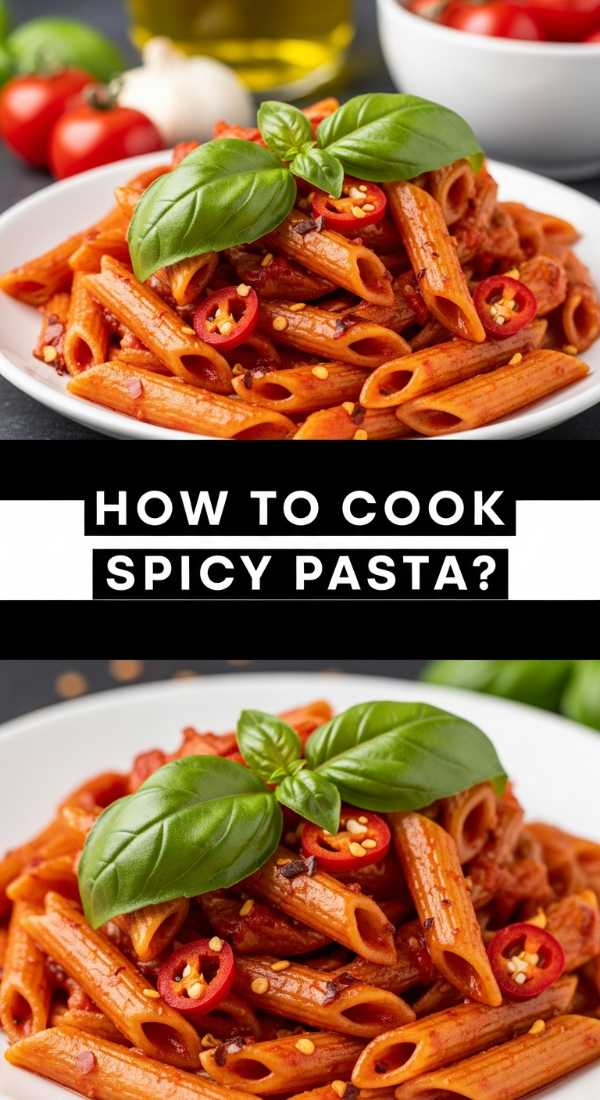
Why we love this
This pasta is a vibrant explosion of heat and silkiness that clings to every curve of the noodle. The aroma of toasted garlic and Calabrian chilies creates an intoxicating scent that draws everyone to the kitchen before the timer even goes off. Each bite offers a sophisticated balance of spicy zing and rich, buttery undertones that make it feel like a dish from a high-end Italian bistro. It is the kind of meal that makes you want to close your eyes and savor the complex layers of flavor.
Ingredients
- 8 oz rigatoni or penne
- 2 tbsp tomato paste
- 3 cloves garlic, thinly sliced
- 1 tsp red chili flakes or Calabrian chili paste
- 1/2 cup heavy cream
- 1/4 cup grated Parmesan cheese
- Fresh basil for garnish
How to make it
- Boil a large pot of water and add enough salt so it tastes like the sea; cook your pasta until it is just shy of al dente (about 2 minutes less than the package directions).
- Reserve 1 cup of starchy pasta water before draining—this liquid gold is essential for the sauce’s emulsion.
- In a wide skillet over medium heat, sauté the sliced garlic in olive oil until it is fragrant and translucent, being careful not to let it brown or turn bitter.
- Add the tomato paste and chili flakes to the pan. Use a wooden spoon to stir constantly for 3-5 minutes until the paste darkens to a deep rust color and smells slightly caramelized.
- Whisk in the heavy cream and a splash of pasta water, stirring until a smooth, vibrant orange sauce forms.
- Toss in the pasta and Parmesan, stirring vigorously over low heat. Add more pasta water as needed until the sauce is glossy and coats every noodle perfectly.
How to style avocado toast?
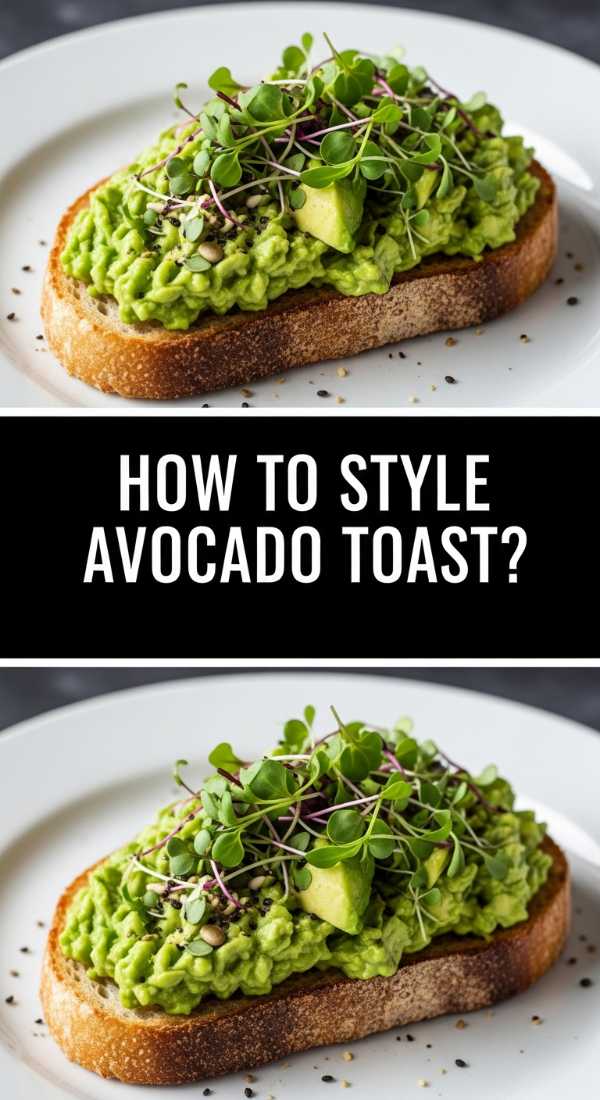
Why we love this
Avocado toast is the canvas of the modern breakfast world, offering a lush, buttery texture that contrasts beautifully against a thick slice of sourdough. The visual appeal of bright green mash topped with pops of red pepper and dark seeds is enough to make anyone feel like a gourmet chef. There is a refreshing creaminess that coats the palate, brightened by a squeeze of lemon that cuts through the healthy fats. It’s a simple luxury that feels both nourishing and indulgent at the very same time.
Ingredients
- 2 thick slices of sourdough bread
- 1 ripe Hass avocado
- 1/2 lemon, juiced
- Everything Bagel seasoning
- Red pepper flakes
- Microgreens or radish slices for styling
How to make it
- Toast your sourdough slices in a toaster or on a griddle with a small amount of butter until they are a deep golden brown and have a sturdy structure.
- In a small bowl, combine the avocado flesh with lemon juice and a pinch of salt. Mash with a fork, leaving some small chunks for a more interesting, rustic texture.
- Spread a thick, even layer of the avocado mash onto the warm toast, extending it all the way to the very edges of the crust.
- Use the back of a spoon to create small decorative swirls or “waves” in the avocado surface to catch the toppings and oil.
- Generously sprinkle with Everything Bagel seasoning and red pepper flakes for a kick of heat.
- Top with thinly sliced radishes or a handful of microgreens to add height and a professional, ‘cafe-style’ finish.
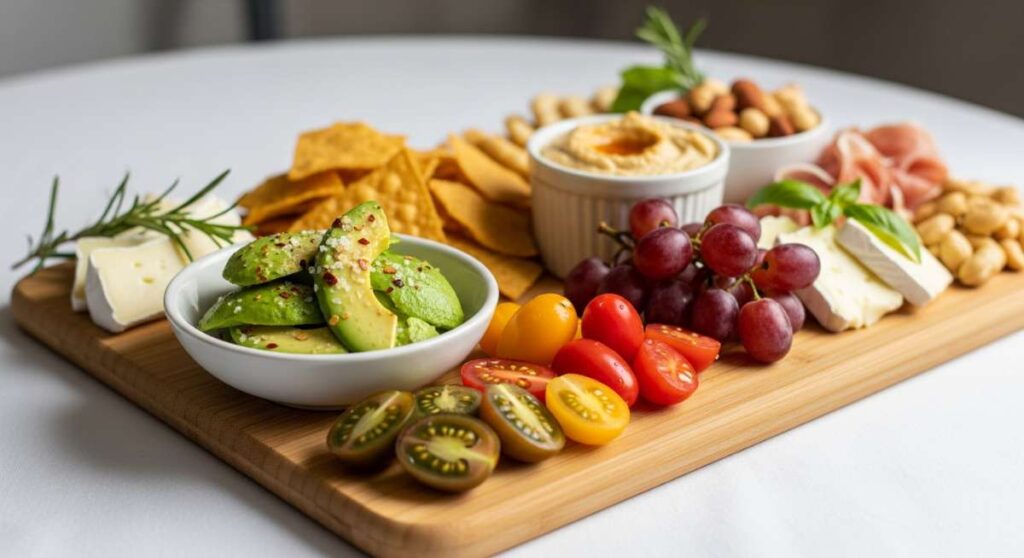
How to build food platters?

Why we love this
A well-constructed food platter is a feast for the senses, bringing together a symphony of colors, shapes, and textures that invite guests to explore. The beauty lies in the organized chaos—the way a sharp cheddar nestles against a sweet grape or how a crunchy cracker dips into a silky hummus. It creates a relaxed, conversational atmosphere where the food itself becomes the centerpiece of the room. Every glance at the board reveals a new combination to try, making the dining experience feel like an interactive journey.
Ingredients
- Assorted cheeses (Brie, Sharp Cheddar, Goat Cheese)
- Cured meats (Prosciutto, Salami)
- Fresh fruits (Grapes, Berries, Fig slices)
- Nuts and olives
- Artisan crackers and sliced baguette
- Honey or fig jam
How to make it
- Select a large wooden board or slate and start by placing your “anchors”—these are small bowls filled with olives, jams, or dips that create structure on the board.
- Position your cheeses next. Keep one block whole, slice one into triangles, and crumble another to provide visual variety in shapes.
- Fan out your meats in a ribbon-like fashion or fold them into quarters to add volume and height to the platter.
- Fill the largest remaining gaps with your crackers and bread slices, following the natural curves of the bowls and cheeses.
- Use small fruits like berries or grapes to tuck into the tiny crevices, ensuring no part of the board is left bare for a “bountiful” look.
- Finish by drizzling honey over the Brie and garnishing with sprigs of fresh thyme or rosemary to add a pop of green and a fresh aroma.
How to roast lemon salmon?
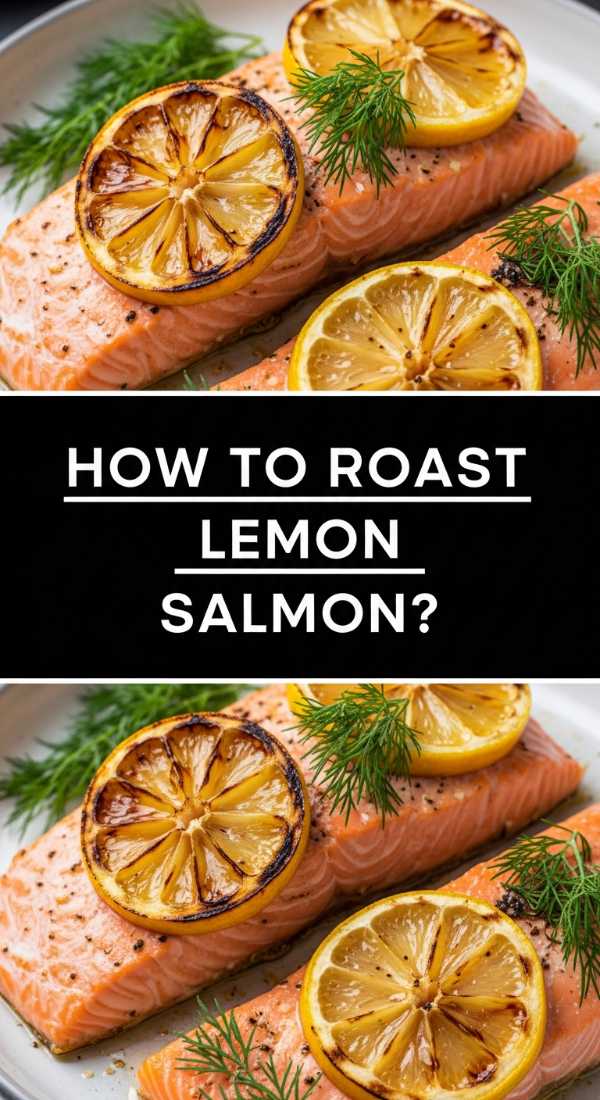
Why we love this
Lemon salmon is the epitome of light, sophisticated dining, offering a tender flake that melts in your mouth with every bite. The bright, zesty aroma of roasted citrus slices pairs perfectly with the rich, savory notes of the fish, creating a profile that is both clean and deeply satisfying. As the salmon roasts, the juices from the lemon mingle with the herbs, basting the fish in a natural sauce that keeps it incredibly moist. It’s a vibrant, colorful dish that looks just as good as it tastes on a summer evening.
Ingredients
- 1 lb salmon fillet (center cut)
- 1 large lemon, thinly sliced
- 2 tbsp melted butter or olive oil
- 2 cloves garlic, minced
- Fresh dill and parsley
- Salt and cracked black pepper
How to make it
- Preheat your oven to 400°F (200°C) and line a baking dish with parchment paper or foil for easy cleanup.
- Pat the salmon fillet completely dry with paper towels; moisture on the surface prevents the seasoning from sticking and the fish from roasting properly.
- In a small bowl, whisk together the melted butter, minced garlic, salt, and pepper, then brush this mixture generously over the top of the salmon.
- Lay the thin lemon slices across the top of the fish in an overlapping pattern, which protects the flesh and infuses it with citrus oils.
- Bake for 12-15 minutes. You will know it is done when the salmon is opaque and flakes easily with a fork in the thickest part (internal temp should hit 145°F).
- Remove from the oven and immediately garnish with a handful of freshly chopped dill and parsley for a burst of herbal freshness.
How to bake party sliders?

Why we love this
There is nothing quite like pulling a tray of sliders out of the oven and watching the cheese stretch as you pull them apart. The tops are glazed in a savory, buttery mixture that turns the buns into a golden, slightly sweet crust that crunches softly before giving way to a warm, savory center. These are the ultimate crowd-pleasers, offering a hand-held explosion of flavor that balances salt, fat, and heat perfectly. The aroma of melted cheese and toasted onions is enough to make any party feel like a success.
Ingredients
- 1 pack (12 count) Hawaiian sweet rolls
- 1/2 lb deli ham or roast beef
- 6 slices Provolone or Swiss cheese
- 1/2 cup melted butter
- 1 tbsp Dijon mustard
- 1 tsp Worcestershire sauce
- 1 tbsp dried minced onions or poppy seeds
How to make it
- Preheat your oven to 350°F (175°C). Without pulling the rolls apart, use a long serrated knife to slice the entire slab of rolls in half horizontally.
- Place the bottom half of the rolls in a baking dish and layer the meat evenly across the bread, followed by a thick layer of cheese slices.
- Place the top half of the rolls back on. In a small bowl, whisk the melted butter, mustard, Worcestershire sauce, and dried onions.
- Pour the butter mixture evenly over the tops of the rolls, using a pastry brush to ensure every inch of the bread is saturated.
- Cover the dish tightly with aluminum foil and bake for 10 minutes to melt the cheese without burning the tops.
- Remove the foil and bake for an additional 5-7 minutes until the tops are golden brown and slightly crisp to the touch.
How to create smoothie bowls?

Why we love this
A smoothie bowl is like having dessert for breakfast, but with a nutritional profile that leaves you feeling energized and glowing. The thick, velvet-like texture of the frozen fruit base provides a cooling sensation that is perfectly complemented by the crunch of granola and the snap of fresh seeds. Visually, the vibrant purples of acai or the deep pinks of pitaya create a stunning backdrop for artfully arranged toppings. It is a mindful way to start the day, focusing on the fresh, clean flavors of nature’s candy.
Ingredients
- 2 cups frozen mixed berries or mango
- 1 frozen banana (for creaminess)
- 1/2 cup almond milk or coconut water
- 1 tbsp almond butter
- Toppings: Granola, chia seeds, sliced strawberries, shredded coconut
How to make it
- Place your frozen fruit and banana in a high-speed blender. The fruit must be fully frozen to achieve that thick, scoopable soft-serve consistency.
- Add the almond milk sparingly; start with 1/4 cup and only add more if the blender stalls. You want the mixture to be as thick as possible.
- Blend on high, using a tamper tool to push the frozen fruit down into the blades until the mixture is completely smooth and uniform in color.
- Pour the thick smoothie into a wide, chilled bowl and use a spoon to smooth out the surface.
- Arrange your toppings in neat rows or a circular pattern: start with the heavy items like granola, then add the fruit slices, and finish with the small seeds.
- Serve immediately before it melts, enjoying the contrast between the freezing base and the room-temperature toppings.
How to fry crispy chicken?

Why we love this
Crispy fried chicken is a masterclass in texture, offering a rugged, craggy crust that shatters into savory bits with every bite. Beneath that golden armor lies meat that is incredibly succulent and tender, having been marinated to perfection. The scent of hot oil and toasted spices is nostalgic and inviting, promising a meal that is unapologetically indulgent. It is the ultimate soul food, bringing a sense of warmth and satisfaction that few other dishes can match, especially when paired with a cold dip.
Ingredients
- 1 lb chicken thighs or tenders
- 1 cup buttermilk
- 1.5 cups all-purpose flour
- 1/2 cup cornstarch (for extra crunch)
- Spices: Paprika, garlic powder, onion powder, cayenne, salt, pepper
- Neutral oil for frying (Peanut or Vegetable)
How to make it
- Marinate the chicken in buttermilk and a pinch of salt for at least 2 hours, or overnight, to tenderize the proteins and ensure a juicy interior.
- In a shallow dish, whisk together the flour, cornstarch, and all of your dry spices. The cornstarch is the secret weapon for a glass-like crunch.
- Drizzle two tablespoons of the buttermilk marinade into the flour mixture and stir with a fork to create small “clumps”—these will become the extra-crispy bits on the chicken.
- Dredge each piece of chicken in the flour, pressing firmly to ensure a thick coating, then shake off the excess.
- Heat 2 inches of oil in a heavy cast-iron skillet to 350°F (175°C). Use a thermometer to maintain this heat; too low and the chicken gets greasy, too high and it burns.
- Fry the chicken in batches for 5-7 minutes per side until the internal temperature reaches 165°F and the crust is a deep, golden mahogany.
How to sear garlic shrimp?
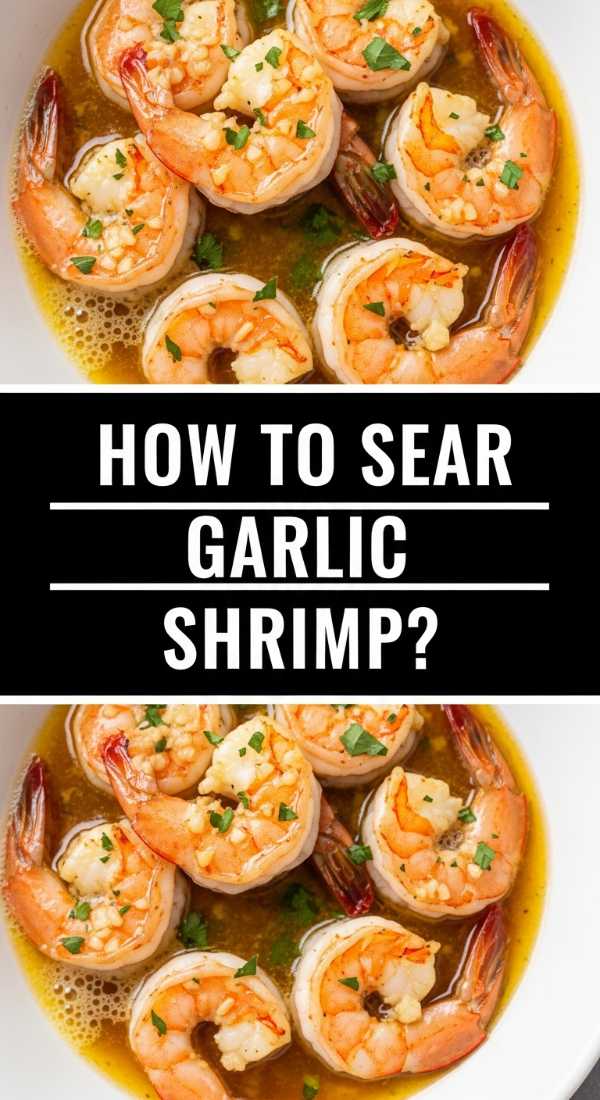
Why we love this
Garlic shrimp is a fast-paced culinary delight that brings the essence of the coast right to your dinner table. The sight of the shrimp turning from translucent grey to a vibrant, pearly pink in a sizzling pan is always a thrill for the home cook. The sauce, a rich emulsion of butter, lemon, and toasted garlic, is so flavorful you’ll want to mop up every last drop with a piece of crusty bread. It’s a dish that feels elegant and sophisticated, yet it comes together with minimal effort and maximum impact.
Ingredients
- 1 lb large shrimp, peeled and deveined
- 4 cloves garlic, minced
- 3 tbsp unsalted butter
- 1 tbsp olive oil
- 1/2 tsp red pepper flakes
- Fresh parsley and lemon wedges
How to make it
- Pat the shrimp dry with paper towels to ensure they sear rather than steam when they hit the hot pan. Season lightly with salt and pepper.
- Heat the olive oil and 1 tablespoon of butter in a large skillet over medium-high heat until the butter is foamy and just beginning to turn brown.
- Add the shrimp in a single layer, ensuring they aren’t crowded. Sear for 1-2 minutes without moving them to develop a golden-brown crust on the bottom.
- Flip the shrimp and immediately add the remaining butter, minced garlic, and red pepper flakes to the center of the pan.
- Spoon the melting garlic butter over the shrimp repeatedly for another 60-90 seconds until the garlic is fragrant but not burnt.
- Remove from heat as soon as the shrimp are opaque and curled into a loose ‘C’ shape. Garnish with parsley and a generous squeeze of fresh lemon juice.
How to prepare veggie tacos?

Why we love this
Veggie tacos are a celebration of the garden, offering an earthy and vibrant alternative to traditional meat fillings. The combination of roasted cauliflower or smoky beans provides a hearty texture that stands up beautifully to zesty slaws and creamy garnishes. Each taco is a handheld party of flavors—smoky, tangy, spicy, and fresh all at once. They are incredibly customizable, allowing everyone to build their perfect bite, and the bright colors make them an absolute standout on any dinner spread.
Ingredients
- 1 head cauliflower (cut into small florets) or 2 cans black beans
- 2 tbsp taco seasoning (cumin, chili powder, smoked paprika)
- Small corn or flour tortillas
- Toppings: Pickled red onions, sliced radish, avocado, cilantro
- Sauce: Lime crema (sour cream mixed with lime juice and zest)
How to make it
- Preheat your oven to 425°F (220°C). Toss your cauliflower florets in olive oil and taco seasoning until they are completely and evenly coated.
- Spread the cauliflower on a baking sheet and roast for 20-25 minutes, tossing halfway through, until the edges are charred and the centers are tender.
- While the veggies roast, prepare your lime crema by whisking together sour cream, lime juice, lime zest, and a pinch of salt until smooth.
- Warm your tortillas directly over a gas flame for 10 seconds per side or in a dry skillet until they are pliable and have small charred spots.
- Assemble the tacos by placing a generous spoonful of the roasted veggies in the center of the warm tortilla.
- Top with pickled onions for acidity, radish for crunch, and a heavy drizzle of the lime crema to tie all the earthy flavors together.
Conclusion
In a world that often feels rushed, the viral food board reminds us to slow down and enjoy the assembly of a good meal. Whether you’re smashing potatoes to the perfect crunch or layering the perfect avocado toast, these dishes are about more than just sustenance—they’re about the sensory experience of cooking and sharing. I hope these recipes inspire you to clear off your counter, grab a big board, and create something beautiful this weekend. Don’t forget to tag me in your recreations; I can’t wait to see your lazy-day masterpieces!