
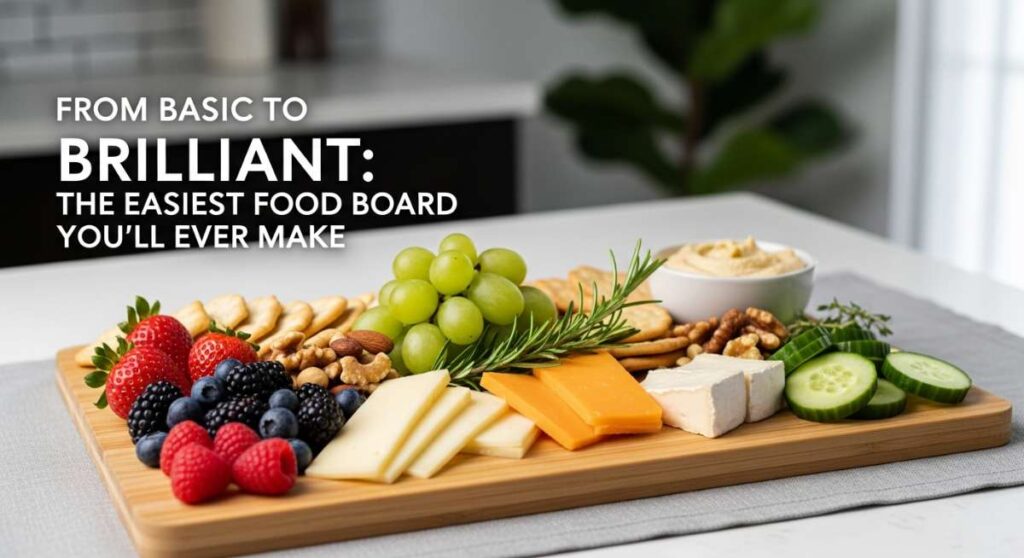
We’ve all been there—the doorbell is about to ring, and you’re standing in the kitchen with a bag of crackers and a block of cheese, feeling like your hosting game is more ‘blah’ than ‘brilliant.’ I remember the first time I tried to host a brunch; I spent four hours over-complicating a single quiche while my guests sat awkwardly in the living room. That was the moment I realized the secret to viral-worthy hosting isn’t about working harder; it’s about the art of the assembly. There’s something almost magical about a beautifully laid-out food board that invites people to graze, laugh, and linger just a little bit longer.
Today, I’m taking you behind the scenes of my signature ‘Brilliant Board.’ We aren’t just throwing things on a tray; we are creating a sensory experience that feels lush and curated. From the crisp scent of freshly pressed juices to the irresistible sizzle of home-style favorites, this guide is designed to help you transform basic ingredients into a centerpiece that will have everyone reaching for their phones to snap a photo before they even take a bite. Let’s dive into the easiest way to make your kitchen the heart of the home.
How to make fresh apple juice?

Why we love this
There is nothing that compares to the crisp, clean aroma of freshly pressed apples filling your kitchen on a sunny morning. Unlike the store-bought versions that often feel heavy and overly sweet, homemade apple juice has a bright, translucent quality and a tart zing that dances on the tongue. Imagine the sound of that first crunch as you slice into a Gala apple, followed by the sight of golden liquid swirling into a glass filled with ice—it is the ultimate refresher that feels like a hug from an orchard in every single sip.
Ingredients
- 4 large Granny Smith apples (for tartness)
- 4 large Gala or Honeycrisp apples (for sweetness)
- 1/2 inch fresh ginger (optional, for a kick)
- A squeeze of lemon juice to prevent oxidation
How to make it
- Begin by thoroughly washing your apples under cold running water to remove any wax or residue; since we are juicing the skin, cleanliness is paramount.
- Core the apples and cut them into segments that are appropriately sized for your specific juicer’s chute, ensuring you remove the seeds which can add a bitter aftertaste.
- Turn your juicer to a medium-high speed setting to efficiently extract the liquid while maintaining the integrity of the enzymes.
- Slowly feed the apple slices and the optional ginger into the juicer, using the plunger to apply steady, even pressure rather than forcing them through too quickly.
- Once the juice is collected, stir in a teaspoon of lemon juice immediately; this acts as a natural antioxidant to keep that beautiful golden hue from turning brown.
- Pour the juice through a fine-mesh sieve or cheesecloth if you prefer a perfectly clear, pulp-free consistency, and serve immediately over crushed ice.
How to squeeze orange juice?
Why we love this
Waking up to the vibrant, citrusy scent of oranges being squeezed is like an instant dose of liquid sunshine. The texture of real, hand-squeezed juice is unmatched—thick with tiny bursts of pulp that explode with flavor, offering a natural sweetness that no carton could ever replicate. It feels artisanal and intentional, a small luxury that turns a simple breakfast board into a high-end cafe experience right in your own dining room, leaving a lingering, zesty fragrance in the air long after the glasses are empty.
Ingredients
- 6-8 large Valencia or Navel oranges
- A pinch of sea salt (to enhance sweetness)
- Fresh mint sprigs for garnish
How to make it
- Select oranges that feel heavy for their size, as this indicates a higher juice content, and roll them firmly against your countertop with your palm for 30 seconds to loosen the internal membranes.
- Slice each orange in half crosswise, ensuring a clean cut to expose the segments evenly for maximum extraction.
- Using a manual citrus press or an electric reamer, place the orange half onto the cone and apply firm downward pressure while rotating the fruit.
- Continue juicing until only the white pith remains, being careful not to over-squeeze into the bitter white layer of the peel.
- Pour the collected juice into a carafe, adding a tiny pinch of sea salt—a professional secret that neutralizes acidity and makes the natural sugars pop.
- Garnish with a slapped mint leaf (hitting the leaf against your hand releases the oils) to add a refreshing aromatic layer to the citrus profile.
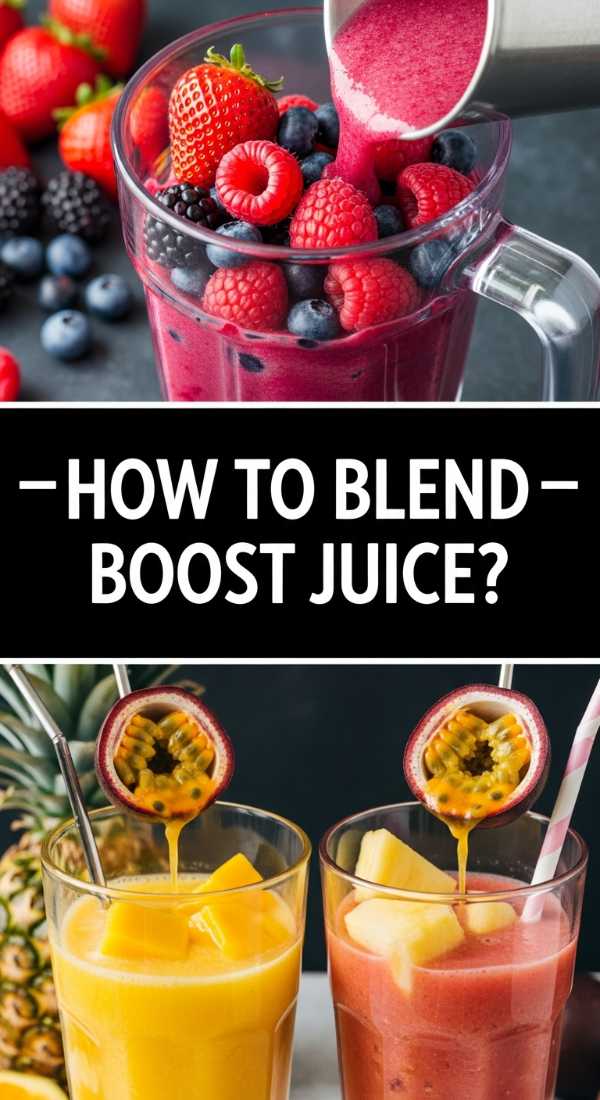
How to blend boost juice?
Why we love this
This is the ‘glow-up’ your food board needs, providing a vibrant pop of color and a serious nutritional punch that feels both indulgent and virtuous. The texture is creamy and velvety, with a cooling sensation that provides the perfect contrast to the heavier elements on your board. As you blend, the deep purples of berries or the electric greens of spinach create a visual masterpiece that signals vitality and energy, making your guests feel truly pampered and nourished with every smooth, refreshing gulp.
Ingredients
- 1 cup frozen blueberries
- 1 ripe banana
- 1 handful of baby spinach
- 1 cup coconut water
- 1 tablespoon hemp seeds
How to make it
- Add your liquid base, the coconut water, to the blender first; this ensures the blades can spin freely and prevents the motor from stalling during the blending process.
- Layer in your soft ingredients like the spinach and banana, followed by the heavy frozen blueberries and hemp seeds on top to weigh the greens down into the blades.
- Start the blender on its lowest speed setting to break down the frozen fruit, then gradually increase to the highest ‘liquify’ or ‘smoothie’ setting.
- Blend for a full 60 to 90 seconds until the mixture is completely homogenous and there are no visible flecks of spinach left.
- Check the consistency; if it’s too thick to pour elegantly, add a tablespoon of coconut water at a time until it reaches a pourable, silk-like texture.
- Pour into small shot glasses for your board, ensuring a clean pour to maintain those sharp, vibrant colors.
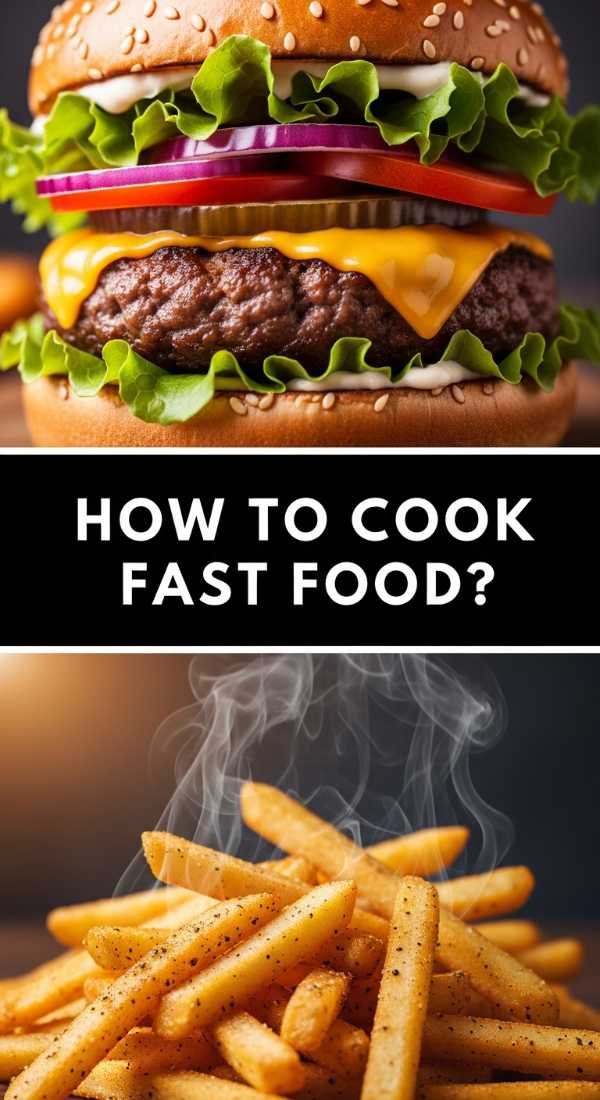
How to cook fast food?
Why we love this
There is a nostalgic, primal joy in the smell of salty, crispy fries and sizzling sliders that instantly puts guests at ease. Bringing a ‘fast food’ element to an elegant board breaks the formality and adds a layer of comfort that everyone secretly craves. We love the contrast of the golden-brown, crunchy exterior of a perfectly fried potato against the soft, pillowy texture of a brioche bun—it’s the ultimate crowd-pleaser that brings a sense of fun and approachability to your sophisticated spread.
Ingredients
- Frozen waffle fries or shoestring fries
- Mini beef patties or halloumi slices
- Slider buns
- Truffle oil and parmesan (to elevate the ‘fast food’ vibe)
How to make it
- Preheat your air fryer or oven to 400°F (200°C); a high temperature is essential for achieving that signature fast-food crunch without the excess oil.
- Spread the fries in a single layer, ensuring they aren’t overlapping, which allows the hot air to circulate and prevents sogginess.
- Cook the fries for 15-18 minutes, shaking the basket halfway through to ensure an even, golden-brown color on all sides.
- While the fries cook, sear your slider patties in a cast-iron skillet over high heat for 2 minutes per side to create a deep, caramelized crust (the Maillard reaction).
- Toast the slider buns face-down in the residual fat in the pan for 30 seconds until they are warm and slightly crisp.
- Immediately toss the hot fries in a drizzle of truffle oil and a dusting of parmesan cheese, then assemble the sliders with a toothpick to keep them upright on the board.
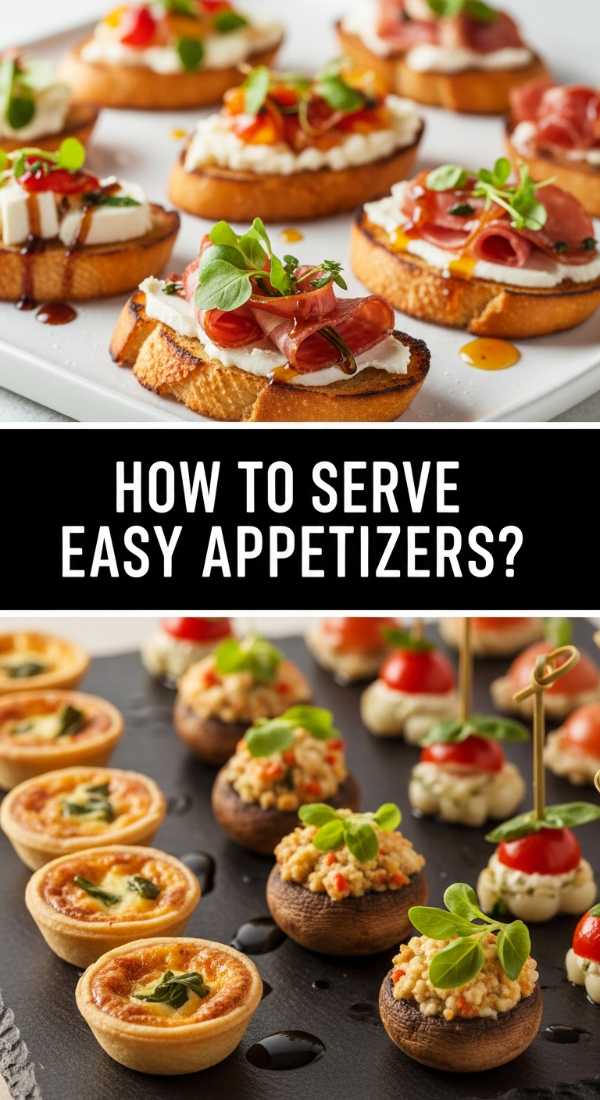
How to serve easy appetizers?
Why we love this
The beauty of easy appetizers lies in their ability to provide complex flavor profiles with minimal effort, acting as the savory anchors of your food board. We love the tactile experience of picking up a small, perfectly composed bite—the crunch of a crostini, the creaminess of goat cheese, and the sweet tang of a balsamic glaze all merging in one mouthful. It creates a rhythm to the eating experience, allowing guests to sample different textures and flavors without feeling overwhelmed by a single large dish.
Ingredients
- Baguette, sliced and toasted
- Goat cheese or cream cheese
- Prosciutto or smoked salmon
- Fig jam or honey
- Fresh arugula
How to make it
- Slice the baguette into 1/2-inch rounds on a bias to create more surface area for toppings and toast them under a broiler for 1-2 minutes until the edges are golden.
- Wait for the bread to cool slightly so the cheese doesn’t melt and run off; you want a thick, stable layer of goat cheese spread from edge to edge.
- Fold a thin ribbon of prosciutto or a slice of smoked salmon on top of the cheese, creating height and volume for a more professional look.
- Add a small dollop of fig jam or a drizzle of honey in the center of the meat to provide a sweet counterpoint to the saltiness.
- Top with a single leaf of fresh arugula for a pop of green and a peppery finish that cleanses the palate.
- Arrange them in a linear or circular pattern on the board to create a sense of order and abundance.
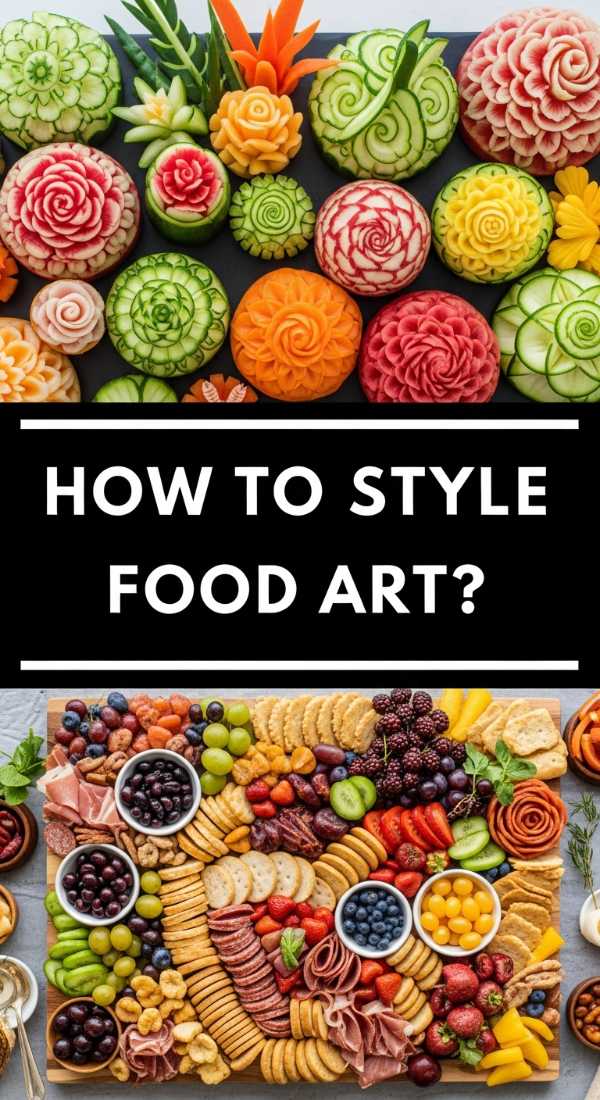
How to style food art?

Why we love this
Styling food art is where a simple meal transforms into a viral masterpiece; it is the visual ‘wow’ factor that makes people stop in their tracks. We love how the careful placement of a pomegranate jewel or the rhythmic fan of a sliced pear creates a sense of luxury and intention. It’s about more than just eating; it’s about the aesthetic harmony of colors—deep reds, vibrant greens, and earthy browns—coming together to tell a story of abundance and celebration that delights the eyes before it ever hits the tongue.
Ingredients
- Edible flowers (pansies or nasturtiums)
- Fresh herbs (rosemary sprigs, thyme)
- Whole fruits (pomegranates, grapes on the vine)
- Nuts and dried fruits for filling gaps
How to make it
- Start by placing your largest items first—the bowls of juice or the main appetizer plates—to create ‘anchor points’ on your board or table.
- Create ‘movement’ by placing winding paths of grapes or crackers that lead the eye from one side of the board to the other in an S-curve.
- Fill the large gaps with clusters of nuts or dried cranberries, ensuring no part of the board’s surface is visible; this creates the ‘abundance’ effect.
- Layer in your garnishes: tuck rosemary sprigs under cheeses and scatter edible flowers over dips to add pops of contrasting color.
- Use a variety of heights; place some items directly on the board and others on small raised platforms or inside hollowed-out fruit shells.
- Step back frequently to check the balance of colors; if one side looks too ‘brown’ from breads, add a cluster of bright berries or a sliced kiwi to lift the visual weight.
How to bake birthday food?
Why we love this
Birthday food carries an emotional weight unlike any other—it’s the scent of vanilla and sugar that signifies a special milestone and pure, unadulterated joy. We love the soft, moist crumb of a homemade cupcake and the way a swirl of buttercream frosting feels like the ultimate indulgence. Adding a baked element to your board makes the occasion feel personal and handmade, filling the room with a warm, comforting aroma that reminds everyone of childhood celebrations and the simple pleasure of a sweet treat.
Ingredients
- 1 ½ cups all-purpose flour
- 1 cup granulated sugar
- 1 ½ tsp baking powder
- ½ cup softened butter
- 1 large egg
- ½ cup whole milk
- Vanilla bean paste
How to make it
- Preheat your oven to 350°F (175°C) and line a mini-cupcake tin; mini versions are better for boards as they allow for ‘grazing’ without being too filling.
- Cream the softened butter and sugar together for at least 3-5 minutes until the mixture is pale, light, and fluffy; this aeration is key to a soft crumb.
- Whisk in the egg and vanilla bean paste—use paste instead of extract to see those beautiful little black vanilla specks in the finished cake.
- In a separate bowl, sift the flour and baking powder together to remove lumps and ensure even rising during the bake.
- Alternate adding the dry ingredients and the milk to the butter mixture, starting and ending with the dry, and mixing only until just combined to avoid toughening the gluten.
- Fill the liners 2/3 full and bake for 12-15 minutes or until a toothpick comes out clean; let them cool completely before frosting to prevent the cream from melting.
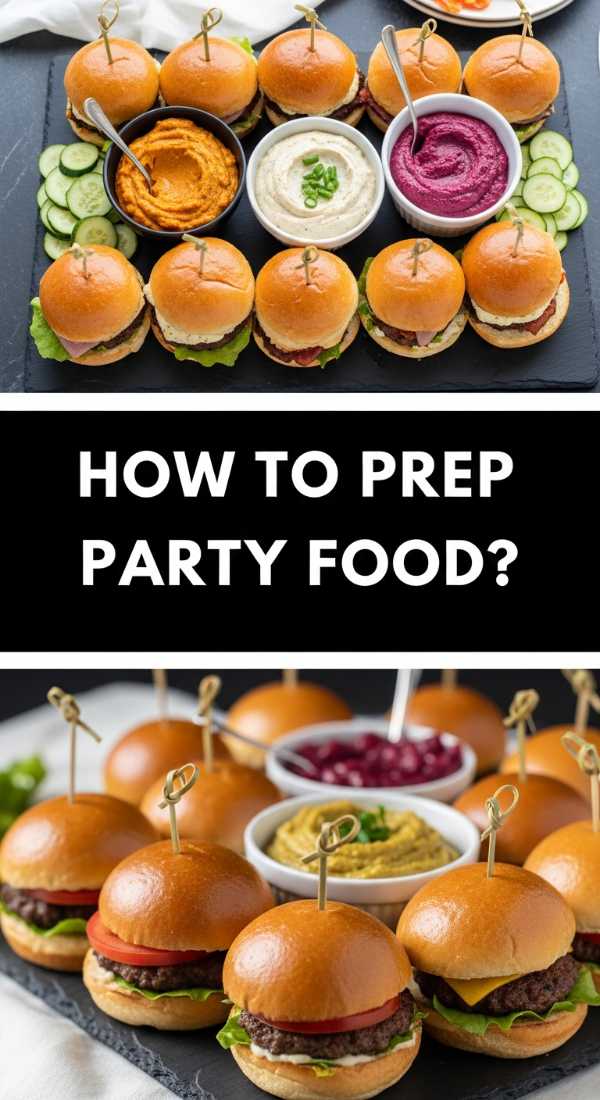
How to prep party food?
Why we love this
The magic of party food prep is the peace of mind it brings, allowing the host to actually enjoy the party rather than being stuck in the kitchen. We love the organized chaos of a prep session—the rhythmic chopping, the stacking of containers, and the satisfaction of seeing a fridge full of ready-to-assemble components. It’s about creating a stress-free environment where the flavors have had time to meld, resulting in dips and marinades that are deeper and more complex, making the final presentation feel effortless and polished.
Ingredients
- Pre-cut vegetables (carrots, cucumbers, radishes)
- Marinated olives
- Dips (hummus, tzatziki, or spinach dip)
- Salami or ham rosettes
How to make it
- Plan your board 24 hours in advance by washing and cutting all hardy vegetables; store them in airtight containers with a damp paper towel to maintain crispness.
- Prepare your dips at least 4 hours before serving; this allows the garlic, herbs, and spices to fully infuse into the creamy base.
- Create your meat rosettes by folding rounds of salami in half and then in half again, pinning them with a toothpick or bunching them tightly in a small bowl so they hold their shape.
- Batch-toast any nuts or seeds in a dry pan for 3-5 minutes until fragrant and store them in a dry jar to maintain their crunch.
- Prepare your fruit by washing and drying thoroughly; for fruits like apples or pears, wait until the very last moment to slice to prevent browning.
- Arrange your ‘non-perishables’ (crackers, nuts, chocolates) on the board an hour early and cover with plastic wrap, leaving only the cold items for the final 5-minute assembly.
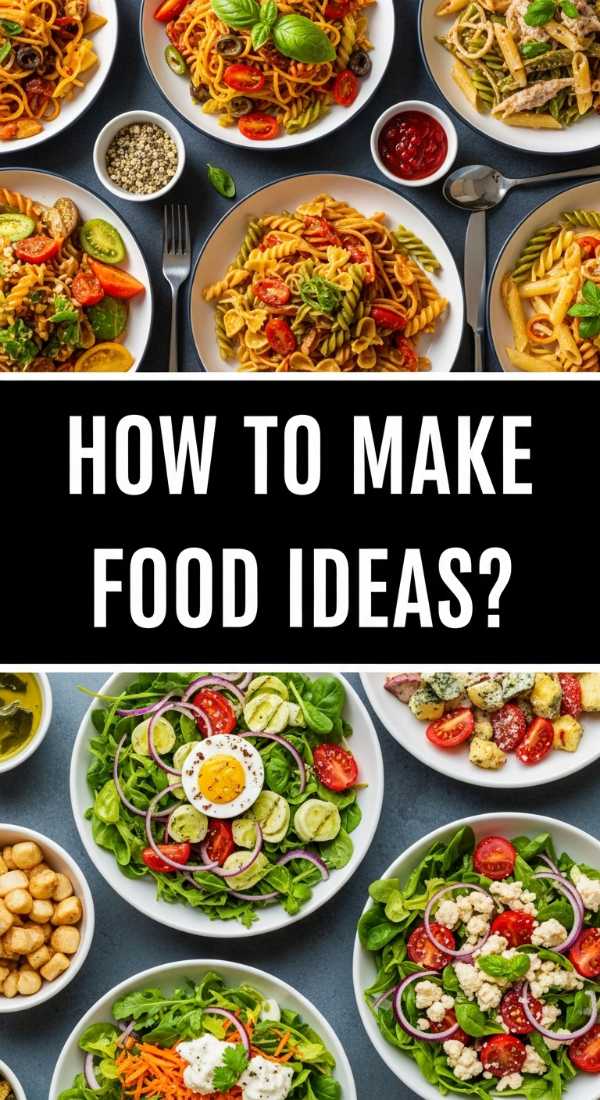
How to make food ideas?
Why we love this
Conceptualizing food ideas is the creative spark that sets a viral board apart from a standard tray; it’s the ‘brainstorming’ phase that allows your personality to shine. We love the process of mood-boarding—choosing a theme like ‘Mediterranean Summer’ or ‘Cozy Autumn’ and finding ingredients that fit that specific vibe. It’s an intellectual and sensory puzzle, matching colors, textures, and seasonal produce to create a cohesive story that excites the imagination and makes the act of eating feel like an adventure.
Ingredients
- A notebook or digital mood board
- Seasonal produce guide
- Color wheel (for visual planning)
- Texture list (crunchy, creamy, soft, sharp)
How to make it
- Start by choosing a single ‘hero ingredient’ or a color palette (e.g., monochromatic green or high-contrast red and white) to anchor your concept.
- Research what is currently in season at your local farmer’s market; seasonal items are cheaper, taste better, and naturally look more ‘premium’ on a board.
- Map out your board on a piece of paper first, drawing circles for where bowls will go and lines for where ‘rivers’ of crackers or fruit will flow.
- Ensure you have a balance of the four key taste profiles: Salt (meats/olives), Sweet (fruit/honey), Sour (pickles/citrus), and Bitter (dark chocolate/arugula).
- Think about the ‘vessel’—will you use a wooden board, a marble slab, or individual slate tiles? The texture of the board itself contributes to the overall ‘idea.’
- Keep a running list of ‘unexpected pairings’ (like watermelon and feta or apple and cheddar) to give your guests a conversational talking point.
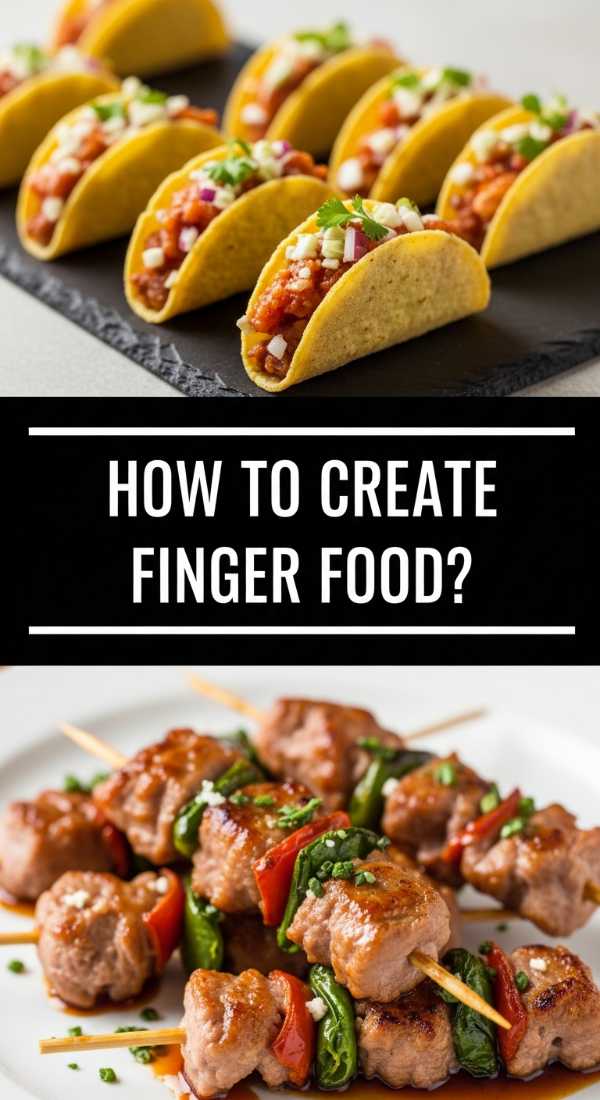
How to create finger food?
[IMAGE_10]
Why we love this
Finger food is the ultimate social lubricant; it removes the barrier of cutlery and formal seating, encouraging guests to move around and mingle. We love the ‘pop-ability’ of these tiny treasures—the way a single olive or a cube of sharp cheddar provides a concentrated burst of flavor that doesn’t require a plate. It’s a playful way to eat that feels casual yet curated, allowing for a diverse range of tastes and textures to be enjoyed in quick succession, making the dining experience feel light, fast-paced, and modern.
Ingredients
- Skewers or fancy toothpicks
- Cheese cubes (Manchego, Cheddar, or Havarti)
- Pitted olives
- Cherry tomatoes
- Tortellini (cooked and cooled)
How to make it
- Choose ingredients that are ‘structural’ and won’t fall apart when pierced with a skewer; avoid overly crumbly cheeses or very soft fruits.
- For a classic ‘caprese’ skewer, thread a cherry tomato, a small basil leaf, and a mini mozzarella pearl onto a bamboo pick.
- For a ‘pasta’ finger food, cook cheese tortellini until al dente, rinse in cold water to stop the cooking, and toss in a light pesto before skewering with an olive.
- Keep all finger foods uniform in size; aim for ‘one-bite’ dimensions (roughly 1 inch) so guests can eat them comfortably while holding a drink.
- Arrange the skewers in ‘bouquets’ inside small glasses or lay them in overlapping rows to create a sense of geometric precision on your board.
- Always provide a small, discreet bowl nearby for discarded toothpicks or olive pits to keep the board looking pristine throughout the event.
Conclusion
And there you have it—your roadmap from basic ingredients to a brilliant, viral-ready food board! Remember, the secret isn’t in perfection, but in the variety of textures, the pop of fresh colors, and the love you put into the assembly. Whether you’re hosting a big birthday bash or just making a Tuesday night feel a little more special, these simple steps will ensure your spread is the talk of the town. So, grab your favorite board, start squeezing those oranges, and let your creativity flow. Happy hosting!