
Why Everyone is Obsessed with This Simple 4-Ingredient Food Board
There is something about the golden hour of a late summer afternoon that demands simplicity. You know those moments—where the sun hangs low, the air is thick with the scent of blooming jasmine, and you suddenly have a house full of friends but zero desire to spend hours over a hot stove. It’s in these quiet, joyful moments that the ‘Simple Board’ was born, a concept that celebrates the beauty of high-quality ingredients arranged with love rather than stress.
We’ve all seen the over-the-top charcuterie boards that require a degree in architecture to assemble, but the world is shifting back to basics. People are craving connection over perfection. This 4-ingredient food board trend isn’t just about the food; it’s about the ease of lifestyle it represents—a way to nourish your soul and your guests without missing a single second of the laughter echoing through your living room.
How to Make Pasta Salad?

Why we love this
This isn’t just a side dish; it is a symphony of textures and bright, herbaceous notes that sing of Mediterranean summers. Imagine the satisfying bounce of perfectly al dente rotini against the burst of sun-ripened cherry tomatoes and the creamy, salty crumble of high-quality feta cheese. Every bite is coated in a silky, zesty vinaigrette that awakens the palate, leaving a refreshing aftertaste of fresh basil and cracked black pepper that lingers just long enough to make you reach for another forkful.
Ingredients
- 1 lb Dried Rotini or Penne Pasta
- 1 pint Cherry Tomatoes, halved
- 8 oz Feta Cheese, cubed or crumbled
- 1/2 cup Zesty Italian Vinaigrette
- Handful of fresh Basil leaves
How to make it
- Fill a large stockpot with water and add a generous tablespoon of sea salt; the water should taste like the ocean to properly season the pasta from the inside out. Bring to a rolling boil over high heat.
- Add the pasta and stir immediately to prevent sticking. Cook for exactly 8-9 minutes, or until it reaches a firm ‘al dente’ texture—avoid overcooking as the pasta will soften further once the dressing is added.
- While the pasta cooks, halve your cherry tomatoes using a sharp serrated knife to ensure clean cuts without squishing the fruit.
- Drain the pasta in a colander and immediately rinse with cold water for 30 seconds to stop the cooking process and remove excess starch, which prevents the salad from becoming gummy.
- In a large wooden bowl, toss the cooled pasta with the vinaigrette until every spiral is glistening. Gently fold in the tomatoes and feta cheese, being careful not to over-mix so the cheese maintains its structure.
- Garnish with hand-torn basil leaves and a final crack of black pepper before chilling in the refrigerator for at least 30 minutes to allow the flavors to marry.
How to Mix Summer Cocktails?

Why we love this
There is an undeniable magic in the clink of ice against glass on a humid evening, especially when that glass contains a drink that tastes like liquid sunshine. This cocktail captures the essence of the season with the sharp, clean bite of premium gin balanced by the soft, floral sweetness of elderflower and the aggressive brightness of freshly squeezed lime. It feels sophisticated yet effortless, providing a cooling sensation that starts at the lips and radiates through the body, making it the ultimate companion for porch-side storytelling.
Ingredients
- 2 oz Botanical Gin
- 1 oz Elderflower Liqueur
- 3/4 oz Fresh Lime Juice
- Club Soda to top
- Fresh Mint and Cucumber ribbons for garnish
How to make it
- Begin by chilling your highball glass in the freezer for 10 minutes or filling it with ice water while you prepare the drink to ensure maximum frostiness.
- In a cocktail shaker, combine the gin, elderflower liqueur, and lime juice. Ensure you use fresh lime juice; the bottled variety lacks the volatile oils necessary for that true summer zing.
- Fill the shaker with large, solid ice cubes. Shake vigorously for at least 15-20 seconds—you want the shaker to feel painfully cold to the touch, indicating the drink is properly aerated and chilled.
- Discard the ice water from your serving glass and fill it with fresh, clear ice. Double strain the mixture into the glass to catch any small ice shards or pulp.
- Top slowly with chilled club soda, allowing the bubbles to naturally mix the ingredients without stirring away the carbonation.
- Express the oils of a fresh mint sprig by slapping it against your hand before placing it in the glass alongside a thin, elegant ribbon of cucumber.
How to Grill Best Sides?

Why we love this
Grilling transforms humble vegetables into something deeply soulful through the alchemy of char and smoke. These grilled sides offer a smoky depth that balances the natural sugars of the produce, resulting in a caramelization that is both sweet and savory. The aroma of slightly charred corn and asparagus wafting through the garden creates an instant sense of festivity, while the snap of the vegetable skins gives way to a tender, buttery interior that feels like a warm hug for your taste buds.
Ingredients
- 4 ears of Sweet Corn, husked
- 1 bunch Thick Asparagus spears
- Olive Oil for brushing
- Smoked Paprika and Flaky Sea Salt
- Lime wedges
How to make it
- Preheat your grill to medium-high heat (about 400°F). Ensure the grates are scrubbed clean and lightly oiled to prevent the delicate vegetables from tearing.
- Prep the asparagus by snapping off the woody bottom ends; they will naturally break at the point where the stalk becomes tender.
- Lightly coat the corn and asparagus with olive oil using your hands or a silicone brush, ensuring an even, thin layer that will facilitate browning rather than steaming.
- Place the corn on the hottest part of the grill first. Cook for 10-12 minutes, turning every 2 minutes. Look for the kernels to turn a deep golden yellow with patches of dark brown char.
- Add the asparagus during the last 4-5 minutes of grilling. Lay them perpendicular to the grates so they don’t fall through. Grill until they are bright green with charred tips and just tender when pierced with a fork.
- Remove from the heat and immediately dust with smoked paprika and flaky sea salt. Serve with lime wedges to squeeze over the top, adding a hit of acidity that cuts through the smoky char.
How to Cook Healthy Meals?

Why we love this
Eating healthy doesn’t have to feel like a compromise; it should feel like a celebration of vibrancy and nourishment. This approach to cooking focuses on the integrity of whole ingredients, where the crunch of raw vegetables meets the satisfying grain of quinoa and the richness of healthy fats. It’s a meal that leaves you feeling light and energized rather than weighed down, offering a rainbow of colors on your plate that is as visually stunning as it is nutritionally dense.
Ingredients
- 1 cup Tricolor Quinoa
- 1 Avocado, sliced
- 2 cups Baby Spinach
- 1 Roasted Sweet Potato, cubed
- Tahini Dressing
How to make it
- Rinse the quinoa thoroughly in a fine-mesh sieve under cold water for 2 minutes to remove the naturally occurring saponins, which can cause a bitter taste.
- In a small pot, combine the quinoa with 2 cups of water or vegetable broth. Bring to a boil, then reduce heat to the lowest setting, cover tightly, and simmer for 15 minutes.
- Turn off the heat and let the quinoa sit, covered, for 5 minutes. This ‘steam’ phase is crucial for achieving fluffy, separate grains rather than a mushy texture. Fluff with a fork.
- While the quinoa rests, roast your sweet potato cubes at 400°F with a drizzle of avocado oil for 25 minutes until the edges are caramelized and the centers are soft.
- Assemble your bowl by creating a bed of fresh baby spinach. Mound the warm quinoa and roasted sweet potatoes on top to slightly wilt the greens.
- Finish with fresh avocado slices and a generous drizzle of creamy tahini dressing, which provides the healthy fats needed to absorb the vitamins in the greens.
How to Make Summer Soup?

Why we love this
Summer soup is an exercise in restraint and freshness, often served chilled to provide a bracingly cool respite from the midday heat. A classic Gazpacho or chilled cucumber soup offers a silky, velvety mouthfeel punctuated by the sharp crunch of finely diced garnishes. It tastes like a garden in a bowl—bright, slightly acidic, and incredibly hydrating, with the fragrance of fresh dill or cilantro rising from the surface to refresh your senses before you even take the first spoonful.
Ingredients
- 4 large Roma Tomatoes, cored
- 1 English Cucumber, peeled
- 1 Red Bell Pepper, deseeded
- 2 cloves Garlic
- 2 tbsp Sherry Vinegar
How to make it
- Roughly chop the tomatoes, cucumber, and bell pepper into uniform chunks. Using an English cucumber is preferred as the skin is thinner and the seeds are less bitter.
- Place the vegetables into a high-speed blender along with the garlic cloves and sherry vinegar. The vinegar is essential for that signature Spanish ‘tang’ that defines a good Gazpacho.
- Pulse the blender on low initially to break down the chunks, then increase to high speed for 1-2 minutes until the mixture is completely smooth and emulsified.
- Taste the soup; if it feels too thick, add a tablespoon of cold water or tomato juice at a time until the desired consistency is reached.
- Pass the liquid through a fine-mesh strainer into a glass pitcher if you prefer a perfectly smooth, restaurant-quality texture, discarding the pulp.
- Chill in the refrigerator for at least 4 hours. Serving this soup lukewarm is a mistake—it must be icy cold. Pour into chilled bowls and garnish with a drizzle of extra virgin olive oil and diced cucumber.
How to Pack Picnic Sides?

Why we love this
The best picnic sides are those that travel well, maintaining their integrity and flavor even after an hour in a basket. There’s a rustic charm to opening a mason jar to find a perfectly layered bean salad or a crunchy slaw that hasn’t gone soggy. These dishes are designed for the outdoors—sturdy, vibrant, and easy to eat with a simple bamboo fork while sitting on a checkered blanket, providing a burst of savory satisfaction amidst the fresh air and sunshine.
Ingredients
- 1 can Chickpeas, rinsed
- 1/2 Red Onion, finely diced
- 1 cup Flat Leaf Parsley, chopped
- Lemon Zest and Juice
- 3 tbsp Olive Oil
How to make it
- Ensure your chickpeas are completely dry after rinsing by patting them with a paper towel; this allows the dressing to adhere better to the skins.
- In a medium mixing bowl, whisk together the lemon juice, lemon zest, and olive oil until the mixture is thick and cloudy (emulsified).
- Add the chickpeas and finely diced red onion to the bowl. The tiny dice of the onion ensures you get flavor in every bite without a single piece being overwhelming.
- Fold in the chopped parsley. Be generous with the herbs; they act more like a salad green than a garnish in this preparation.
- Transfer the mixture into airtight glass jars. Packing them tightly helps the chickpeas marinate in the lemon dressing during transit.
- Store the jars in a cooler with ice packs. The cold temperature keeps the onion crisp and the parsley vibrant green for up to 6 hours.
How to Plan Summer Dinners?
Why we love this
Planning summer dinners is an art form that prioritizes leisure and the celebration of seasonal produce. It’s about creating a menu that allows the host to be part of the party, featuring dishes that are assembled rather than slaved over. These dinners feel light and breezy, focusing on shareable plates that encourage guests to linger at the table long after the candles have flickered out, creating an atmosphere of intimacy and relaxed elegance that defines the best parts of the season.
Ingredients
- Fresh Sourdough Loaf
- Selection of Hard and Soft Cheeses
- Seasonal Fruits (Figs or Peaches)
- Prosciutto or Salami
- Honey for drizzling
How to make it
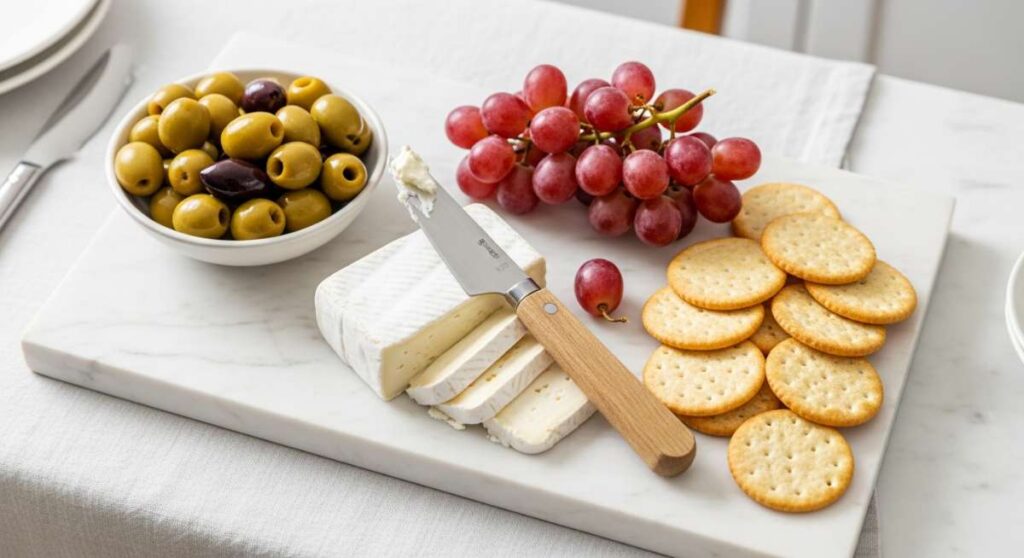
- Start by selecting a ‘hero’ element, such as a perfectly ripe brie or a bunch of flame-kissed grapes, and place it in the center of a large wooden board.
- Slice the sourdough into thick, rustic wedges. Toast them lightly under a broiler for 2 minutes just until the edges are golden but the center remains chewy.
- Arrange the meats in ‘ribbons’ by folding them loosely; this adds height and visual interest to the board while making them easy for guests to grab.
- Slice the peaches or figs and nestle them against the cheeses. The sweetness of the fruit cuts beautifully through the creamy fats of the dairy.
- Fill small decorative bowls with honey or grainy mustard and place them in the empty gaps on the board to create a sense of abundance.
- Set the board out 20 minutes before guests arrive. This allows the cheese to come to room temperature, which is essential for the full flavor profile to develop.
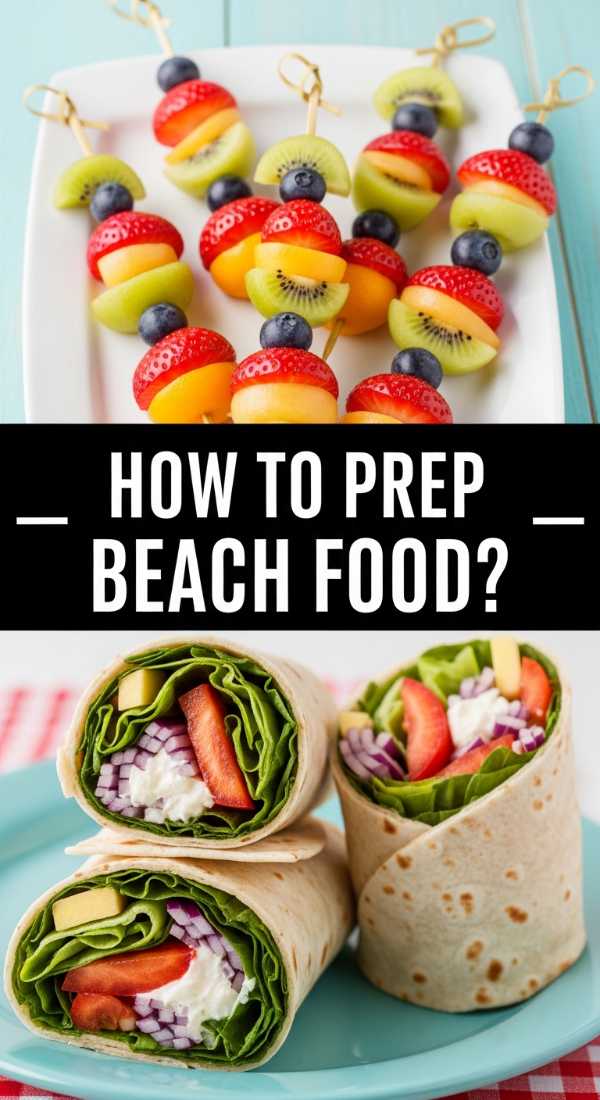
How to Prep Beach Food?

Why we love this
Beach food needs to be resilient, refreshing, and entirely sand-proof. There is a specific joy in reaching into a cold cooler after a dip in the ocean to find a crisp, hydrating snack that cuts through the salt on your lips. These prepped bites are designed for simplicity and maximum refreshment, offering a clean, watery crunch that rehydrates and revitalizes you under the beating sun, making every moment on the shore feel like a luxury retreat.
Ingredients
- Watermelon wedges
- Cucumber slices
- Tajin Seasoning
- Fresh Lime juice
- Sea Salt
How to make it
- Slice a cold watermelon into thick, manageable triangles, keeping the rind on to act as a natural ‘handle’ for sandy hands.
- Slice an English cucumber into thick rounds. Thick slices hold their temperature better and provide a more satisfying crunch than thin ones.
- In a small, dry container, mix your Tajin seasoning with an extra pinch of sea salt for those who like a more savory kick.
- Pack the watermelon and cucumber into a leak-proof plastic container, layered with damp paper towels to maintain humidity and prevent drying.
- Keep the lime wedges in a separate small silicone bag so the juice doesn’t cause the watermelon to macerate and become mushy before you’re ready to eat.
- When ready to serve, squeeze the lime directly over the fruit and sprinkle with the Tajin mix. The combination of sweet, salt, and heat is the ultimate beach-side flavor profile.
How to Make Hummingbird Food?

Why we love this
Welcoming hummingbirds to your garden is like hosting tiny, iridescent jewels that hover with breathtaking speed. Making your own nectar is a simple act of stewardship that ensures these high-energy creatures have a safe, chemical-free fuel source. There is a meditative peace in watching them dart to and fro, their wings humming a gentle rhythm that connects your backyard to the pulse of the natural world, turning your outdoor space into a sanctuary of life and color.
Ingredients
- 1 cup White Granulated Sugar
- 4 cups Filtered Water
How to make it
- Mix the sugar and water in a medium saucepan. It is critical to use plain white granulated sugar only; honey, brown sugar, or sugar substitutes can be fatal to hummingbirds.
- Heat the mixture over medium heat, stirring constantly until the sugar is completely dissolved. You do not need to bring it to a full boil, but a light simmer for 1-2 minutes helps eliminate any impurities in the water.
- Remove from heat and let the syrup cool completely to room temperature. Never put hot nectar into a feeder, as it can warp the plastic and harm the birds.
- Do not add red food coloring. The red parts of your feeder are enough to attract them, and the dye can be harmful to their delicate systems.
- Fill your clean bird feeder with the nectar and store any excess in a sealed jar in the refrigerator for up to two weeks.
- Hang the feeder in a shaded area to prevent the nectar from fermenting too quickly in the sun, and change the fluid every 3-5 days to keep it fresh.
How to Serve Baseball Snacks?
[IMAGE_10]
Why we love this
Baseball snacks are the ultimate nostalgia trip, bringing the energy of the ballpark right into your living room. There is a tactile satisfaction in cracking open a peanut shell or digging into a bowl of buttery, salty popcorn while the game plays in the background. It’s about the communal experience of sharing treats that are unpretentious and fun, creating a relaxed environment where the food is just as much a part of the tradition as the seventh-inning stretch.
Ingredients
- Roasted Peanuts (in-shell)
- Pretzels
- Caramel Corn
- Beef Jerky strips
How to make it
- Select a large, divided tray or use several small galvanized buckets to give that authentic ‘stadium’ feel to your presentation.
- Place the in-shell peanuts in the largest section. Providing them in the shell is key—the ‘work’ of opening them is part of the slow-paced baseball experience.
- Lightly warm the pretzels in a 300°F oven for 5 minutes before serving to revive their crunch and enhance the aroma of the baked dough.
- Layer the caramel corn in a separate bowl to keep the sticky sweetness away from the salty items, ensuring each snack maintains its distinct texture.
- Provide small individual paper bags or boats for guests to create their own custom ‘snack mix’ to take back to their seats.
- Place a large ‘discard’ bowl in the center of the table specifically for peanut shells, keeping the area tidy while maintaining the casual vibe of the game.
The Joy of Simple Hosting
At the end of the day, the obsession with the 4-ingredient food board isn’t about the food at all—it’s about the freedom it grants you. By stripping away the complexity of traditional hosting, you open up space for what truly matters: the stories shared, the laughter that makes your stomach ache, and the quiet comfort of being together. Whether you are prepping for a beach day or setting out a spread for the big game, remember that the best ingredient you can ever bring to the table is your own presence. So, keep it simple, keep it fresh, and enjoy every bite of the season.