
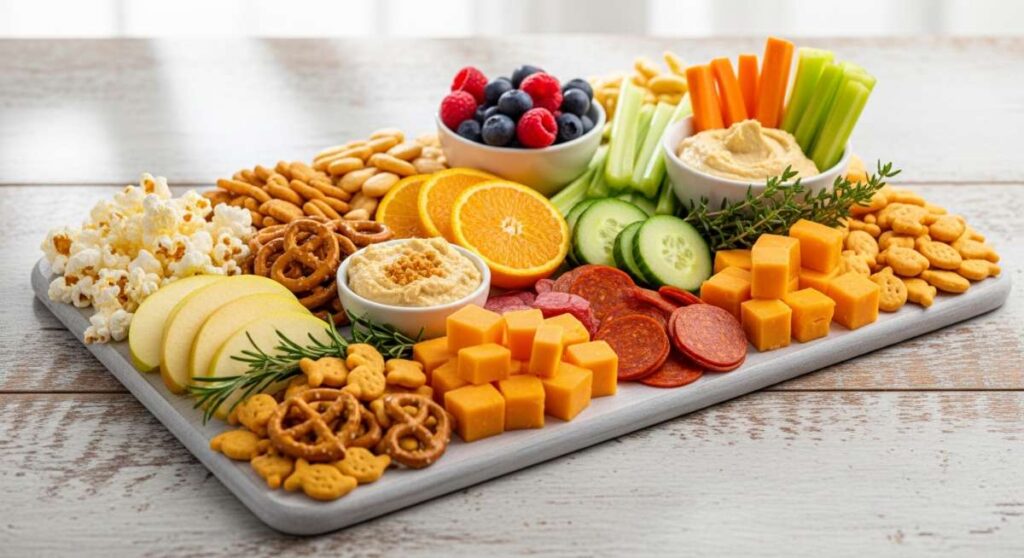
How to Master the Viral Snack Board Trend on a Budget
There is something inherently magical about gathering friends and family around a table laden with a colorful, overflowing snack board. It’s not just about the food; it’s about the laughter that erupts as everyone reaches for that last piece of cheese or the shared discovery of a perfectly ripe strawberry. In a world that often feels rushed and disconnected, the viral ‘simple food board’ trend has become my favorite way to slow down and create an atmosphere of effortless abundance without breaking the bank.
I remember the first time I tried to assemble one of these boards. I was worried it would look sparse or cost a fortune in gourmet imports. But I quickly learned the secret: it’s all about mixing high-impact homemade elements with budget-friendly staples. By focusing on seasonal ingredients and a few ‘star’ recipes, you can create a centerpiece that looks like a million bucks while keeping your grocery bill in check. Let’s dive into my favorite summer additions that will turn your next board into a viral-worthy masterpiece.
How to make summer pasta salad?

Why we love this
This pasta salad is the ultimate crowd-pleaser because it manages to be both incredibly light and deeply satisfying at the same time. We love the way the zesty vinaigrette clings to every curve of the rotini, while the salty punch of feta cheese creates a creamy contrast against the crisp, cool snap of fresh cucumbers and cherry tomatoes. As you take a bite, the aroma of fresh basil and oregano wafts up, instantly transporting your senses to a sunny Mediterranean hillside, making it the perfect vibrant base for any summer board layout.
Ingredients
- 16 oz Rotini or Fusilli pasta
- 1 cup cherry tomatoes, halved
- 1 English cucumber, diced
- 1/2 red onion, finely minced
- 1/2 cup Kalamata olives, sliced
- 4 oz Feta cheese, crumbled
- 1/2 cup extra virgin olive oil
- 1/4 cup red wine vinegar
- 1 tbsp dried oregano
- Salt and pepper to taste
How to make it
- Fill a large pot with water, add a generous pinch of salt, and bring to a rolling boil over high heat. Add the pasta and cook for approximately 8-10 minutes, or until just al dente—you want it to have a slight bite so it doesn’t get mushy after dressing.
- While the pasta cooks, whisk together the olive oil, red wine vinegar, oregano, salt, and pepper in a small bowl to create a bright, emulsified dressing.
- Drain the pasta and immediately rinse it under cold running water to stop the cooking process and remove excess starch. This ensures the salad stays light and the noodles don’t stick together.
- In a large mixing bowl, combine the cooled pasta with the halved tomatoes, diced cucumbers, red onions, and olives.
- Pour the dressing over the mixture and toss thoroughly with large spoons until every ingredient is evenly coated.
- Gently fold in the crumbled feta cheese last to prevent it from breaking down too much, then refrigerate for at least 30 minutes before serving to let the flavors meld together beautifully.
How to make refreshing summer cocktails?

Why we love this
There is nothing quite like the sound of ice clinking against glass on a humid July afternoon to signal that the party has truly started. These cocktails are designed to be the ultimate thirst-quenchers, balancing the botanical notes of high-quality spirits with the sharp, bright zing of fresh citrus and a hint of herbal sweetness. The effervescence of the soda water lifts the heavy heat of the day, leaving you feeling refreshed and revitalized with every chilled, sparkling sip that perfectly complements the salty snacks on your board.
Ingredients
- 2 oz Gin or Vodka
- 1 oz fresh lime juice
- 1/2 oz simple syrup
- 4-5 fresh mint leaves
- Club soda or sparkling water
- Ice cubes
- Lime wheels for garnish
How to make it
- Place the fresh mint leaves and simple syrup in a sturdy highball glass or a cocktail shaker. Use a muddler to gently press the leaves—don’t shred them, just bruise them to release those fragrant essential oils.
- Add the lime juice and your choice of spirit (Gin for floral notes, Vodka for a cleaner finish) to the glass.
- Fill the glass to the brim with large, solid ice cubes. Coldness is key here; you want the drink to stay chilled without diluting too quickly.
- Use a long bar spoon to stir the mixture vigorously for about 10 seconds, ensuring the flavors are well-integrated from top to bottom.
- Top the drink with chilled club soda, pouring slowly to maintain the carbonation.
- Give it one final, gentle stir and garnish with a fresh lime wheel and a sprig of mint for a professional, viral-ready look.
How to grill perfect corn?

Why we love this
Grilled corn is the quintessential taste of summer, offering a smoky, caramelized sweetness that you simply cannot achieve in a steamer basket. We love the tactile experience of holding a warm cob, the kernels bursting with juicy flavor against the savory richness of melted butter and a dusting of smoky chili powder. The sight of those golden-brown char marks provides a rustic, artisanal aesthetic to your snack board that feels both nostalgic and sophisticated, making it an absolute must-have for outdoor entertaining.
Ingredients
- 4-6 ears of fresh corn, husks removed
- 4 tbsp unsalted butter, softened
- 1 tsp smoked paprika or chili powder
- 1/2 cup Cotija cheese, crumbled
- Fresh cilantro, chopped
- Lime wedges
How to make it
- Preheat your grill to medium-high heat (about 400°F). Ensure the grates are clean and lightly oiled to prevent sticking.
- Place the shucked corn directly onto the hot grill grates. Do not crowd them; give each ear enough space to breathe.
- Close the lid and grill for about 10-12 minutes. Every 2-3 minutes, use tongs to rotate the corn a quarter turn. You are looking for even charring and for the kernels to turn a vibrant, deep yellow.
- Check for doneness by pressing a kernel; it should feel plump and yield slightly.
- Remove the corn from the grill and immediately brush generously with softened butter while the ears are still steaming hot.
- Sprinkle with smoked paprika, crumbled Cotija cheese, and fresh cilantro. Serve with lime wedges on the side for guests to squeeze over the top for a bright acid hit.
How to pack beach sliders?
Why we love this
Beach sliders are the unsung heroes of the snack board world because they are perfectly portioned, incredibly portable, and stay delicious even after a few hours in the sun. We love the contrast between the soft, pillowy sweetness of Hawaiian rolls and the savory, melted goodness of ham and Swiss cheese tucked inside. The buttery, poppyseed glaze on top adds a sophisticated crunch and a rich aroma that makes these little sandwiches feel like a gourmet treat rather than just a simple snack.
Ingredients
- 1 pack (12 count) Sweet Hawaiian rolls
- 1/2 lb deli ham, thinly sliced
- 6 slices Swiss cheese
- 1/2 cup unsalted butter, melted
- 1 tbsp Dijon mustard
- 1 tsp Worcestershire sauce
- 1 tbsp poppy seeds
How to make it
- Preheat your oven to 350°F. Without pulling the individual rolls apart, use a long serrated knife to slice the entire block of rolls in half horizontally.
- Place the bottom half of the rolls into a baking dish. Layer the ham evenly across the bread, followed by a layer of Swiss cheese slices, ensuring total coverage.
- Place the top half of the rolls back on. In a small bowl, whisk together the melted butter, Dijon mustard, Worcestershire sauce, and poppy seeds.
- Pour the butter mixture evenly over the tops of the rolls, using a pastry brush to ensure the sides are coated as well.
- Cover the dish with foil and bake for 10 minutes to melt the cheese, then remove the foil and bake for another 5 minutes until the tops are golden and slightly crisp.
- Allow them to cool slightly before slicing into individual sliders. For the beach, wrap the entire block in foil to keep them warm and prevent them from drying out in the sea breeze.
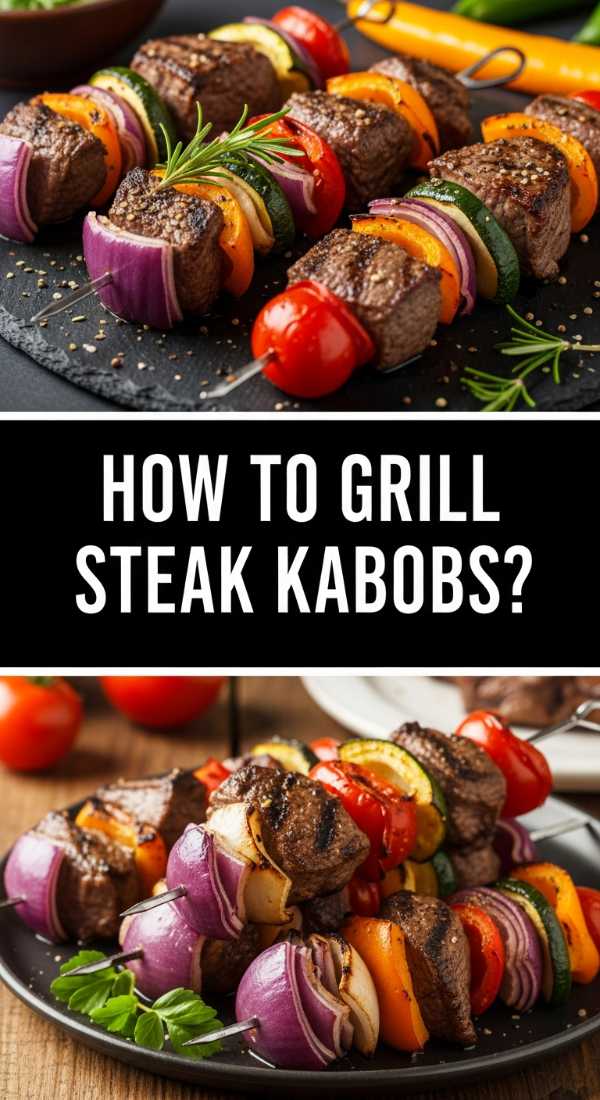
How to grill steak kabobs?

Why we love this
Steak kabobs are a visual powerhouse on any board, offering vibrant pops of color from charred vegetables alongside succulent, perfectly seared cubes of beef. We love the way the high heat of the grill locks in the juices of the steak, creating a savory crust that contrasts beautifully with the tender-crisp texture of onions and bell peppers. The scent of sizzling beef and woodsmoke is practically a dinner bell for guests, promising a protein-packed bite that feels luxurious despite being very budget-friendly when using cheaper cuts like sirloin.
Ingredients
- 1.5 lbs Sirloin steak, cut into 1-inch cubes
- 2 large bell peppers (red and green), cut into chunks
- 1 large red onion, cut into wedges
- 1/4 cup soy sauce
- 2 tbsp olive oil
- 2 cloves garlic, minced
- 1 tsp black pepper
- Wooden or metal skewers
How to make it
- If using wooden skewers, soak them in water for at least 30 minutes prior to grilling to prevent them from catching fire.
- In a large bowl, whisk together the soy sauce, olive oil, minced garlic, and black pepper. Add the steak cubes and toss to coat. Let marinate for at least 30 minutes (or up to 4 hours in the fridge) to tenderize the meat.
- Thread the steak, peppers, and onions onto the skewers in an alternating pattern. Don’t pack them too tightly; a little space allows the heat to circulate and cook everything evenly.
- Preheat the grill to high heat. You want a searing temperature to get those beautiful grill marks without overcooking the center.
- Place the skewers on the grill and cook for about 3-4 minutes per side (totaling 8-12 minutes). The steak should reach an internal temperature of 135°F for medium-rare.
- Remove from the grill and let the meat rest for 5 minutes before serving. This allows the juices to redistribute, ensuring every bite is tender and flavorful.
How to make hummingbird nectar?
Why we love this
While not a snack for humans, including a hummingbird feeder near your outdoor snack board setup adds a magical, living element to your gathering. We love the quiet thrill of watching these tiny, iridescent creatures dart to and fro as you enjoy your meal. Making your own nectar is far superior to store-bought versions because it is free of harmful red dyes and takes only minutes to prepare, ensuring that your backyard guests are just as well-fed and happy as your human ones.
Ingredients
- 1 cup granulated white sugar
- 4 cups water
How to make it
- Combine the water and sugar in a small saucepan over medium-high heat. It is vital to use refined white sugar only; honey, brown sugar, or artificial sweeteners can be fatal to hummingbirds.
- Stir the mixture constantly until the sugar is completely dissolved. Bring the solution to a light boil for about 1-2 minutes to help slow down the growth of bacteria or mold in the feeder.
- Remove the pan from the heat and allow the nectar to cool completely to room temperature. Filling a feeder with hot liquid can warp the plastic or injure the birds.
- Clean your hummingbird feeder thoroughly with hot water and a brush—avoid using soap if possible, or rinse extremely well.
- Fill the feeder with the cooled nectar and hang it in a shaded area near your patio.
- Store any leftover nectar in the refrigerator for up to two weeks, and be sure to change the nectar in the feeder every 3-5 days to keep it fresh and safe.
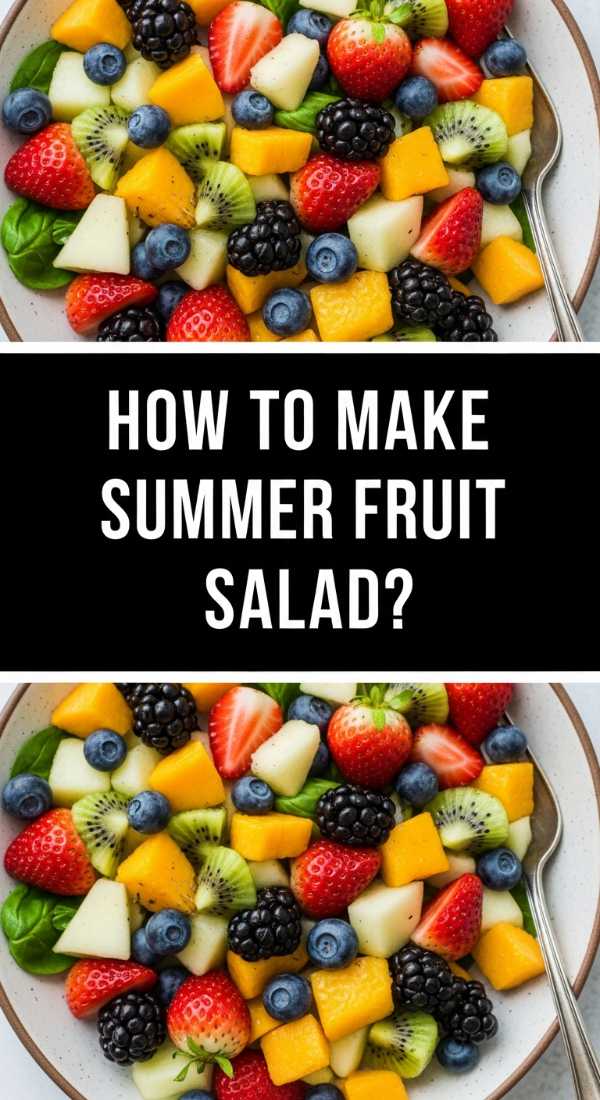
How to make summer fruit salad?
Why we love this
This isn’t your average, soggy cafeteria fruit salad; this is a vibrant, glistening celebration of the season’s best offerings. We love the explosion of natural sugars from ripe watermelon and berries, heightened by a subtle honey-lime glaze that makes the colors pop and the flavors sing. The addition of fresh mint adds a cooling, aromatic finish that cleanses the palate between savory bites on the board, making it a refreshing anchor that appeals to kids and adults alike.
Ingredients
- 4 cups watermelon, cubed
- 1 pint strawberries, hulled and halved
- 1 cup blueberries
- 1 cup grapes
- Juice of 1 lime
- 2 tbsp honey or agave nectar
- 1/4 cup fresh mint leaves, chiffonade
How to make it
- Carefully cube the watermelon and prep the berries, ensuring all pieces are roughly the same bite-sized scale. This makes the salad easier to eat and more visually appealing.
- In a small jar or bowl, whisk together the lime juice and honey until the honey is fully dissolved into the acid. This creates a light syrup that prevents the fruit from browning and adds a beautiful sheen.
- Place all the fruit into a large glass bowl. Pour the lime-honey mixture over the top.
- Toss the fruit very gently with a silicone spatula to avoid crushing the delicate berries.
- Just before serving, sprinkle the fresh mint over the top and give it one final, light toss.
- Keep the salad chilled until the very last moment to ensure the watermelon stays crisp and the flavors remain sharp and bright.
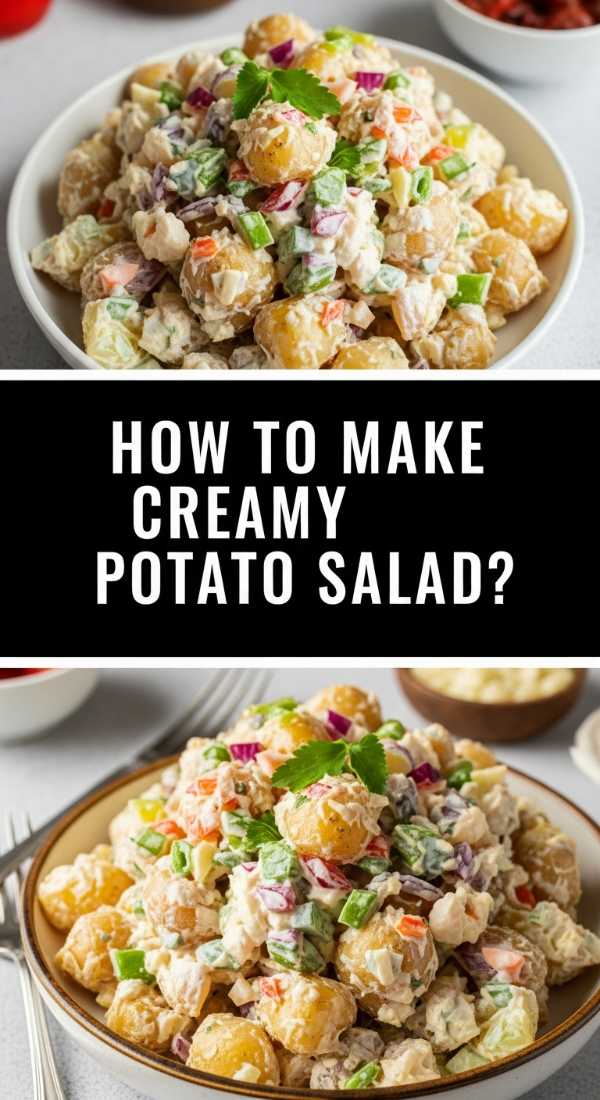
How to make creamy potato salad?
Why we love this
There is a nostalgic, soulful comfort in a bowl of creamy potato salad that nothing else can quite match. We love the velvety texture of the Yukon Gold potatoes—which hold their shape while remaining incredibly buttery—mixed with the sharp crunch of celery and the earthy tang of yellow mustard. It’s a hearty, grounding addition to a snack board that feels like a warm hug, providing a satisfying richness that balances out the lighter, fruitier elements of your spread.
Ingredients
- 2 lbs Yukon Gold potatoes, peeled and cubed
- 1/2 cup mayonnaise
- 2 tbsp yellow mustard
- 2 hard-boiled eggs, chopped
- 1/2 cup celery, finely diced
- 1/4 cup red onion, minced
- 2 tbsp fresh dill, chopped
- Salt and pepper to taste
How to make it
- Place the cubed potatoes in a large pot and cover with cold water by at least an inch. Starting with cold water ensures the potatoes cook evenly from edge to center.
- Bring the water to a boil, then reduce heat and simmer for 10-15 minutes until the potatoes are fork-tender but not falling apart. Drain and let them cool slightly.
- While the potatoes are cooling, whisk together the mayonnaise, mustard, salt, and pepper in a large mixing bowl until smooth.
- Add the warm potatoes to the dressing. Mixing them while they are still slightly warm allows them to absorb the flavors more deeply than if they were cold.
- Gently fold in the chopped eggs, celery, red onion, and fresh dill. Use a folding motion to keep the potato cubes intact.
- Cover and refrigerate for at least 2 hours before serving. This chilling time is crucial for the starches to set and the flavors to fully develop into a cohesive, creamy delight.
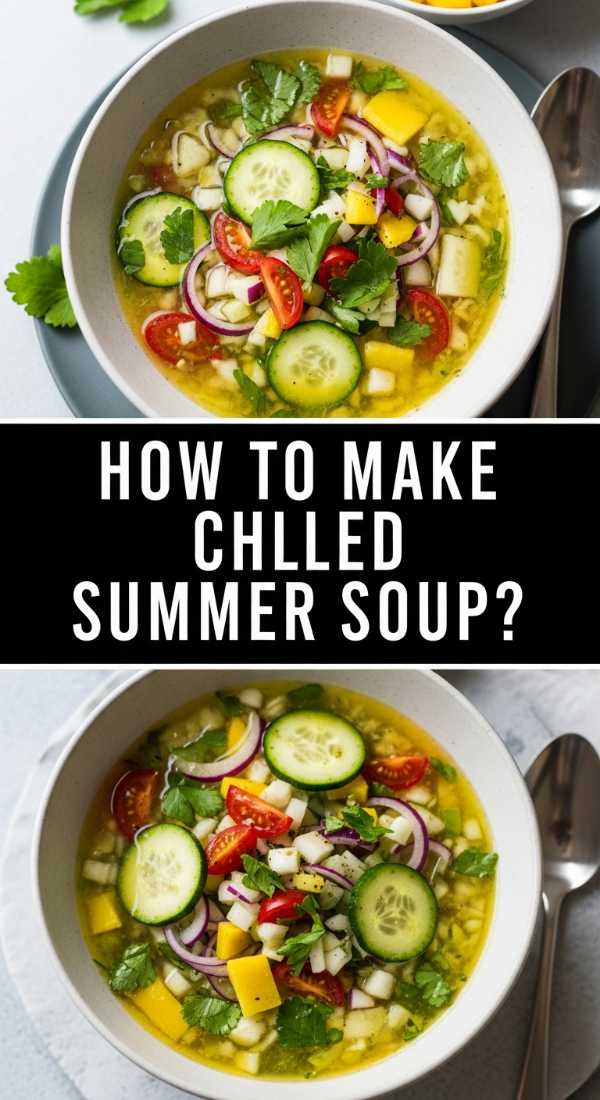
How to make chilled summer soup?

Why we love this
Chilled soup, or Gazpacho, is like a garden in a bowl, offering a sophisticated and unexpectedly refreshing element to a summer board. We love the zingy, raw intensity of the tomatoes and peppers, blended into a smooth yet textured soup that cools you down from the inside out. It’s an incredibly healthy, budget-friendly way to use up garden surplus, and serving it in small shot glasses or ramekins on your board adds an elegant, high-end feel to your casual gathering.
Ingredients
- 2 lbs ripe tomatoes, cored
- 1 cucumber, peeled and seeded
- 1 red bell pepper, deseeded
- 1/2 small red onion
- 1 clove garlic
- 2 tbsp sherry vinegar or red wine vinegar
- 1/4 cup extra virgin olive oil
- Salt and cumin to taste
How to make it
- Roughly chop the tomatoes, cucumber, bell pepper, and onion. Don’t worry about perfect shapes as they are going into the blender.
- Place the vegetables and garlic into a high-speed blender. Add the vinegar, olive oil, and a pinch of cumin and salt.
- Pulse the blender until you reach your desired consistency. Some people prefer a chunky, rustic texture, while others like a silkier, fully pureed soup.
- Taste and adjust the seasoning. The flavors will mute slightly as the soup chills, so ensure it has a good ‘zing’ from the vinegar.
- Pour the soup into a glass container and refrigerate for at least 4 hours—overnight is even better to let the acidity soften the raw garlic and onion bite.
- Serve in chilled small glasses or bowls, garnished with a tiny drizzle of olive oil or a sprig of cilantro for a beautiful presentation.
How to make summer smoothie bowls?
[IMAGE_10]
Why we love this
Smoothie bowls bring a playful, dessert-like energy to a brunch-style snack board. We love the thick, frosty texture of the blended fruit—somewhere between a smoothie and a soft-serve sorbet—which provides a cooling base for an array of crunchy, colorful toppings. They are a literal canvas for creativity, allowing you to decorate with granola, seeds, and edible flowers that make the entire board look like a work of art while offering a healthy, energizing treat for your guests.
Ingredients
- 2 cups frozen mixed berries
- 1 frozen banana, sliced
- 1/2 cup almond milk or coconut water
- 1 tbsp almond butter (optional)
- Toppings: Granola, chia seeds, sliced kiwi, and shredded coconut
How to make it
- Place the frozen berries and banana slices into a blender. It is vital that the fruit is frozen solid; using fresh fruit will result in a drinkable smoothie rather than a spoonable bowl.
- Add the almond milk sparingly. Start with 1/4 cup and only add more if the blender is struggling. You want the thickest consistency possible.
- Blend on high, using a tamper if your blender has one to push the frozen fruit down into the blades.
- Stop once the mixture is smooth and creamy with no large frozen chunks remaining.
- Pour the thick mixture into shallow bowls. Use the back of a spoon to smooth the surface.
- Immediately add your toppings in neat rows or patterns. The frozen base will hold the toppings on the surface, allowing you to create a beautiful, viral-worthy design before it starts to melt.
Mastering the Art of the Board
Creating a viral-worthy snack board is less about the price tag and more about the love and intention you put into the presentation. By mixing these homemade favorites with simple crackers, cheeses, and nuts, you create a tapestry of flavors that invites people to linger and enjoy. Remember, the best boards are the ones that disappear the fastest because they were made to be eaten and enjoyed together. Happy hosting!
Frequently Asked Questions
Q: How do I keep my board from looking messy?
A: Start with your largest bowls (like the potato salad or pasta salad) and place them on the board first to act as anchors. Fill the gaps with smaller items like skewers and fruit, and use ‘movers’ like nuts or grapes to fill every tiny hole so the board looks lush and abundant.
Q: Can I prepare these items in advance?
A: Absolutely! Most of these recipes, like the potato salad, pasta salad, and gazpacho, actually taste better if they sit in the fridge for a few hours. Just assemble the final board right before guests arrive so everything stays fresh and crisp.