

Why Everyone Is Obsessed With This Simple 3-Ingredient Food Board
There is something almost magical about the way a simple arrangement of food can transform a regular Tuesday night into a core memory. I remember the first time I set out a wooden board filled with just three high-quality ingredients; the room fell silent, not because of the lack of food, but because of the pure, unadulterated appreciation for the flavors on display. It’s a reminder that we don’t need a twelve-course meal to feel nourished; we just need intention and a little bit of soul.
Lately, the world has felt so fast and complicated that coming back to the basics feels like a radical act of self-care. This 3-ingredient food board trend isn’t just about the aesthetics—though it certainly looks stunning on a reclaimed wood surface—it’s about the permission to slow down. Whether you’re foraging in your backyard or grabbing fresh produce from the local market, these recipes are designed to fit perfectly into that lifestyle of effortless elegance.
How to make dandelion jelly?
Why we love this
Dandelion jelly is often referred to as ‘liquid sunshine’ in a jar, and for good reason. Its vibrant, golden hue captures the essence of a spring morning, while its flavor profile surprisingly mimics the delicate, floral sweetness of high-end honey with a hint of citrus. Spreading this over a warm, buttered piece of sourdough provides a sensory experience that is both nostalgic and sophisticated, offering a subtle floral aroma that lingers pleasantly on the palate long after the first bite.
Ingredients
- 2 cups dandelion petals (yellow parts only)
- 4 cups water
- 1 package powdered fruit pectin
- 4 cups granulated sugar
- 2 tablespoons lemon juice
How to make it
- Begin by foraging for fresh dandelions in a clean, pesticide-free area, picking only the largest, brightest heads. Carefully pull the yellow petals away from the green sepals, as the green parts are incredibly bitter and will ruin the delicate flavor of the jelly.
- Place the petals in a large pot with 4 cups of boiling water, cover, and let them steep overnight or for at least 8 hours to create a strong dandelion ‘tea’ infusion. Strain the mixture through a fine-mesh sieve or cheesecloth, pressing firmly to extract every drop of liquid.
- Pour the dandelion tea into a heavy-bottomed saucepan and stir in the lemon juice and pectin. Bring the mixture to a full rolling boil over high heat, stirring constantly to ensure the pectin dissolves completely without clumping.
- Add the sugar all at once and return the mixture to a hard boil that cannot be stirred down. Boil vigorously for exactly one to two minutes, monitoring the consistency closely; you are looking for the liquid to coat the back of a spoon in a thick, translucent sheet.
- Remove from heat and skim off any foam that has risen to the top using a metal spoon. Ladle the hot jelly into sterilized jars, leaving a quarter-inch of headspace, and process in a boiling water bath for 10 minutes to ensure a shelf-stable seal.
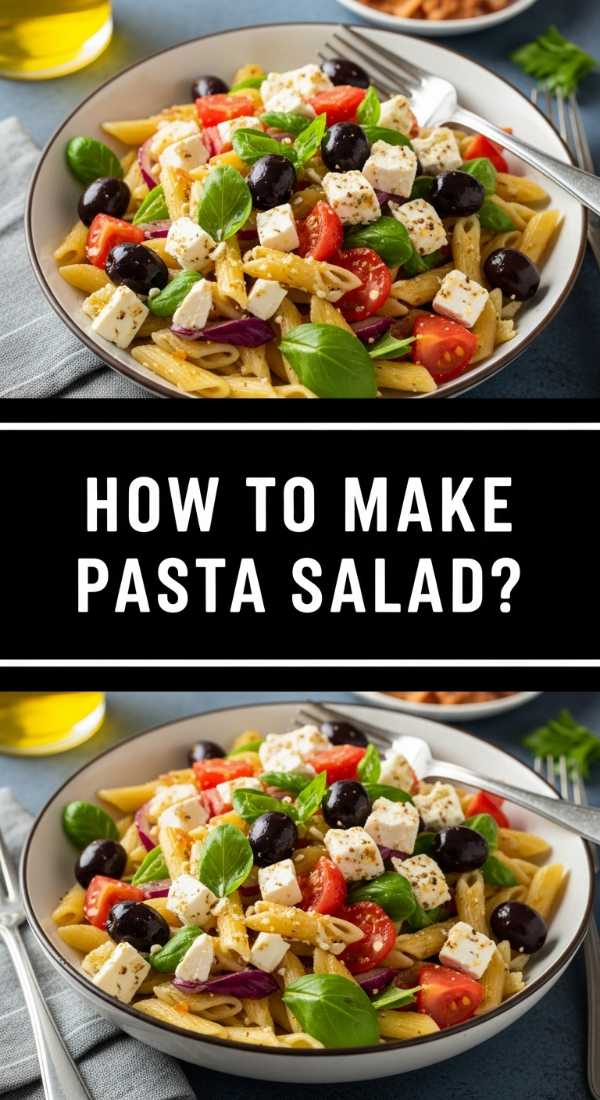
How to make pasta salad?

Why we love this
A classic pasta salad is the ultimate chameleon of the summer food board, offering a refreshing explosion of textures that keeps you coming back for more. We love the way the al dente ridges of the pasta catch the zesty vinaigrette, paired with the sharp crunch of fresh bell peppers and the creamy saltiness of feta cheese. It’s a dish that feels cooling on a hot afternoon, carrying the herbaceous scent of fresh basil and the bright acidity of red wine vinegar that awakens the senses.
Ingredients
- 1 lb rotini or fusilli pasta
- 1 cup cherry tomatoes, halved
- 1/2 cup cucumber, diced
- 1/4 cup red onion, finely minced
- 1/2 cup Italian vinaigrette
- 1/2 cup crumbled feta cheese
How to make it
- Boil a large pot of heavily salted water—it should taste like the sea—to season the pasta from the inside out. Cook the rotini until it is just past al dente, as pasta tends to firm up slightly when chilled; drain and immediately rinse with cold water to stop the cooking process and remove excess starch.
- While the pasta cools, prepare your vegetables by slicing the cherry tomatoes lengthwise and dicing the cucumbers into uniform quarter-inch pieces to ensure a consistent bite throughout the salad.
- In a large mixing bowl, combine the chilled pasta with the prepared vegetables and red onion. Pour half of the Italian vinaigrette over the mixture and toss thoroughly with large tongs, ensuring every crevice of the pasta is coated.
- Fold in the crumbled feta cheese gently so it doesn’t break down into a paste. Cover the bowl with plastic wrap and refrigerate for at least two hours; this allows the pasta to absorb the flavors of the dressing and the vegetables to release their juices.
- Just before serving on your board, toss the salad again and add the remaining vinaigrette if it looks dry. Garnish with fresh herbs or a crack of black pepper for a professional, vibrant finish.
How to prep camping meals?

Why we love this
Camping meals bring a primal sense of satisfaction that you just can’t replicate in a modern kitchen. There is a deep, smoky aroma that infuses everything cooked over an open flame, making even the simplest ingredients feel like a gourmet feast in the wilderness. We love the ritual of unfolding a warm foil packet to reveal steaming, tender vegetables and seasoned meats, enjoyed while the cool night air settles around the campfire and the sound of crackling wood provides the perfect soundtrack.
Ingredients
- 1 lb protein (chicken strips or smoked sausage)
- 2 cups chopped potatoes
- 1 cup baby carrots
- 2 tablespoons olive oil
- 1 tablespoon smoked paprika and garlic salt mix
How to make it
- Start your prep at home by chopping your protein and vegetables into uniform, bite-sized pieces; this is crucial because it ensures everything cooks at the same rate over the uneven heat of a campfire.
- Place the chopped ingredients into a large gallon-sized freezer bag, add the olive oil and seasoning mix, and shake vigorously until every piece is evenly coated. Store this in your cooler until you are ready to cook.
- When at the campsite, prepare heavy-duty aluminum foil squares (about 12×12 inches). Portion the mixture onto the center of each square, then fold the edges up and over, crimping them tightly to create a sealed environment that will steam the food in its own juices.
- Place the foil packets directly onto a grate over hot coals—avoiding the direct dancing flames, which can scorch the bottom—and cook for approximately 20 to 25 minutes. Use tongs to rotate the packets halfway through the cooking time to ensure even heat distribution.
- Carefully open one packet to check for doneness; the potatoes should be fork-tender and the protein should be fully opaque. Let them rest for two minutes before serving directly from the foil for a rustic, no-mess experience.
How to prep summer meals?

Why we love this
Summer meal prep is all about honoring the vibrance of the season while minimizing the time spent standing over a hot stove. We adore the lightness of these meals, which often feature raw, crisp elements and bright, citrus-forward dressings that leave you feeling energized rather than weighed down. The visual appeal of a summer board filled with rainbow-colored produce is undeniable, bringing a sense of garden-fresh joy and effortless health to your outdoor dining table.
Ingredients
- Assorted seasonal greens (arugula, spinach)
- Pre-cooked chilled quinoa
- Stone fruits (peaches or plums), sliced
- Lemon-tahini dressing
- Toasted sunflower seeds
How to make it
- Adopt a ‘component-based’ prep strategy by washing and drying all your greens early in the week and storing them in airtight containers with a paper towel to absorb excess moisture and maintain crispness.
- Cook a large batch of quinoa or farro using vegetable broth instead of water for extra depth of flavor; once cooked, spread it out on a baking sheet to cool quickly before refrigerating to prevent it from becoming gummy.
- Slice your stone fruits just before assembly to prevent oxidation. If you must prep them ahead of time, toss them in a small amount of lemon juice to maintain their bright color and prevent browning.
- Whisk together your lemon-tahini dressing in a mason jar, ensuring the tahini is fully emulsified with the lemon juice and a splash of warm water until it reaches a thick, pourable cream consistency.
- When it’s time to eat, layer the cold grains over the greens on your board, top with the fruit and seeds, and drizzle the dressing generously. This method keeps ingredients fresh and allows for quick assembly without turning on the oven.
How to cook quick chicken?

Why we love this
Quick-cooked chicken is the backbone of any successful food board, providing a satisfying protein element that is tender, juicy, and incredibly versatile. We love the golden-brown crust that forms during a high-heat sear, locking in the savory juices and creating a beautiful contrast with the soft, white meat inside. Infused with garlic and fresh thyme, the aroma fills the kitchen with a comforting, home-cooked scent that promises a delicious and balanced meal in under fifteen minutes.
Ingredients
- 2 large chicken breasts, butterflied or pounded thin
- 2 tablespoons avocado oil (high smoke point)
- 1 teaspoon dried oregano
- Salt and cracked black pepper
- 2 cloves garlic, smashed
How to make it
- The secret to quick chicken is surface area; butterfly your chicken breasts or use a meat mallet to pound them to an even half-inch thickness, which ensures they cook through rapidly without drying out the exterior.
- Pat the chicken extremely dry with paper towels—this is the most important step for achieving a professional-grade sear—and season both sides generously with salt, pepper, and oregano.
- Heat a heavy cast-iron skillet over medium-high heat until the oil is shimmering and just beginning to wisps of smoke. Carefully lay the chicken in the pan, laying it away from you to avoid oil splashes.
- Sear the first side undisturbed for about 4-5 minutes until a deep golden crust forms and the meat releases easily from the pan. Flip the chicken, add the smashed garlic cloves to the oil, and cook for another 3-4 minutes until the internal temperature reaches 165°F (74°C).
- Remove the chicken from the pan and let it rest on a cutting board for at least 5 minutes before slicing. This allows the juices to redistribute through the fibers, ensuring every bite is moist and flavorful.
How to make summer salad?

Why we love this
A true summer salad is a celebration of peak-season produce, blending sweet and savory notes in a way that feels like a party on the tongue. We love the juxtaposition of juicy heirloom tomatoes against the creamy, milky richness of fresh burrata or mozzarella, all tied together by the peppery bite of fresh arugula. It is a dish that smells like a sun-drenched garden, with the fragrance of torn mint leaves and the earthy richness of balsamic glaze creating a complex and sophisticated profile.
Ingredients
- 3 large heirloom tomatoes, sliced thick
- 1 ball of fresh burrata cheese
- Handful of fresh basil and mint leaves
- 2 tablespoons extra virgin olive oil
- 1 tablespoon thick balsamic glaze
How to make it
- Select your heirloom tomatoes by weight and scent; they should feel heavy for their size and smell earthy near the stem. Slice them into thick, substantial rounds to provide a sturdy base for the salad.
- Arrange the tomato slices on your board in an overlapping pattern, then place the burrata ball directly in the center. Use a sharp knife to gently break the outer shell of the cheese so the creamy interior begins to spill out over the tomatoes.
- Hand-tear the basil and mint leaves rather than chopping them with a knife; this prevents the edges from bruising and releases more of the aromatic oils for a fresher scent.
- Drizzle the highest quality extra virgin olive oil you have over the entire arrangement, ensuring you get some on both the cheese and the tomatoes to enhance the fat-soluble flavors.
- Finish with a decorative drizzle of balsamic glaze and a generous pinch of flaky sea salt. The salt will draw out the tomato juices, creating a natural dressing that mingles with the oil and cheese for a perfect bite.
How to cook healthy salmon?

Why we love this
Salmon is the crown jewel of a healthy food board, offering a rich, buttery texture and a wealth of heart-healthy omega-3s. We love how the skin transforms into a crisp, salty crackling when prepared correctly, providing a satisfying crunch that yields to the tender, flaky pink meat beneath. When finished with a squeeze of charred lemon, the flavor is bright, clean, and incredibly satisfying, making it a favorite for those who want to feel pampered while eating nutritiously.
Ingredients
- 2 salmon fillets (6 oz each), skin-on
- 1 tablespoon olive oil
- 1/2 teaspoon garlic powder
- Salt and pepper to taste
- 1 lemon, halved
How to make it
- Take your salmon fillets out of the refrigerator 15 minutes before cooking to bring them to room temperature; this ensures the center cooks evenly without the outside becoming overdone.
- Generously season the flesh side with salt, pepper, and garlic powder. Press the seasoning into the meat so it adheres during the cooking process.
- Heat olive oil in a non-stick or well-seasoned cast iron skillet over medium heat. Place the salmon skin-side down in the pan; you should hear a gentle sizzle. Press down lightly with a spatula for the first 30 seconds to prevent the skin from curling.
- Cook for about 5-6 minutes on the skin side only. You will see the color of the fish change from a translucent dark pink to an opaque light pink moving up the side of the fillet. Once the cooked color reaches about three-quarters of the way up, flip the fish.
- Sear the top for just 1-2 minutes for a medium-rare to medium finish. While the fish finishes, place the lemon halves cut-side down in the pan to char them. Serve the salmon immediately with the warm, smoky lemon juice squeezed over the top.
How to make summer steak?

Why we love this
Summer steak is all about that perfect char and the melt-in-your-mouth tenderness that comes from high-quality beef treated with respect. We love the robust, savory aroma of a seared crust seasoned with coarse salt and cracked pepper, especially when paired with a bright, herbaceous chimichurri. It’s a focal point for any food board that feels celebratory and masculine yet refined, offering a deep umami flavor that perfectly complements grilled vegetables and cold drinks.
Ingredients
- 1 lb flank steak or skirt steak
- 2 tablespoons soy sauce
- 1 tablespoon honey
- 1 teaspoon minced garlic
- 1/2 teaspoon red pepper flakes
How to make it
- Whisk together the soy sauce, honey, garlic, and red pepper flakes in a shallow dish to create a marinade that provides both salt and sugar for optimal caramelization (the Maillard reaction).
- Place the steak in the marinade for at least 30 minutes, or up to 4 hours in the fridge. Skirt and flank steaks have long fibers that benefit from this chemical breakdown to ensure a tender result.
- Preheat your grill or a heavy griddle pan to high heat. It must be screaming hot to achieve a proper sear without overcooking the thin interior of the summer steak cuts.
- Place the steak on the heat and sear for 3-4 minutes per side for a perfect medium-rare. Avoid moving the steak around; let it sit so the sugars in the marinade form a dark, flavorful crust.
- Remove the steak to a board and let it rest for a full 10 minutes. This is non-negotiable; resting allows the muscle fibers to relax. Slice the steak thinly *against the grain* (perpendicular to the visible lines in the meat) to ensure every slice is incredibly tender.
How to make berry salad?

Why we love this
A berry salad acts as the jewel-toned centerpiece of a summer board, offering a burst of natural sweetness and antioxidants. We love the way the tartness of blackberries contrasts with the floral sweetness of ripe strawberries, all tied together by a whisper of fresh mint and a hint of lime. It’s a palate cleanser that feels incredibly indulgent yet light, with a texture that is juicy and vibrant, making it the perfect accompaniment to salty cheeses or grilled meats.
Ingredients
- 2 cups strawberries, hulled and quartered
- 1 cup blueberries
- 1 cup raspberries
- 1 tablespoon honey or agave
- Juice of 1 lime
- Fresh mint leaves, chiffonade
How to make it
- Wash your berries gently in a bowl of cold water with a splash of vinegar to remove any impurities, then pat them completely dry with a soft lint-free towel to prevent the salad from becoming watery.
- Hull the strawberries and cut them into quarters or slices so they are roughly the same size as the other berries, creating a harmonious look and an easier eating experience.
- In a small bowl, whisk together the lime juice and honey until the honey is completely dissolved into the citrus. This creates a simple ‘macerating’ liquid that will draw out the natural juices of the fruit.
- Place all the berries in a large glass bowl and drizzle the lime-honey mixture over them. Toss very gently with a silicone spatula or your clean hands to avoid crushing the delicate raspberries.
- Sprinkle the fresh mint chiffonade over the top just before serving. The mint provides a cooling finish that elevates the berries from a simple fruit bowl to a sophisticated summer salad.
How to roast summer veggies?
[IMAGE_10]
Why we love this
Roasting summer vegetables transforms them from humble garden staples into caramelized, concentrated bites of pure flavor. We love how the high heat of the oven coaxes out the natural sugars in zucchini, bell peppers, and red onions, creating softened interiors and slightly charred, crispy edges. The aroma of roasting garlic and Mediterranean herbs wafting through the house is the ultimate invitation to the table, promising a side dish that is as beautiful as it is delicious.
Ingredients
- 2 medium zucchinis, sliced into rounds
- 2 bell peppers, cut into chunks
- 1 red onion, wedged
- 3 tablespoons olive oil
- 1 teaspoon dried Italian seasoning
How to make it
- Preheat your oven to 425°F (220°C). A high temperature is essential for roasting summer veggies because it evaporates moisture quickly, allowing the vegetables to brown rather than steam.
- Spread the prepared zucchini, peppers, and onions onto a large rimmed baking sheet. Ensure the vegetables are in a single layer with space between them; overcrowding the pan will cause the vegetables to release steam and become mushy.
- Drizzle the olive oil over the vegetables and toss them with your hands until every piece is glossy. Sprinkle the Italian seasoning, salt, and pepper evenly across the tray.
- Roast for 20-25 minutes, using a spatula to toss the vegetables halfway through. Look for the edges of the onions to be darkened and the peppers to have slight char marks.
- Once removed from the oven, immediately sprinkle with a little extra sea salt or a squeeze of fresh lemon juice while they are still sizzling to brighten the roasted flavors before adding them to your food board.
The Beauty of the Simple Food Board
As we’ve explored these ten versatile components, it’s clear why the simple food board has taken the lifestyle world by storm. It’s an approachable way to entertain that prioritizes quality over quantity and connection over performance. By mastering these foundational recipes—from the floral sweetness of dandelion jelly to the savory perfection of a summer steak—you can curate a board that tells a story of the season and provides a feast for all the senses. Remember, the best boards aren’t the ones that are the most expensive; they are the ones made with fresh ingredients and shared with the people you love.