
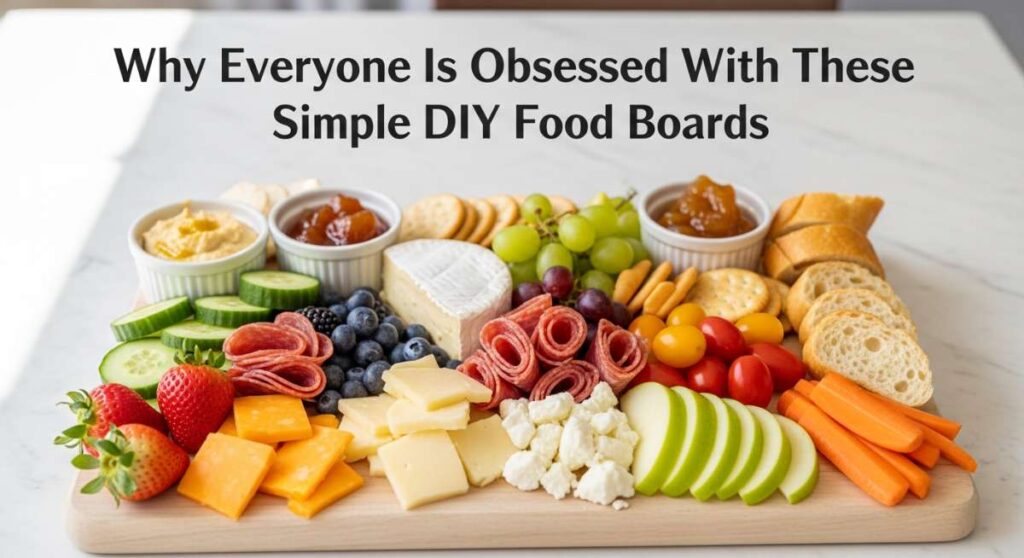
Have you ever walked into a room and been immediately drawn to a table that looks like a work of art, but feels as cozy as a Sunday morning? That’s the magic of the modern food board. There’s something deeply nostalgic and inherently social about gathering around a shared platter, picking and choosing bits of flavor that tell a story of comfort and creativity. In a world that often feels rushed, these boards invite us to slow down, linger over a glass of wine, and actually enjoy the process of eating.
The obsession isn’t just about the aesthetics—though let’s be honest, those vibrant colors and textures are pure Instagram gold. It’s about the democratization of hosting. You don’t need a culinary degree to create a viral-worthy spread; you just need fresh ingredients and a little bit of heart. Whether it’s a rainy Tuesday or a celebratory Saturday, assembling these simple yet elevated components transforms a meal into an experience that nourishes both the body and the soul.
How to make tasty wraps?

Why we love this
There is nothing quite like the satisfying crunch of a perfectly wrapped tortilla giving way to a medley of fresh, vibrant fillings. We love these because they are the ultimate handheld vessel for flavor, offering a cooling contrast of crisp greens against zesty sauces and savory proteins. The aroma of a toasted wrap hitting a hot pan fills the kitchen with a comforting, bready scent that promises a light yet deeply fulfilling bite, making it the perfect centerpiece for a casual lunch board.
Ingredients
- Large flour or spinach tortillas
- Sliced deli turkey or grilled chicken
- Fresh arugula and shredded carrots
- Ripe avocado slices
- Creamy chipotle mayo or hummus
- Thinly sliced red onion
How to make it
- Begin by warming your tortillas in a dry skillet over medium-low heat for about 15 seconds per side; this makes them pliable and prevents tearing.
- Spread a generous tablespoon of your chosen sauce across the center third of the tortilla, leaving a two-inch border at the edges to ensure a clean seal.
- Layer your proteins and heavier vegetables first in a neat horizontal line, then top with the lighter greens to maintain structural integrity.
- Fold the sides of the tortilla inward toward the center, then firmly tuck the bottom edge over the filling and roll tightly away from you, using your fingers to keep the ingredients tucked in.
- Place the wrap seam-side down in a hot pan for 30 seconds to ‘weld’ the edge shut, creating a crispy, golden seal that keeps everything contained.
How to cook perfect salmon?

Why we love this
Perfectly cooked salmon is a masterpiece of textures: a glass-like, crackling skin that shatters under the fork to reveal succulent, buttery flakes of pink fish. The aroma is clean and oceanic, heightened by the scent of browned butter and charred lemon zest that dances through the air. It’s the kind of dish that feels incredibly luxurious and high-end, yet provides a wholesome, melt-in-your-mouth experience that leaves you feeling energized and satisfied.
Ingredients
- Fresh Atlantic or Sockeye salmon fillets
- Extra virgin olive oil
- Kosher salt and cracked black pepper
- Unsalted butter
- Fresh lemon wedges and dill
How to make it
- Pat the salmon fillets extremely dry with paper towels; moisture is the enemy of a crispy skin, so ensure there is no dampness left on the surface.
- Season the flesh side generously with salt and pepper, and heat a heavy-bottomed stainless steel or cast-iron skillet over medium-high heat until the oil ripples.
- Place the salmon skin-side down in the pan, pressing gently with a spatula for 10 seconds to prevent the skin from curling; do not move it for at least 4-5 minutes.
- Wait for the color of the fish to turn opaque about three-quarters of the way up the side, then flip the fillet and add a knob of butter to the pan.
- Baste the salmon with the foaming butter for the final 60 seconds of cooking until the internal temperature reaches 125-130°F for a perfect medium-rare.
How to bake soft cookies?

Why we love this
The scent of vanilla and caramelizing sugar wafting from the oven is perhaps the most universally loved aroma in the world. Soft cookies provide that incredible, pillowy chewiness that contrasts with slightly crisp, golden edges, creating a nostalgic sensation of warmth and home. Every bite is a balance of rich sweetness and a hint of salt, making these the star of any dessert board where the goal is pure, unadulterated comfort.
Ingredients
- 2 1/4 cups all-purpose flour
- 1 cup unsalted butter (softened)
- 3/4 cup brown sugar and 3/4 cup white sugar
- 2 large eggs at room temperature
- 1 tsp baking soda and 1 tsp sea salt
- 2 cups semi-sweet chocolate chips
How to make it
- Cream the softened butter with both sugars for at least 3-5 minutes until the mixture is pale and fluffy; this incorporates air which is vital for a soft texture.
- Add the eggs one at a time, beating well after each addition to emulsify the fats, and then stir in the vanilla extract.
- Sift the dry ingredients together and fold them into the wet mixture by hand just until no white streaks remain—overmixing will develop gluten and make the cookies tough.
- Chill the dough in the refrigerator for at least 2 hours; this allows the flour to hydrate and prevents the cookies from spreading too thin in the oven.
- Bake at 350°F (175°C) on a parchment-lined sheet for 9-11 minutes, pulling them out when the edges are just barely golden but the centers still look slightly underbaked.
How to make chocolate treats?

Why we love this
Chocolate treats are the ultimate indulgence, offering a deep, velvety richness that lingers on the palate long after the first bite. We love the way tempered chocolate snaps with a clean sound before melting into a smooth, decadent creaminess that coats the tongue. Whether infused with sea salt or nuts, these treats provide a sophisticated sensory journey of bittersweet notes and silky textures that make any food board feel like a high-end boutique experience.
Ingredients
- High-quality dark chocolate bars (70% cocoa)
- Coconut oil (for shine)
- Assorted toppings: sea salt, crushed pistachios, dried cranberries
- Silicone molds or parchment paper
How to make it
- Chop the chocolate into uniform, small pieces to ensure even melting, and set aside a small handful to use as ‘seed’ chocolate for tempering.
- Melt two-thirds of the chocolate in a double boiler over low heat, ensuring the water never touches the bottom of the bowl, until it reaches roughly 115°F.
- Remove from heat and stir in the remaining ‘seed’ chocolate vigorously until the temperature drops to 88-90°F, which creates the perfect crystalline structure for a glossy finish.
- Pour the tempered chocolate into molds or spread it thin on parchment paper, then immediately sprinkle with your desired toppings while it is still wet.
- Allow the treats to set at room temperature in a cool, dry place for at least an hour before snapping into pieces or removing from molds.
How to roast healthy dinners?

Why we love this
Roasting is a transformative process that coaxes out the hidden natural sugars in vegetables and meats, resulting in a caramelized sweetness that is deeply satisfying. The sight of charred, golden-brown edges against vibrant greens and purples is visually stunning, while the aroma of roasted garlic and herbs creates an inviting, earthy atmosphere. It’s a method that honors the integrity of the ingredients while providing a complex depth of flavor through high-heat concentration.
Ingredients
- Seasonal root vegetables (carrots, sweet potatoes, beets)
- Lean protein (chicken thighs or chickpeas)
- Avocado oil or grapeseed oil (high smoke point)
- Fresh rosemary and thyme
- Garlic cloves, smashed
How to make it
- Preheat your oven to 425°F (220°C) and place your baking sheet inside to get hot; a preheated pan ensures an immediate sear on the food.
- Cut all vegetables into uniform sizes—roughly 1-inch cubes—to ensure they finish cooking at the exact same time without some pieces turning to mush.
- Toss the ingredients in a bowl with just enough high-smoke-point oil to coat them lightly; too much oil will lead to steaming rather than roasting.
- Spread the ingredients in a single layer on the hot pan, leaving ample space between each piece so the air can circulate freely; crowding the pan causes sogginess.
- Roast for 25-35 minutes, tossing the contents halfway through, until the edges are deeply browned and the centers are tender when pierced with a fork.
How to use crock pots?

Why we love this
The slow cooker is the unsung hero of the kitchen, turning humble ingredients into a symphony of tender, fall-apart goodness while you go about your day. There is a specific kind of magic in coming home to a house filled with the rich, savory perfume of slow-simmered beef or aromatics. The resulting dishes are incredibly juicy and infused with layers of flavor that can only be achieved through hours of gentle heat, making them perfect for a ‘build-your-own-taco’ or ‘slider’ board.
Ingredients
- Chuck roast or pork shoulder
- Beef broth or apple cider
- Onions, carrots, and celery (the aromatics)
- Bay leaves and peppercorns
- Worcestershire sauce or soy sauce for umami
How to make it
- Always sear your meat in a hot skillet before placing it in the crock pot; this ‘Maillard reaction’ develops a crust that adds essential depth to the final sauce.
- Layer your hardier root vegetables at the bottom of the pot as they take longer to cook and benefit from being closest to the heat source.
- Place the seared meat on top of the vegetables and pour in your liquids, but only fill the pot about halfway to prevent boiling over as the meat releases its own juices.
- Set the cooker to ‘Low’ for 8 hours rather than ‘High’ for 4; the lower temperature allows the connective tissues to break down slowly, resulting in a much more tender texture.
- Keep the lid closed throughout the process; every time you lift the lid, you lose significant heat and moisture, which can add 20-30 minutes to your cooking time.
How to prep quick meals?

Why we love this
Quick meal prep is all about the thrill of efficiency without sacrificing the joy of a fresh, homemade meal. We love the vibrant colors of pre-chopped veggies and the organized feel of a kitchen ready for action. The result is a meal that feels bright and intentional, providing a sense of accomplishment and a burst of fresh flavor even on the busiest weeknights. It turns the ‘what’s for dinner’ stress into a creative, fast-paced assembly of delicious components.
Ingredients
- Pre-washed spinach or kale
- Cooked quinoa or farro
- Jarred roasted red peppers
- Feta cheese or goat cheese
- Lemon-tahini dressing
How to make it
- Dedicate 30 minutes on Sunday to ‘component prepping’: wash your greens, cook one large batch of grains, and whisk together a versatile dressing.
- Store ingredients in clear, airtight glass containers; seeing the colorful food makes you more likely to use it and keeps everything crisp for up to 5 days.
- When ready to eat, use the ‘Bowl Method’: start with a base of greens, add a scoop of cold grains, and top with pre-sliced veggies and a protein.
- Incorporate ‘flavor bombs’ like pickled onions or fermented hot sauce to add instant complexity to the dish without any extra cooking time.
- If heating is required, use a high-heat sauté for 3 minutes just to take the chill off the grains and wilt the greens slightly for a warm, comforting bowl.
How to make crispy veggies?

Why we love this
Crispy vegetables are a revelation, proving that greens can be just as addictive as snacks. The audible crunch of a roasted floret or a fried green bean is incredibly satisfying, followed by the concentrated, savory flavor of the vegetable itself. This preparation method adds an element of fun and texture to any food board, making it easy to eat your vitamins while enjoying the salty, toasted notes of a perfectly crisped exterior.
Ingredients
- Broccoli florets or Brussels sprouts
- Cornstarch or rice flour (the secret for extra crunch)
- Garlic powder and smoked paprika
- Cooking spray or olive oil
How to make it
- Ensure your vegetables are completely bone-dry after washing; any remaining water will turn into steam and prevent the crisping process.
- Lightly toss the vegetables in a bowl with a teaspoon of cornstarch; this creates a microscopic barrier that browns beautifully and stays crunchy.
- Season generously and arrange the vegetables on a wire rack set over a baking sheet; the rack allows hot air to reach the bottom of the food, preventing sogginess.
- Roast at a high temperature, like 400°F (200°C), for about 20 minutes, or use an air fryer at 375°F for 12 minutes for an even faster result.
- Finish with a sprinkle of flaky sea salt immediately after they come out of the heat to ensure the salt sticks to the surface.
How to grill juicy burgers?

Why we love this
The burger is the quintessential centerpiece of the outdoor food board, evoking memories of summer sun and backyard gatherings. We love the smoky, charred aroma that drifts from the grill and the way the melted cheese drapes over the thick, savory patty. A truly juicy burger offers a rich, beefy depth that is balanced by the cool crunch of lettuce and the tang of pickles, creating a symphony of classic flavors that never goes out of style.
Ingredients
- 80/20 ground chuck (fat is essential for juice)
- Brioche buns, lightly toasted
- Sharp cheddar cheese slices
- Beefsteak tomato slices
- Secret sauce (mayo, mustard, relish)
How to make it
- Form your patties gently without overworking the meat; handle it as little as possible to keep the texture light and prevent a ‘hockey puck’ consistency.
- Press a small thumbprint indentation into the center of each raw patty; this prevents the burger from puffing up into a ball as the proteins contract on the heat.
- Get your grill to a high heat (around 450°F) and place the cold patties directly onto the grates, searing for 3-4 minutes without moving them to get those perfect grill marks.
- Flip only once and resist the urge to press down on the patty with your spatula, as this squeezes out the precious juices that make the burger flavorful.
- Add the cheese in the last minute of cooking and cover the grill for 30 seconds to create a perfect, gooey melt before resting the meat for 2 minutes.
How to whip creamy soup?
[IMAGE_10]
Why we love this
There is nothing more soothing than a silken, creamy soup served in a mug or small bowl on a gathering board. We love the way the steam carries the scent of roasted aromatics and fresh herbs, offering a warm embrace on a chilly day. The texture should be completely smooth, like velvet, providing a rich mouthfeel that feels indulgent yet light, acting as the perfect dipping companion for crusty bread or artisanal crackers.
Ingredients
- Roasted butternut squash or tomatoes
- High-quality vegetable or chicken stock
- Heavy cream or full-fat coconut milk
- Sautéed shallots and garlic
- Fresh sage or basil
How to make it
- Sauté your aromatics in butter or oil until translucent, then add your pre-roasted vegetables and stock, simmering for 10 minutes to marry the flavors.
- Use a high-powered immersion blender directly in the pot, or transfer to a stand blender in small batches (filling only halfway to avoid steam explosions).
- Blend on high for at least 60 seconds—longer than you think you need—to aerate the liquid and achieve that signature professional silkiness.
- Return the soup to a low simmer and slowly whisk in your cream or coconut milk, which adds fat and stability to the emulsion.
- Strain the soup through a fine-mesh sieve if you want a truly ‘restaurant-quality’ texture, removing any remaining fibers for a flawless finish.
Why the Food Board Trend is Here to Stay
As we’ve seen, the beauty of the DIY food board lies in its versatility and its ability to turn simple, well-made ingredients into a communal celebration. Whether you’re focusing on the crunch of a perfectly roasted veggie or the buttery flake of a salmon fillet, the board allows you to showcase your effort in a way that feels relaxed and approachable. It’s about more than just food; it’s about the connection we find when we share a meal that was made with intention. So, go ahead—grab a board, pick a subtopic, and start creating your own masterpiece.