

I used to spend hours in the kitchen before guests arrived, sweating over a hot stove and stressing about whether everything would be ready at the exact same moment. I’d be so exhausted by the time the doorbell rang that I could barely enjoy the company I had worked so hard to invite over. Then, I discovered the magic of the food board. It’s the ultimate ‘lazy’ hosting hack that looks like you spent days planning, when in reality, you just mastered a few simple components and laid them out beautifully for everyone to graze on at their own pace.
There is something so inherently communal and warm about a food board. It breaks down the formality of a seated dinner and invites everyone to dive in, share, and linger over their favorite bites. Whether it’s a bright summer spread or a cozy comfort-food layout, these viral simple food boards are all about celebrating the season with minimal effort and maximum impact. Today, I’m sharing the ten staples that have turned my hosting game from stressful to spectacular, allowing me to actually sit down and have a glass of wine with my favorite people.
How to make fresh strawberry pie?

Why we love this
This pie is the absolute essence of summer captured in a flaky crust. The glossiness of the strawberry glaze catching the afternoon sun is enough to make anyone’s mouth water instantly. When you bite into it, you get that perfect contrast between the crisp, buttery pastry and the burst of cold, juicy berries that haven’t been cooked down into mush. It smells like a sun-drenched garden and feels like pure nostalgia on a plate, especially when topped with a cloud of real whipped cream that slowly melts into the red glaze.
Ingredients
- 1 pre-baked 9-inch pie crust
- 1 quart fresh strawberries, hulled
- 1 cup granulated sugar
- 3 tablespoons cornstarch
- 1 cup water
- 3 ounces strawberry flavored gelatin
- Whipped cream for garnish
How to make it
- Start by blind-baking your pie crust. Preheat your oven to 425°F, prick the bottom of the crust with a fork, and bake for 10-12 minutes until it reaches a light golden brown. Set it aside to cool completely; a warm crust will make your glaze runny.
- Wash and thoroughly dry your strawberries. This is crucial because any excess water will prevent the glaze from sticking. Leave the berries whole if they are small, or halve them if they are large, then pile them neatly into the cooled crust.
- In a small saucepan over medium heat, whisk together the sugar, cornstarch, and water. Bring the mixture to a boil, stirring constantly. You will see it transform from a cloudy liquid to a thick, clear syrup. This usually takes about 3 to 5 minutes of consistent bubbling.
- Once thickened, remove from heat and stir in the strawberry gelatin powder until it is completely dissolved and the color is a vibrant, deep red.
- Allow the glaze to cool for about 10 minutes so it doesn’t cook the fresh berries, then pour it evenly over the strawberries in the crust, ensuring every berry is coated.
- Refrigerate the pie for at least 3 hours, or until the glaze is fully set and firm to the touch before slicing.
How to make rotel dip?

Why we love this
There is no party snack quite as addictive or universally beloved as a warm bowl of Rotel dip sitting in the center of a food board. It is the king of comfort food—salty, creamy, and just spicy enough to keep you coming back for ‘one more’ chip. The aroma of melted cheese mixed with savory browned sausage fills the room and immediately signals to guests that the party has started. It’s thick, indulgent, and has that perfect velvety texture that clings to every nook and cranny of a sturdy tortilla chip.
Ingredients
- 1 lb ground breakfast sausage or lean ground beef
- 1 loaf (32 oz) Velveeta cheese, cubed
- 2 cans (10 oz) Ro-Tel diced tomatoes and green chilies, undrained
- 1/2 teaspoon garlic powder
- Tortilla chips for serving
How to make it
- Place a large skillet over medium-high heat and add your ground sausage or beef. Use a wooden spoon to break the meat into very small, uniform crumbles as it browns. Cook until no pink remains and the meat has developed a slightly crispy, savory exterior.
- Carefully drain all the excess grease from the skillet. If using sausage, this step is vital to ensure your dip isn’t oily.
- Turn your heat down to low and add the cubed Velveeta cheese. Using cubes rather than a solid block ensures the cheese melts evenly without burning on the bottom.
- Pour in both cans of Ro-Tel, including the juices. The acidity from the tomatoes helps balance the richness of the cheese.
- Stir the mixture constantly with a heat-resistant spatula. Continue stirring until the cheese is completely melted and the dip is smooth and glossy.
- If the dip is too thick, you can stir in a splash of milk or heavy cream. Transfer to a small slow cooker on the ‘warm’ setting to keep it pourable throughout your event.
How to make summer salad?

Why we love this
A true summer salad should feel like a refreshing breeze on a humid day. We love this version because it balances the peppery bite of fresh arugula with the cooling, hydrating sweetness of ripe watermelon. The addition of salty feta provides a creamy tang that ties the fruit and greens together, while the aromatic scent of torn mint leaves elevates the whole experience. It’s a sensory delight that looks stunning on a board with its vibrant greens, deep reds, and stark whites, finished with a dark, syrupy drizzle of balsamic.
Ingredients
- 4 cups baby arugula or spring mix
- 3 cups seedless watermelon, cubed
- 1/2 cup crumbled feta cheese
- 1/4 cup fresh mint leaves, torn
- 1/2 red onion, thinly sliced
- 2 tablespoons balsamic glaze
- 2 tablespoons extra virgin olive oil
- Salt and pepper to taste
How to make it
- Begin by preparing your watermelon. Cut it into uniform 1-inch cubes and place them on a paper towel for 5 minutes to absorb excess moisture so the salad doesn’t get soggy.
- In a large, shallow serving bowl or on a flat board, layer your greens. I prefer arugula for its structural integrity and spicy flavor profile.
- Scatter the watermelon cubes and thinly sliced red onions over the greens. For the onion, ensure they are paper-thin to provide flavor without overpowering the fruit.
- Sprinkle the crumbled feta and the torn mint leaves over the top. Tearing the mint by hand instead of chopping it prevents the leaves from bruising and keeps the aroma fresh.
- Just before serving, whisk together the olive oil with a pinch of salt and pepper and drizzle it over the salad.
- Finish with a decorative drizzle of balsamic glaze. Do not toss the salad until the very last second to keep the greens crisp and the colors distinct.
How to grill marinated chicken?
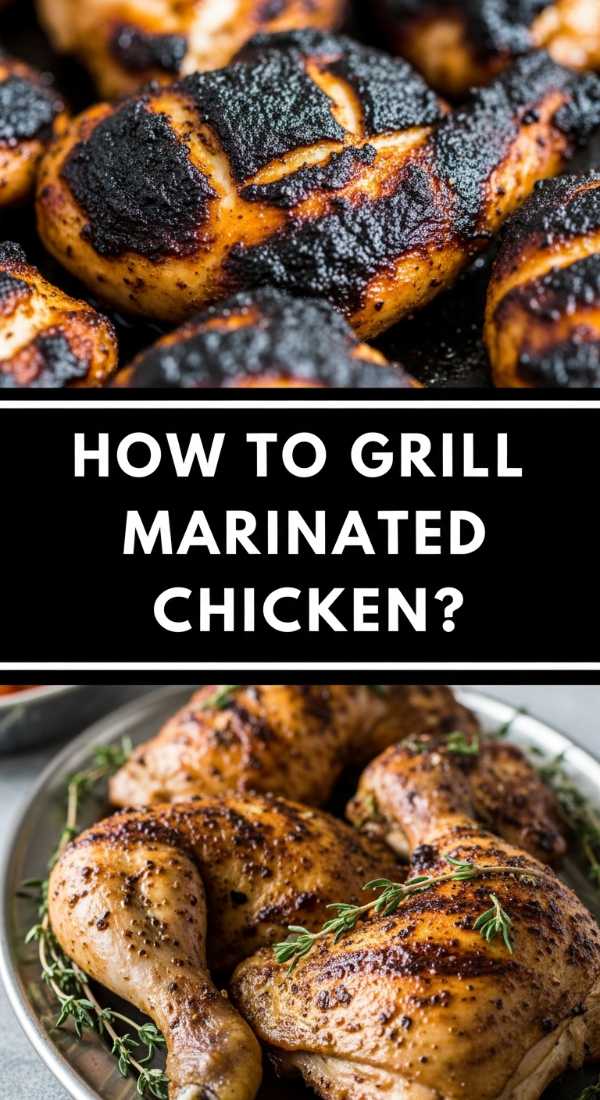
Why we love this
Nothing beats the smoky, charred aroma of perfectly grilled chicken wafting through the backyard. When done right, the exterior is caramelized and slightly crisp from the grill marks, while the interior remains incredibly juicy and tender. The marinade seeps deep into the meat, infusing it with bright citrus notes and earthy herbs that bloom when they hit the heat. It’s a versatile protein that anchors any food board, providing a satisfying, savory element that pairs beautifully with both fresh fruits and heavy sides.
Ingredients
- 2 lbs boneless, skinless chicken breasts or thighs
- 1/4 cup extra virgin olive oil
- 3 tablespoons fresh lemon juice
- 3 cloves garlic, minced
- 1 teaspoon dried oregano
- 1 teaspoon smoked paprika
- Salt and freshly ground black pepper
How to make it
- In a large bowl or a gallon-sized zip-top bag, combine the olive oil, lemon juice, minced garlic, oregano, paprika, salt, and pepper. Whisk or shake to emulsify the marinade.
- Place the chicken in the marinade, ensuring every piece is thoroughly coated. Refrigerate for at least 30 minutes, though 4 to 6 hours is ideal for deep flavor penetration. Avoid marinating for more than 12 hours as the acid in the lemon will begin to break down the meat’s texture.
- Preheat your grill to medium-high heat (about 400°F). Clean the grates thoroughly and lightly oil them to prevent sticking.
- Place the chicken on the grill. If using breasts, cook for about 6-7 minutes per side. Do not move the chicken once you place it down; this allows the grill marks to sear into the meat.
- Use a meat thermometer to check for doneness. The chicken is ready when it reaches an internal temperature of 165°F.
- Remove the chicken from the grill and transfer it to a plate. Tent it loosely with aluminum foil and let it rest for at least 5-8 minutes. This resting period allows the juices to redistribute, ensuring the meat doesn’t dry out when sliced.
How to cook spring pasta?
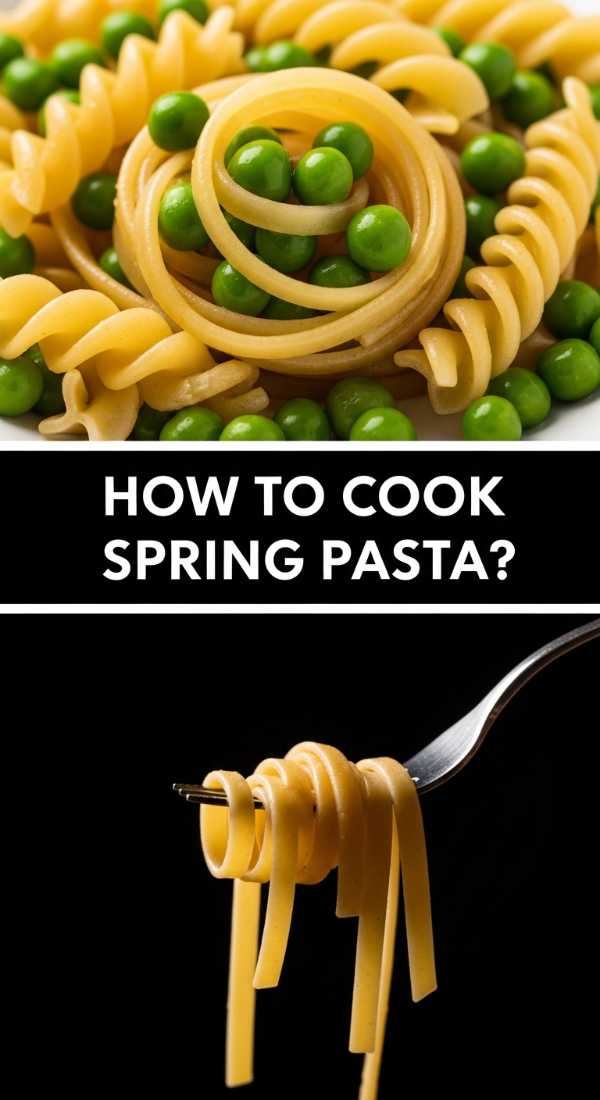
Why we love this
Spring pasta is a celebration of new growth and light, bright flavors. We love it because it moves away from heavy, slow-simmered sauces in favor of a silky, buttery emulsion that highlights the snap of fresh asparagus and the sweetness of baby peas. Each forkful offers a variety of textures—from the al dente pasta to the tender-crisp vegetables—all tied together with a zesty lemon finish and a dusting of sharp parmesan. It’s a clean, elegant dish that feels sophisticated yet takes only minutes to prepare.
Ingredients
- 1 lb pasta (penne, fusilli, or farfalle)
- 1 bunch thin asparagus, cut into 1-inch pieces
- 1 cup fresh or frozen peas
- 3 tablespoons butter
- 2 tablespoons olive oil
- 2 cloves garlic, sliced thin
- Zest and juice of 1 lemon
- 1/2 cup grated Parmesan cheese
- Fresh parsley, chopped
How to make it
- Bring a large pot of heavily salted water to a rolling boil. Add your pasta and cook according to the package directions for ‘al dente’ texture.
- During the last 3 minutes of the pasta’s cooking time, add the asparagus pieces and peas directly into the boiling pasta water. This blanches the vegetables perfectly without needing an extra pot.
- Before draining, reserve at least 1 cup of the starchy pasta water—this is the secret to a silky sauce. Drain the pasta and vegetables.
- In the same pot over medium heat, melt the butter and olive oil. Add the sliced garlic and sauté for about 1 minute until fragrant but not browned.
- Return the pasta and vegetables to the pot. Pour in the lemon juice and half of the reserved pasta water. Toss vigorously to create a light sauce that coats every noodle.
- Remove from heat, stir in the lemon zest, Parmesan cheese, and fresh parsley. If the pasta looks dry, add more pasta water a tablespoon at a time until it reaches a glossy consistency. Serve immediately.
How to use sourdough discard?

Why we love this
Sourdough discard is the unsung hero of the kitchen, offering a complex, tangy depth that you just can’t get from standard flour. Transforming it into crispy crackers is our favorite way to use it because it creates a sophisticated addition to any charcuterie board. The crackers are incredibly crunchy, with a fermented tang that pairs perfectly with sharp cheeses or creamy dips. As they bake, the kitchen fills with a warm, yeasty aroma that is deeply comforting and wholesome, making you feel like a pro baker with very little effort.
Ingredients
- 1 cup sourdough discard (unfed)
- 1 cup all-purpose flour
- 1/4 cup unsalted butter, softened
- 1/2 teaspoon fine sea salt
- 2 tablespoons dried herbs (like rosemary or thyme)
- Coarse sea salt for topping
- 2 tablespoons olive oil for brushing
How to make it
- In a medium bowl, mix the sourdough discard, flour, softened butter, sea salt, and dried herbs. Knead the mixture by hand until it forms a smooth, cohesive ball of dough. If it’s too sticky, add a tablespoon of flour.
- Wrap the dough in plastic and refrigerate for at least 30 minutes. This chills the butter and makes the dough much easier to roll out thinly.
- Preheat your oven to 350°F. Divide the dough into two equal pieces.
- Place one piece of dough on a sheet of parchment paper. Roll it out as thin as possible—ideally about 1/16th of an inch. The thinner the dough, the crispier the cracker.
- Brush the surface lightly with olive oil and sprinkle with coarse sea salt. Use a pizza cutter or a sharp knife to score the dough into squares or rectangles.
- Bake for 15-20 minutes, or until the edges are golden brown and the centers are firm. Let them cool completely on a wire rack to reach maximum crispiness before breaking them along the score lines.
How to make hummingbird food?

Why we love this
There is something magical about sitting on a porch and watching hummingbirds dart back and forth. Making your own nectar is a small act of kindness for nature that provides endless entertainment for your guests. We love this recipe because it’s clean, safe, and free from the artificial red dyes found in store-bought versions which can be harmful to the birds. It takes seconds to whip up, and the simple sugar-to-water ratio mimics the natural nectar of flowers, ensuring the birds keep coming back to your garden all season long.
Ingredients
- 1 cup white granulated sugar
- 4 cups water
How to make it
- Measure out 4 cups of water and place them in a medium saucepan. It is best to use filtered water if your tap water has a high chlorine content.
- Bring the water to a boil. Boiling the water helps remove impurities and ensures the sugar dissolves completely and quickly.
- Remove the pan from the heat and stir in 1 cup of white granulated sugar. Continue stirring until the water is perfectly clear and no sugar crystals remain at the bottom. Do not use honey, brown sugar, or artificial sweeteners, as these can be fatal to hummingbirds.
- Allow the mixture to cool to room temperature. This is a critical step; never put hot nectar into a feeder as it can warp the plastic and harm the birds’ delicate tongues.
- Fill your clean hummingbird feeders with the nectar. Store any extra nectar in a sealed jar in the refrigerator for up to two weeks.
- Clean and refill the feeders every 3-5 days (more often in extreme heat) to prevent mold growth and fermentation.
How to make cold pea salad?

Why we love this
Cold pea salad is a vintage classic that deserves a permanent spot on your food board. It’s a beautiful study in contrasts: the sweet, popping texture of the peas, the sharp bite of red onion, the salty crunch of bacon, and the creamy richness of the mayo-based dressing. It smells fresh and savory all at once. It’s the kind of dish that people usually take a small scoop of out of politeness and then immediately go back for a giant second helping once they taste how perfectly the flavors harmonize.
Ingredients
- 1 lb frozen petite peas, thawed and drained
- 1/2 cup sharp cheddar cheese, cubed very small
- 1/2 cup red onion, finely diced
- 6 strips bacon, cooked crisp and crumbled
- 1/2 cup mayonnaise
- 1 tablespoon apple cider vinegar
- 1 teaspoon sugar
- Salt and pepper to taste
How to make it
- Start by cooking your bacon until it is very crispy. Drain it on paper towels and crumble it into small bits once cooled. Set aside.
- Ensure your peas are completely thawed but still cold. Drain them thoroughly in a colander and pat them dry with a paper towel. Excess moisture will thin out the dressing and make the salad watery.
- In a small bowl, whisk together the mayonnaise, apple cider vinegar, sugar, salt, and pepper until the dressing is smooth and tangy.
- In a large mixing bowl, combine the peas, small cheddar cubes, and finely diced red onion.
- Pour the dressing over the pea mixture and fold gently with a spatula. You want to coat everything without crushing the tender peas.
- Stir in the bacon bits last to preserve their crunch. Cover and refrigerate for at least one hour before serving to allow the flavors to meld together.
How to make grilled asparagus?
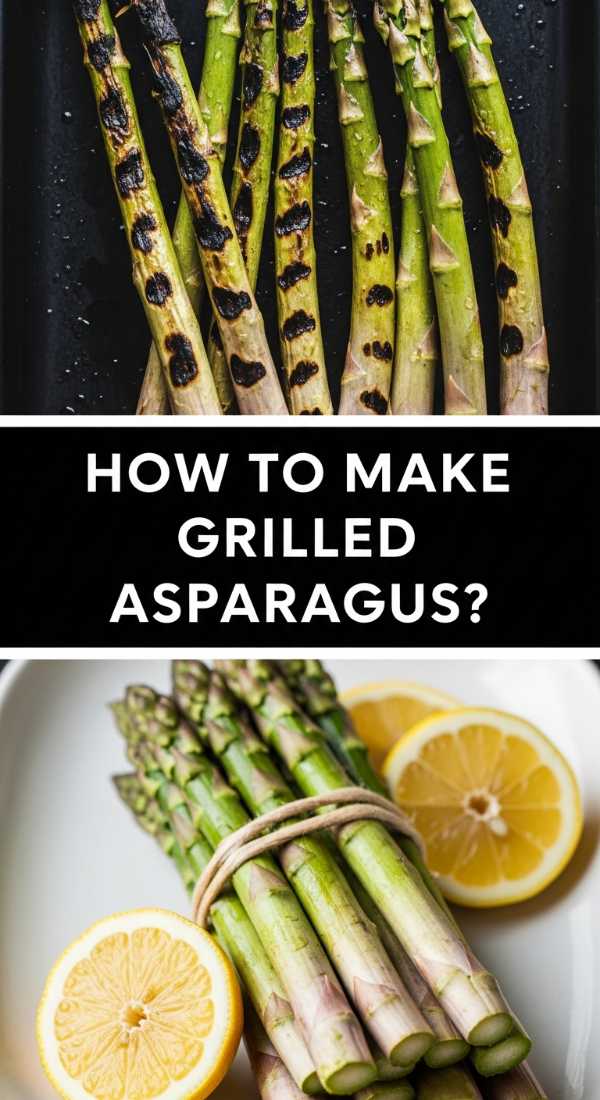
Why we love this
Grilled asparagus is the ultimate side dish because it’s effortless yet looks incredibly high-end. When the spears hit the hot grill, they develop a beautiful char on the tips that tastes slightly nutty and sweet, while the stalks stay tender but retain a satisfying snap. The aroma of roasting greens and olive oil is intoxicating. It’s a healthy, vibrant addition to any board that provides an earthy counterpoint to richer meats or cheeses, especially when finished with a squeeze of fresh lemon and a shower of salty parmesan.
Ingredients
- 1 bunch fresh asparagus, tough ends trimmed
- 2 tablespoons extra virgin olive oil
- 1/2 teaspoon garlic powder
- Salt and freshly ground black pepper
- Lemon wedges for serving
- Optional: Shaved Parmesan cheese
How to make it
- Prepare the asparagus by snapping off the woody bottom ends. A pro tip: hold a spear at both ends and bend it; it will naturally break where the tender part begins. Use this as a guide for the rest of the bunch.
- In a large shallow dish or a baking sheet, toss the asparagus with olive oil, garlic powder, salt, and pepper until each spear is evenly glistening.
- Preheat your grill to high heat. You want the grates very hot to get those distinct sear marks quickly without overcooking the inside.
- Lay the asparagus across the grates, perpendicular to the bars so they don’t fall through.
- Grill for 3 to 5 minutes total. Use tongs to roll the spears occasionally so they brown evenly on all sides. They are done when they are bright green with charred spots and can be easily pierced with a fork but still have a bit of ‘bite.’
- Remove from the grill and immediately squeeze fresh lemon juice over the hot spears. Top with shaved Parmesan if desired and serve warm or at room temperature.
How to make shoneys pie?

Why we love this
Shoney’s Pie is a legendary dessert that brings a bit of diner-style Americana to your hosting spread. It’s known for its towering pile of whole strawberries encased in a thick, translucent red glaze that has just the right amount of jiggle. We love it because it’s visually stunning—a true showstopper that looks far more complicated than it actually is. The flavor is a perfect loop of sweet fruit and a buttery, crumbly crust that feels like a celebration of every summer picnic you’ve ever loved.
Ingredients
- 1 9-inch deep-dish pie shell, baked and cooled
- 1.5 lbs fresh strawberries, cleaned and hulled
- 1 cup sugar
- 3 tablespoons cornstarch
- 1 cup water
- 4 tablespoons strawberry gelatin powder (Jell-O)
- Optional: Red food coloring for that classic diner look
How to make it
- Ensure your pre-baked pie shell is completely cold. Arrange the cleaned strawberries in the shell, stem-side down, in tight concentric circles. If the strawberries are very large, you can cut them in half, but whole berries provide that iconic Shoney’s height.
- In a medium saucepan, whisk together the sugar and cornstarch. Slowly whisk in the water until no lumps remain.
- Place the pan over medium heat and bring to a boil. Stir constantly for about 2 minutes. The mixture will thicken significantly and turn from opaque to clear.
- Remove from the heat and stir in the strawberry gelatin powder. If you want that extra-bright ‘neon’ red color typical of the original diner pie, add one or two drops of red food coloring now.
- Let the glaze sit for 10-15 minutes at room temperature. You want it to be cool enough that it doesn’t cook the berries, but still fluid enough to pour.
- Slowly pour the glaze over the strawberries, starting from the center and working your way out, ensuring it fills all the gaps between the berries. Chill in the refrigerator for at least 4 hours before serving with a generous dollop of whipped cream.
Hosting Made Simple
Hosting doesn’t have to mean spending your entire evening in the kitchen. By focusing on these simple, viral-worthy dishes and presenting them in a relaxed, board-style format, you create an atmosphere that is both impressive and incredibly inviting. The beauty of the ‘lazy’ host’s guide is that it prioritizes connection over perfection. So, grab a board, pick a few of these seasonal favorites, and enjoy the party you worked so hard to put together!