

Stop Everything: You Need to Try This Viral Snack Board
There is something truly magical about the way food can bring people together, especially when it’s served in such a beautiful, approachable way. We’ve all seen those stunning boards scrolling through our feeds, but I wanted to create something that wasn’t just eye candy. This viral snack board is about the soul of gathering—the laughter that happens over a shared plate, the tactile joy of dipping a piece of crusty bread into a velvety sauce, and the vibrant colors that make you feel like you’re eating a piece of art.
I remember the first time I set this out for my family; the room went quiet for a split second before everyone started reaching in, sharing stories, and asking for the recipes. It’s more than a meal; it’s an experience. Whether you’re hosting a big party or just looking to elevate your Tuesday night, these elements will transform your kitchen into a sanctuary of flavor. Let’s dive into the components that make this board a total showstopper.
How to make refreshing salads?

Why we love this
There is nothing quite like the crisp, cooling snap of a perfectly chilled cucumber paired with the peppery bite of fresh arugula. Imagine the aroma of torn mint leaves wafting through your kitchen, mingling with the bright, citrusy scent of lemon zest. Each bite is a symphony of textures—the crunch of the vegetable, the soft crumble of feta, and the silkiness of extra-virgin olive oil coating your tongue. It’s the kind of dish that cleanses the palate and leaves you feeling revitalized, like a cool breeze on a humid afternoon.
Ingredients
- 2 large English cucumbers, thinly sliced
- 1 cup fresh arugula
- 1/4 cup crumbled feta cheese
- 2 tablespoons fresh mint, chiffonade
- 1 tablespoon fresh dill, chopped
- Juice of half a lemon
- 2 tablespoons high-quality olive oil
- Flaky sea salt and cracked black pepper
How to make it
- Begin by washing your cucumbers thoroughly; for this salad, I prefer to leave the skin on for that extra snap and vibrant green color. Slice them into thin rounds using a mandoline on a 1/8-inch setting to ensure every piece is uniform and delicate.
- Place the cucumber slices in a large glass bowl and sprinkle with a pinch of sea salt. Let them sit for about 5 minutes; this draws out just enough moisture to keep the salad from becoming soggy while intensifying the cucumber flavor.
- In a small jar, combine your lemon juice and olive oil. Shake vigorously for 30 seconds until the mixture is fully emulsified—you’ll know it’s ready when it looks slightly opaque and thickened.
- Gently toss the arugula and cucumbers together using your hands or light tongs. You want to coat the leaves without bruising them.
- Sprinkle the feta, mint, and dill over the top. Drizzle the dressing just before serving to maintain the maximum crunch. Finish with a final flourish of cracked black pepper and flaky salt for a professional touch.
How to make creamy sauces?

Why we love this
A truly great creamy sauce is like a warm hug for your taste buds. It should be thick enough to coat the back of a spoon, with a glossy sheen that catches the light beautifully. The aroma of roasted garlic and tempered cream creates an inviting atmosphere that makes everyone congregate in the kitchen. As you dip into it, you experience a richness that is balanced by a subtle tang, leaving a lingering, savory finish that makes you reach for just one more bite. It is the ultimate comfort element for any board.
Ingredients
- 1 cup heavy cream
- 4 cloves garlic, roasted and mashed
- 1/2 cup grated Parmesan cheese
- 1/4 teaspoon ground nutmeg
- 2 tablespoons unsalted butter
- Salt and white pepper to taste
How to make it
- Start by melting your butter in a heavy-bottomed saucepan over medium-low heat. You don’t want it to brown; just let it reach a gentle, foaming state to provide a silky base.
- Whisk in the mashed roasted garlic. Use a silicone whisk to break up the garlic until it becomes a smooth paste within the butter, releasing its sweet, nutty aroma.
- Slowly pour in the heavy cream while whisking constantly. Increase the heat to medium, but do not let it reach a rolling boil. You are looking for a gentle simmer where small bubbles dance around the edges of the pan.
- Reduce the heat to low and add the grated Parmesan in small handfuls. Whisk each batch until fully melted before adding the next; this prevents the sauce from becoming grainy or clumping.
- Add the nutmeg and white pepper. Continue to cook on low for 3-4 minutes until the sauce thickens to a velvety consistency. It is done when it coats a spoon and leaves a clear path when you run your finger through the back of it.
How to prep family meals?

Why we love this
Preparing meals for the family is about creating a sense of ease and abundance. There is a deep satisfaction in seeing a large tray filled with roasted vegetables, tender grains, and succulent proteins, all seasoned to perfection. The kitchen fills with the scent of thyme and rosemary, signaling to everyone that it’s time to slow down and connect. It’s the feeling of a Sunday afternoon—unhurried, nourishing, and designed to satisfy every palate at the table, from the pickiest eaters to the most adventurous foodies.
Ingredients
- 1 lb sweet potatoes, cubed
- 1 lb Brussels sprouts, halved
- 2 lbs chicken thighs, bone-in
- 3 tablespoons avocado oil
- 1 tablespoon dried oregano
- 1 teaspoon smoked paprika
- Salt and pepper to taste
How to make it
- Preheat your oven to 425°F (220°C). High heat is essential for achieving that perfect caramelization on the vegetables while keeping the chicken juicy and tender.
- Line two large baking sheets with parchment paper. This ensures nothing sticks and makes cleanup a breeze—a must-have tip for busy weeknights.
- In a large bowl, toss the sweet potatoes and Brussels sprouts with 2 tablespoons of avocado oil, salt, and pepper. Spread them in a single layer on one tray, ensuring they aren’t crowded so they roast rather than steam.
- Pat the chicken thighs completely dry with paper towels. This is the secret to getting crispy skin. Rub them with the remaining oil, oregano, and smoked paprika.
- Place the chicken on the second tray and put both trays in the oven. Roast the vegetables for 25-30 minutes until golden and tender. Roast the chicken for 35-40 minutes until the internal temperature reaches 165°F and the skin is a deep, crackling gold.
How to cook cheesy pasta?

Why we love this
Cheesy pasta is the gold standard of indulgence. There is something primal and deeply satisfying about long strands of pasta dripping with a molten blend of cheeses. The sight of that first “cheese pull” as you lift a forkful is enough to make anyone’s mouth water. It’s heavy, it’s rich, and it’s layered with the sharp tang of cheddar and the nutty depth of Gruyère. The texture is a beautiful contrast between the al dente pasta and the liquid gold that surrounds it, creating a decadent mouthfeel that is pure bliss.
Ingredients
- 1 lb Cavatappi or Rigatoni pasta
- 2 cups sharp cheddar, freshly grated
- 1 cup Gruyère cheese, freshly grated
- 3 cups whole milk
- 4 tablespoons butter
- 1/4 cup all-purpose flour
- 1/2 teaspoon dry mustard powder
How to make it
- Boil a large pot of heavily salted water. Cook your pasta for exactly 2 minutes less than the package directions for “al dente.” This is crucial because the pasta will finish cooking in the cheese sauce and you want it to retain its bite.
- While the pasta boils, melt butter in a large pot over medium heat. Whisk in the flour to create a roux. Cook for 2 minutes, stirring constantly, until the raw flour smell disappears and it smells slightly nutty.
- Gradually whisk in the milk, one cup at a time. Keep whisking until the sauce is smooth and begins to thicken, which usually takes about 5-7 minutes. It should have the consistency of a thick gravy.
- Turn the heat to the lowest setting and stir in the dry mustard. Add the cheese in small batches, stirring until each batch is completely melted. Do not rush this, or the sauce might break!
- Drain the pasta and immediately fold it into the cheese sauce. Stir gently for 1-2 minutes over low heat until every nook and cranny of the pasta is filled with cheesy goodness.
How to make zesty dressings?

Why we love this
A zesty dressing is the spark that brings a salad to life. It’s all about that bright, electric acidity that makes your taste buds dance. The sharp zing of vinegar combined with the punch of Dijon mustard and the herbaceous aroma of fresh shallots creates a profile that is both sophisticated and energizing. When you drizzle it over greens, it doesn’t just sit there—it penetrates, highlighting the natural sweetness of the vegetables and adding a layer of complexity that makes a simple bowl of leaves taste like a gourmet dish.
Ingredients
- 1/2 cup extra-virgin olive oil
- 1/4 cup apple cider vinegar
- 1 tablespoon Dijon mustard
- 1 small shallot, finely minced
- 1 tablespoon honey or maple syrup
- Salt and pepper to taste
How to make it
- In a small mixing bowl, combine the minced shallot and apple cider vinegar. Let this sit for about 5 minutes; the acid in the vinegar will “quick-pickle” the shallots, mellowing their bite and infusing the vinegar with flavor.
- Add the Dijon mustard and the honey to the vinegar mixture. Whisk them together until the mustard is fully incorporated and the honey has dissolved.
- Now comes the most important part: the emulsion. Very slowly, drip the olive oil into the bowl while whisking vigorously with your other hand.
- Continue the slow drizzle until all the oil is added. The dressing should transform from a watery liquid into a thick, creamy, and unified sauce that won’t separate.
- Taste and season with salt and pepper. If it’s too tart, add a tiny bit more honey; if it’s too sweet, add a drop more vinegar. Store in a glass jar in the fridge for up to a week.
How to make crispy chicken?

Why we love this
Crispy chicken is all about the sound—that audible *crunch* that signifies a perfect cook. The skin should be paper-thin and shattered like glass when bitten, revealing meat that is incredibly moist and steaming hot. The aroma is salty, savory, and irresistible, reminiscent of the best comfort food memories. It’s a texture game: the resistance of the crust followed by the tender yield of the chicken. It’s the star of the snack board, providing a hearty, satisfying element that pairs perfectly with every sauce and salad.
Ingredients
- 4 chicken cutlets, pounded to 1/2 inch thickness
- 1 cup Panko breadcrumbs
- 1/2 cup all-purpose flour
- 2 large eggs, beaten
- 1 teaspoon garlic powder
- 1/2 teaspoon onion powder
- Neutral oil for frying (like vegetable or canola)
How to make it
- Set up a dredging station with three shallow bowls: one with flour seasoned with salt and pepper, one with the beaten eggs, and one with Panko mixed with garlic and onion powder.
- Dredge each chicken cutlet first in the flour, shaking off the excess so only a thin veil remains. Dip into the egg wash, ensuring it’s fully coated, then press firmly into the Panko. Use your palms to really adhere those crumbs to the meat.
- Heat about 1/2 inch of oil in a large cast-iron skillet over medium-high heat. To test if the oil is ready, drop a single breadcrumb in; if it sizzles instantly, you’re good to go.
- Carefully lay the chicken in the pan, working in batches to avoid crowding, which drops the oil temperature and leads to greasy chicken. Fry for 3-4 minutes per side.
- Look for a deep, golden-brown color and a firm feel when pressed with tongs. Transfer to a wire cooling rack (not a paper towel!) to allow air to circulate, keeping the bottom just as crispy as the top.
How to prep healthy lunches?
Why we love this
Prepping healthy lunches is an act of self-love that pays off all week long. There is a sense of calm that comes from seeing organized containers filled with vibrant greens, roasted chickpeas, and colorful quinoa. The textures are varied—soft grains, crunchy seeds, and creamy avocado—making every lunch feel like a treat rather than a chore. It’s about balance: fueling your body with nutrients while keeping your palate excited with different flavor combinations that prevent the dreaded “lunch fatigue.”
Ingredients
- 2 cups cooked quinoa
- 1 can chickpeas, drained and roasted
- 2 cups chopped kale
- 1 cup cherry tomatoes, halved
- 1/4 cup pumpkin seeds (pepitas)
- Lemon tahini dressing
How to make it
- Start by prepping your “base” grain. Cook your quinoa in vegetable broth instead of water for an extra layer of savory flavor. Once cooked, fluff it with a fork and let it cool completely to prevent it from steaming the other ingredients in the container.
- Roast your chickpeas at 400°F with a drizzle of oil and a pinch of cumin for 20 minutes until they are crunchy. This adds a necessary protein and texture element.
- Massage your kale! Place the chopped kale in a bowl with a tiny bit of olive oil and salt, and squeeze it with your hands for 60 seconds. This breaks down the tough fibers, making it tender and much easier to digest.
- Assemble your containers by layering the quinoa at the bottom, followed by the massaged kale, tomatoes, and roasted chickpeas.
- Keep your dressing in a separate small container. This is the ultimate pro-tip: never dress your salad until the moment you’re ready to eat to keep everything vibrant and fresh. Sprinkle the pepitas on top last for a final crunch.
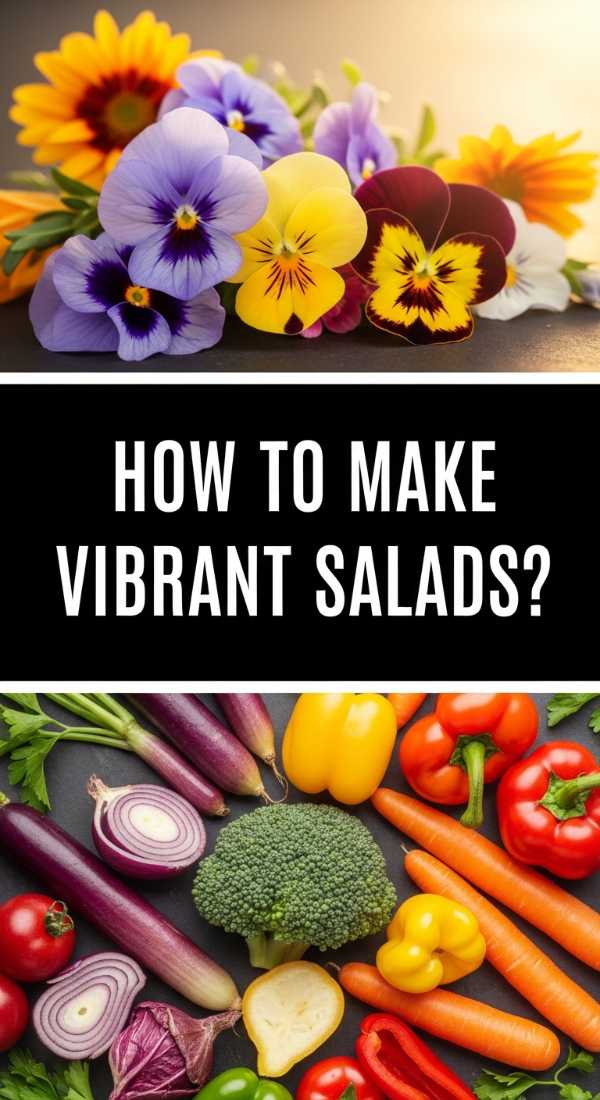
How to make vibrant salads?

Why we love this
A vibrant salad is a feast for the eyes before it ever reaches your mouth. It’s a riot of color—deep purples from radicchio, bright oranges from shredded carrots, and emerald greens from fresh herbs. The aroma is earthy and fresh, like a garden after a rainstorm. Each forkful offers a different experience: a burst of sweetness from a pomegranate seed, a bitter note from a leaf, or the creamy richness of a slice of avocado. It’s a dish that feels alive and celebratory, making it the perfect centerpiece for a viral snack board.
Ingredients
- 3 cups mixed baby greens
- 1/2 cup shredded purple cabbage
- 1/2 cup shredded carrots
- 1/4 cup pomegranate seeds
- 1/2 avocado, sliced
- 1/4 cup toasted walnuts
How to make it
- Focus on the “shred.” Use a box grater or a food processor attachment to get your cabbage and carrots into fine, uniform wisps. This allows them to mingle perfectly with the delicate baby greens.
- Toast your walnuts in a dry pan over medium heat for 3-5 minutes. Stay close and toss them frequently; they go from perfectly toasted to burnt in a matter of seconds. You’ll know they’re done when they smell incredibly fragrant and look slightly shiny.
- In a very large bowl, toss the greens, cabbage, and carrots. Use a large volume so you can toss them with plenty of air, keeping the salad light and voluminous rather than packed down.
- Add the pomegranate seeds and toasted walnuts. These are your “jewels”—they provide the pops of color and crunch that make the salad feel special.
- Just before serving, top with the sliced avocado. Drizzle with a light vinaigrette and toss one final time very gently so you don’t mash the avocado. The goal is a messy, beautiful pile of nature’s best.
How to make tangy sauce?
Why we love this
Tangy sauces are the ultimate “wake up call” for your palate. They provide that sharp, vinegar-forward or citrus-heavy punch that cuts through rich meats or fried appetizers. The scent is sharp and appetizing, often featuring notes of lime, ginger, or fermented chili. It’s the kind of sauce that makes your mouth water instantly. The texture is usually thinner and more fluid than a creamy sauce, allowing it to seep into the nooks and crannies of whatever you’re dipping, ensuring every bite is infused with a bold, zesty personality.
Ingredients
- 1/2 cup Greek yogurt
- 2 tablespoons lime juice
- 1 tablespoon Sriracha or hot sauce
- 1 teaspoon grated fresh ginger
- 1 clove garlic, minced
- A pinch of salt
How to make it
- In a small ceramic bowl, combine the Greek yogurt and lime juice. Whisk until the yogurt thins out slightly and becomes a perfectly smooth, pourable consistency.
- Add the ginger and garlic. For the best results, use a microplane to grate them directly into the bowl. This ensures there are no large chunks, allowing the flavors to distribute evenly throughout the sauce.
- Stir in the Sriracha. You can adjust the amount based on your heat preference—start with a teaspoon and work your way up until it has the perfect “kick.”
- Let the sauce sit at room temperature for at least 15 minutes before serving. This allows the heat of the ginger and garlic to meld with the cooling yogurt and the acid of the lime.
- Give it a final stir and a taste. The flavor should be bright, sharp, and slightly spicy. If it feels too aggressive, a tiny drop of honey can help round out the sharp edges.
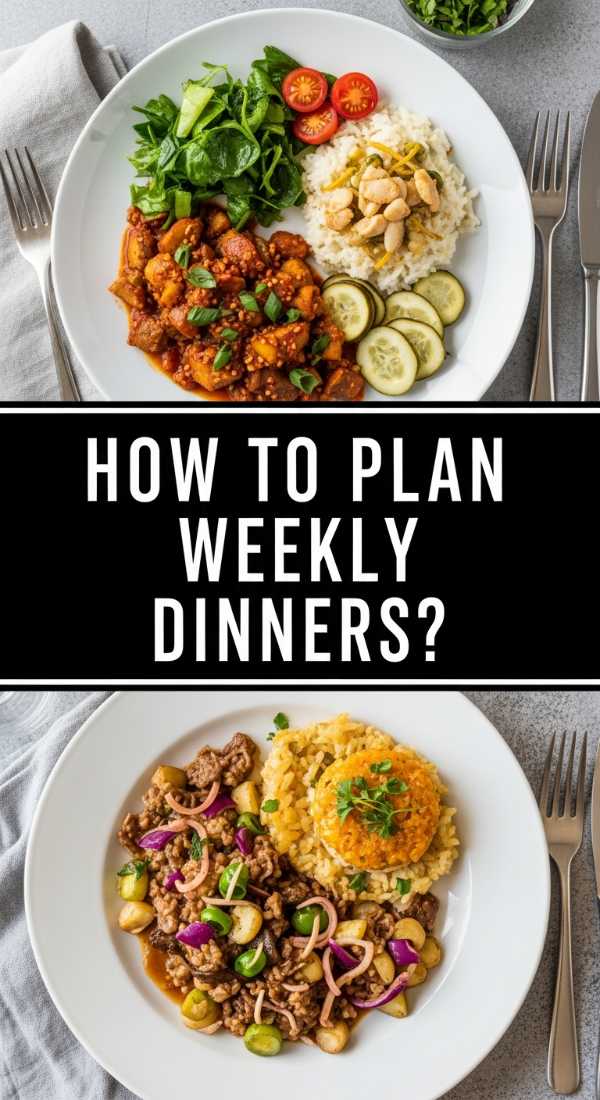
How to plan weekly dinners?
[IMAGE_10]
Why we love this
Planning weekly dinners is the secret to a peaceful home life. There is a profound sense of relief that comes from knowing exactly what’s for dinner when the 5:00 PM rush hits. It’s the aroma of a pre-planned slow cooker meal greeting you at the door or the visual beauty of a prepped fridge. This practice allows you to be more intentional with your ingredients, reducing waste and ensuring your family eats a variety of flavors. It turns cooking from a stressful chore into a creative outlet where you can experiment with new themes and global cuisines.
Ingredients
- 1 hour of quiet time
- A meal planning notebook or app
- Inventory of your pantry and freezer
- List of 5 core recipes
- Seasonal produce list
How to make it
- Start with a “Pantry Audit.” Spend 10 minutes looking through your cupboards and freezer to see what you already have. This prevents buying duplicate ingredients and saves money.
- Choose a theme for each night to make decision-making easier (e.g., Meatless Monday, Taco Tuesday, Pasta Friday). This structure provides a helpful framework while still allowing for variety.
- Write down your 5 core meals and create a consolidated grocery list. Organize the list by grocery store aisle (Produce, Meat, Dairy, etc.) to make the actual shopping trip as efficient as possible.
- Dedicate one afternoon (usually Sunday) to “component prepping.” Wash and chop your vegetables, cook a big batch of grains, and whisk together two or three dressings. This isn’t about cooking full meals, but preparing the building blocks.
- Post the menu somewhere visible in the kitchen. Not only does this stop the “What’s for dinner?” questions, but it also builds anticipation for the delicious meals ahead.
Conclusion
Creating this viral snack board is more than just a culinary project—it’s about bringing a sense of joy and abundance back to your table. By mastering these ten elements, from the crunchiest chicken to the most vibrant salads, you are equipping yourself with the tools to make any meal feel like a special occasion. I hope these recipes inspire you to gather your favorite people, turn up some music, and enjoy the simple, beautiful pleasure of good food shared with love. Happy boarding!