
There is a specific kind of magic that happens when the sun begins to dip below the horizon, casting a long, golden glow across your backyard. It’s that moment when the air cools just enough to grab a light cardigan, and you realize your outdoor space is no longer just a patch of grass—it’s an extension of your soul. For years, I looked at my patio and saw only a cold concrete slab and missed opportunities. But I’ve learned that a home isn’t just defined by its four walls; it’s defined by the sanctuary we create in the spaces between them.
In this post, I’m sharing the heart and soul behind my favorite transformations. We’re diving into the DIY projects that turned my outdoor area from a ‘place I walk through’ to a ‘place I never want to leave.’ Whether you have a sprawling estate or a tiny urban balcony, these projects are designed to evoke that warm, fuzzy feeling of belonging. Let’s roll up our sleeves and bring some aesthetic intentionality to every corner of your living space.
How to Build a Planter Privacy Wall for Ultimate Backyard Seclusion

Why we love this
There is nothing quite like the scent of fresh-cut cedar mingled with the damp earth of a new garden. This privacy wall provides more than just a barrier from the neighbors; it creates a living, breathing cocoon of greenery that filters the wind into a gentle breeze. As the sun filters through the horizontal slats, it creates a rhythmic pattern of light and shadow that dances across your patio floor. It feels like a secret garden sanctuary where the outside world simply ceases to exist, leaving you with the soothing sound of rustling leaves and the privacy you’ve been dreaming of.
Essential Elements:
- Pressure-treated 4×4 posts
- Cedar 1×6 fence pickets or slats
- Large wooden planter box liners
- Galvanized deck screws
- Potting soil and climbing vines (like Jasmine or Clematis)
- Exterior-grade wood stain in a warm teak or driftwood grey
How to make it
- Begin by measuring your desired area and marking where your 4×4 posts will go; if on a deck, use post bases, but if on soil, dig holes 2 feet deep and set them in quick-dry concrete to ensure a rock-solid foundation.
- Once the posts are level and the concrete has cured for at least 24 hours, attach your lower planter box frames to the base of the posts using 3-inch screws, ensuring the boxes are deep enough (at least 12-15 inches) for healthy root growth.
- Install your horizontal cedar slats starting from the top of the planter box upwards, using a 1/2-inch spacer between each board to allow for airflow and a modern, airy aesthetic.
- Sand all rough edges with 120-grit sandpaper until the wood feels like velvet to the touch, then apply a high-quality UV-resistant stain with a natural bristle brush, following the grain carefully.
- Line the planters with landscaping fabric to prevent soil washout, fill with a high-quality potting mix, and plant your climbing vines, gently weaving the initial tendrils through the lower slats to encourage them to grow upward.
How to Use Budget Solar Lights for a Glowing Front Porch Entrance

Why we love this
As twilight settles in, there is a profound sense of comfort in seeing a warm, amber glow guiding you home. These budget-friendly solar lights aren’t just functional; they add a layer of sophisticated ambiance that mimics the soft flicker of candlelight without the hassle of wiring. The way the light spills across the porch steps creates a welcoming texture, highlighting the grain of the wood and the vibrant colors of your potted plants. It turns a dark, forgotten entrance into a high-end invitation to come inside and stay a while, all powered by the sun we enjoyed all day.
Essential Elements:
- Set of warm-white LED solar path lights
- Glass mason jars (optional for DIY lanterns)
- Black matte spray paint (for a high-end finish)
- Heavy-duty outdoor mounting tape or stakes
- Rechargeable solar batteries
How to make it
- Take your budget solar lights apart by removing the plastic stakes and the clear housing, then give the plastic rims a quick coat of matte black or antique bronze spray paint to hide the ‘cheap’ plastic look and give them a designer feel.
- Check the solar panels on top to ensure they are clean and free of any protective plastic film; if they look dull, a quick coat of clear gloss spray can sometimes revive their ability to absorb sunlight.
- Find the areas of your porch that receive at least 6 hours of direct sunlight during the day; if your porch is covered, consider mounting the solar sensors at the very edge of the roofline or using remote-panel solar strings.
- Place the lights at varying heights—some at ground level to illuminate the path and some tucked into hanging baskets or on side tables—to create depth and visual interest in your lighting design.
- Wait for nightfall to do your final ‘aiming,’ turning the lights slightly toward focal points like a beautiful wreath or a house number to ensure the most aesthetic impact.
How to Style Front Yard Rock Landscaping for High End Curb Appeal

Why we love this
There is a sophisticated, tactile beauty in the contrast between smooth river stones and the sharp, architectural lines of modern succulents. Rock landscaping brings an earthy, grounded energy to your home’s exterior that looks manicured year-round with almost zero effort. We love the way the different shades of slate, cream, and charcoal change color when it rains, turning from matte textures to shimmering jewel tones. It feels clean, intentional, and incredibly high-end, providing a neutral backdrop that makes the natural colors of your home and plants truly pop against the horizon.
Essential Elements:
- Multi-sized river rocks or Mexican beach pebbles
- Heavy-duty weed barrier fabric
- Steel or heavy plastic landscape edging
- Lava rocks or crushed granite for filler
- Low-maintenance architectural plants (Agave, Yucca, or Ornamental Grasses)
How to make it
- Clear the area of all grass and weeds, digging down about 2-3 inches to create a recessed bed that will hold the rocks in place without them spilling onto your walkway.
- Lay down a professional-grade weed barrier, overlapping the edges by 6 inches and securing it with landscaping staples every foot to prevent any rogue green from breaking through your clean design.
- Install your edging—I recommend a slim black steel edging for a modern look—hammering it into the ground so it sits about an inch above the soil level to create a crisp, defined border.
- Place your larger ‘hero’ rocks or boulders first, burying the bottom third of the rock in the ground so it looks like a natural outcropping rather than just sitting on top of the soil.
- Fill in the remaining area with your smaller pebbles, raking them level and then spraying them down with a hose to remove the dust and reveal the stones’ true, vibrant colors.
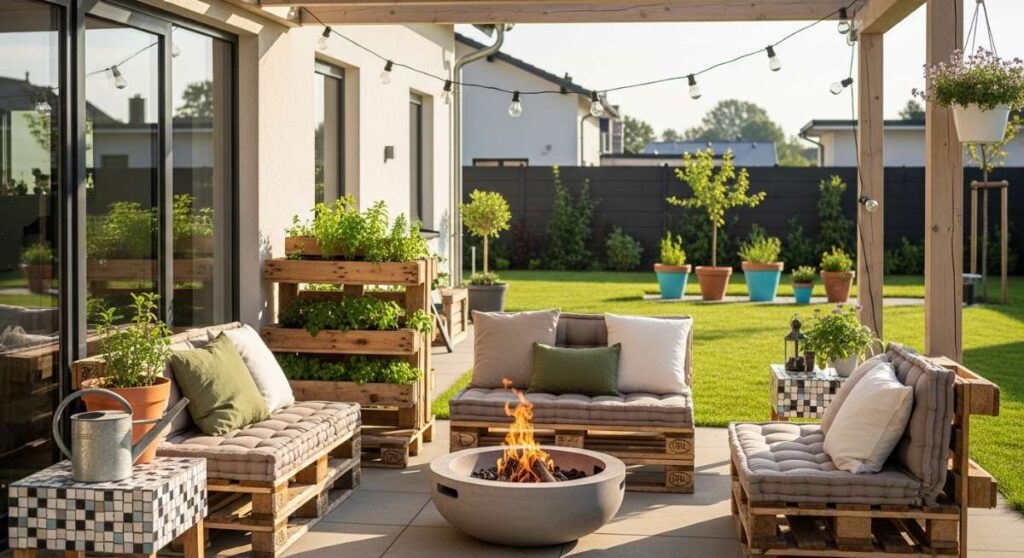
How to Complete a Concrete Slab Patio Makeover for the Perfect Summer Hangout

Why we love this
Transforming a cold, cracked concrete slab into a stylish outdoor living room is one of the most rewarding DIYs you can tackle. The feeling of stepping onto a freshly painted, patterned surface that mimics the look of expensive tile is pure luxury underfoot. It changes the entire temperature of the backyard, making the space feel finished and curated rather than industrial and unfinished. When you pair that fresh surface with a plush outdoor rug and a few oversized floor pillows, the patio becomes the heart of the home, perfect for barefoot summer nights and long conversations over iced tea.
Essential Elements:
- Concrete cleaner and degreaser
- Concrete primer and exterior porch/patio paint
- Large-scale geometric stencil
- Small high-density foam rollers
- Painter’s tape and a measuring tape
- Clear anti-slip concrete sealer
How to make it
- Power wash the concrete thoroughly to remove all dirt and loose debris, then apply a degreaser to any oil spots and scrub with a stiff brush; this is the most critical step for paint adhesion.
- Apply two thin, even coats of a high-quality exterior concrete primer using a long-handled roller, allowing at least 4 hours of dry time between coats or according to the manufacturer’s instructions.
- Roll on your base color (usually a light neutral like sand or dove grey) and let it cure for 24 hours before you even think about starting the stencil work.
- Secure your stencil in the center of the patio with painter’s tape and use a ‘dry brush’ technique with your foam roller—meaning you roll most of the paint off onto a paper towel first—to prevent bleeding under the stencil edges.
- Work in a grid pattern from the center out, and once the entire patio is stenciled and dry, apply two coats of clear anti-slip sealer to protect your hard work from the elements and foot traffic.
How to Paint a Shed Mural for a Whimsical Garden Sanctuary

Why we love this
A garden shed shouldn’t just be a place to hide the lawnmower; it should be a canvas for your imagination. Painting a mural transforms a utilitarian structure into a focal point that feels like something out of a storybook. Whether it’s oversized botanical leaves or soft, abstract clouds, the mural adds a splash of personality and joy to the garden. We love the way the colors interact with the changing light throughout the day, and how the mural provides a year-round ‘bloom’ even in the middle of winter when the rest of the garden is dormant. It’s a whimsical touch that makes your backyard feel truly unique.
Essential Elements:
- Exterior acrylic latex paint in various colors
- High-quality synthetic brushes (angled and detail sizes)
- Chalk or a pencil for sketching
- Exterior clear topcoat (UV resistant)
- Ladder and painter’s tape
How to make it
- Clean the shed walls with a mild detergent and water, then sand any peeling paint or rough wood patches to create a smooth surface for your masterpiece.
- Sketch your design lightly using chalk or a light pencil; I like using chalk because you can easily wipe it away with a damp cloth if you want to change the proportions or the flow of the design.
- Block in your largest areas of color first using a 2-inch brush, working from the background to the foreground to create a sense of depth and layering.
- Switch to smaller detail brushes for the finer lines, like the veins of leaves or the center of flowers, and don’t be afraid to mix colors directly on a palette to get those perfect, custom shades.
- Once the mural is completely dry (wait at least 48 hours), apply a clear, non-yellowing exterior topcoat to protect the pigments from fading in the harsh sun and to make the shed easy to wipe down.
How to Master Realistic Pantry Organization for a Stress Free Kitchen

Why we love this
Walking into a perfectly organized pantry feels like a deep, cleansing breath for your brain. There is something incredibly satisfying about the clink of glass jars and the sight of uniform labels that turn everyday staples into a work of art. The aroma of cinnamon, roasted coffee, and dried herbs becomes more pronounced when things aren’t buried under piles of plastic bags. This isn’t just about aesthetics; it’s about the ease of knowing exactly what you have, reducing food waste, and making the act of cooking feel like a calm, creative ritual rather than a frantic search for the baking powder.
Essential Elements:
- Airtight glass or BPA-free plastic canisters
- Uniform labels (minimalist or handwritten)
- Lazy Susans for oils and vinegars
- Tiered shelving for canned goods
- Woven baskets for bulky items or snacks
How to make it
- Empty your entire pantry and wipe down the shelves with a warm microfiber cloth and a drop of essential oil like lemon or eucalyptus for a fresh, clean scent.
- Group your items into logical categories: baking, grains, snacks, canned goods, and breakfast; this allows you to see exactly how many containers of each size you will actually need.
- Decant your dry goods—flour, sugar, pasta, and cereal—into your clear canisters, ensuring you cut out the expiration dates or cooking instructions and tape them to the back or bottom of the jar.
- Place frequently used items at eye level and use Lazy Susans in the corners so that your oils, honey, and sauces are always just a quick spin away from your reach.
- Label everything immediately using a consistent font or style, which not only looks beautiful but also ensures that every family member knows exactly where the oats belong when they’re putting away the groceries.
How to Create an Above Ground Pool Bar for a Tropical Backyard Oasis

Why we love this
An above-ground pool can sometimes feel like a bit of an eyesore, but adding a custom bar transforms it into a five-star tropical resort. Imagine leaning against a smooth wooden ledge, the cool water lapping at your shoulders, while a chilled drink sits just inches away. The combination of the turquoise water and the warm wood tones of the bar creates a vacation vibe right in your own zip code. It’s the ultimate gathering spot for friends, where the sounds of laughter and splashing are complemented by the tactile comfort of a sturdy, well-built surface that makes every Saturday feel like a getaway.
Essential Elements:
- Weather-resistant lumber (Cedar or Redwood)
- Heavy-duty L-brackets or custom supports
- Waterproof wood sealer
- Outdoor bar stools
- Solar-powered clip-on lights for the underside
How to make it
- Measure the outer rim of your pool and determine the length of the bar; usually, a 4 to 6-foot section is perfect for seating two to three people comfortably.
- Build a sturdy frame using 2x4s that will wrap around the top rail of the pool, ensuring that the weight is distributed evenly and doesn’t put stress on the pool wall itself.
- Attach the bar top—I recommend using 1×6 boards spaced slightly apart—securing them from the underside so no screws are visible on the top surface where you’ll be resting your arms.
- Sand the entire bar meticulously, starting with 80-grit and moving to 220-grit, until the wood is completely snag-free to protect both your skin and your swimwear.
- Apply three coats of a marine-grade spar urethane to protect the wood from constant splashes of chlorinated or salt water, allowing each coat to dry for the full recommended time to ensure a hard, waterproof shell.
How to Update a Classic Ranch Exterior for a Modern Timeless Look

Why we love this
Ranch-style homes have such wonderful ‘bones,’ and a modern update brings out their inherent, grounded elegance. By simplifying the color palette and adding natural textures like wood or stone, you take a house from ‘dated’ to ‘designer.’ We love the crisp contrast of a dark charcoal trim against a creamy white siding, and how a new modern front door can act like a piece of jewelry for the whole house. It’s about honoring the horizontal lines of the architecture while infusing it with fresh, contemporary energy that feels both sophisticated and incredibly welcoming to everyone who drives by.
Essential Elements:
- High-quality exterior paint in a modern palette (think Iron Ore or Swiss Coffee)
- Modern black hardware (handle sets, mailboxes, and house numbers)
- Natural wood shutters or porch columns
- Contemporary outdoor sconces
- Symmetry-focused landscaping
How to make it
- Start with a thorough deep clean of the siding and trim using a soft-wash system to avoid damaging the older materials while removing decades of dust and oxidation.
- Paint the main body of the house a soft, warm white and use a deep, matte black or navy for the shutters and trim to create that high-contrast, modern farmhouse or ‘New Ranch’ aesthetic.
- Swap out old, ornate light fixtures for clean-lined, oversized black lanterns that use Edison bulbs to provide a warm, vintage-inspired glow that bridges the gap between old and new.
- Replace standard house numbers with large, modern floating numbers in a vertical arrangement near the door, which adds an instant designer touch for a very small investment.
- Upgrade the porch columns by wrapping existing skinny posts with cedar boards, staining them a light oak or honey color to add warmth and organic texture to the cool paint tones.
How to Design a Rock River Bed for Proper Garden Drainage and Style

Why we love this
A dry creek bed is the perfect marriage of form and function; it solves drainage issues while looking like a beautiful, natural feature of the landscape. There is something deeply meditative about the way the stones wind through the garden, mimicking the path of a mountain stream. During a rainstorm, the sight and sound of water trickling over the pebbles turn a potential mud problem into a soothing water feature. It adds a rugged, earthy texture to the yard that looks even better as it ages and the stones settle into the earth, surrounded by lush ferns and moss.
Essential Elements:
- A variety of stone sizes (boulders, river rocks, and pea gravel)
- Heavy-duty pond liner or landscape fabric
- Trenching shovel
- Native moisture-loving plants (Ferns, Hostas, or Sedges)
- Topsoil and mulch for the edges
How to make it
- Identify the natural path that water takes through your yard during a heavy rain and dig a meandering trench along that path, making it about 12-18 inches wide and 6 inches deep.
- Line the trench with heavy-duty landscape fabric, making sure it extends slightly past the edges of the trench to prevent soil from mixing with your clean stones over time.
- Place your largest boulders at the ‘bends’ of your river bed to act as natural anchors and to help direct the flow of water without erosion.
- Fill the bottom of the trench with medium-sized river rocks, then use smaller pea gravel to fill in the gaps between the larger stones, creating a layered, natural appearance.
- Finish by planting native grasses or ferns along the ‘banks’ of your rock river, which will help soften the edges and make the feature look like it has been part of the landscape for decades.
How to Curate an Elementary Art Room for Inspired Creative Learning
[IMAGE_10]
Why we love this
An art room is a sanctuary for the imagination, a place where the scent of beeswax crayons and the tactile squish of clay invite children to explore their world. We love the vibrant, messy energy of a space that is designed specifically for ‘yes.’ When an art room is curated with accessible materials and organized in a way that feels both bright and orderly, it lowers the barrier to creativity. The sight of a rainbow of markers in clear bins and a wall dedicated to drying masterpieces creates an environment where every child feels like a true artist, and every smudge of paint is a badge of honor.
Essential Elements:
- Adjustable-height tables with wipeable surfaces
- Clear stackable bins for easy-to-see supplies
- Wall-mounted drying rack for paintings
- Large butcher paper roll dispenser
- Comfortable floor cushions for ‘thinking’ and sketching
How to make it
- Divide the room into ‘zones’ based on the type of creation: a wet zone for painting and clay near the sink, and a dry zone for drawing and collage on the other side of the room.
- Use clear containers for all supplies—markers, crayons, glue sticks—and label them with both words and pictures so that even the youngest artists can help with the cleanup process.
- Install a long wire or a curtain rod with clips along one wall to create an instant gallery where work can be hung to dry and be celebrated the moment it’s finished.
- Ensure that all materials are at a child’s eye level and within their reach; this encourages independence and allows the creative flow to happen without constant adult intervention.
- Keep a ‘scrap bin’ for odd bits of paper, ribbon, and fabric, which teaches kids to see the creative potential in everyday items and encourages ‘tinkering’ and mixed-media exploration.
The Joy of a Curated Home
Transforming your space isn’t about achieving perfection; it’s about creating a backdrop for your life’s most beautiful moments. From the quiet morning coffee on a stenciled patio to the afternoon sun hitting a shed mural, these projects are the threads that weave your personality into the fabric of your home. I hope these DIYs inspire you to look at your outdoor (and indoor!) spaces with fresh eyes and a creative heart. Remember, the best time to start creating the home of your dreams is today. Happy DIY-ing!