

The Ultimate Viral Food Board You Need to Try Right Now
There is something inherently magical about a gathering where the food isn’t just served, but celebrated. As we transition into the golden hours of late spring and early summer, I’ve found that nothing brings people together quite like a beautifully curated ‘Viral Food Board.’ It’s more than just a trend; it’s an invitation to linger over sweet and savory treats while celebrating life’s biggest milestones, from graduation caps to the first harvest of garden-fresh rhubarb.
Lately, my kitchen has been a whirlwind of flour, zesty lemons, and the bright crimson hue of rhubarb stalks. This collection isn’t just about feeding a crowd; it’s about creating an experience that feels both indulgent and deeply personal. Whether you’re hosting a sophisticated graduation brunch or a casual afternoon in the sun, these elements come together to create a board that is as visually stunning as it is delicious. Let’s dive into the recipes that will make your next hosting moment go viral.
How to bake elegant graduation cakes?
Why we love this
An elegant graduation cake is the crowning jewel of any celebration, offering a sophisticated velvet crumb that melts on the tongue. We love the way a simple vanilla or almond base can be elevated with gold leaf accents and soft, muted floral garnishes, creating a centerpiece that feels both timeless and triumphant. The aroma of high-quality butter and Madagascar vanilla filling the air as it bakes is enough to make any graduate feel like the star of the show. It’s a refined, classic choice that honors years of hard work with a touch of luxury.
Ingredients
- 2 1/2 cups all-purpose flour
- 1 1/2 cups granulated sugar
- 1 cup unsalted butter, softened
- 4 large eggs, room temperature
- 1 cup whole milk
- 1 tbsp vanilla bean paste
- 2 tsp baking powder
- 1/2 tsp salt
- Gold leaf and edible flowers for garnish
How to make it
- Preheat your oven to 350°F (175°C) and grease two 8-inch round cake pans, lining the bottoms with parchment paper to ensure an easy release.
- In a large bowl, sift together the flour, baking powder, and salt to aerate the dry ingredients, which ensures a light, airy crumb.
- Using a stand mixer fitted with the paddle attachment, cream the softened butter and sugar on medium-high speed for 5 full minutes until the mixture is pale and fluffy.
- Add eggs one at a time, beating well after each addition and scraping down the sides of the bowl to ensure a cohesive emulsion.
- Reduce mixer speed to low and alternate adding the dry ingredients and the milk, beginning and ending with the flour; do not overmix, or the cake will be tough.
- Fold in the vanilla bean paste by hand with a spatula to preserve the delicate aroma.
- Divide the batter evenly between the pans and bake for 30-35 minutes, or until a wooden skewer inserted into the center comes out clean with just a few moist crumbs.
- Cool in the pans for 10 minutes before transferring to wire racks to cool completely before applying a smooth, professional layer of buttercream and gold leaf.
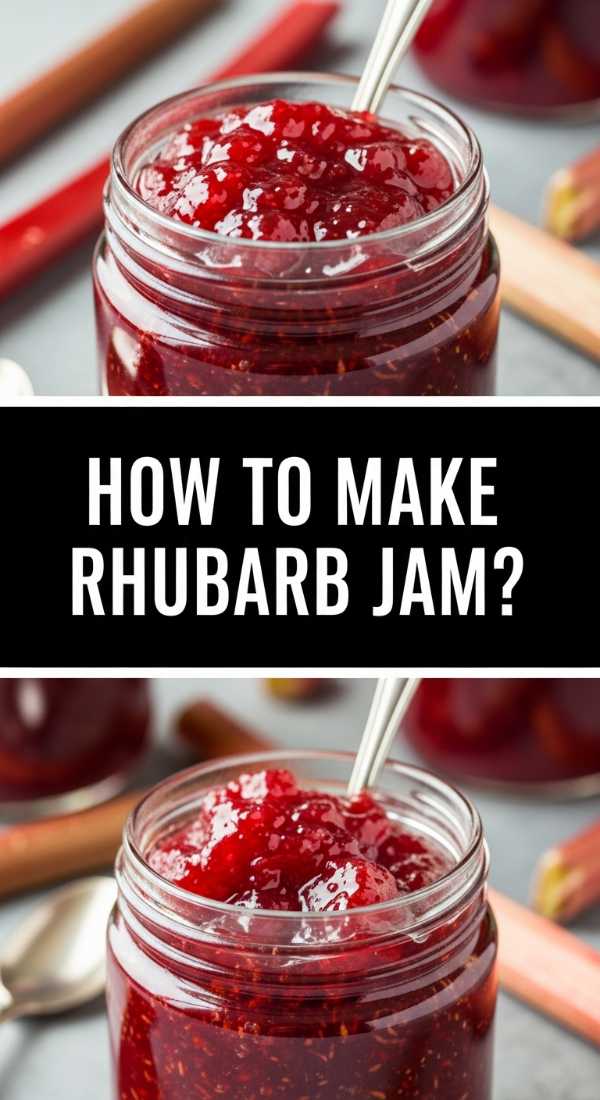
How to make fresh rhubarb jam?
Why we love this
This jam is like bottling the very essence of early summer sun. The texture is thick and jammy with just enough fruit structure to provide a satisfying bite, while the flavor profile strikes a perfect, mouth-puckering balance between tart rhubarb and sweet sugar. We love the vibrant, jewel-toned pink color that brightens up a morning piece of sourdough toast or a simple thumbprint cookie. It’s an artisanal touch that feels incredibly high-end but is deceptively simple to achieve in your own kitchen.
Ingredients
- 4 cups fresh rhubarb, chopped into 1/2 inch pieces
- 1 1/2 cups granulated sugar
- 1 tbsp lemon juice
- 1 tsp lemon zest
- 1/2 tsp vanilla extract
How to make it
- In a large, heavy-bottomed stainless steel pot, combine the chopped rhubarb and sugar, stirring well to coat each piece. Let this sit for 30 minutes to allow the sugar to draw out the natural juices.
- Place the pot over medium heat and stir constantly until the sugar has completely dissolved and the mixture begins to simmer.
- Add the lemon juice and zest, which provide the necessary acidity to help the natural pectins set the jam.
- Increase the heat to medium-high and bring to a rolling boil, stirring frequently to prevent the bottom from scorching.
- Cook for 12-15 minutes, or until the mixture reaches 220°F (104°C) on a candy thermometer. If you don’t have a thermometer, place a small spoonful on a chilled plate; if it wrinkles when pushed with a finger, it’s ready.
- Remove from heat, stir in the vanilla extract, and skim off any foam from the surface with a metal spoon.
- Pour into sterilized glass jars, leaving 1/4 inch of headspace, and let cool completely at room temperature before refrigerating.
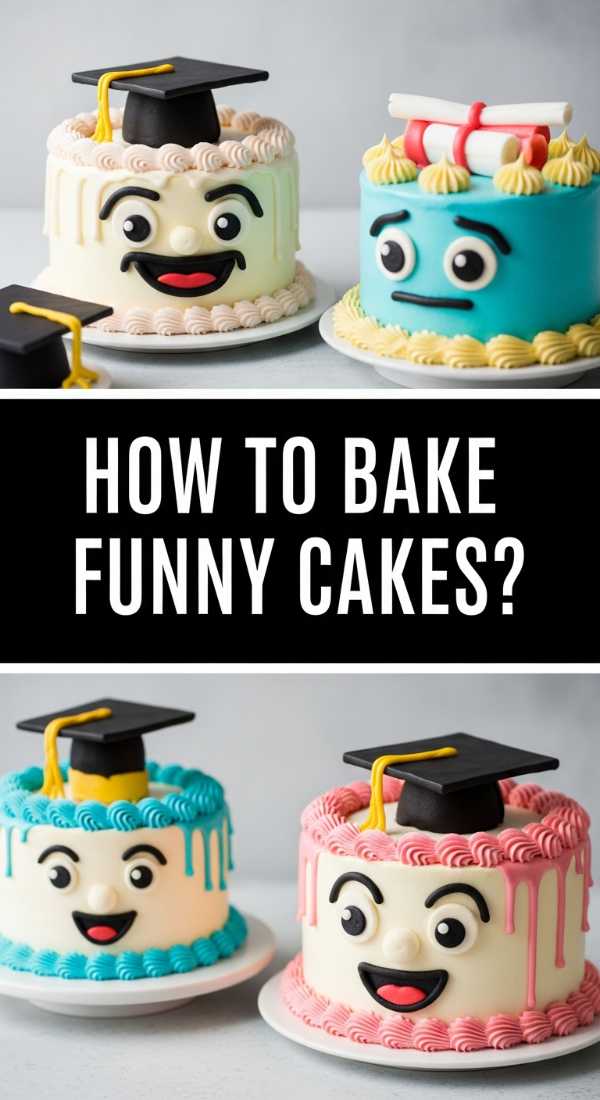
How to bake funny graduation cakes?
Why we love this
While elegance has its place, a funny graduation cake brings an infectious joy and a sense of relief to the party. Whether it features a ‘One Degree Hotter’ pun or a fondant figure of a graduate sleeping on a pile of textbooks, these cakes are the ultimate conversation starters. We love the way they break the ice and allow the graduate to laugh at the stress they’ve just conquered. The flavor is usually a crowd-pleasing chocolate or funfetti, making it a hit for guests of all ages who appreciate a good joke along with a great slice.
Ingredients
- Your favorite boxed cake mix (enhanced with an extra egg and melted butter instead of oil)
- 2 cans of vanilla frosting
- Gel food coloring (assorted colors)
- Fondant or modeling chocolate
- Edible markers
- Lettering stencils
How to make it
- Bake your cake according to the enhanced box instructions, ensuring you use a sturdy pan shape like a rectangle to provide a ‘canvas’ for your joke.
- Allow the cake to cool completely, then chill it in the refrigerator for one hour; this makes the surface firmer and easier to frost without picking up crumbs.
- Divide your frosting into several bowls and use gel food coloring to create bright, vibrant hues that pop.
- Apply a ‘crumb coat’ (a thin layer of frosting) and chill again for 30 minutes before applying the final, smooth layer of frosting.
- Use fondant to sculpt small graduation caps or ‘diplomas’ that look slightly disheveled for comedic effect.
- Write your chosen pun using edible markers or a piping bag with a fine round tip; keep your hand steady and move with a fluid motion for the best lettering.
- Add decorative borders using a star tip to frame the joke, ensuring the cake looks intentional and professional despite the humorous theme.
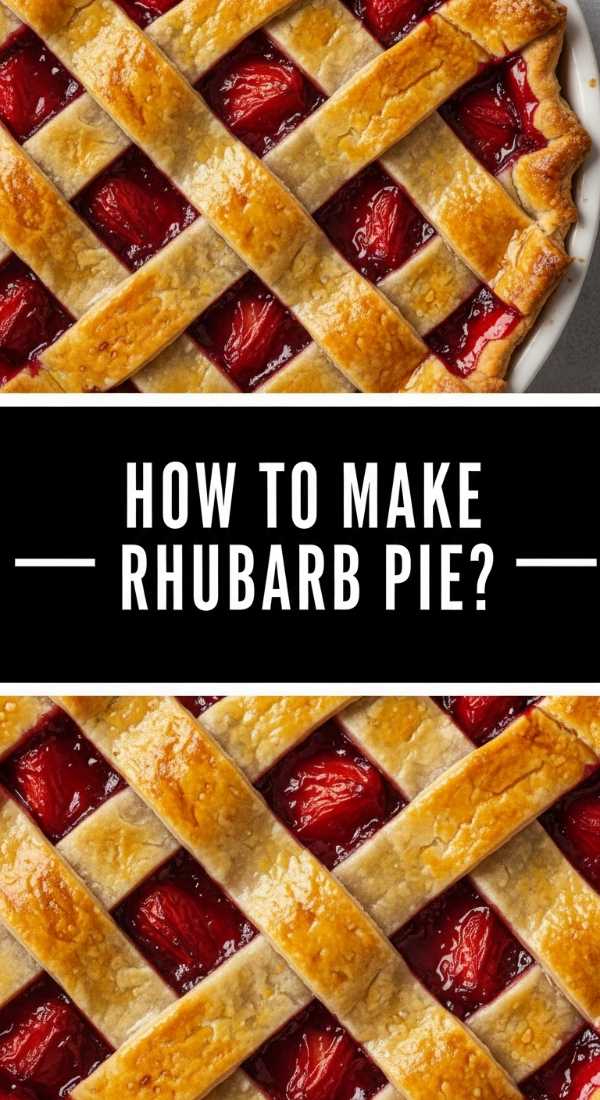
How to make strawberry rhubarb pie?

Why we love this
Strawberry rhubarb pie is the undisputed queen of seasonal desserts, offering a sensory experience that is both nostalgic and exhilarating. The smell of the bubbling, ruby-red filling as it caramelizes in the oven is practically intoxicating, blending the sweetness of sun-ripened strawberries with the sharp tang of rhubarb. The contrast between the jammy interior and the flaky, buttery, salt-kissed crust is what keeps us coming back for more. It’s a rustic masterpiece that looks stunning on any food board, especially when served with a melting scoop of vanilla bean ice cream.
Ingredients
- 2 1/2 cups all-purpose flour
- 1 cup cold unsalted butter, cubed
- 1 tsp salt
- 1 tsp sugar
- 6-8 tbsp ice water
- 3 cups strawberries, halved
- 3 cups rhubarb, sliced into 1/2 inch pieces
- 1 cup granulated sugar
- 1/4 cup cornstarch
- 1 tbsp lemon juice
- 1 egg (for egg wash)
How to make it
- Prepare the crust by pulsing flour, salt, sugar, and cold butter in a food processor until it resembles coarse meal with pea-sized bits of butter.
- Slowly drizzle in ice water, one tablespoon at a time, pulsing just until the dough begins to clump together. Divide into two disks, wrap in plastic, and chill for at least 1 hour.
- In a large bowl, toss the strawberries and rhubarb with sugar, cornstarch, and lemon juice; let macerate for 15 minutes so the juices start to flow.
- Roll out the first disk of dough on a floured surface to a 12-inch circle and drape it into a 9-inch pie plate.
- Fill the crust with the fruit mixture, avoiding too much excess liquid if there is a large puddle at the bottom of the bowl.
- Roll out the second disk and cut into strips to create a lattice top, weaving them over and under for a classic look.
- Crimp the edges to seal, brush the lattice with a beaten egg wash, and sprinkle with coarse sugar.
- Bake at 400°F (200°C) for 20 minutes, then reduce heat to 375°F (190°C) and bake for another 35-40 minutes until the filling is thick and bubbling and the crust is deep golden brown.
How to decorate graduation cookies?

Why we love this
Graduation cookies are the ultimate edible mementos, offering a crisp, buttery bite that provides the perfect canvas for artistic expression. We love the precision of royal icing—how it settles into a smooth, porcelain-like finish that can be customized with school colors and tiny piped details like tassels and year dates. There’s something so satisfying about the ‘snap’ of a well-baked sugar cookie followed by the sweet, citrusy hint of the icing. They are portable, beautiful, and serve as both a treat and a piece of decor for your celebration board.
Ingredients
- Batch of chilled sugar cookie dough
- 4 cups powdered sugar
- 3 tbsp meringue powder
- 6-8 tbsp warm water
- Gel food coloring
- Piping bags and small round tips
How to make it
- Roll out your chilled cookie dough to a consistent 1/4 inch thickness and cut into shapes like graduation caps, diplomas, and stars.
- Bake until the edges are just barely beginning to turn a light golden color, then let them cool completely on a wire rack; icing will melt if the cookies are even slightly warm.
- Make the royal icing by whisking powdered sugar, meringue powder, and water until stiff peaks form, then thin it out with drops of water until it reaches ’15-second consistency’ (where a line drawn in the icing disappears in 15 seconds).
- Divide the icing and tint with gel colors to match the graduate’s school colors.
- Outline the edge of the cookie with a slightly thicker icing, then ‘flood’ the center with the thinner icing, using a toothpick to pop any air bubbles.
- Let the base layer dry for at least 4 hours until hard to the touch.
- Add fine details like the ‘2024’ text or tassel lines using a stiff piping icing and a very small #1 or #2 round tip, keeping your pressure consistent for clean lines.
How to frost graduation cupcakes?
Why we love this
Cupcakes are the perfect individual-serve option for a busy party, and when frosted with intention, they look like miniature works of art. We love the classic ‘swirl’ that adds height and drama to the board, especially when topped with a chocolate mortarboard cap. The texture of a silky-smooth Swiss meringue buttercream against a moist sponge is pure heaven. These little cakes allow for a variety of flavors while maintaining a cohesive look through matching liners and coordinated frosting colors, making them a viral-worthy addition to any spread.
Ingredients
- 12 pre-baked vanilla or chocolate cupcakes
- 1 cup unsalted butter, softened
- 3 cups powdered sugar
- 2 tbsp heavy cream
- 1 tsp vanilla extract
- Miniature chocolate bars and thin chocolate squares (for toppers)
- Sour belt candies (for tassels)
How to make it
- Ensure your cupcakes are completely cool to the touch before starting, as any warmth will cause the buttercream to slide off.
- In a stand mixer, beat the butter for 3 minutes until very light; slowly add powdered sugar one cup at a time on low speed, then crank it up to high for 2 more minutes.
- Add the heavy cream and vanilla, beating until the frosting is fluffy and holds a firm peak.
- Fit a piping bag with a large open star tip (like 1M) and pipe a tall, three-tier swirl starting from the outside edge and moving toward the center.
- To make the ‘cap’ toppers, place a drop of frosting on a miniature chocolate bar and press a thin square chocolate piece on top.
- Attach a small strip of sour belt or a piece of licorice as the tassel using another dot of frosting.
- Gently place the chocolate cap onto the center of the frosting swirl and chill for 20 minutes to set the decorations in place.
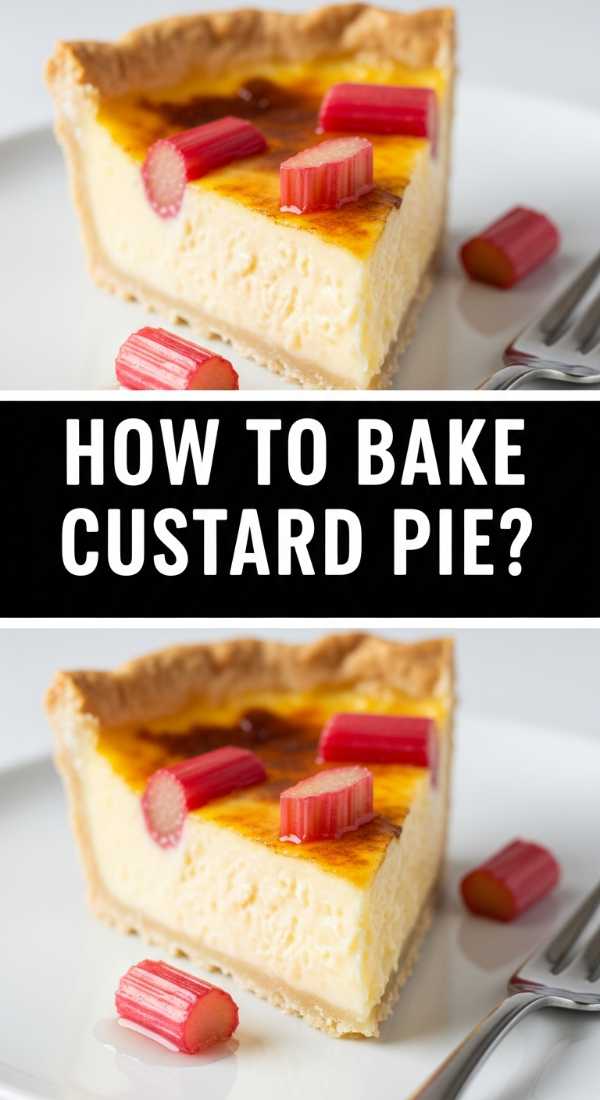
How to bake rhubarb custard pie?
Why we love this
This pie is a sophisticated step up from the classic crumble, offering a silky, elegant custard that nestles around tart pieces of rhubarb. We love the way the creamy, sweet egg custard mellows out the sharp acidity of the fruit, creating a balanced flavor profile that feels incredibly refined. The texture is smooth and luscious, contrasted by the crunch of a perfectly blind-baked crust. It’s the kind of dessert that reminds you of old-fashioned country kitchens but looks absolutely stunning on a modern food board with its pale pink and cream hues.
Ingredients
- 1 pre-baked 9-inch pie crust
- 3 cups chopped rhubarb
- 3 large eggs
- 1 cup granulated sugar
- 1/2 cup heavy cream
- 1/4 cup all-purpose flour
- 1/2 tsp nutmeg
- 1 tsp vanilla extract
How to make it
- Blind bake your pie crust at 375°F (190°C) using pie weights for 15 minutes, then remove weights and bake for 5 more minutes to ensure the bottom stays crisp.
- Spread the chopped rhubarb evenly across the bottom of the warm, pre-baked crust.
- In a medium bowl, whisk the eggs and sugar together until the mixture is slightly pale and well-combined.
- Whisk in the flour and nutmeg, ensuring there are no lumps, then slowly stir in the heavy cream and vanilla extract until the custard base is smooth.
- Carefully pour the custard mixture over the rhubarb in the pie shell, using a spoon to ensure the rhubarb is evenly distributed.
- Bake at 350°F (175°C) for 45-50 minutes; the pie is done when the edges are set and slightly puffed, but the center still has a slight, jello-like jiggle.
- Allow the pie to cool completely on a wire rack for at least 3 hours to let the custard fully set before slicing into clean, sharp wedges.
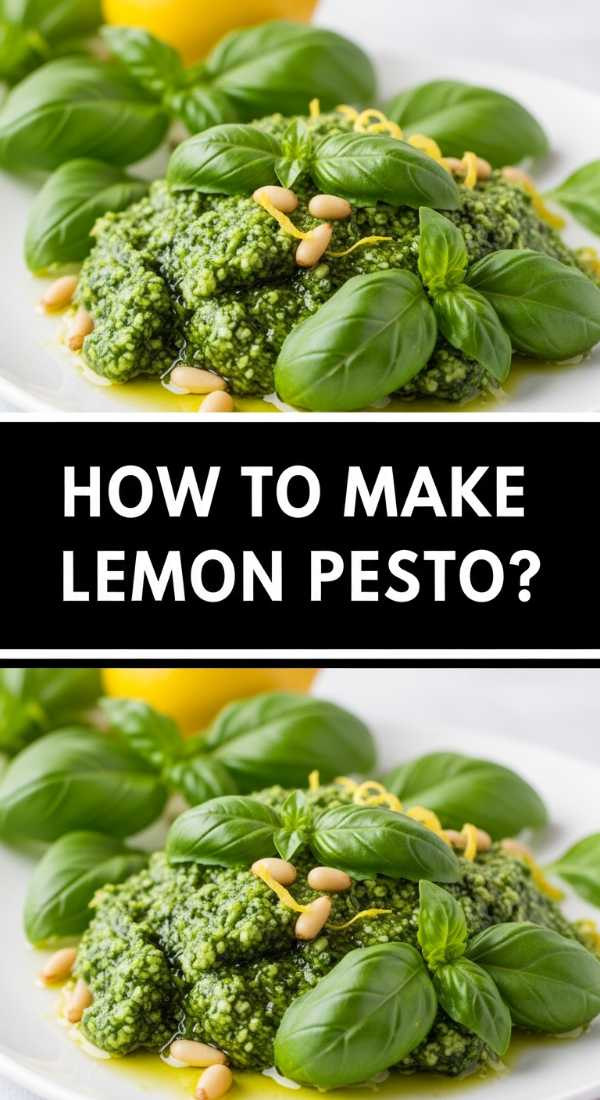
How to make homemade lemon pesto?
Why we love this
Lemon pesto is a bright, zingy departure from the traditional basil variety, and it adds a much-needed savory pop to a viral food board. We love the explosive freshness of lemon zest combined with the earthy richness of toasted pine nuts and salty Parmesan cheese. It smells like a Mediterranean summer afternoon and has a vibrant, light green color that looks beautiful drizzled over crackers or used as a dip for fresh vegetables. It’s a versatile, zesty condiment that cuts through the sweetness of other board items, making every bite feel refreshed.
Ingredients
- 2 cups fresh basil leaves, packed
- 1/2 cup freshly grated Parmesan cheese
- 1/3 cup toasted pine nuts or walnuts
- 2 large lemons (zest and juice)
- 2 garlic cloves, smashed
- 1/2 cup extra virgin olive oil
- 1/2 tsp sea salt
- 1/4 tsp black pepper
How to make it
- Start by toasting your pine nuts in a dry pan over medium-low heat for 3-5 minutes, tossing constantly until they are golden brown and fragrant; let them cool completely.
- In a food processor, pulse the basil, cooled nuts, garlic, lemon zest, and Parmesan until everything is coarsely chopped.
- While the processor is running on low, slowly drizzle in the olive oil in a thin, steady stream to create a perfect emulsion that won’t separate.
- Add 2 tablespoons of fresh lemon juice, salt, and pepper, then pulse a few more times to incorporate.
- Taste and adjust the acidity; if it’s too sharp, add a touch more olive oil; if it’s too flat, add a pinch more salt or lemon juice.
- Transfer to a small decorative bowl and top with a thin slice of lemon and a few whole pine nuts for a professional presentation on your board.
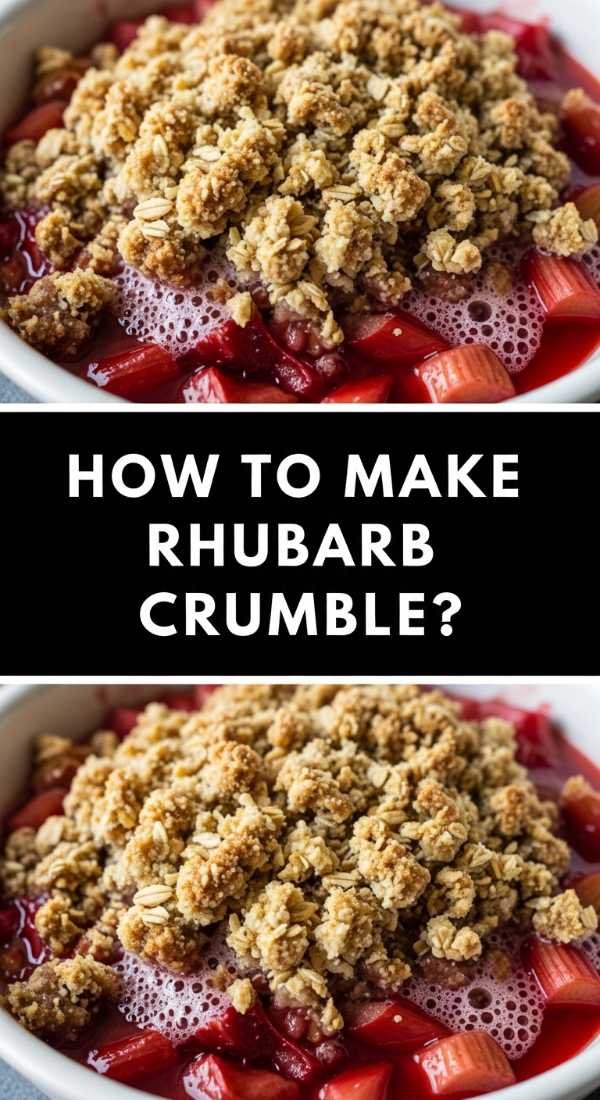
How to bake rhubarb crumble?
Why we love this
A rhubarb crumble is the ultimate comfort food, celebrated for its rustic charm and the heavenly contrast between the bubbling fruit and the buttery, oat-filled topping. We love the way the rhubarb breaks down into a soft, tangy compote that seeps into the bottom of the golden-brown crumble. The aroma of cinnamon and toasted oats wafting through the house is purely nostalgic. It’s best served warm, providing a cozy, heart-warming element to your food board that invites guests to scoop up a generous portion and enjoy the simple pleasures of summer produce.
Ingredients
- 5 cups rhubarb, chopped into 1-inch pieces
- 3/4 cup granulated sugar
- 1 tbsp cornstarch
- 1 cup old-fashioned rolled oats
- 1 cup all-purpose flour
- 1 cup brown sugar, packed
- 1/2 cup cold unsalted butter, cubed
- 1 tsp cinnamon
- 1/2 tsp salt
How to make it
- Preheat your oven to 375°F (190°C) and lightly grease a 9×9 inch baking dish.
- In a large bowl, toss the rhubarb with the granulated sugar and cornstarch until the fruit is well-coated; spread this evenly into the prepared dish.
- In a separate bowl, combine the oats, flour, brown sugar, cinnamon, and salt.
- Using your fingertips or a pastry cutter, work the cold, cubed butter into the dry mixture until it forms large, moist clumps that hold together when squeezed.
- Scatter the crumble topping generously over the rhubarb, making sure to cover the edges so the fruit doesn’t dry out.
- Bake for 35-40 minutes; keep an eye on the color—you want the topping to be deep golden brown and the fruit juices to be thick and bubbling up around the sides.
- Let it rest for 15 minutes before serving to allow the juices to thicken, ensuring each scoop is jammy rather than watery.
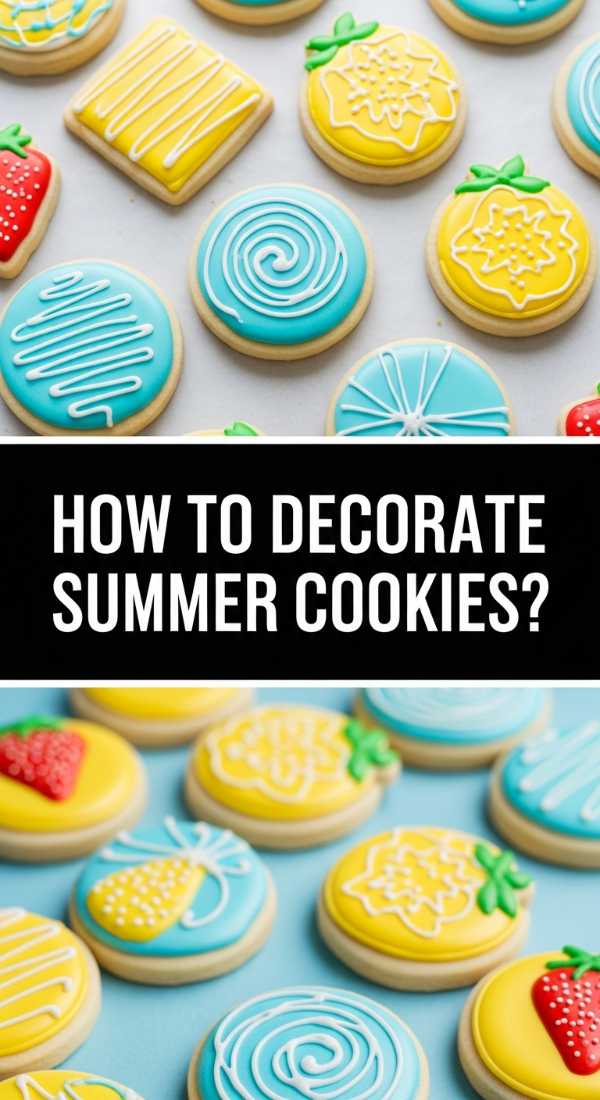
How to decorate summer sugar cookies?
[IMAGE_10]
Why we love this
Summer sugar cookies are like little bites of sunshine, often infused with lemon or lime zest to give them a bright, seasonal edge. We love decorating these with vibrant tropical colors, fruit shapes, and floral patterns that reflect the energy of the season. The texture is soft and tender, with a slight crunch at the edge, while the icing provides a sweet, zesty finish. They bring a playful, lighthearted vibe to the food board, reminding everyone that summer is a time for relaxation, bright colors, and sweet, simple moments shared with friends.
Ingredients
- Batch of lemon-infused sugar cookie dough
- 3 cups powdered sugar
- 2 tbsp corn syrup (for shine)
- 1/2 tsp lemon extract
- 2-3 tbsp milk
- Gel food colors (pink, yellow, teal)
- Edible glitter (optional)
How to make it
- Roll out your lemon-infused dough and cut into summer shapes like suns, pineapples, or simple circles. Bake at 350°F (175°C) for 8-10 minutes and cool completely.
- Whisk together powdered sugar, corn syrup, lemon extract, and enough milk to create a thick but pourable glaze (it should look like heavy cream).
- Divide the glaze into bowls and add your bright summer gel colors, stirring gently to avoid creating air bubbles.
- Dip the top of each cookie directly into the glaze, letting the excess drip off before turning it upright. This creates a perfectly smooth, shiny surface with minimal effort.
- While the glaze is still wet, you can use a second color to drop small dots into the base and use a toothpick to drag them into heart or flower shapes (the ‘wet-on-wet’ technique).
- Add a sprinkle of edible glitter or a pinch of fresh lemon zest while the icing is tacky to add texture and visual interest.
- Allow the cookies to dry on a flat surface for at least 2 hours until the glaze has completely set into a firm, glossy shell.
Conclusion
Building the ultimate viral food board is all about balancing the high-stakes elegance of a graduation celebration with the rustic, vibrant flavors of early summer. From the tart pop of rhubarb to the zesty brightness of lemon pesto, each of these recipes contributes a unique texture and flavor that makes your spread unforgettable. Remember, the best boards are those that tell a story—so don’t be afraid to mix your funny cupcakes with your elegant cakes and let your guests enjoy the beautiful, delicious chaos of a life well-celebrated!