

The 5-Minute Viral Food Board That’s Taking Over Your Feed
There is something truly magical about the way a perfectly curated food board brings people together. Whether it’s the soft glow of golden hour hitting a perfectly glazed tart or the laughter shared over a plate of whimsically decorated cookies, these moments are what memories are made of. Recently, my feed has been flooded with these stunning, ‘viral’ spreads that look like they stepped out of a high-end magazine, and I realized it isn’t about the cost—it’s about the heart and the artistry put into every small detail.
We’ve all had those afternoons where we want to create something special but feel overwhelmed by the complexity of hosting. This guide is my love letter to you, a collection of my favorite elements that combine the tart nostalgia of summer rhubarb with the celebratory spark of graduation season. From the zesty zing of fresh lemon pesto to the intricate piping on a graduation cupcake, let’s dive into how you can recreate this aesthetic at home and make your next gathering feel absolutely legendary.
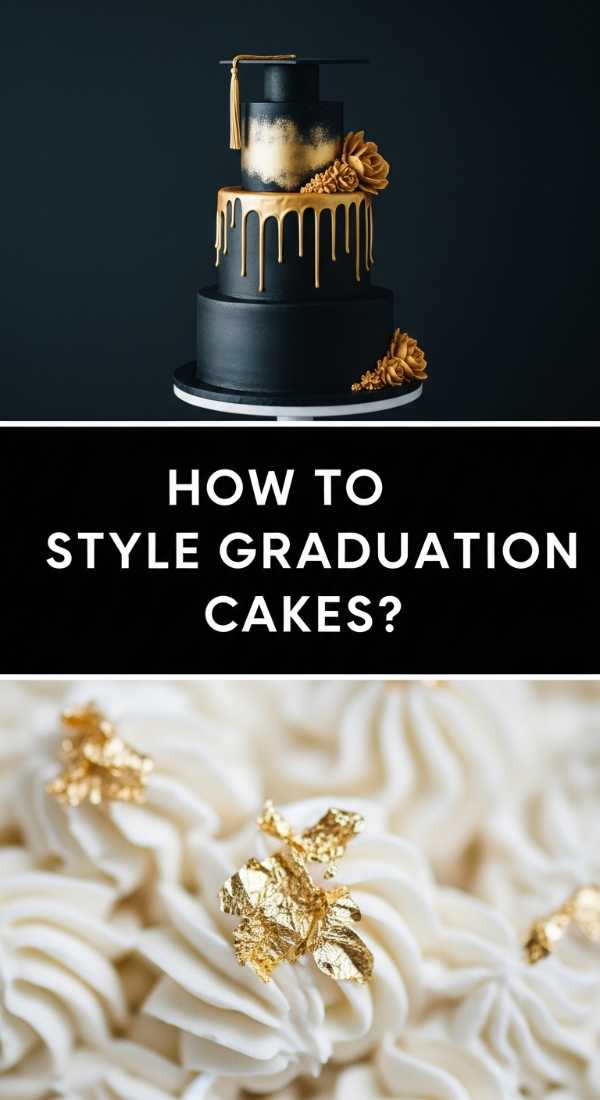
How to style graduation cakes
Why we love this
A graduation cake isn’t just a dessert; it’s a centerpiece of achievement that captures years of hard work in a single, sweet bite. We love styling these because they offer a canvas for elegance—think of the way smooth, silken buttercream catches the light, contrasted by the sharp, metallic shimmer of a gold-leafed acrylic topper. The aroma of rich vanilla bean and sugary frosting fills the room, creating an atmosphere of pure celebration that makes every graduate feel like the star of the show.
Ingredients
- Triple-layer vanilla or chocolate sponge cake
- Silky Swiss meringue buttercream
- Edible gold leaf or metallic sprinkles
- Fresh florist-grade flowers (organic)
- Custom acrylic or wooden cake topper
- Offset spatula and bench scraper
How to make it
- Begin by chilling your cake layers thoroughly to prevent crumbs from mixing into your frosting; cold cakes are much easier to handle.
- Apply a thin ‘crumb coat’ of buttercream across the top and sides, using an offset spatula to fill any gaps between layers, then refrigerate for 20 minutes until firm.
- Apply a generous second layer of frosting and use a tall metal bench scraper held at a 45-degree angle against the turntable to create a perfectly smooth, sharp-edged finish.
- Gently press edible gold leaf onto the lower third of the cake using a dry, soft-bristle brush, ensuring you don’t touch the leaf with your fingers as it will stick to your skin.
- Arrange your fresh flowers in a crescent shape around the top edge, tucking the stems into small floral picks to keep the cake food-safe.
- Place your graduation topper slightly off-center for a modern, balanced look that guides the eye across the entire design.
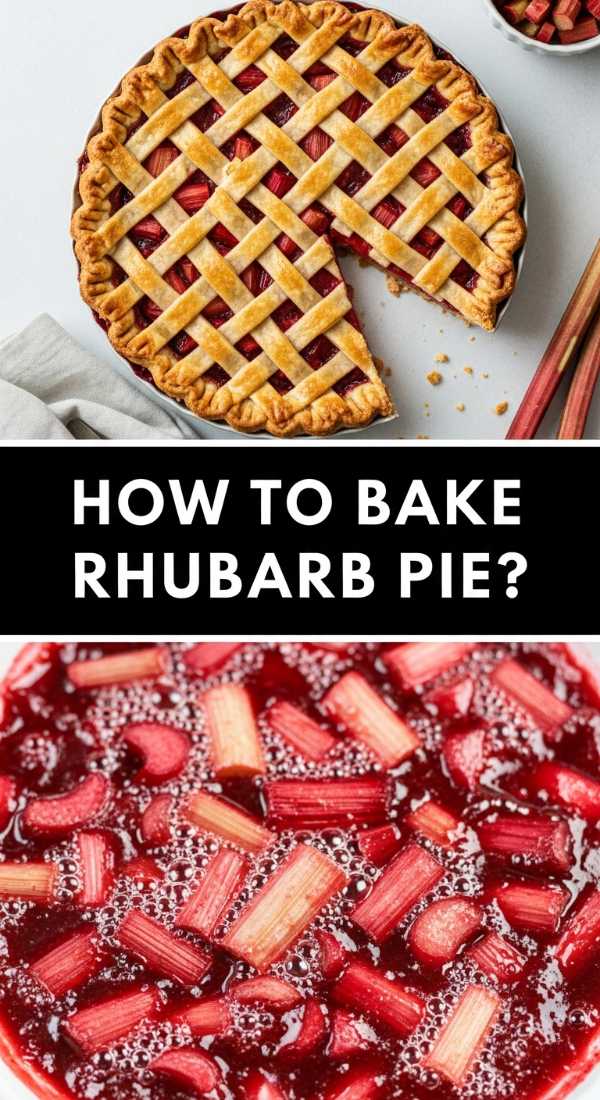
How to bake rhubarb pie
Why we love this
Rhubarb pie is the ultimate herald of spring, offering a sophisticated balance of sharp tartness and buttery, flaky indulgence. There is nothing quite like the scent of bubbling ruby-red stalks mingling with cinnamon and sugar as they caramelize in the oven’s heat. When you pull that golden-brown crust out and see the vibrant juices peeking through the lattice, it evokes a sense of rustic comfort that warms the soul and reminds us of slower, sun-drenched days in the garden.
Ingredients
- 2 1/2 cups all-purpose flour
- 1 cup cold unsalted butter, cubed
- 5 cups fresh rhubarb, cut into 1-inch pieces
- 1 1/4 cups granulated sugar
- 3 tablespoons cornstarch
- 1 teaspoon orange zest
- 1 egg (for egg wash)
- Coarse sparkling sugar
How to make it
- Prepare your crust by pulsing cold butter and flour until pea-sized crumbs form, then add ice water a tablespoon at a time until the dough just holds together.
- Divide the dough into two discs, wrap in plastic, and chill for at least one hour to allow the gluten to relax and the fat to firm up.
- In a large bowl, toss the rhubarb with sugar, cornstarch, and orange zest, letting it sit for 15 minutes so the juices begin to release and thicken.
- Roll out the bottom crust and fit it into a 9-inch pie plate, then pour in the rhubarb mixture, ensuring it is evenly distributed.
- Roll out the second disc and cut into 1-inch strips to create a lattice top, weaving them over and under to create a beautiful, structural vent for the steam.
- Brush the lattice with a beaten egg wash and sprinkle generously with coarse sugar for a crunch, then bake at 400°F for 20 minutes before lowering to 375°F for another 35-40 minutes until the filling is thick and bubbling.
How to decorate graduation cookies

Why we love this
Graduation cookies are the perfect bite-sized canvas for storytelling, allowing you to customize colors and themes to match a specific journey. We adore the satisfying snap of a perfectly baked sugar cookie paired with the smooth, matte finish of royal icing that melts on the tongue. Decorating these is a meditative process, where the vibrant hues of school spirit come to life in the form of tiny tassels, diplomas, and mortarboards that look almost too good to eat.
Ingredients
- Batch of chilled sugar cookie dough
- Royal icing (flooding and piping consistencies)
- Gel food coloring in school colors
- Fine-tip piping bags and nozzles
- Scribe tool or toothpick
- Edible silver or gold luster dust
How to make it
- Roll your dough to a consistent 1/4-inch thickness and use graduation-themed cutters; bake until the edges are just barely golden to ensure they remain soft.
- Outline the edge of the cookie with ‘piping consistency’ icing (thick like toothpaste) to create a dam that prevents the center from spilling over.
- Immediately fill the center with ‘flooding consistency’ icing (runny like honey) and use a scribe tool to pop any air bubbles and push the icing into the corners.
- Allow the base layer to dry completely for at least 6-8 hours in a cool, dry place before adding secondary details.
- Pipe intricate details like the tassel on a cap or the ribbon on a diploma using the thicker piping icing to create a 3D effect.
- For a professional finish, mix a drop of vodka with luster dust and paint onto the dried icing details to give them a metallic, celebratory shine.
How to design funny cakes

Why we love this
Funny cakes, often called ‘ugly cakes’ or ‘meme cakes,’ bring a much-needed dose of levity and personality to the dessert table. They break the rules of traditional perfection, favoring bright, clashing colors and snarky, relatable messages that spark immediate conversation and laughter. The texture is usually a nostalgic, fluffy American buttercream that feels like a childhood birthday party, wrapped in a design that doesn’t take itself too seriously but tastes absolutely divine.
Ingredients
- Two 6-inch round cake layers
- Neon gel food colorings
- Abundant American buttercream
- Piping bags with star and round tips
- Offset spatula
- Humorous quote or inside joke for the text
How to make it
- Stack and frost your cake with a base color that pops—don’t worry about making it perfectly smooth, as a slightly rustic look adds to the charm.
- Choose a contrasting, bright color for the borders; use a large star tip to create oversized, kitschy ‘shell’ borders around the top and bottom edges.
- Plan your text carefully on a piece of paper first to ensure it fits the diameter of the cake without running out of space.
- Using a small round piping tip and a steady hand, pipe your funny message in the center, embracing a slightly ‘hand-written’ or messy aesthetic for authenticity.
- Add random ‘confetti’ dots or mismatched sprinkles around the sides to enhance the chaotic, fun energy of the design.
- Chill the cake for 30 minutes to set the decorations, ensuring the message stays crisp and legible when served.
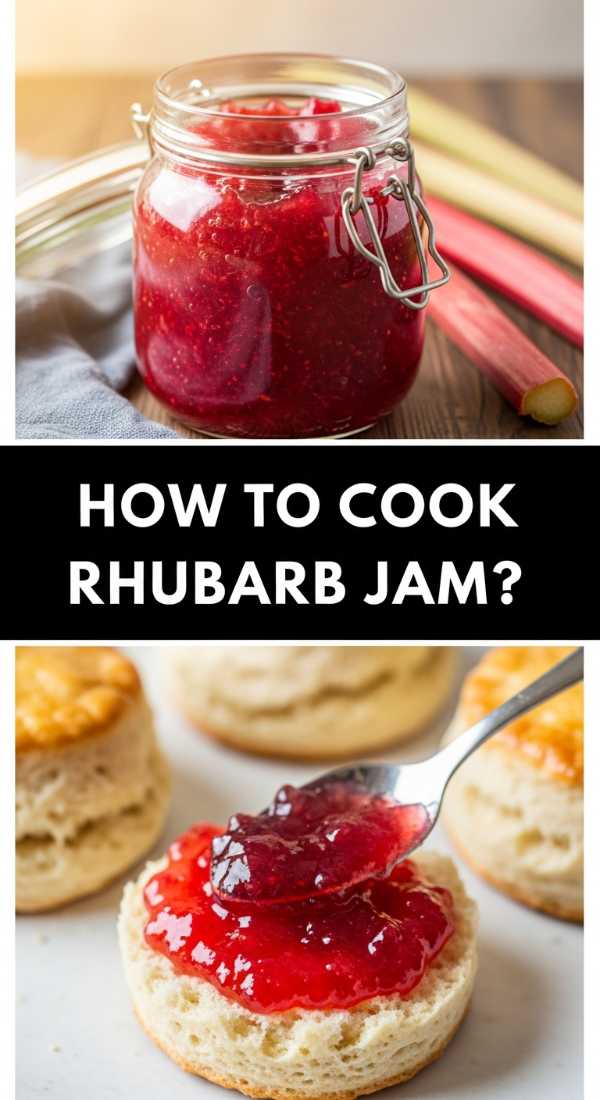
How to cook rhubarb jam
Why we love this
There is a primal satisfaction in watching stalks of tart rhubarb break down into a shimmering, ruby-red preserve that tastes like pure sunshine in a jar. This jam captures the essence of the season, offering a bright acidity that cuts through the richness of morning toast or a dollop of clotted cream. The aroma while it simmers is intoxicating—a blend of fruity sharpness and caramelized sugar that lingers in the kitchen like a warm hug.
Ingredients
- 2 lbs rhubarb, chopped into small pieces
- 4 cups granulated sugar
- 2 tablespoons lemon juice
- 1 teaspoon vanilla bean paste
- A pinch of salt
- Sterilized glass jars
How to make it
- Combine the chopped rhubarb and sugar in a heavy-bottomed pot and let it macerate for at least 2 hours until the rhubarb is swimming in its own syrup.
- Place the pot over medium heat and stir constantly until the sugar has completely dissolved to prevent any gritty texture in the final jam.
- Increase the heat to a rolling boil, adding the lemon juice to provide the necessary pectin and acidity for a proper set.
- Cook for 15-20 minutes, skimming off any white foam that rises to the surface to ensure a clear, jewel-toned finished product.
- Perform the ‘plate test’: place a small spoonful of jam on a chilled plate and push it with your finger; if it wrinkles, it has reached the setting point.
- Stir in the vanilla bean paste at the very end to preserve its delicate flavor, then ladle into hot jars, leaving 1/4 inch of headspace before sealing.
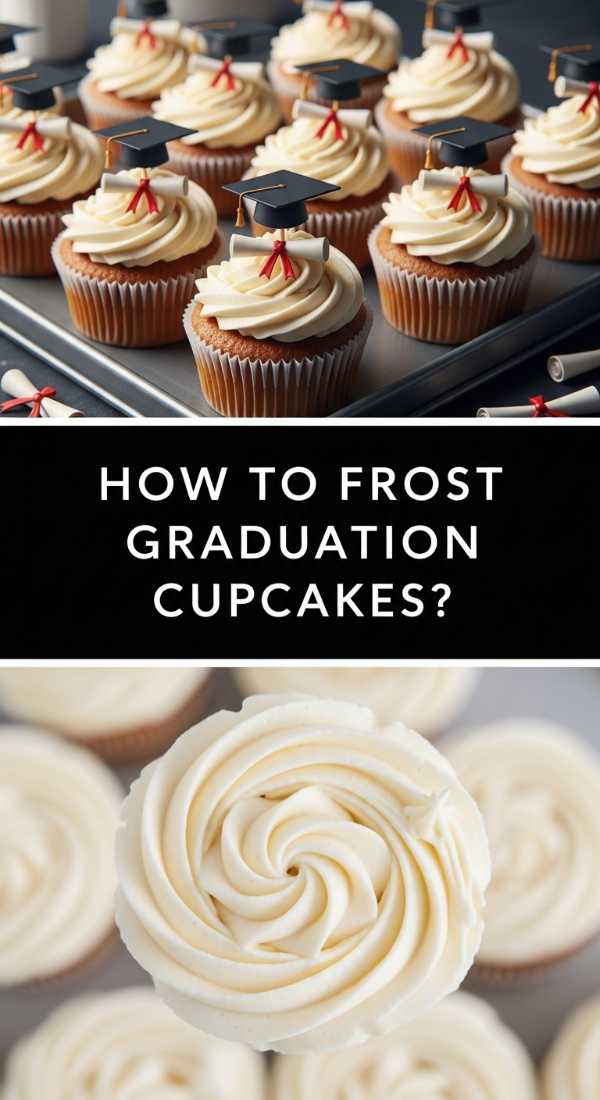
How to frost graduation cupcakes
Why we love this
Cupcakes are the ultimate social dessert, and frosting them for graduation adds a layer of individualized celebration to the event. We love the height and drama of a perfectly piped swirl, topped with a miniature mortarboard that makes every guest feel honored. The creamy, whipped texture of the frosting against a moist, airy crumb creates a sensory experience that is both light and indulgent, perfect for a stand-up party where ease of eating is key.
Ingredients
- Freshly baked cupcakes (cooled completely)
- Stiff-peak buttercream frosting
- Chocolate squares (for caps)
- Miniature chocolate peanut butter cups
- Sour belt candy or fruit leather (for tassels)
- Large open-star piping tip (like 1M)
How to make it
- Fit a piping bag with a large star tip and fill with buttercream, ensuring there are no air pockets that might cause the frosting to ‘pop’ while piping.
- Start in the center of the cupcake, move to the outer edge, and spiral upward in three concentric circles to create a classic, high-profile bakery swirl.
- Assemble the ‘graduation cap’ by placing a small dab of frosting on a miniature peanut butter cup and pressing a chocolate square firmly on top.
- Cut thin strips of sour candy or fruit leather to act as the tassel, adhering it to the center of the chocolate square with another tiny dot of frosting.
- Place the assembled cap gently onto the peak of the buttercream swirl, pressing just enough so it stays secure during transport.
- Finish with a light dusting of edible glitter or sprinkles in school colors for an extra touch of festive magic.
How to make rhubarb crumble
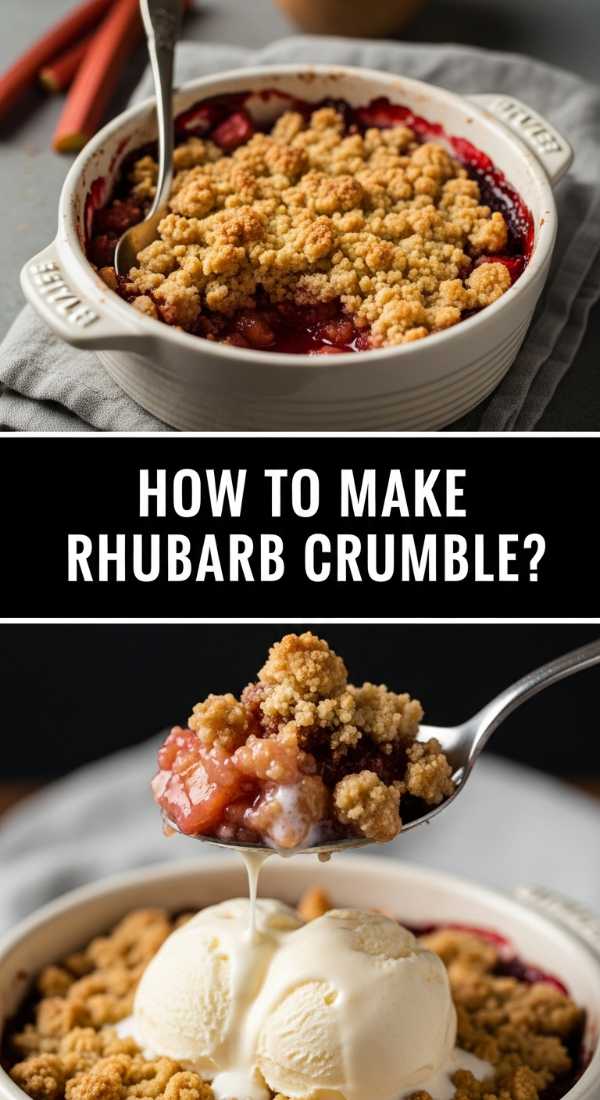
Why we love this
Rhubarb crumble is the definition of ‘hygge’ in dessert form—warm, unpretentious, and deeply comforting. The contrast between the softened, molten fruit at the bottom and the crunchy, buttery oat topping is a texture lover’s dream. As it bakes, the rhubarb softens into a jam-like consistency that is both tart and sweet, and when topped with a scoop of melting vanilla bean ice cream, it creates a hot-and-cold sensation that is simply irresistible.
Ingredients
- 4 cups rhubarb, sliced into half-moons
- 1/2 cup sugar
- 1 cup old-fashioned oats
- 1 cup all-purpose flour
- 1/2 cup brown sugar
- 1/2 cup cold butter, diced
- 1 teaspoon cinnamon
How to make it
- Toss the rhubarb with granulated sugar and a tablespoon of flour, then spread it evenly into a buttered baking dish to form the base.
- In a separate bowl, combine the oats, flour, brown sugar, and cinnamon, mixing well to distribute the spices evenly.
- Work the cold, diced butter into the oat mixture using your fingertips or a pastry cutter until it resembles coarse, clumpy sand.
- Sprinkle the crumble topping generously over the fruit, ensuring you don’t pack it down; the air pockets between the crumbs are what create the crunch.
- Bake at 375°F for 35-40 minutes; look for the fruit juices to be bubbling vigorously at the edges and the top to be a deep golden brown.
- Let it rest for 10 minutes before serving to allow the juices to thicken slightly, ensuring every scoop is perfectly balanced.
How to ice summer cookies
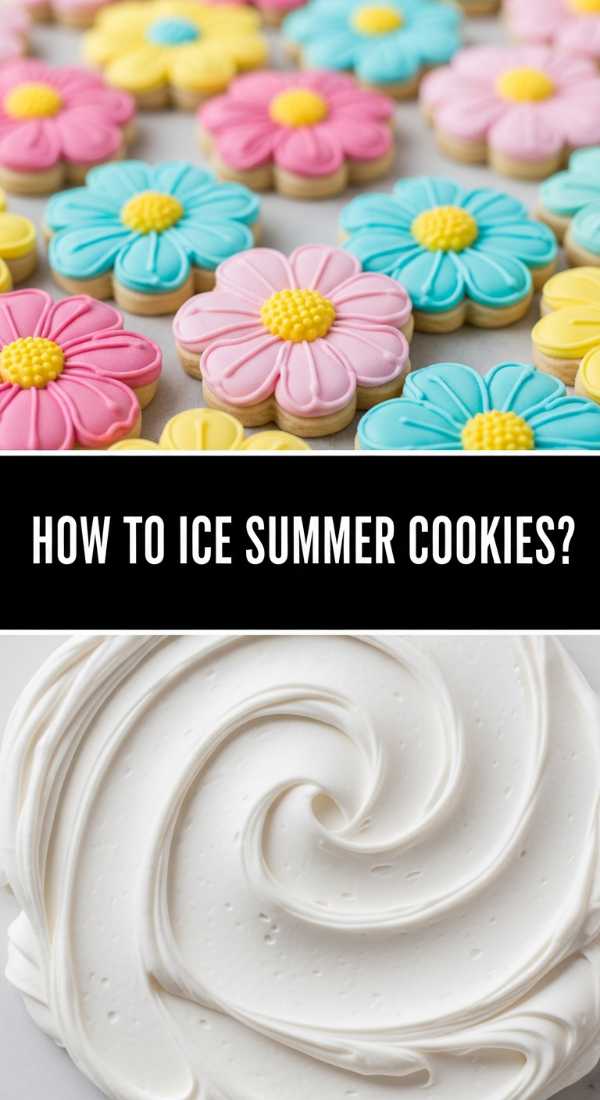
Why we love this
Summer cookies should feel like a breeze—bright, fresh, and full of citrusy cheer. We love icing these with vibrant glazes that mirror the colors of a sunset or a fresh lime, using techniques that emphasize lightness and fun. The smooth, slightly translucent finish of a glaze icing allows the buttery flavor of the cookie to shine through, creating a refreshing treat that is perfect for poolside snacking or a sun-drenched picnic.
Ingredients
- Lemon-zest shortbread cookies
- Powdered sugar
- Freshly squeezed lemon or lime juice
- Bright gel food coloring (yellow, teal, coral)
- Ziploc bags for drizzling
- Edible dried flower petals
How to make it
- Whisk together powdered sugar and citrus juice until you reach a ‘thick ribbon’ consistency—it should flow easily but hold its shape for a few seconds when drizzled.
- Divide the icing into bowls and tint with bright summer colors, using only a tiny drop of gel to maintain a fresh, vibrant aesthetic.
- Dip the top of each cooled cookie directly into the icing, twisting slightly as you pull it away to ensure a clean, even coat without air bubbles.
- While the icing is still wet, use a spoon to drizzle a contrasting color in a zig-zag pattern across the surface for a modern, artistic look.
- Immediately sprinkle a few dried flower petals or a pinch of citrus zest over the wet icing to add texture and a boost of natural aroma.
- Allow the cookies to dry on a wire rack for at least 2 hours until the glaze has hardened into a crackly, sweet shell.
How to prepare lemon pesto
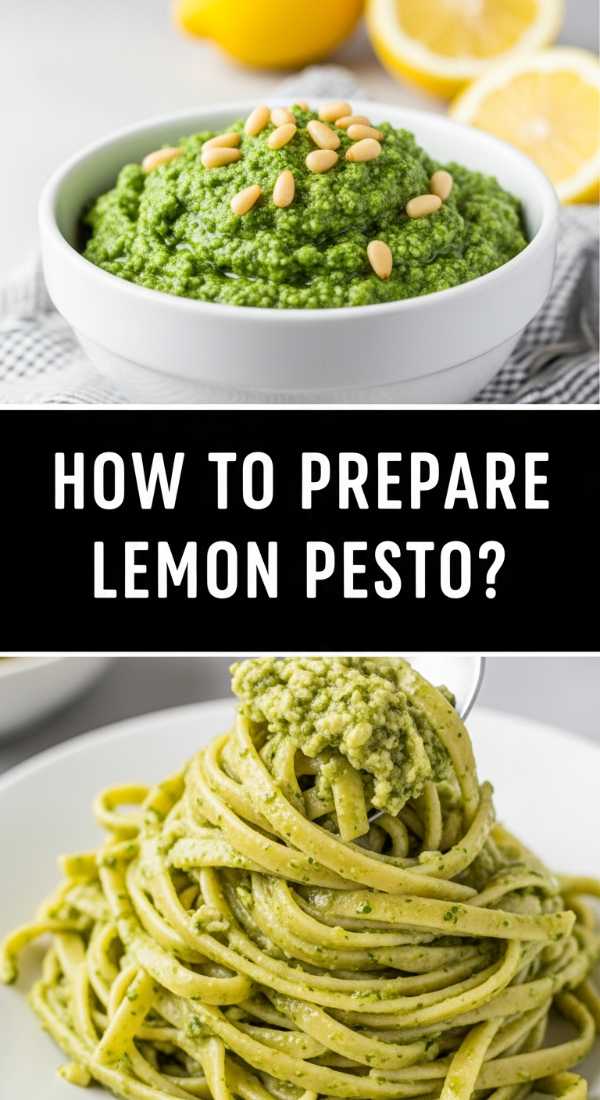
Why we love this
Lemon pesto is a vibrant twist on the classic Genovese style, replacing heavy earthiness with a bright, citrusy punch that wakes up the palate. We love the way the zingy lemon zest cuts through the richness of the toasted pine nuts and Parmesan, creating a sauce that feels sophisticated yet incredibly fresh. The aroma of crushed basil mingling with lemon oil is enough to transport you to a terrace in Southern Italy, making it the perfect addition to a summer board.
Ingredients
- 2 cups fresh basil leaves, packed
- 1/2 cup freshly grated Parmesan cheese
- 1/3 cup pine nuts, lightly toasted
- 2 cloves garlic, minced
- Zest and juice of 1 large organic lemon
- 1/2 cup high-quality extra virgin olive oil
- Sea salt and cracked black pepper
How to make it
- Begin by toasting your pine nuts in a dry pan over medium heat for 2-3 minutes; watch them closely as they can burn in seconds—look for a golden hue and a nutty aroma.
- In a food processor, pulse the basil, toasted nuts, and garlic until they are finely chopped but not yet a paste, preserving some texture.
- Add the Parmesan, lemon zest, and lemon juice, then pulse again for 5 seconds to incorporate the flavors.
- With the processor running on low, slowly drizzle in the olive oil in a steady stream to emulsify the sauce into a creamy, vibrant green mixture.
- Season with salt and pepper to taste, then pulse once more to combine; avoid over-processing, as the heat from the blades can dull the bright green color of the basil.
- Store in a jar with a thin layer of olive oil on top to prevent oxidation, and serve at room temperature for the best flavor profile.
How to brew fancy coffee

Why we love this
Brewing a ‘fancy’ coffee at home is the ultimate act of self-care and the perfect way to cap off a beautiful meal. We love the ritual of it—the sound of the beans grinding, the sight of the creamy cold foam cascading into dark espresso, and the rich, roasted scent that fills the house. It’s an elevated experience that turns a simple caffeine fix into a luxurious moment of indulgence, complete with beautiful layers that look stunning on any social media feed.
Ingredients
- Freshly roasted espresso beans
- Filtered water
- Whole milk or oat milk (for frothing)
- Vanilla or lavender simple syrup
- Ice cubes (clear ice preferred)
- A dash of cocoa powder or cinnamon for garnish
How to make it
- Grind your beans to a fine consistency and pull two shots of espresso; look for a thick, hazelnut-colored ‘crema’ on top as a sign of a perfect extraction.
- Fill a tall, aesthetic glass with large, clear ice cubes, which melt slower and won’t dilute your drink as quickly as smaller chips.
- Pour your choice of simple syrup over the ice, followed by the hot espresso; the temperature change will create beautiful dark swirls in the glass.
- Froth cold milk using an electric handheld frother for 30-45 seconds until it doubles in volume and has a thick, velvety ‘micro-foam’ texture.
- Slowly pour the frothed milk over the back of a spoon into the glass to create distinct, clean layers between the coffee and the foam.
- Finish with a light dusting of cocoa powder or a single dried lavender sprig to elevate the presentation and provide a subtle aromatic hint with every sip.
Conclusion
Creating a viral-worthy food board isn’t about following a set of strict rules; it’s about the joy of combining flavors and aesthetics that speak to the season. Whether you’re celebrating a new graduate or simply enjoying the bounty of a summer harvest, these elements—from the tartness of rhubarb to the zesty kick of lemon pesto—provide a feast for both the eyes and the soul. I hope this guide inspires you to get into the kitchen, play with your food, and share something beautiful with the people you love. Happy styling!