

Let’s be honest: we’ve all spent way too many hours scrolling through social media, mesmerized by those stunning, perfectly curated food boards. You know the ones—the grazing platters that look like they belong in a high-end gallery rather than on a kitchen counter. But between work, errands, and just trying to survive the week, who actually has the energy for all that intricate slicing and dicing? That’s where the ‘Lazy Girl’ method comes in. It’s about achieving that viral aesthetic with maximum flavor and absolutely minimal effort, so you can spend less time in the kitchen and more time actually enjoying your life.
The secret to a viral-worthy food board isn’t perfection; it’s about variety, color, and a few key ‘hero’ dishes that look much more complicated than they actually are. I’ve realized that the best boards are the ones that feel lived-in and approachable, where guests (or just you on a Tuesday night!) feel comfortable grabbing a bite. Whether you’re hosting a last-minute brunch or just want to treat yourself to a fancy solo dinner, these simple recipes are designed to fill your board with warmth, texture, and seriously delicious vibes without the burnout.
How to make fluffy pancakes?
Why we love this
There is nothing quite like the smell of sweet, vanilla-scented batter hitting a warm griddle on a slow Sunday morning. These pancakes are the definition of comfort; they boast a golden-brown, slightly crisp exterior that gives way to a cloud-like, airy center that practically melts on your tongue. When you stack them high on a food board and drizzle them with amber maple syrup, the steam rising from the stack creates a cozy, inviting atmosphere that makes everyone reach for a fork immediately. It’s a sensory experience that combines the nostalgia of childhood with the simple luxury of a well-made breakfast.
Ingredients
- 1 ½ cups all-purpose flour
- 3 ½ teaspoons baking powder
- 1 teaspoon salt
- 1 tablespoon white sugar
- 1 ¼ cups milk
- 1 egg
- 3 tablespoons melted butter
- 1 teaspoon vanilla extract
How to make it
- Begin by sifting your dry ingredients—flour, baking powder, salt, and sugar—into a large mixing bowl to ensure there are no lumps, which is the first secret to a smooth batter.
- In a separate jug, whisk together the milk, egg, melted butter, and vanilla extract until fully incorporated and slightly frothy.
- Create a well in the center of the dry ingredients and pour in the wet mixture; use a wire whisk to combine them just until the large flour streaks disappear. Do not overmix! A few small lumps are perfectly fine and actually help keep the pancakes tender.
- Heat a non-stick griddle or heavy-bottomed frying pan over medium-low heat. You want a steady, even heat rather than a searing flame. Lightly grease with a tiny bit of butter or oil.
- Scoop approximately 1/4 cup of batter per pancake onto the hot surface. Watch for the ‘bubble cue’: when the surface is covered in small bubbles that start to pop and stay open, and the edges look set and matte, it’s time to flip.
- Slide a thin spatula underneath and flip in one confident motion. Cook the second side for another 1-2 minutes until it reaches a beautiful golden-tan color.
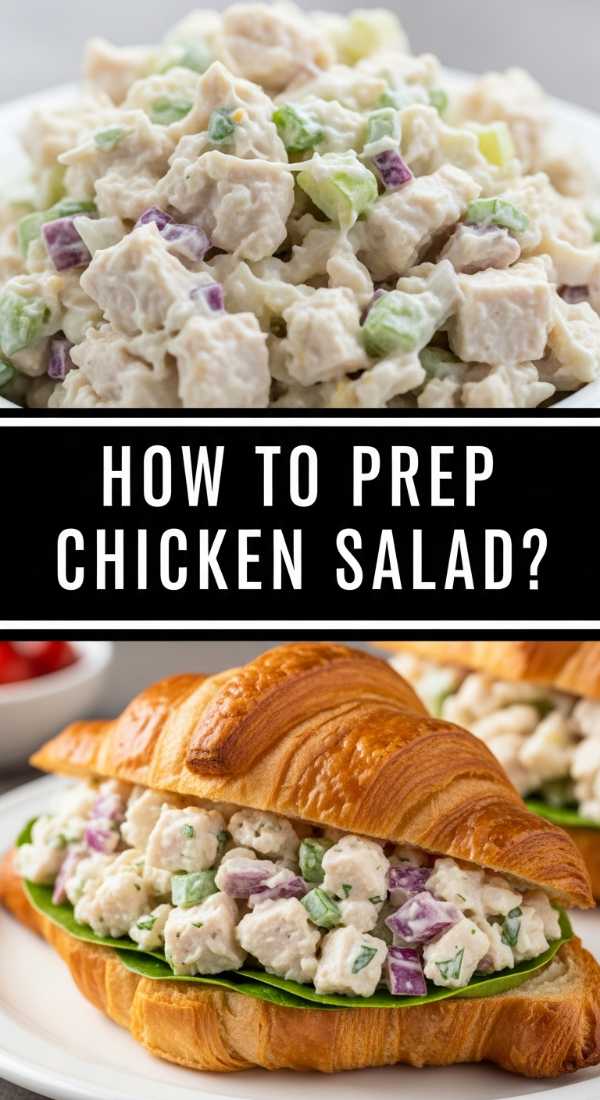
How to prep chicken salad?

Why we love this
A really good chicken salad is all about the interplay of textures—the crunch of fresh celery, the pop of juicy grapes, and the creamy, herb-flecked dressing that binds it all together. It’s a refreshing addition to any board, providing a cool contrast to warmer elements and a satisfying savory-sweet balance that keeps you coming back for ‘just one more’ cracker-full. The aroma of fresh dill and lemon zest brightens the whole dish, making it feel elegant yet incredibly grounded and homemade. It’s the ultimate versatile filler that looks beautiful served in a hollowed-out bell pepper or a simple ceramic bowl.
Ingredients
- 2 cups cooked, shredded rotisserie chicken
- ½ cup mayonnaise
- ¼ cup Greek yogurt
- 1 tablespoon fresh dill, chopped
- 1 teaspoon Dijon mustard
- ½ cup halved red grapes
- ¼ cup diced celery
- Salt and cracked black pepper to taste
How to make it
- Start with high-quality protein; using a store-bought rotisserie chicken is the ultimate lazy girl hack—just ensure the meat is completely cooled before you begin shredding it into bite-sized pieces.
- In a medium bowl, whisk together the mayonnaise, Greek yogurt, Dijon mustard, and fresh dill. The yogurt adds a nice tang and lightens the texture without sacrificing creaminess.
- Add the shredded chicken, diced celery, and halved grapes to the dressing bowl. The celery provides the necessary structure and crunch, while the grapes offer bursts of sweetness.
- Use a large silicone spatula to fold the ingredients together gently. You want every piece of chicken coated, but you don’t want to mash the grapes or break down the chicken fibers too much.
- Taste and season generously with salt and a lot of freshly cracked black pepper. The pepper is crucial for cutting through the richness of the mayo.
- For the best flavor, cover and refrigerate for at least 30 minutes before serving. This allows the herbs to infuse the dressing and the chicken to absorb the seasoning.
How to sear steak bites?
Why we love this
Steak bites are the ultimate ‘luxury on a budget’ addition to a food board, offering that rich, umami-packed flavor of a full steak dinner in perfect, bite-sized portions. As they sear, the butter browns and foams, creating a nutty, toasted aroma that fills the kitchen and draws everyone toward the stove. Each bite features a deeply caramelized, savory crust and a tender, juicy interior that releases a burst of garlic-infused juices with every chew. Garnished with a sprinkle of flaky sea salt and fresh rosemary, they look rustic and sophisticated all at once, making them the undisputed star of any savory platter.
Ingredients
- 1 lb sirloin steak, cut into 1-inch cubes
- 2 tablespoons high-smoke point oil (like avocado oil)
- 3 tablespoons unsalted butter
- 4 cloves garlic, smashed
- 2 sprigs fresh rosemary or thyme
- Salt and black pepper
How to make it
- Pat the steak cubes extremely dry using paper towels; moisture is the enemy of a good sear. Once dry, season them generously on all sides with salt and pepper.
- Place a heavy cast-iron skillet over high heat until it is wisps of smoke are just starting to appear. Add the oil and swirl to coat the pan.
- Add the steak bites in a single layer, ensuring they are not crowded. If the pan is too full, they will steam instead of sear. You should hear a loud, aggressive sizzle immediately.
- Leave them undisturbed for 2 minutes to develop a deep brown crust. Use tongs to flip each piece and sear the other sides for another 60-90 seconds.
- Lower the heat to medium and drop in the butter, smashed garlic, and herb sprigs. As the butter melts and foams, tilt the pan and use a large spoon to continuously baste the steak bites with the flavored butter for about 1 minute.
- Remove the steak from the pan immediately to a warm plate and let them rest for 5 minutes. This allows the fibers to relax and the juices to redistribute, ensuring they stay tender.
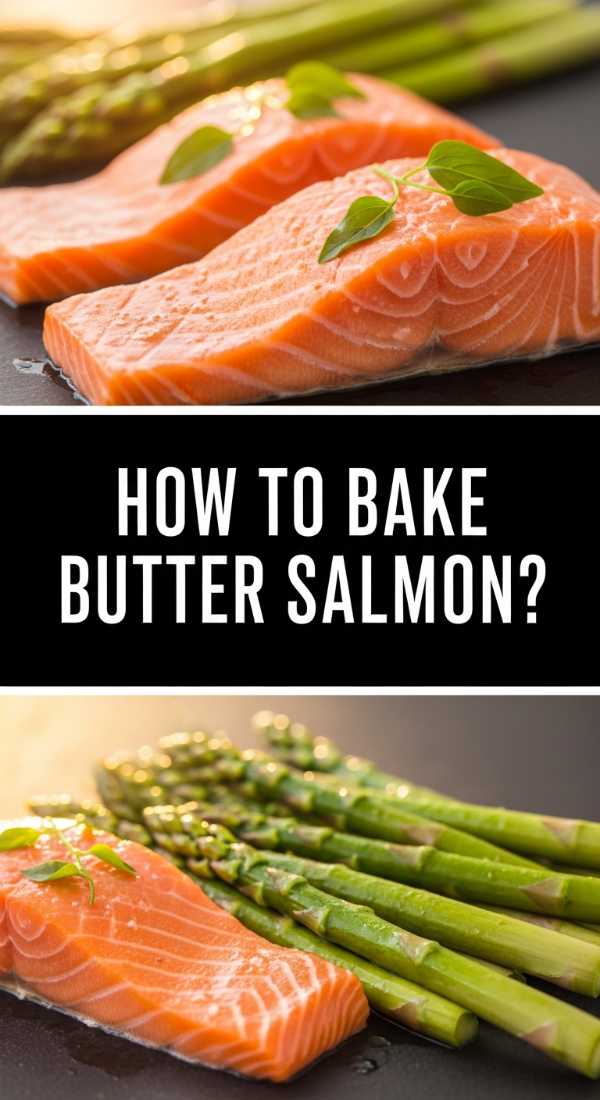
How to bake butter salmon?

Why we love this
Salmon prepared this way is remarkably silky and tender, with a buttery mouthfeel that feels incredibly indulgent yet light. The gentle heat of the oven coaxes out the natural oils of the fish, while the lemon and butter create a bright, velvety sauce that pools around each flake. It’s a visually stunning dish, with the vibrant pink of the fish contrasted against bright yellow lemon wheels and green herbs, adding a pop of color and a sophisticated ‘main character’ energy to your food board. The subtle aroma of baked citrus and dill is enough to make anyone’s mouth water before they even take a bite.
Ingredients
- 2 large salmon fillets (about 6oz each)
- 3 tablespoons melted butter
- 1 tablespoon honey
- 2 cloves garlic, minced
- 1 lemon, thinly sliced
- Fresh dill for garnish
- Salt and paprika
How to make it
- Preheat your oven to 375°F (190°C) and line a baking sheet with parchment paper or a large piece of aluminum foil that you can later fold into a pouch.
- In a small bowl, whisk together the melted butter, honey, minced garlic, and a pinch of paprika. The honey helps the salmon caramelize slightly, while the paprika adds a hint of smokiness and color.
- Place the salmon fillets on the foil and season them with salt. Pour the butter mixture evenly over the top of each fillet, ensuring the sides are coated.
- Arrange 2-3 lemon slices on top of each piece of fish. If using foil, fold the edges up to create a loose ‘tent’ or pouch; this traps the steam and keeps the fish exceptionally moist.
- Bake for 12-15 minutes. To check for doneness, press a fork gently into the thickest part of the fish—it should flake easily and look opaque rather than translucent in the center.
- For a ‘viral’ finish, open the foil and broil on high for the last 2 minutes to slightly brown the lemon edges and the top of the fish. Garnish with fresh dill immediately.
How to roast chicken fajitas?
Why we love this
Sheet pan fajitas are a lazy girl’s dream because they deliver high-impact flavor with almost zero cleanup. The high heat of the oven chars the edges of the peppers and onions, intensifying their natural sweetness and creating those beautiful ‘burnt’ bits that look so appetizing on a platter. The chicken stays succulent, coated in a smoky, spicy rub that wafts through the house like your favorite Mexican grill. Serving these on a board with warm tortillas and lime wedges creates an interactive, vibrant DIY station that is as fun to look at as it is to eat.
Ingredients
- 1 lb chicken breast, sliced into thin strips
- 3 bell peppers (multi-colored), sliced
- 1 large red onion, sliced
- 2 tablespoons olive oil
- 1 tablespoon chili powder
- 1 teaspoon cumin
- 1 teaspoon garlic powder
- Juice of 1 lime
How to make it
- Preheat your oven to 425°F (220°C). A high temperature is essential here to mimic the sear of a traditional cast-iron fajita skillet.
- On a large, rimmed sheet pan, toss the chicken strips, sliced peppers, and onions with the olive oil. Use your hands to ensure everything is evenly slicked with oil.
- In a small jar, mix the chili powder, cumin, garlic powder, salt, and pepper. Sprinkle this seasoning over the entire sheet pan and toss again until the chicken and veggies are thoroughly coated in the spices.
- Spread the mixture out into a single, even layer. If the pan is overcrowded, the vegetables will turn mushy rather than roasting and charring.
- Roast for 18-22 minutes, tossing everything halfway through the cooking time. Look for the chicken to be cooked through and the edges of the peppers to be slightly blackened.
- Immediately after removing from the oven, squeeze fresh lime juice over the whole pan. The acidity wakes up the spices and adds a fresh, zesty finish that balances the roasted flavors.
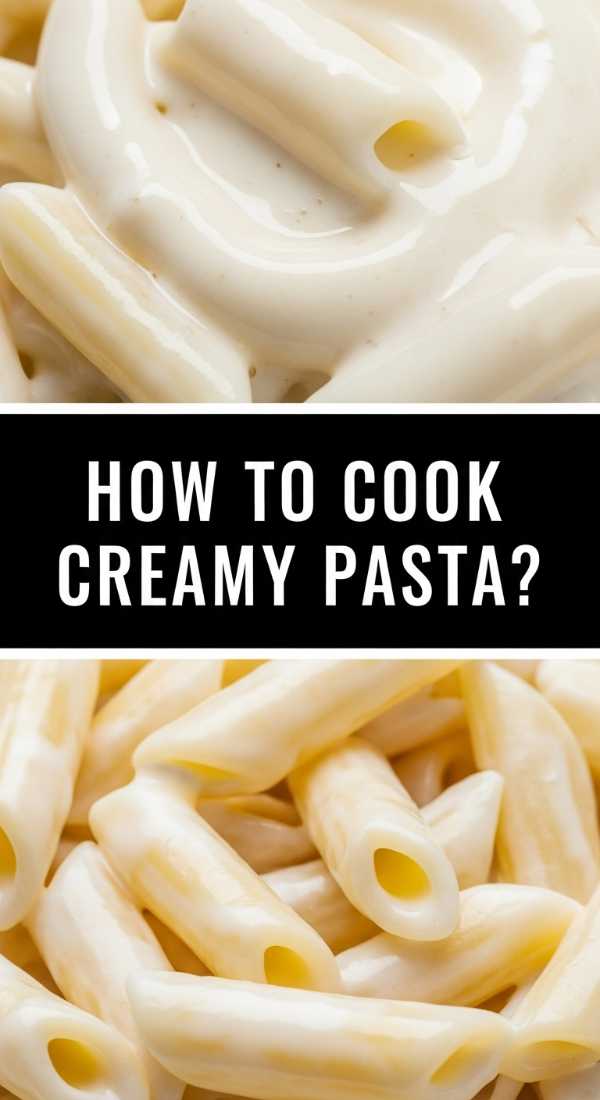
How to cook creamy pasta?

Why we love this
This is the ultimate ‘hug in a bowl’—a silky, decadent pasta that feels like it came from a high-end Italian trattoria but takes mere minutes to assemble. The sauce is rich and glossy, clinging to every curve of the pasta with a salty punch from the parmesan and a mellow sweetness from sautéed garlic. It’s the kind of dish that smells like pure comfort, and when served as part of a board in a shared bowl, it provides a luxurious, carb-heavy anchor that balances out lighter snacks. The texture is smooth and velvety, providing a satisfying contrast to crunchy bread or fresh vegetables.
Ingredients
- 8 oz pasta (fettuccine or penne work best)
- 1 cup heavy cream
- ½ cup freshly grated Parmesan cheese
- 2 cloves garlic, minced
- 2 tablespoons butter
- Fresh parsley, chopped
- Reserved pasta water
How to make it
- Boil your pasta in a large pot of heavily salted water. Aim for ‘al dente’—about 1-2 minutes less than the package directions suggest—as the pasta will finish cooking in the sauce.
- CRITICAL STEP: Before draining the pasta, dip a measuring cup into the pot and save at least 1 cup of the starchy pasta water. This is the liquid gold that makes the sauce emulsion perfect.
- In a large skillet over medium heat, melt the butter and sauté the minced garlic for about 1 minute until it’s fragrant but not browned.
- Pour in the heavy cream and bring to a gentle simmer. Let it bubble for 2-3 minutes until it starts to thicken slightly.
- Turn the heat to low and whisk in the Parmesan cheese slowly. Once the cheese is melted and the sauce is smooth, toss in the cooked pasta.
- Add a splash of the reserved pasta water and toss continuously. The starch in the water helps the creamy sauce bond to the noodles. Keep adding water a tablespoon at a time until the sauce is the perfect, glossy consistency. Garnish with parsley and extra cheese.
How to grill cheesy quesadillas?
Why we love this
There is something universally satisfying about the sound of a knife slicing through a perfectly crisp, buttery tortilla. These quesadillas are all about the ‘cheese pull’—that gooey, stretchy center that makes them a crowd favorite on any grazing board. The heat from the pan transforms simple ingredients into a toasted, savory treat with a hint of salt and a rich, melted interior. They are easy to stack and look fantastic when cut into neat triangles, revealing layers of melted cheese and perhaps a hint of fresh herbs or jalapeños inside.
Ingredients
- 2 large flour tortillas
- 1 ½ cups shredded Mexican cheese blend (Monterey Jack, Cheddar, Quesadilla cheese)
- 1 tablespoon butter or oil
- Optional: sliced jalapeños or cilantro
How to make it
- Heat a large non-stick skillet or griddle over medium heat. Add half of the butter and let it melt until it starts to sizzle slightly.
- Place one tortilla in the pan and immediately sprinkle the cheese evenly over the entire surface, going almost to the very edge. This ensures every bite has cheese. Add any optional fillings like jalapeños now.
- Place the second tortilla on top. Use a heavy spatula or a smaller pan to press down on the quesadilla; this creates better contact with the heat and a crunchier exterior.
- Cook for about 3-4 minutes. Lift a corner to check—you’re looking for a deep, golden brown color and ‘freckles’ on the tortilla.
- Carefully flip the quesadilla. If you’re nervous about flipping, slide it onto a plate, place the pan over the plate, and flip them together. Add the remaining butter to the pan before finishing the second side.
- Cook for another 2-3 minutes until the cheese is completely melted and oozing out the sides. Remove from the heat and let it sit for 60 seconds before slicing into wedges to prevent the cheese from sliding out.
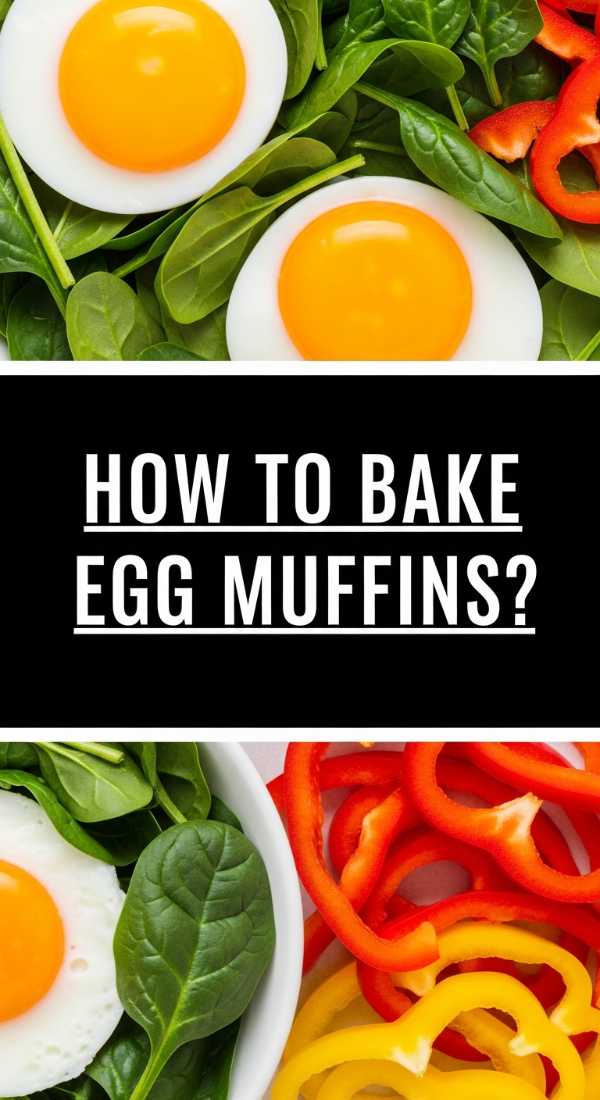
How to bake egg muffins?

Why we love this
Egg muffins are like tiny, individualized crustless quiches that add a pop of color and protein to your board. They have a delicate, souffle-like texture when warm and stay incredibly moist thanks to the addition of veggies like spinach and creamy feta cheese. The aroma of baked eggs and salty cheese is subtle yet inviting, and their uniform shape makes them look professionally catered. They are the ultimate ‘grab and go’ item for a brunch board, offering a savory, nutritious bite that feels light and satisfying without the heaviness of a traditional pie crust.
Ingredients
- 6 large eggs
- ¼ cup milk
- ½ cup chopped spinach
- ¼ cup crumbled feta cheese
- ¼ cup cooked bacon bits or ham
- Salt and pepper
How to make it
- Preheat your oven to 350°F (175°C). Use a silicone muffin tin or very generously grease a standard metal tin with non-stick spray or butter. Eggs stick easily, so don’t skip this!
- In a large bowl, whisk the eggs and milk together until the yolks and whites are completely combined and a few bubbles form on top. Season with salt and pepper.
- Place a pinch of spinach, a few bacon bits, and a sprinkle of feta into the bottom of each muffin cup. Distributing the ‘solids’ first ensures every muffin gets an equal amount of toppings.
- Pour the egg mixture over the fillings until each cup is about 3/4 full. Do not fill to the top, as the eggs will puff up like mini souffles as they bake.
- Bake for 18-22 minutes. The muffins are done when the centers are set and no longer jiggle, and the tops are just starting to turn a pale golden color.
- Let them cool in the tin for 5 minutes before using a thin knife to gently pop them out. They will deflate slightly as they cool, which is completely normal!
How to build taco bowls?

Why we love this
A taco bowl is a celebration of freshness and customization, offering a vibrant mix of warm, seasoned beef, cool avocado, and zesty lime rice. It’s a visual feast on a board, especially when you assemble the components in distinct, colorful piles that allow guests to build their own perfect bite. The scent of cumin and lime is incredibly appetizing, and the variety of textures—from the creamy beans to the crisp corn—makes every spoonful a different experience. It’s the perfect way to include a hearty, healthy option that feels festive and ‘viral’ without requiring hours of plating.
Ingredients
- 1 lb ground beef or turkey
- 1 packet taco seasoning (or cumin, chili powder, and onion powder)
- 2 cups cooked cilantro-lime rice
- 1 can black beans, rinsed
- 1 cup corn kernels
- 1 avocado, sliced
- Salsa and sour cream for topping
How to make it
- In a large skillet over medium-high heat, brown the ground beef, breaking it into small crumbles as it cooks. Drain any excess fat to keep the bowl feeling fresh rather than greasy.
- Add the taco seasoning and a splash of water (about 1/4 cup). Simmer for 3-5 minutes until the sauce has thickened and coated every piece of meat.
- Prepare your base: cook your rice and fluff it with fresh lime juice and chopped cilantro. This adds a bright, professional-tasting layer to the bowl.
- Warm the black beans and corn in a small saucepan or the microwave with a pinch of salt and a squeeze of lime.
- Assembly for the board: Place a large bowl of the seasoned meat in the center of your board. Surround it with smaller bowls containing the rice, beans, corn, and salsa.
- Add the sliced avocado last to prevent browning, and place a bowl of sour cream or Greek yogurt on the side. This ‘deconstructed’ look is what makes it board-friendly!
How to saute garlic shrimp?
[IMAGE_10]
Why we love this
Garlic shrimp is the ultimate quick-win for a food board; it takes less than five minutes to cook but looks and tastes like a gourmet delicacy. The shrimp turn a beautiful, opaque pearly pink as they cook, curled into tight, succulent bites that are drenched in a glistening garlic-butter sauce. The aroma is intoxicating—pungent garlic, bright lemon, and fresh parsley come together to create a scent that is synonymous with high-end seaside dining. It adds an element of elegance and a different protein profile to your board that feels fancy but is secretly the easiest thing on the list.
Ingredients
- 1 lb large shrimp, peeled and deveined
- 3 tablespoons butter
- 4 cloves garlic, finely minced
- ½ teaspoon red pepper flakes (optional)
- Fresh parsley, chopped
- 1 lemon, cut into wedges
How to make it
- Pat the shrimp dry with paper towels. Just like steak, dry shrimp will sear and develop flavor much better than damp ones.
- In a wide skillet over medium-high heat, melt the butter. Once it starts to sizzle, add the minced garlic and red pepper flakes. Sauté for just 30-60 seconds—you want the garlic to be fragrant and soft, but not brown or bitter.
- Add the shrimp to the pan in a single layer. Don’t move them for about 1-2 minutes until the bottoms start to turn pink.
- Flip the shrimp and cook for another 1-2 minutes on the other side. Shrimp cook very fast; they are done as soon as they lose their translucency and form a ‘C’ shape. If they form an ‘O’ shape, they are likely overcooked!
- Turn off the heat and toss in the chopped parsley and a big squeeze of fresh lemon juice. The residual heat will wilt the parsley and incorporate the lemon into the butter sauce.
- Serve them immediately, pouring all that extra garlic butter from the pan over the top of the shrimp on your board.
Wrapping It All Up
Creating a viral food board doesn’t have to be a stressful production. By focusing on these simple, ‘lazy girl’ approved dishes, you can build a spread that is as delicious as it is beautiful. Remember, the best part of a food board is the community it creates—the way people gather around it, picking their favorite bites and trying new combinations. So, pour yourself a glass of something sparkling, set out your favorite platter, and enjoy the effortless glow of a meal well-made (even if it only took you half the time people think it did!).