
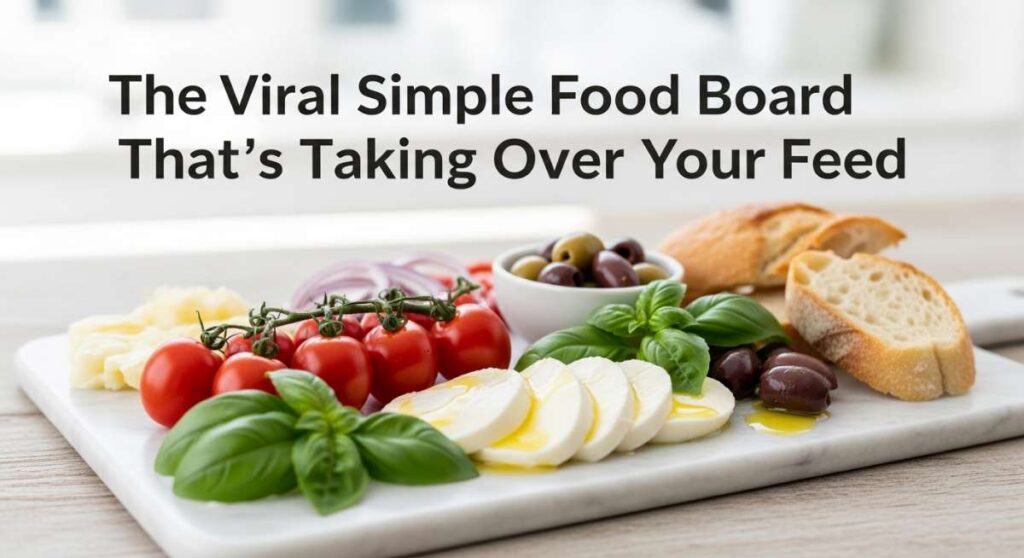
There is something undeniably magical about a shared meal that looks as good as it tastes. Lately, my feed has been flooded with these incredible, rustic spreads—the ‘Simple Food Board’—and I finally decided to dive in and create my own. It’s not just about the food; it’s about the laughter that happens over the board, the clinking of glasses, and the effortless way a variety of textures and flavors come together to create a true culinary experience right in your living room.
I remember the first time I set one of these up for a casual Sunday brunch. The house smelled of browned butter and roasted garlic, and as I laid out the crispy potatoes next to the velvet-smooth pasta, I realized that this is the ultimate way to eat. It removes the formality of plated meals and replaces it with a cozy, ‘choose-your-own-adventure’ vibe that guests absolutely adore. Today, I’m sharing the ten core components that make my food board go viral every single time.
How to make fluffy pancakes?

Why we love this
There is nothing quite like the sight of a towering stack of pancakes, golden-brown and steaming hot, sitting at the center of your board. These aren’t just any pancakes; they are clouds of sweetness that melt the moment they hit your tongue. The aroma of vanilla and warm maple syrup creates an instant sense of home and comfort, while the slightly crisp edges provide a satisfying contrast to the soft, airy interior that soaks up butter like a sponge. It’s the ultimate breakfast luxury that feels like a warm hug on a plate.
Ingredients
- 2 cups all-purpose flour
- 2 tablespoons sugar
- 1 tablespoon baking powder
- 1/2 teaspoon salt
- 1 1/2 cups whole milk
- 1 large egg
- 4 tablespoons melted butter (unsalted)
- 1 teaspoon vanilla extract
How to make it
- In a large mixing bowl, whisk together the flour, sugar, baking powder, and salt until perfectly combined. This ensures even rising.
- In a separate medium bowl, beat the egg, then stir in the milk, melted butter, and vanilla extract. Ensure the butter isn’t hot enough to cook the egg!
- Make a well in the center of the dry ingredients and pour in the wet mixture. Use a silicone spatula to fold the batter gently. Pro Tip: Stop mixing while there are still a few small lumps; over-mixing leads to tough, rubbery pancakes.
- Heat a non-stick griddle or large skillet over medium-low heat. Test the heat by dropping a bead of water on it—it should sizzle and dance.
- Lightly grease the pan with a small amount of butter or oil. Pour 1/4 cup of batter for each pancake.
- Watch for bubbles to form on the surface and the edges to look set and matte (usually 2-3 minutes). Flip carefully with a thin spatula.
- Cook the second side for another 1-2 minutes until it reaches a deep golden hue. Keep warm in a 200°F oven until ready to serve on your board.
How to cook garlic steak?

Why we love this
A perfectly seared garlic steak brings a sophisticated, savory depth to the board that balances the lighter elements. The sensory experience is intense: the hiss of the steak hitting the hot cast iron, the intoxicating scent of crushed garlic cloves infusing into foaming butter, and the sight of a rich, mahogany crust. When sliced thinly against the grain, the meat reveals a succulent, pink center that is buttery and tender, offering a robust umami punch that satisfies every craving.
Ingredients
- 1.5 lbs Ribeye or New York Strip (room temperature)
- 4 cloves garlic, smashed
- 3 sprigs fresh rosemary or thyme
- 3 tablespoons unsalted butter
- 2 tablespoons high-smoke point oil (like avocado or grapeseed)
- Coarse sea salt and cracked black pepper
How to make it
- At least 30 minutes before cooking, remove the steak from the fridge and pat it extremely dry with paper towels. Moisture is the enemy of a good crust.
- Generously season all sides of the steak with salt and pepper. Don’t forget the edges!
- Heat a heavy cast-iron skillet over high heat until it begins to smoke slightly. Add the oil and swirl to coat the pan.
- Carefully lay the steak in the pan, laying it away from you to avoid oil splashes. Press down slightly to ensure contact.
- Sear undisturbed for 3-4 minutes per side for a medium-rare finish. Use tongs to sear the fat cap on the side until crispy.
- Reduce heat to medium. Add the butter, smashed garlic cloves, and herbs to the pan.
- Once the butter is foaming, tilt the pan and use a large spoon to continuously bast the steak with the hot garlic butter for the final 2 minutes of cooking.
- Remove the steak from the pan and let it rest on a cutting board for at least 8-10 minutes. This allows the juices to redistribute so they don’t run out when you slice it.
How to bake sheet chicken?

Why we love this
Sheet pan chicken is the unsung hero of the food board because it manages to be both rustic and elegant. The skin becomes incredibly thin and shatteringly crisp, protecting the meat beneath so it remains exceptionally juicy and moist. As it roasts, the chicken fat mingles with lemon and herbs, creating a natural sauce that smells like a Mediterranean summer. It’s effortless, colorful, and provides a hearty protein base that pairs beautifully with any vegetable on the spread.
Ingredients
- 2 lbs chicken thighs (bone-in, skin-on)
- 1 lemon, sliced into rounds
- 1/4 cup olive oil
- 1 tablespoon dried oregano
- 1 teaspoon smoked paprika
- 4 cloves garlic, minced
- Salt and pepper to taste
How to make it
- Preheat your oven to 425°F (220°C). This high heat is crucial for rendering the fat and crisping the skin.
- Line a large rimmed baking sheet with parchment paper for easy cleanup and to prevent sticking.
- In a small bowl, whisk together olive oil, minced garlic, oregano, paprika, salt, and pepper to create a marinade.
- Pat the chicken thighs dry. Arrange them on the sheet pan, ensuring they aren’t crowded together; airflow is key for crispiness.
- Brush the marinade generously over every inch of the chicken, even under the skin if possible.
- Tuck the lemon slices around and slightly under the chicken pieces to infuse them with bright citrus notes.
- Roast for 25-35 minutes. Use a meat thermometer to ensure the internal temperature reaches 165°F (74°C) at the thickest part.
- For an extra-crispy finish, turn on the broiler for the last 2 minutes of cooking, watching closely so the skin doesn’t burn.
How to make creamy pasta?
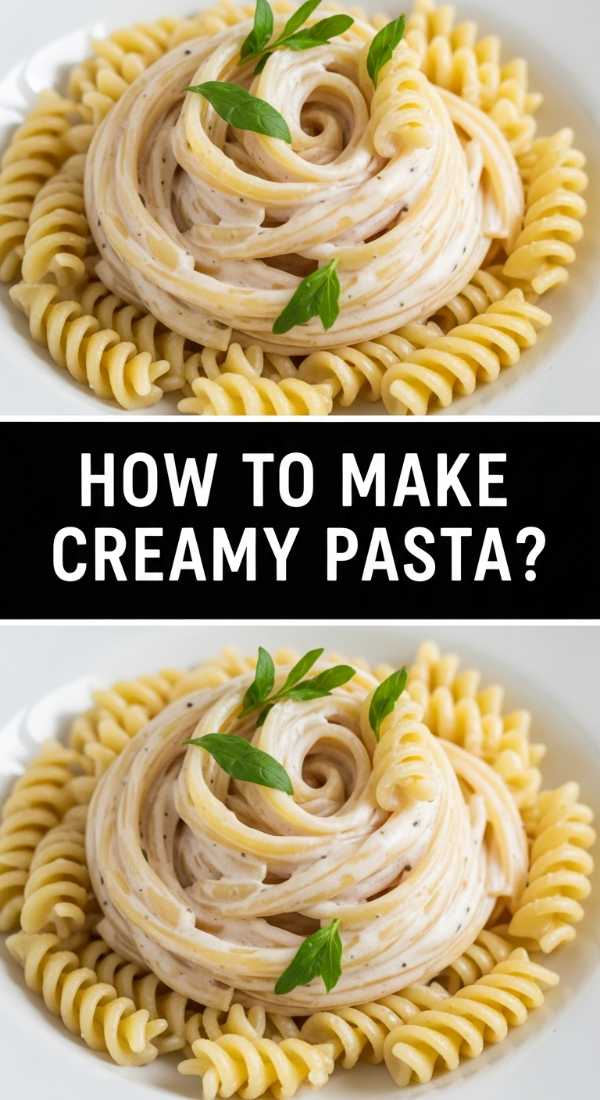
Why we love this
This pasta is pure indulgence, acting as the luxurious anchor of your board. Every strand of noodle is coated in a velvety, ivory sauce that clings to it perfectly, offering a rich mouthfeel that is both silky and decadent. The subtle bite of parmesan cheese and the aromatic base of sautéed shallots provide a complex flavor profile that feels like something from a high-end bistro. It’s the kind of comfort food that invites everyone to twirl their forks and linger over the meal.
Ingredients
- 12 oz Fettuccine or Penne
- 1 cup heavy cream
- 1/2 cup freshly grated Parmesan cheese
- 2 tablespoons butter
- 1 shallot, finely minced
- 1/2 cup reserved pasta water
- Fresh parsley for garnish
How to make it
- Bring a large pot of heavily salted water to a rolling boil. Cook the pasta until it is just ‘al dente’—usually 1-2 minutes less than the package directions.
- Before draining, carefully scoop out 1 cup of the starchy pasta water and set it aside. This is the secret to a smooth sauce!
- In a large skillet over medium heat, melt the butter and sauté the minced shallots until they are translucent and fragrant (about 3 minutes).
- Pour in the heavy cream and bring to a gentle simmer. Let it reduce slightly for about 5 minutes until it thickens enough to coat the back of a spoon.
- Whisk in the Parmesan cheese slowly until melted and smooth. If the sauce is too thick, whisk in a splash of the reserved pasta water.
- Add the cooked pasta directly into the skillet. Toss vigorously over low heat to emulsify the sauce and the pasta water, creating a glossy coating.
- Finish with a sprinkle of fresh parsley and a crack of black pepper before placing it in a warm bowl on your board.
How to prep chicken salad?
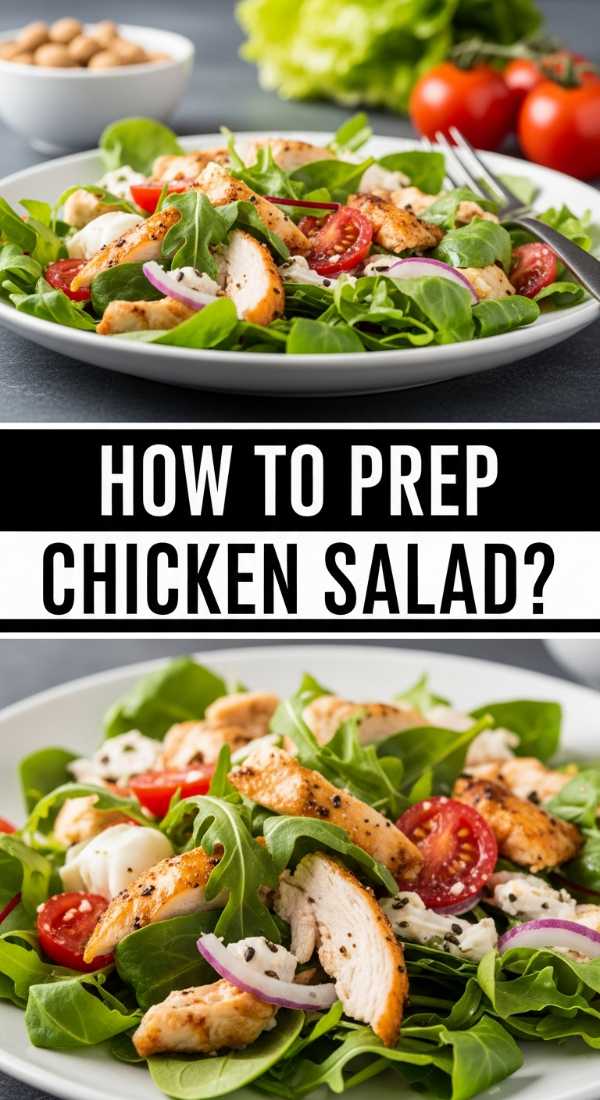
Why we love this
Chicken salad adds a refreshing, cool contrast to the warm elements of the board. The texture is a delightful symphony of tender shredded chicken, the sharp crunch of fresh celery, and the creamy, zesty dressing that binds it all together. It’s bright, herbaceous, and incredibly versatile, offering a light and airy flavor profile that cleanses the palate between richer bites. It’s the perfect topping for crackers or a simple slice of crusty bread from the board’s edge.
Ingredients
- 3 cups shredded cooked chicken (rotisserie works great)
- 1/2 cup mayonnaise
- 1/4 cup Greek yogurt (for tang)
- 2 stalks celery, finely diced
- 1/4 cup red onion, minced
- 1 tablespoon fresh dill, chopped
- 1 teaspoon Dijon mustard
- Juice of half a lemon
How to make it
- Start by shredding your cooked chicken. For the best texture on a board, I recommend a mix of hand-shredded pieces and smaller chunks to hold the dressing well.
- In a medium mixing bowl, whisk together the mayonnaise, Greek yogurt, Dijon mustard, and lemon juice until the dressing is completely smooth.
- Add the finely diced celery and red onion to the dressing. Pro Tip: Soak the minced red onion in cold water for 5 minutes then drain before adding to remove the harsh ‘bite’.
- Fold in the shredded chicken and fresh dill using a large spoon. Stir until every piece of chicken is evenly coated but don’t over-mash the meat.
- Taste and season with salt and pepper as needed.
- Cover and refrigerate for at least 30 minutes before serving. This allows the flavors to meld and the salad to firm up slightly for better scooping.
How to roast honey carrots?

Why we love this
These honey-roasted carrots bring a stunning pop of vibrant orange to your spread, looking like edible jewels. The roasting process intensifies their natural sugars, which then caramelize with the honey to create a sticky, sweet glaze that is balanced by a hint of earthy thyme. They are tender enough to melt in your mouth but retain a slight ‘snap’ at the core, providing a garden-fresh sweetness that complements the savory meats and salty cheeses on the board perfectly.
Ingredients
- 1 lb whole baby carrots (tops trimmed)
- 2 tablespoons honey
- 2 tablespoons olive oil
- 1 teaspoon fresh thyme leaves
- 1/2 teaspoon flaky sea salt
- 1/2 teaspoon black pepper
How to make it
- Preheat your oven to 400°F (200°C). Scrub the carrots clean, but leave them whole for a more rustic, viral-worthy appearance.
- In a small bowl, whisk together the olive oil, salt, pepper, and thyme. Do not add the honey yet! Adding honey too early can cause it to burn before the carrots are tender.
- Toss the carrots in the oil mixture on a baking sheet until they are thoroughly coated.
- Spread them in a single layer, ensuring they aren’t touching so they roast rather than steam.
- Bake for 15-20 minutes until the carrots are tender when pierced with a fork and show some light browning.
- Remove the tray from the oven and drizzle the honey over the hot carrots. Use tongs to toss them right on the tray so the residual heat thins the honey and coats them evenly.
- Return to the oven for a final 3-5 minutes to let the honey glaze bubble and become sticky. Serve warm.
How to bake egg muffins?

Why we love this
Egg muffins are the ultimate ‘grab-and-go’ addition to a food board, offering protein-packed bites that are as beautiful as they are delicious. They have a light, souffle-like texture that is bouncy and soft, filled with colorful flecks of peppers and melting pockets of cheese. The aroma of baked eggs and savory toppings is incredibly inviting, and their uniform shape makes them look professionally catered while maintaining a cozy, homemade feel that guests gravitate toward immediately.
Ingredients
- 8 large eggs
- 1/2 cup milk
- 1 cup fresh spinach, chopped
- 1/2 cup bell peppers, finely diced
- 1/2 cup shredded cheddar cheese
- Salt and pepper to taste
- Non-stick cooking spray
How to make it
- Preheat your oven to 350°F (175°C). Generously grease a standard 12-cup muffin tin with non-stick spray or butter—eggs are notorious for sticking!
- In a large bowl, whisk the eggs and milk together until the mixture is pale yellow and slightly frothy. This air incorporation helps them stay light.
- Stir in the chopped spinach, diced peppers, and shredded cheese. Season with a good pinch of salt and pepper.
- Pour the egg mixture into the muffin cups, filling each about 3/4 of the way full. They will puff up in the oven then sink slightly as they cool.
- Bake for 18-22 minutes. You’ll know they are done when the centers are set and no longer jiggle, and the tops are slightly golden.
- Let them rest in the tin for 5 minutes before using a thin knife to gently loosen the edges and pop them out.
- Place them in a neat row or cluster on your board for easy grabbing.
How to sear juicy salmon?
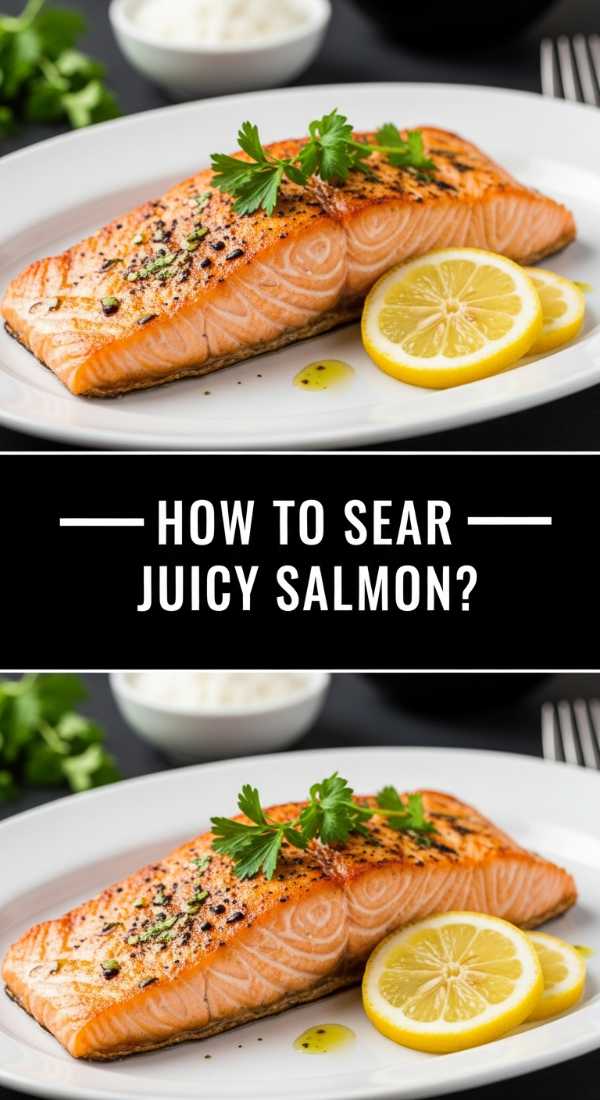
Why we love this
A perfectly seared piece of salmon is the crown jewel of any high-end food board. The contrast between the crackling, salty skin and the buttery, flake-apart flesh is a texture lover’s dream. It offers a clean, sophisticated flavor that feels lighter than red meat, while the vibrant pink hue adds a level of visual ‘wow’ factor that makes the whole board look expensive. Drizzled with a little lemon, it brings a bright, fatty richness that is absolutely irresistible.
Ingredients
- 2 salmon fillets (6 oz each)
- 1 tablespoon olive oil
- 1 tablespoon butter
- 1/2 teaspoon paprika
- Lemon wedges for serving
- Kosher salt and black pepper
How to make it
- Remove the salmon from the fridge 15 minutes before cooking. Pat the skin and the flesh extremely dry with paper towels.
- Season both sides with salt, pepper, and a light dusting of paprika for color and a hint of smokiness.
- Heat a non-stick or stainless steel skillet over medium-high heat. Add the olive oil and wait until it shimmers.
- Place the salmon fillets in the pan, skin-side down. Press down gently with a spatula for 10 seconds to ensure the skin makes full contact and doesn’t curl.
- Lower the heat to medium. Let the salmon cook undisturbed on the skin side for about 5-6 minutes. You will see the color change slowly crawl up the side of the fish.
- Once the skin is crispy and the fish is cooked 3/4 of the way through, flip carefully.
- Add the butter to the pan and cook for just 1-2 minutes on the flesh side. This keeps the center moist and slightly translucent (medium-rare to medium).
- Remove from the pan immediately and finish with a squeeze of fresh lemon juice before placing on the board.
How to make pesto wraps?

Why we love this
These pesto wraps are the perfect handheld element, offering a burst of Mediterranean freshness in every bite. The aromatic, nutty scent of basil pesto hits you first, followed by the soft chew of the tortilla and the crisp snap of fresh greens inside. They are light, herby, and provide a wonderful green aesthetic to the board. Because they are sliced into pinwheels, they reveal a beautiful spiral of colors that makes the entire spread look meticulously styled and deeply appetizing.
Ingredients
- 4 large flour tortillas
- 1/2 cup high-quality basil pesto
- 2 cups baby arugula or spinach
- 1/2 lb thin-sliced deli turkey or grilled chicken strips
- 1/4 cup sundried tomatoes, chopped
- 4 oz softened cream cheese (optional base layer)
How to make it
- Lay the tortillas flat on a clean workspace. If they are cold, microwave them for 10 seconds to make them pliable and prevent tearing.
- Spread a thin, even layer of softened cream cheese over the entire surface (this acts as ‘glue’), followed by a generous layer of basil pesto.
- Layer the sliced meat over the bottom two-thirds of the tortilla, followed by a handful of greens and a sprinkle of sundried tomatoes.
- Starting from the bottom, roll the tortilla up as tightly as possible. A tight roll is essential for the pinwheels to hold their shape on the board.
- Wrap the rolls tightly in plastic wrap and refrigerate for at least 20 minutes. This chilling period ‘sets’ the wrap.
- Using a very sharp serrated knife, trim the uneven ends off, then slice the rolls into 1-inch thick pinwheels.
- Arrange them standing up or on their sides to show off the beautiful green spiral filling.
How to cook potato wedges?

Why we love this
No food board is complete without the ultimate crowd-pleaser: crispy potato wedges. These are the gold standard of comfort—thick-cut, seasoned to perfection, and boasting a rugged, crunchy exterior that gives way to a fluffy, mashed-potato-like center. They are savory, salty, and carry a hint of garlic and spice that makes them impossible to stop eating. They act as the perfect ‘scoop’ for any sauces or dips you include on your board, providing a satisfying, earthy base for the whole meal.
Ingredients
- 3 large Russet potatoes
- 1/4 cup olive oil
- 1 tablespoon cornstarch (the secret for crunch!)
- 1 teaspoon garlic powder
- 1 teaspoon smoked paprika
- 1/2 teaspoon onion powder
- 1 teaspoon sea salt
How to make it
- Preheat your oven to 425°F (220°C). Scrub the potatoes well and cut each into 8 even wedges.
- Pro Tip: Soak the cut wedges in a bowl of cold water for 30 minutes. This removes excess starch and ensures a crispier finish. Drain and pat very dry.
- In a large bowl, toss the dry wedges with olive oil until fully coated.
- In a small container, mix the cornstarch, garlic powder, paprika, onion powder, and salt. Sprinkle this over the oiled potatoes and toss again until each wedge has a fine coating of seasoning.
- Arrange the wedges on a parchment-lined baking sheet in a single layer, ensuring the skin side is down for maximum crunch.
- Bake for 30-35 minutes, flipping them halfway through the cooking time using tongs.
- The wedges are done when they are deep golden brown and the edges look sharp and crispy. Sprinkle with a little extra salt while hot and serve immediately.
Bringing It All Together
Creating a viral-worthy food board is all about the balance of colors, temperatures, and textures. By combining these ten elements—from the fluffiness of the pancakes to the crunch of the potato wedges—you create a landscape of food that invites people to dig in and explore. Don’t be afraid to fill the gaps with fresh berries, nuts, or a few sprigs of rosemary to give it that final ‘blogger’ touch. Remember, the best part of a food board isn’t the photos you take; it’s the memories you make while sharing it with the people you love. Happy hosting!