
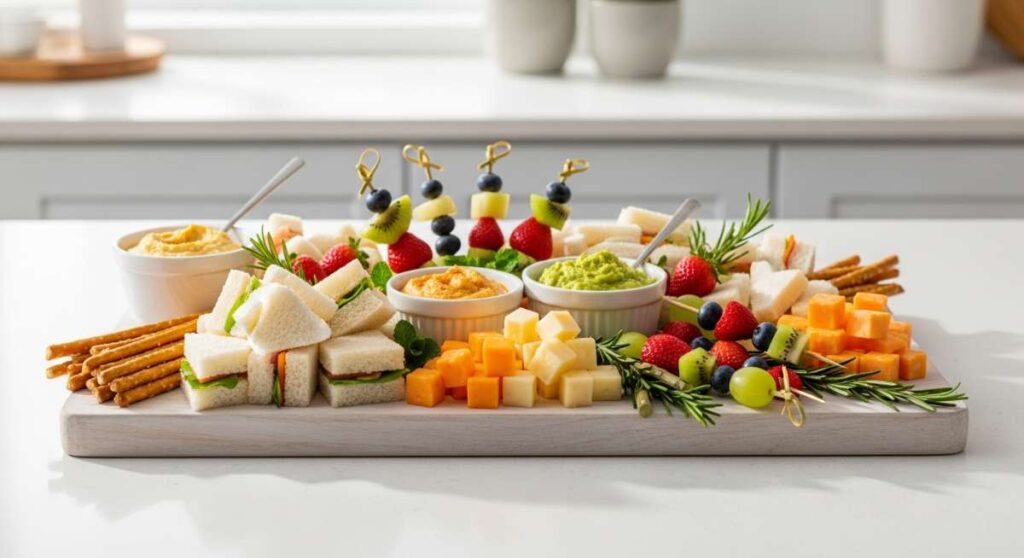
There is something inherently magical about the way a simple wooden board can transform a mundane Tuesday night into a curated, aesthetic experience that nourishes both the soul and the body. We’ve all seen them scrolling through TikTok—those vibrant, color-coded ‘Simple Food Boards’ that look like a work of art but are actually packed with incredible, whole-food nutrition. It’s the evolution of ‘Girl Dinner,’ but with a sophisticated, wellness-forward twist that makes healthy eating feel like a celebration rather than a chore.
I remember the first time I set one of these up for a quiet night in; the house smelled of roasted garlic and fresh herbs, and suddenly, my kitchen felt like a high-end bistro. These boards aren’t just about the food; they are about the ritual of slow living and intentional eating. By combining textures, colors, and flavors on one canvas, we create a sensory experience that satisfies our cravings while keeping our energy levels steady and our hearts full. Let’s dive into the components that make this viral board a true lifestyle game-changer.
How to make zucchini noodles?

Why we love this
There is a refreshing, garden-fresh snap to zucchini noodles that pasta simply cannot replicate, offering a light and airy base for your favorite sauces. As you spiralize the squash, the vibrant green ribbons release a subtle, earthy aroma that signals a clean, revitalizing meal is on the way. When sautéed just right, they retain a delicate al dente bite that carries the richness of garlic butter or spicy marinara beautifully. It is the ultimate way to feel satisfied and full without that heavy, sluggish ‘carb coma’ that usually follows a big bowl of traditional noodles.
Ingredients
- 3 medium zucchinis, firm and bright green
- 2 tablespoons extra virgin olive oil
- 2 cloves garlic, thinly sliced
- A pinch of sea salt and cracked black pepper
- Optional: Red pepper flakes and lemon zest
How to make it
- Begin by washing and drying your zucchinis thoroughly; firm vegetables produce the best noodles. Use a spiralizer or a handheld julienne peeler to create long, uniform strands, stopping when you reach the seedy core to avoid excess moisture.
- Place the noodles in a colander and sprinkle with a teaspoon of salt, letting them sit for about 10 minutes to draw out excess water, then gently pat them dry with a clean kitchen towel.
- Heat a large skillet over medium-high heat and add the olive oil; once it shimmers, toss in the garlic slices until they are fragrant and just beginning to turn golden brown.
- Add the zucchini noodles to the pan and flash-sauté them for only 2 to 3 minutes, using tongs to keep them moving constantly so they cook evenly without becoming mushy.
- Remove from heat immediately once they are slightly softened but still vibrant green, and finish with a squeeze of lemon and a crack of black pepper for a bright, zesty finish.
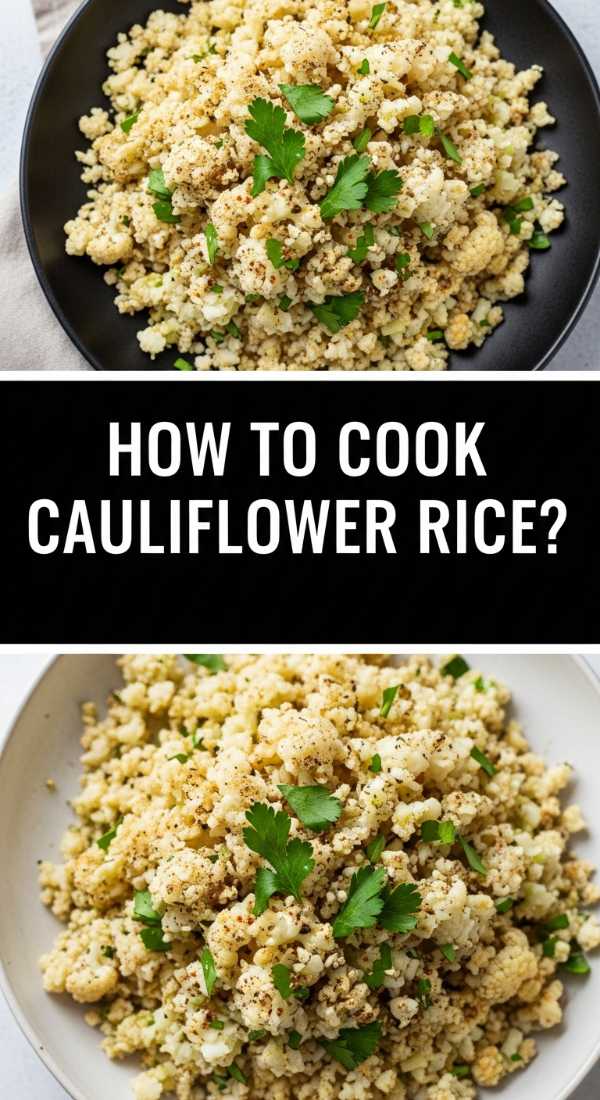
How to cook cauliflower rice?
Why we love this
Cauliflower rice is the ultimate culinary chameleon, soaking up every ounce of flavor from your seasonings while providing a satisfying, grain-like texture that feels incredibly hearty. There is a wonderful nuttiness that emerges when the tiny florets hit a hot pan, creating a toasty aroma that fills the kitchen and builds anticipation. It’s light, fluffy, and surprisingly versatile, acting as the perfect fluffy cloud to soak up juices from grilled meats or the creamy richness of a healthy curry. We love it because it’s a high-volume, low-calorie powerhouse that allows you to eat a massive, glowing bowl of goodness while feeling totally vibrant.
Ingredients
- 1 large head of cauliflower (or a bag of pre-riced cauliflower)
- 1 tablespoon avocado oil or ghee
- 1/2 teaspoon garlic powder
- Salt and pepper to taste
- Fresh parsley for garnish
How to make it
- If starting with a whole head, remove the leaves and stem, then cut the cauliflower into large florets. Pulse them in a food processor until they reach the size of small grains of rice, being careful not to over-process into a paste.
- Heat a wide, flat-bottomed skillet over medium heat with your choice of healthy fat; using a large pan ensures the ‘rice’ sautés rather than steams.
- Add the cauliflower rice to the hot pan in an even layer, letting it sit undisturbed for about 2 minutes to develop a slight golden crust and a nutty depth of flavor.
- Stir the rice and continue cooking for another 3 to 5 minutes, seasoning with garlic powder, salt, and pepper as you go.
- The visual cue for doneness is when the grains are tender to the bite but still hold their shape; remove from heat and fluff with a fork before serving warm on your food board.
How to bake sugar free brownies?

Why we love this
Imagine the smell of deep, dark cocoa wafting through your home, promising a decadent treat that won’t result in a sugar crash later. These brownies are incredibly fudgy and rich, with a velvety texture that melts on the tongue and satisfies even the most intense chocolate cravings. They have that classic crinkle top and a moist, dense center that feels like a total indulgence, yet they are crafted with ingredients that love you back. It’s the perfect addition to a food board, providing a sweet, chocolatey anchor that pairs beautifully with fresh berries and a handful of raw nuts.
Ingredients
- 1 cup almond flour
- 1/2 cup unsweetened cocoa powder
- 3/4 cup granulated monk fruit sweetener
- 1/2 cup melted coconut oil or grass-fed butter
- 2 large eggs, room temperature
- 1 teaspoon vanilla extract
- 1/2 cup sugar-free dark chocolate chips
How to make it
- Preheat your oven to 350°F (175°C) and line an 8×8 inch baking pan with parchment paper, leaving an overhang on the sides for easy removal later.
- In a medium bowl, whisk together the melted coconut oil and monk fruit sweetener until well combined, then add the eggs one at a time, whisking vigorously after each addition to build a slight structure.
- Sift in the cocoa powder and almond flour to ensure there are no lumps, then gently fold the dry ingredients into the wet mixture using a spatula until just combined.
- Fold in the sugar-free chocolate chips for extra pockets of melty goodness, then pour the thick batter into the prepared pan and smooth the top.
- Bake for 20 to 25 minutes; the key visual cue is that the edges should be set but the center should still have a very slight jiggle. Let them cool completely in the pan to allow the fudgy texture to fully set before slicing into squares.
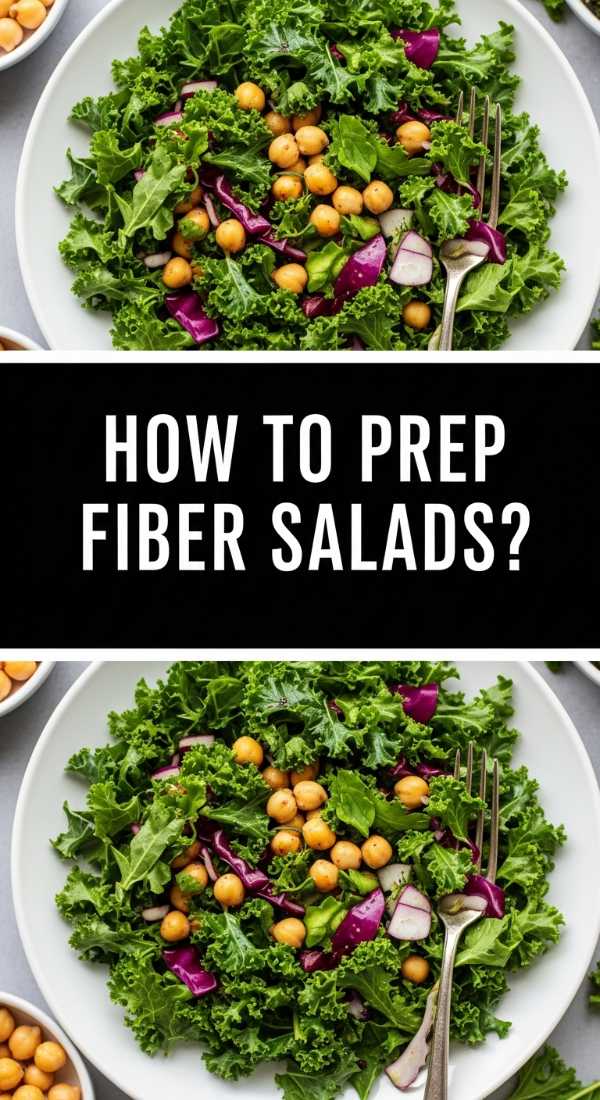
How to prep fiber salads?
Why we love this
A true fiber salad is a celebration of crunch, color, and vitality, offering a complex symphony of textures that keeps every bite interesting and satisfying. We love the way crisp kale, snap peas, and shredded carrots mingle with hearty legumes, creating a bowl that is as beautiful to look at as it is delicious to eat. The aroma of a zesty lemon-tahini dressing tied together with fresh mint and parsley makes the whole kitchen smell like a spring garden. It is the backbone of any healthy food board, providing the essential roughage that keeps your digestion humming and your skin glowing from the inside out.
Ingredients
- 2 cups chopped kale or Swiss chard
- 1 cup cooked chickpeas or lentils
- 1/2 cup shredded carrots
- 1/4 cup pumpkin seeds (pepitas)
- Dressing: Lemon juice, olive oil, dijon mustard, and honey
How to make it
- Start by prepping your greens; if using kale, remove the tough ribs and chop the leaves finely, then ‘massage’ them with a tiny bit of olive oil and salt for 2 minutes until they become dark green and tender.
- Rinse and drain your canned chickpeas or lentils thoroughly, ensuring they are dry so they don’t water down the salad.
- Combine the massaged greens, legumes, and shredded carrots in a large mixing bowl, tossing them gently to distribute the ingredients evenly.
- In a small jar, whisk together 3 parts olive oil to 1 part lemon juice, a teaspoon of dijon mustard, and a drizzle of honey; pour this over the salad just before serving to keep the vegetables crisp.
- Top with pumpkin seeds for a final layer of crunch and a boost of healthy fats, ensuring the salad is seasoned with a final pinch of flaky sea salt.
How to season juicy chicken?

Why we love this
There is nothing quite like the sound of a chicken breast hitting a hot cast-iron skillet, followed by the savory, mouth-watering aroma of searing herbs and spices. When seasoned correctly, the chicken develops a beautiful golden-brown crust that seals in all the moisture, resulting in a tender, succulent protein that practically melts in your mouth. The combination of smoked paprika, garlic, and dried oregano creates a Mediterranean-inspired flavor profile that is both comforting and sophisticated. It provides the essential savory ‘anchor’ for your food board, making the meal feel complete, balanced, and deeply nourishing.
Ingredients
- 2 large chicken breasts, pounded to even thickness
- 1 tablespoon smoked paprika
- 1 teaspoon garlic powder
- 1 teaspoon dried oregano
- 1/2 teaspoon onion powder
- Salt and avocado oil
How to make it
- Pat the chicken breasts completely dry with paper towels; moisture on the surface is the enemy of a good sear and a golden crust.
- In a small bowl, mix the paprika, garlic powder, oregano, onion powder, salt, and pepper. Rub a small amount of avocado oil over the chicken, then coat both sides generously with the spice blend, pressing it into the meat.
- Heat a heavy-bottomed skillet over medium-high heat until it is nearly smoking; add a tablespoon of oil and carefully lay the chicken in the pan, moving away from you to avoid splashes.
- Sear the chicken for 5 to 6 minutes on the first side without moving it, which allows a deep crust to form. Flip and cook for another 4 to 5 minutes.
- Use a meat thermometer to check for an internal temperature of 165°F (74°C). Once reached, transfer the chicken to a cutting board and let it rest for at least 5 minutes before slicing; this allows the juices to redistribute, ensuring every bite is incredibly juicy.
How to make keto pizza?

Why we love this
Keto pizza brings back the joy of a cheesy, savory slice without the heavy, bloated feeling that often follows a standard crust. There is a wonderful, toasted cheese aroma that fills the air as the ‘Fathead’ dough bakes to a golden perfection in the oven. The crust is surprisingly sturdy and chewy, providing the perfect platform for zesty tomato sauce, gooey mozzarella, and salty pepperoni. We love it because it turns a ‘cheat meal’ into a nutrient-dense, high-protein addition to your board that satisfies those comfort food cravings in the healthiest way possible.
Ingredients
- 1.5 cups shredded mozzarella (for the dough)
- 2 tablespoons cream cheese
- 3/4 cup almond flour
- 1 egg
- Toppings: Low-sugar marinara, more mozzarella, and fresh basil
How to make it
- In a microwave-safe bowl, combine the mozzarella and cream cheese; heat in 30-second intervals, stirring in between, until the cheese is completely melted and smooth.
- Quickly stir in the almond flour and the egg, mixing until a dough forms; if it gets too sticky, wet your hands slightly to work the dough into a cohesive ball.
- Place the dough between two sheets of parchment paper and roll it out into a thin circle or rectangle, about 1/4 inch thick.
- Remove the top layer of parchment and bake the crust at 425°F (220°C) for 8 to 10 minutes until it is lightly browned and firm to the touch.
- Add your marinara, extra cheese, and toppings, then return to the oven for another 5 minutes until the cheese is bubbly and charred at the edges. Garnish with fresh basil for a pop of color and aroma.
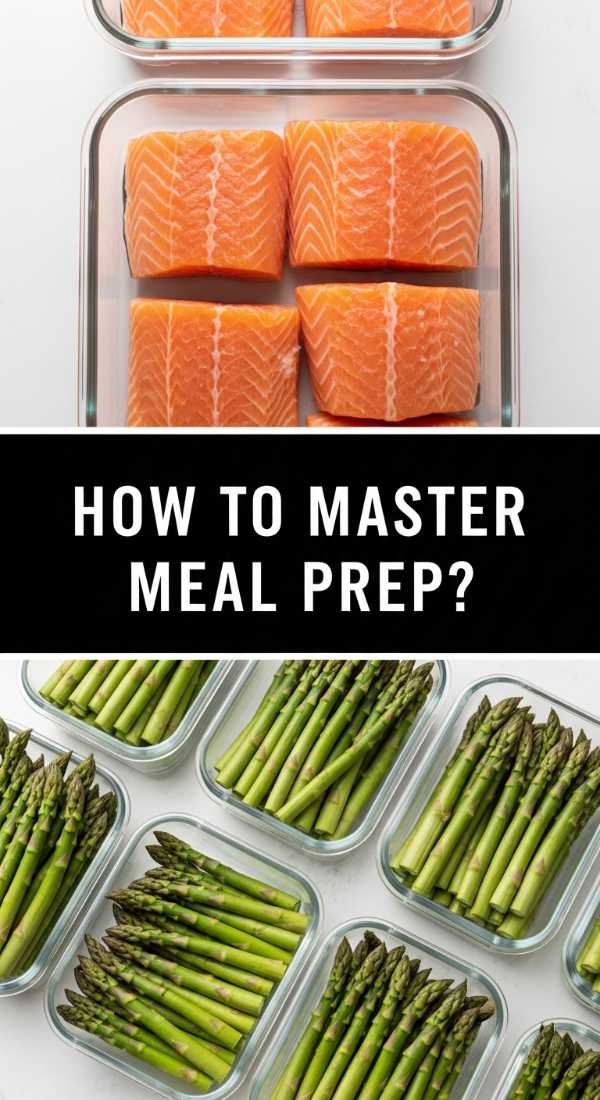
How to master meal prep?
Why we love this
Mastering the art of meal prep is like giving a gift to your future self, creating a sense of calm and organization that flows through your entire week. There is a deep satisfaction in seeing rows of colorful, glass containers filled with prepped ingredients, ready to be assembled into a viral food board at a moment’s notice. The kitchen smells like a busy workshop of health—roasted veggies, cooked grains, and washed greens all coming together in a symphony of efficiency. It eliminates decision fatigue and ensures that even on your busiest days, you have access to a meal that makes you feel vibrant and successful.
Ingredients
- Assorted glass storage containers
- Bulk proteins (chicken, tofu, eggs)
- Bulk grains or veggie bases (quinoa, cauliflower rice)
- Pre-washed greens and chopped raw veggies
- A variety of homemade dressings
How to make it
- Dedicate a 2-hour window on a Sunday to ‘component prepping’ rather than making full meals; this allows for more variety throughout the week.
- Start by roasting a large sheet pan of mixed vegetables (peppers, broccoli, sweet potatoes) at 400°F (200°C) until tender and caramelized.
- While the veggies roast, cook a large batch of your base (like quinoa or brown rice) and your main protein (like shredded chicken or boiled eggs).
- Wash and thoroughly dry all your salad greens using a salad spinner, then store them in a container lined with a dry paper towel to keep them crisp for up to 5 days.
- Whisk together two different dressings—perhaps a lemon vinaigrette and a creamy tahini—and store them in small jars. Now, assembling your viral food board takes less than 5 minutes each evening.
How to bake healthy cookies?

Why we love this
Healthy cookies are the ultimate afternoon pick-me-up, offering a soft, chewy texture and the warm, comforting scent of cinnamon and toasted oats. Unlike traditional cookies, these are packed with slow-releasing energy sources that keep you fueled without the sugar spikes and crashes. We love the way the dark chocolate chips melt into the warm oats, creating a gooey, satisfying treat that feels like a warm hug. Tucking a couple of these into the corner of your food board adds a delightful sweetness that complements the savory elements perfectly, making the meal feel like a complete experience from start to finish.
Ingredients
- 2 ripe bananas, mashed
- 1.5 cups rolled oats
- 1/4 cup almond butter
- 1/3 cup dark chocolate chips
- 1 teaspoon cinnamon and a pinch of salt
How to make it
- Preheat your oven to 350°F (175°C) and line a baking sheet with a silicone mat or parchment paper.
- In a large bowl, mash the ripe bananas until they are liquid and smooth with very few lumps; the riper the bananas, the sweeter the cookies will be.
- Stir in the almond butter and cinnamon until well incorporated, then fold in the rolled oats until every flake is coated in the banana mixture.
- Gently fold in the chocolate chips and a pinch of sea salt to enhance the flavors.
- Scoop tablespoon-sized mounds onto the baking sheet and flatten them slightly, as these cookies do not spread much. Bake for 12 to 15 minutes until the edges are firm and slightly golden; let them cool for 5 minutes on the pan to set their chewy structure.
How to blend fiber smoothies?
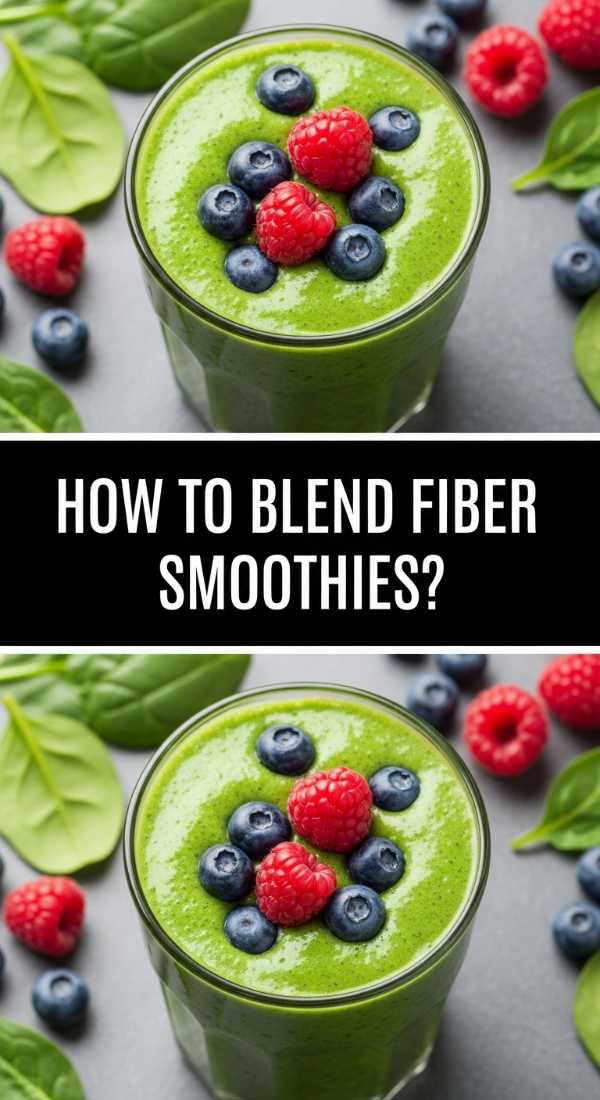
Why we love this
A fiber-rich smoothie is a vibrant, cold, and refreshing burst of energy that tastes like a tropical vacation in a glass. There is a silky, creamy mouthfeel that comes from blending frozen fruits with healthy fats like avocado or flax seeds, creating a thick texture you can almost eat with a spoon. The bright purple of blueberries or the deep green of spinach makes it a visually stunning addition to your morning routine. It’s a wonderful way to ‘sip’ your nutrients, providing a massive dose of antioxidants and fiber that leaves you feeling light, hydrated, and ready to conquer the day.
Ingredients
- 1 cup frozen mixed berries
- 1 handful of fresh spinach
- 1 tablespoon ground flax seeds or chia seeds
- 1/4 frozen avocado (for creaminess)
- 1 cup unsweetened almond milk
How to make it
- Layer your ingredients in the blender starting with the liquid base (almond milk) to ensure the blades can move freely and prevent ‘air pockets.’
- Add the spinach and the ‘fiber boosters’ like flax seeds and avocado next, followed by the frozen fruit on top to weigh everything down.
- Start the blender on a low speed to break up the frozen chunks, then gradually increase to high power for at least 45 to 60 seconds.
- The visual cue for a perfect blend is a smooth, swirling vortex with no visible flecks of green spinach remaining.
- If the smoothie is too thick, add a splash more almond milk; if too thin, add a few ice cubes and blend again until you reach a luscious, soft-serve consistency.
How to assemble clean bowls?
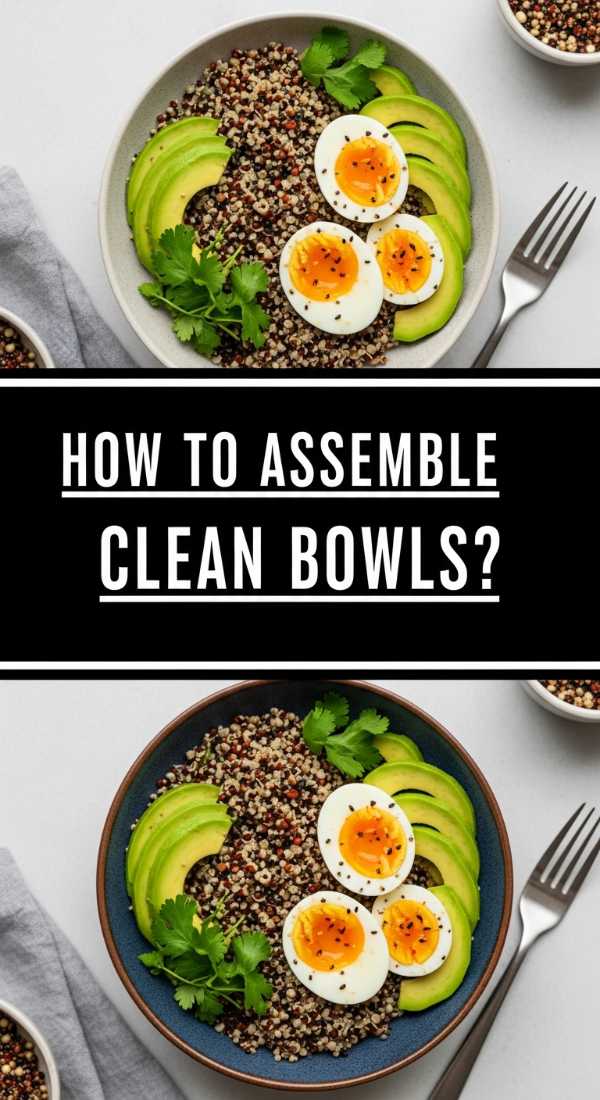
Why we love this
Assembling a clean bowl is an exercise in creativity and mindfulness, allowing you to build a masterpiece of nutrition that is perfectly tailored to your cravings. There is a satisfying weight to a well-built bowl, layered with different temperatures and textures—from warm grains to cold, crisp radishes. We love the way the colors pop against each other: the orange of roasted sweet potatoes, the green of sliced cucumber, and the creamy white of a dollop of Greek yogurt or hummus. It’s the ultimate expression of the ‘Simple Food Board’ philosophy, condensed into a single, portable vessel of health and happiness.
Ingredients
- Base: 1/2 cup cooked quinoa or cauliflower rice
- Protein: 4oz grilled chicken or tofu
- Veggie: 1 cup roasted broccoli and raw cucumbers
- Fat: 1/2 sliced avocado
- Topping: A drizzle of tahini and a sprinkle of hemp hearts
How to make it
- Start with your ‘base’ layer at the bottom of a wide, shallow bowl; spread it out to create a foundation for the other ingredients.
- Arrange your protein and vegetables in distinct ‘sections’ or ‘segments’ on top of the base; this keeps the flavors separate until you’re ready to mix, making for a better visual presentation.
- Place your healthy fats, like avocado or a scoop of hummus, in the center to act as a focal point.
- Drizzle your chosen dressing in a zigzag pattern across the entire bowl, ensuring every component gets a little bit of flavor.
- Finish with ‘texture toppers’ like hemp hearts, sesame seeds, or microgreens to add a professional, cafe-style aesthetic and an extra boost of micronutrients.
Elevating Your Lifestyle One Board at a Time
The beauty of the viral simple food board lies in its versatility and the way it honors the ingredients we put into our bodies. By focusing on whole foods, vibrant colors, and intentional preparation, we turn the necessity of eating into a highlight of our day. Whether you are hosting a friend or simply treating yourself to a quiet, nourishing evening, these recipes provide the perfect toolkit for a healthy, aesthetic, and delicious life. Start small, experiment with flavors, and most importantly, enjoy the process of creating something beautiful for yourself.