
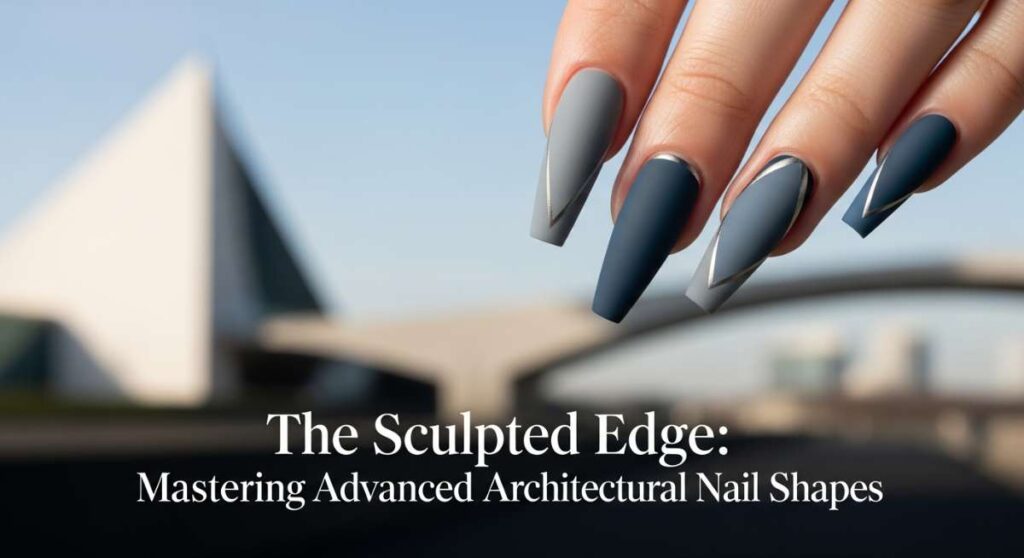
The Sculpted Edge: Mastering Advanced Architectural Nail Shapes
Hello, my loves! Grab your favorite mug of chamomile tea and find a cozy corner, because today we are diving into something that feels like a warm, cloud-soft embrace for your soul. There is a specific kind of magic in looking down at your hands and seeing a masterpiece—a reflection of your inner grace and strength. To me, a fresh manicure isn’t just about color; it’s a quiet ritual of self-love that reminds us we are worth the time and the artistry.
I’ve spent so many afternoons experimenting with the architecture of the nail, finding that perfect balance between structural strength and delicate beauty. Whether you’re a seasoned pro or just beginning to explore your creative side, I want you to feel that same spark of joy I do. Let’s walk through these tutorials together, holding space for creativity and the soft beauty of a well-sculpted edge.
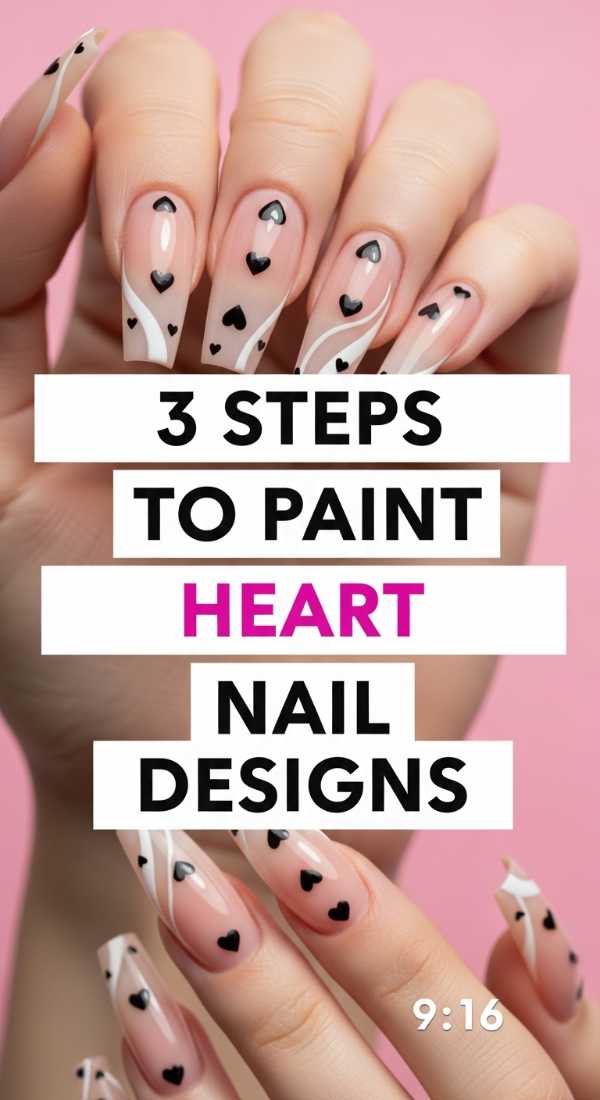
3 Steps to Paint Heart Nail Designs
Why to love these Nails:
There is nothing quite as sweet and tender as a tiny heart dancing on your fingertips. These nails are a love letter to yourself, reminding you to lead with kindness in everything you do. They are playful, romantic, and deceptively easy to achieve, making them perfect for those days when you need a little extra warmth.
Essential Items:
- Nude base polish
- Red or pink liner polish
- A thin dotting tool or toothpick
- Glossy top coat
How to Prepare:
- Apply two thin coats of your base color and let them dry completely for a smooth canvas.
- Use your dotting tool to place two small dots side-by-side where you want the top of the heart to be.
- Draw a small ‘V’ shape from the dots downward to meet at a point, then fill in the center to create a perfect heart.
Budget Range
- Essie Ballet Slippers ($10)
- Beetles Nail Art Liners ($15 for a set)
- Seche Vite Dry Fast Top Coat ($9)
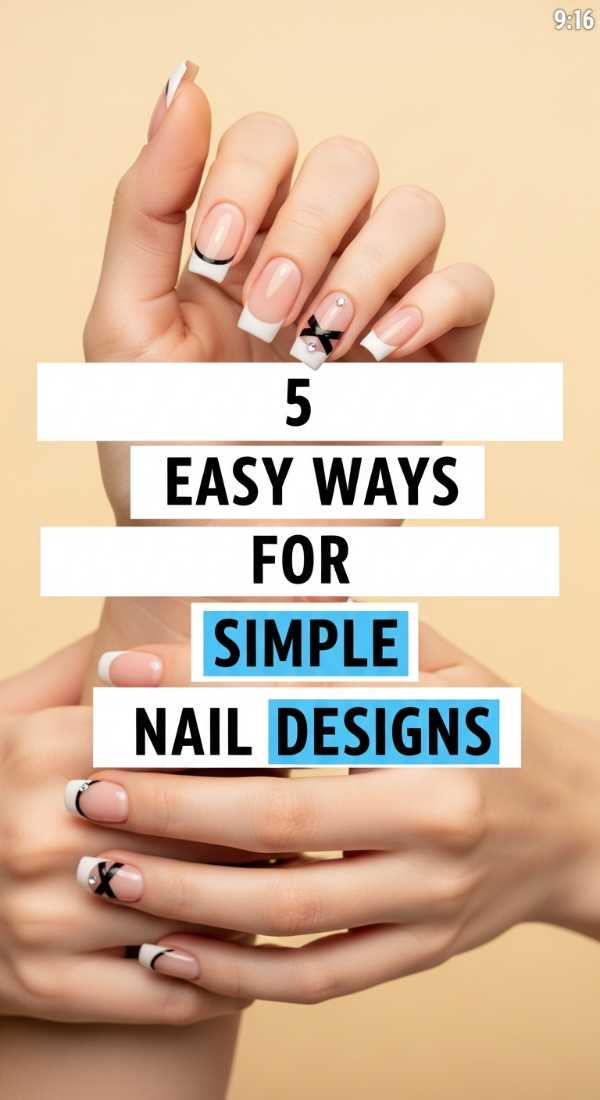
5 Easy Ways for Simple Nail Designs
Why to love these Nails:
Sometimes, the quietest designs speak the loudest. Simple designs allow the natural beauty of your hands to shine through without overwhelming the senses. It’s about finding peace in the minimal, creating a look that transitions effortlessly from a morning coffee run to a candlelit dinner.
Essential Items:
- Sheer pink polish
- Gold striping tape
- Matte top coat
- Small pearl accents
- Nail glue
How to Prepare:
- Cleanse your nails with alcohol to ensure a long-lasting bond.
- Apply a sheer base for a ‘your nails but better’ look.
- Place a single gold stripe vertically down the center of one accent nail.
- Add a tiny pearl at the cuticle of your ring finger for a touch of elegance.
- Seal everything with a matte or glossy top coat depending on your mood.
Budget Range
- Zoya Naked Manicure Kit ($25)
- Amazon Nail Art Tape ($6)
- Sally Hansen Matte Finisher ($7)
4 Steps to Create Spring Nail Designs

Why to love these Nails:
Spring is a season of rebirth, and these designs capture that hopeful energy. Think of soft petals and the first green shoots of the season. Wearing these feels like walking through a sun-drenched meadow, even if you’re just sitting at your desk.
Essential Items:
- Pastel lavender polish
- White acrylic paint or polish
- Detail brush
- Cuticle oil
How to Prepare:
- Shape your nails into a soft oval to mimic the curves of nature.
- Apply the lavender base to all nails and let dry.
- Using the detail brush, paint five small white dots in a circle to form a flower.
- Add a tiny yellow dot in the center and finish with a nourishing cuticle oil.
Budget Range
- OPI Hello Kitty Collection Pastels ($11 each)
- Winstonia Detail Brushes ($12)
- SolarOil Cuticle Care ($9)
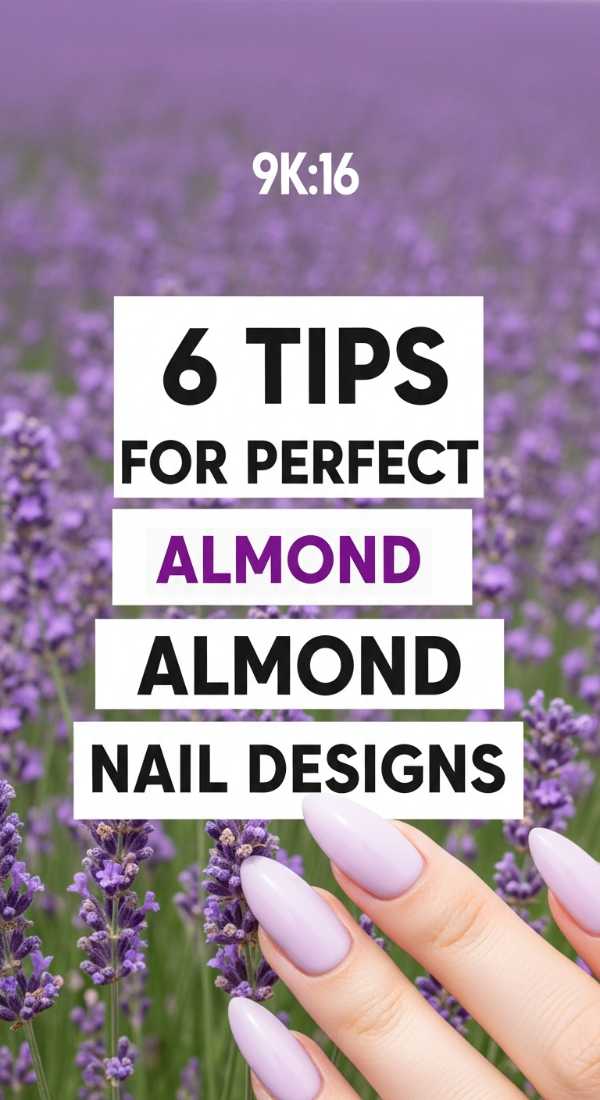
6 Tips for Perfect Almond Nail Designs
Why to love these Nails:
The almond shape is the ultimate sophisticated silhouette. It elongates the fingers and provides a graceful, feminine canvas for any art. It’s architectural yet soft, making it one of the most versatile shapes for the modern woman.
Essential Items:
- High-grit nail file
- Buffing block
- Base builder gel
- UV/LED lamp
- Lint-free wipes
- Alcohol cleanser
How to Prepare:
- Find the center point of your free edge to guide your filing.
- File the sides at a 45-degree angle toward the center.
- Round off the tip—it should look like an almond, not a point.
- Buff the surface gently to remove any ridges.
- Apply a builder gel to reinforce the structure.
- Cure under the lamp and wipe away the inhibition layer.
Budget Range
- Makartt Nail Files ($8)
- SUNUV 48W Lamp ($30)
- Orly Builder in a Bottle ($22)
5 Steps to Master Simple Spring Nails
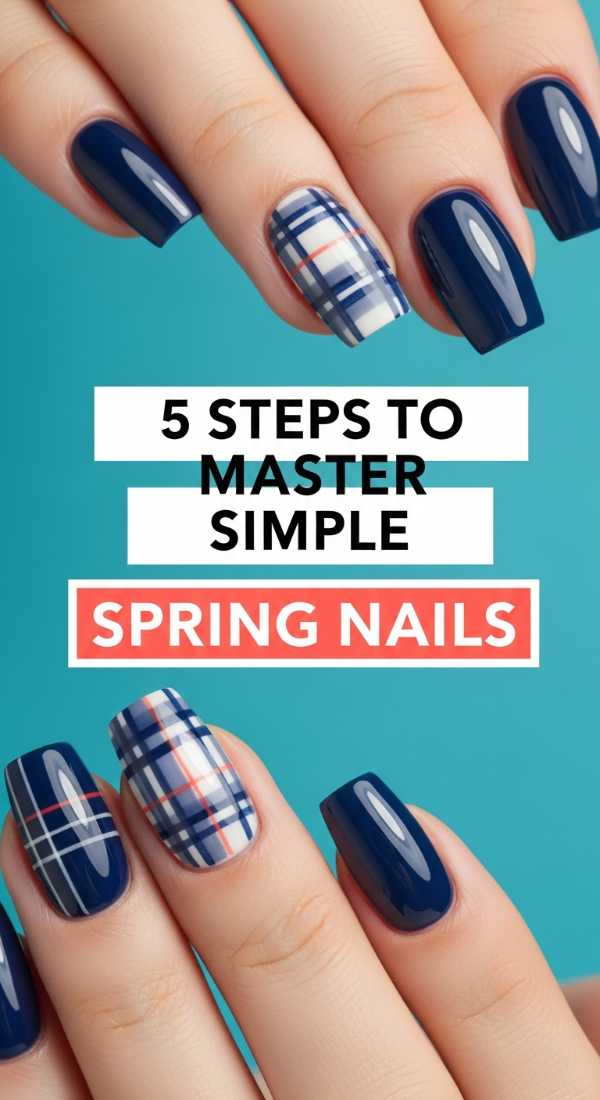
Why to love these Nails:
Spring doesn’t have to be complicated to be beautiful. This approach is all about fresh colors and breathable designs. It’s like a deep breath of fresh air for your aesthetic, keeping things light, airy, and effortlessly chic.
Essential Items:
- Mint green polish
- Sponge for ombre
- Peach polish
- Base coat
- Top coat
How to Prepare:
- Start with a protective base coat to prevent staining.
- Paint the bottom half of the nail in mint green.
- Apply peach polish to a makeup sponge and dab onto the top half.
- Repeat the dabbing until the gradient is smooth.
- Finish with a high-shine top coat to blend the colors.
Budget Range
- Olive & June Spring Set ($40)
- Makeup Sponges ($5)
- Holler and Glow Base Coat ($8)
3 Ways to Style Almond Spring Nails
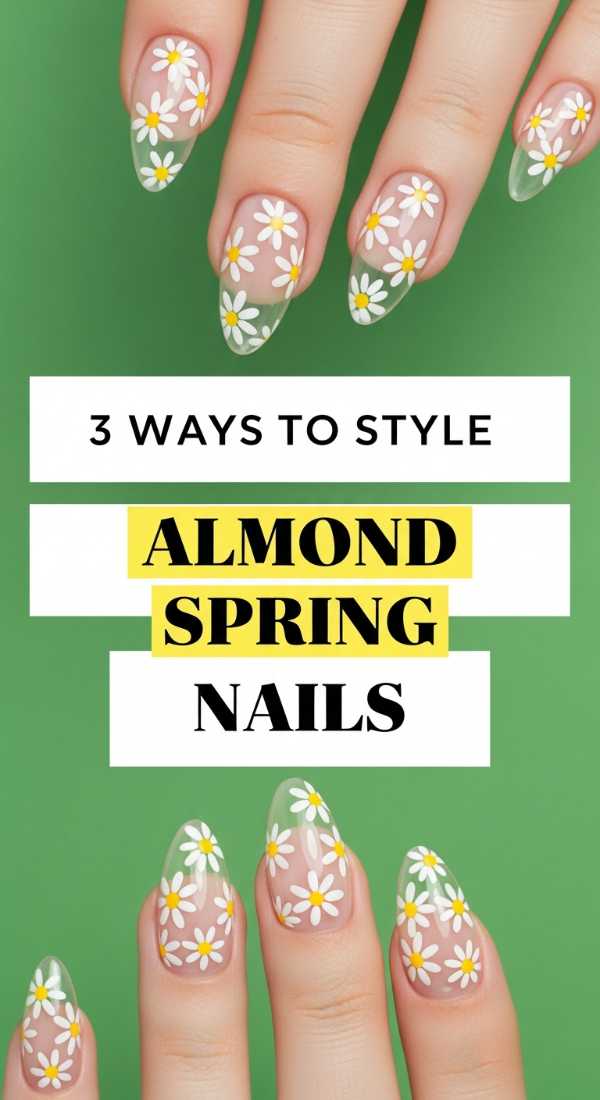
Why to love these Nails:
Styling your almond nails for spring is like picking out a fresh bouquet. You can go whimsical, classic, or modern. This versatility allows you to match your manicure to your favorite spring dresses and that glowing, sun-kissed skin.
Essential Items:
- Iridescent topper
- Floral decals
- Sky blue polish
How to Prepare:
- Option 1: Apply a sky blue base with a single floral decal on the ring finger.
- Option 2: Use the iridescent topper over a bare nail for a ‘glazed donut’ spring look.
- Option 3: Create a French tip using a pastel shade instead of traditional white.
Budget Range
- Lights Lacquer Polishes ($13)
- Etsy Floral Nail Decals ($5)
- Pearl Powder Pigment ($10)
4 Easy Steps for Chic Nail Design
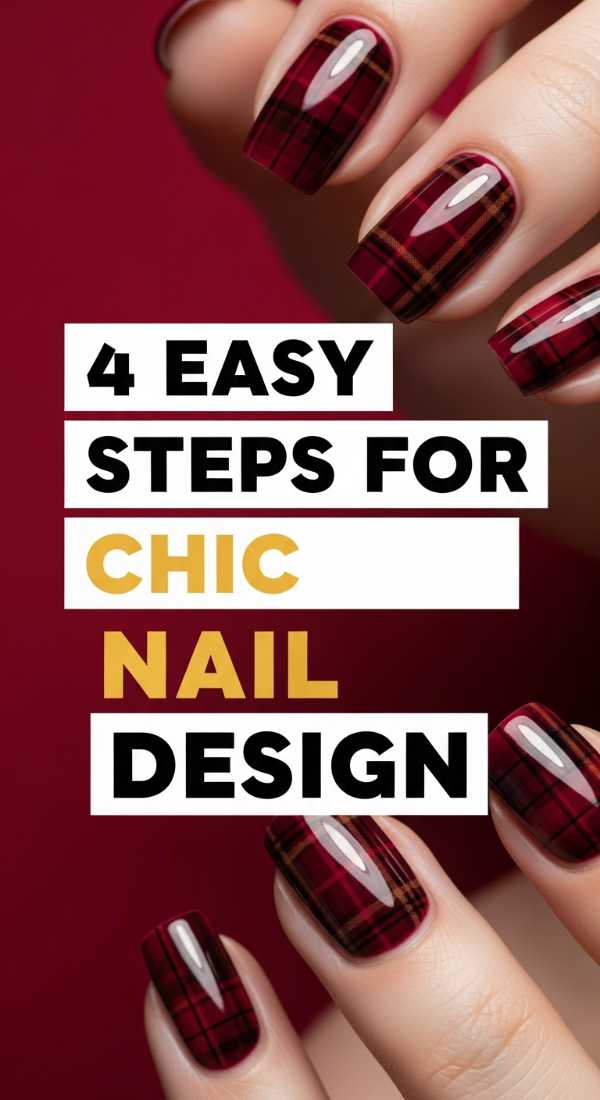
Why to love these Nails:
Chic is a mindset. These designs are for the woman who appreciates clean lines and editorial vibes. It’s about that ‘quiet luxury’ aesthetic that looks incredibly expensive but is secretly so easy to do at home.
Essential Items:
- Deep navy or black polish
- Silver foil flakes
- Clear extension gel
- Tweezers
How to Prepare:
- Paint your nails a solid, dark color for high contrast.
- While the polish is slightly tacky, use tweezers to place silver foil flakes randomly.
- Press the flakes down gently so they lay flat.
- Encapsulate with a thick layer of top coat for a smooth, glass-like finish.
Budget Range
- Chanel Le Vernis ($32)
- Nail Art Foil Gold/Silver Leaf ($7)
- Gelish Top It Off ($14)
5 Quick Tips for Simple Almond Nails
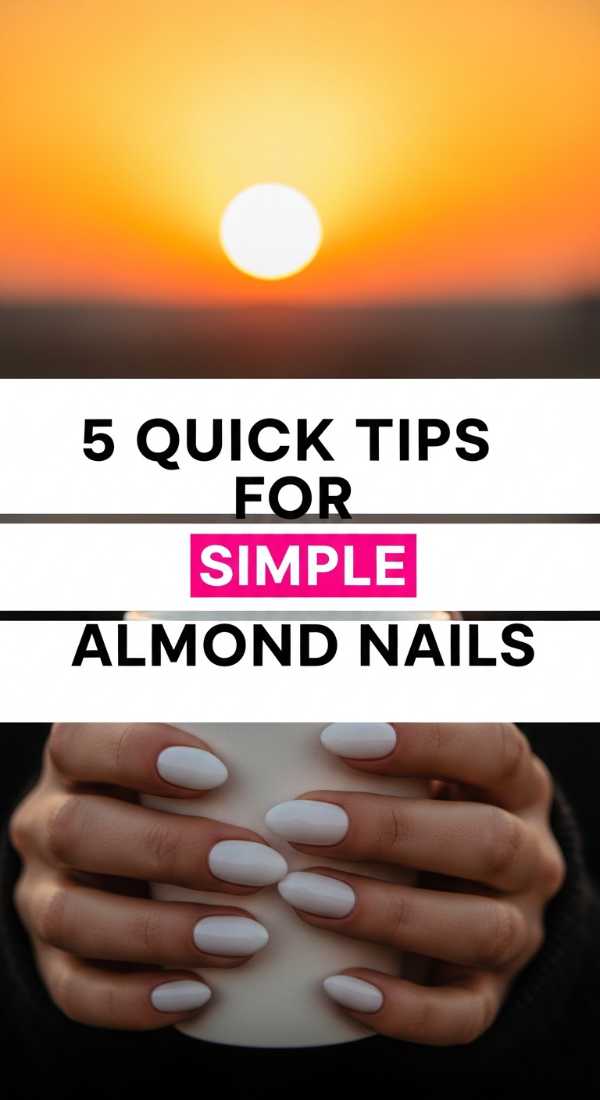
Why to love these Nails:
If you’re short on time but still want to feel polished, these tips are your best friend. Simple almond nails are the ‘white t-shirt’ of the nail world—always in style and always appropriate. They make your hands look manicured with minimal effort.
Essential Items:
- Glass nail file
- Nude polish
- Quick-dry spray
- Wooden cuticle stick
- Hand cream
How to Prepare:
- Use a glass file to prevent peeling and keep the almond shape crisp.
- Push back cuticles gently with a wooden stick—no cutting needed.
- Apply one coat of a ‘blurring’ nude polish to even out nail tone.
- Use a quick-dry spray so you can get back to your day in minutes.
- Massage in a rich hand cream to keep the skin around the almond shape soft.
Budget Range
- Bona Fide Glass File ($12)
- Dazzle Dry System ($20)
- L’Occitane Hand Cream ($13)
6 Steps for Professional Spring Nail Design
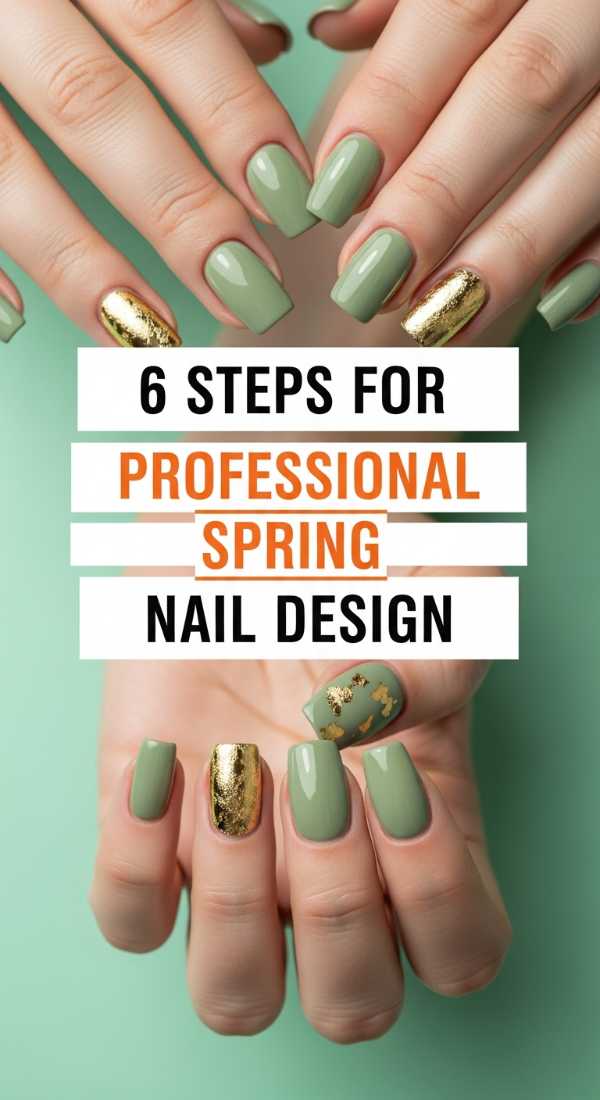
Why to love these Nails:
When you want that ‘just stepped out of the salon’ feeling, this professional-grade spring tutorial is for you. It combines technical precision with soft, seasonal colors for a result that is truly architectural and stunning.
Essential Items:
- Gel polish set
- Dotting tool
- Fine liner brush
- Matte and Glossy top coats
- Clean-up brush
- Acetone
How to Prepare:
- Prep the nail bed thoroughly by removing all oils.
- Apply a base gel and cure.
- Paint a geometric ‘half-moon’ design at the base using a spring pastel.
- Use the fine liner brush to outline the shape in a contrasting metallic.
- Mix matte and glossy textures—matte for the base, glossy for the tip.
- Use the clean-up brush dipped in acetone for crisp, professional edges.
Budget Range
- Kiara Sky Gel Polish ($15)
- Modelones Nail Art Brushes ($9)
- Pure Acetone ($6)
4 Ways to Do Simple Nail Design at Home
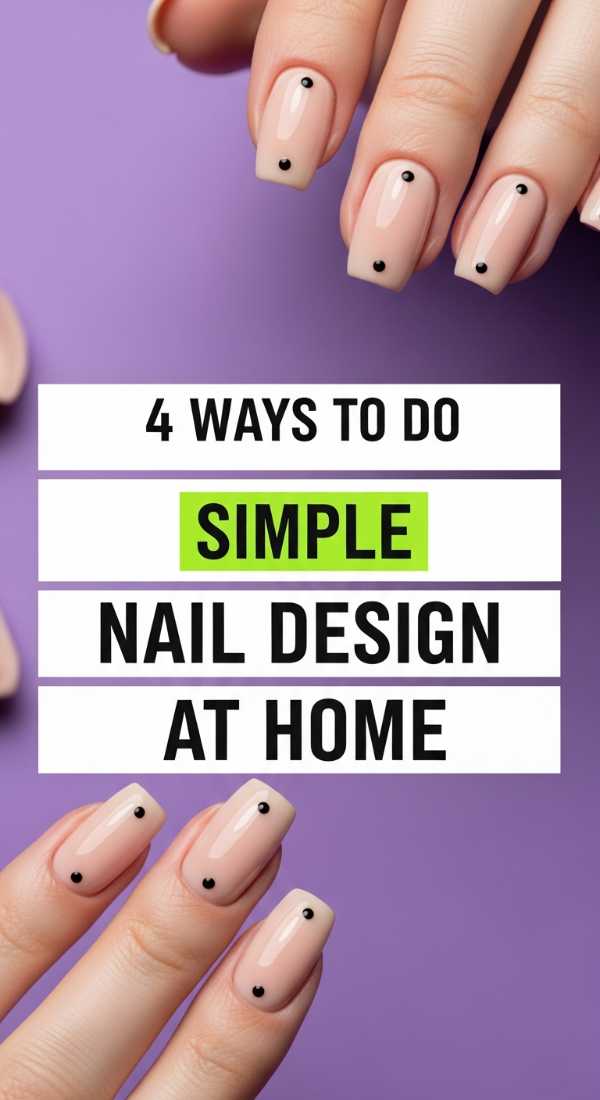
Why to love these Nails:
There is something so satisfying about being your own artist. Doing your nails at home is a form of meditation. It’s a time to slow down, focus on the details, and realize that you have the power to create beauty with your own two hands.
Essential Items:
- Standard polish in your favorite color
- A bobby pin (as a makeshift dotting tool)
- Tape
- Top coat
How to Prepare:
- The Dot Method: Use the end of a bobby pin to create perfect polka dots.
- The Tape Method: Use scotch tape to create sharp diagonal lines for a modern look.
- The Dry Brush: Wipe most of the polish off the brush and streak it over a base for an abstract effect.
- The Accent Nail: Keep four nails solid and use a glitter polish on just one for instant flair.
Budget Range
- Revlon Enamel ($6)
- Scotch Tape ($3)
- Bobby Pins ($2)
Conclusion
My loves, I hope these tutorials inspire you to take a moment for yourself this week. Whether you choose a simple almond shape or a complex spring floral, remember that the process is just as important as the result. Your hands do so much for you—they hold, they create, they comfort—so why not treat them to a little bit of architectural art? Stay soft, stay creative, and keep shining from the fingertips out. Until next time, keep embracing your own unique edge.