
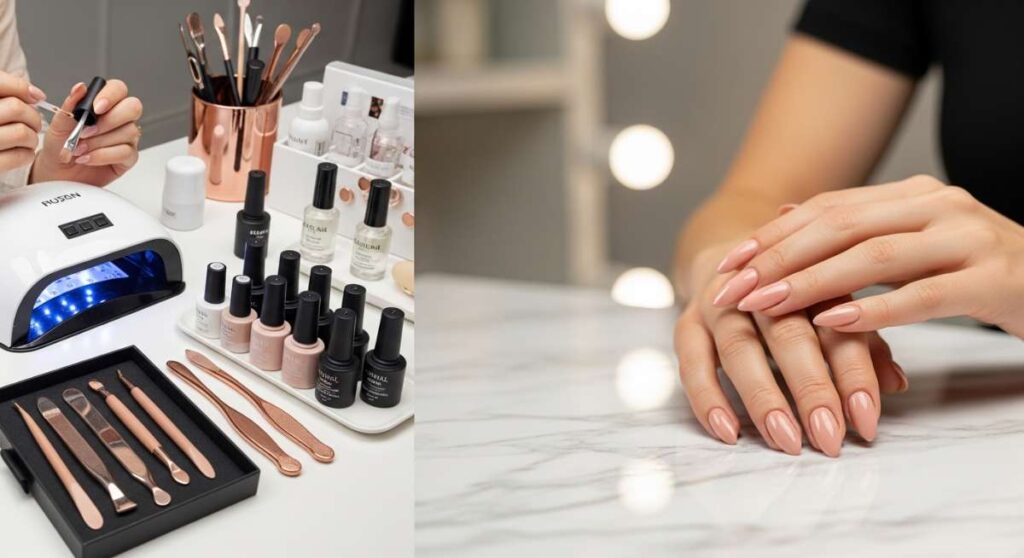
From Hobbyist to High-End: The Anatomy of a Flawless Professional Manicure
Hello, my loves! Welcome back to our cozy little corner of the internet. You know that feeling when you finally sit down after a long day, a warm cup of herbal tea by your side, and you just want to do something kind for yourself? For me, that magic moment has always been the ritual of a manicure. It’s more than just paint on a nail; it’s a tiny canvas where we express our moods, our dreams, and that soft, inner glow we all carry.
I remember when my own DIY attempts looked more like a finger-painting accident than a salon visit. But over time, I’ve learned that the secret to that ‘high-end’ look isn’t just about expensive products—it’s about the intention, the patience, and the gentle touch we give ourselves. Today, I’m so excited to walk you through a professional nail art masterclass, taking you from a hobbyist to a true artist in the comfort of your own sun-drenched living room.
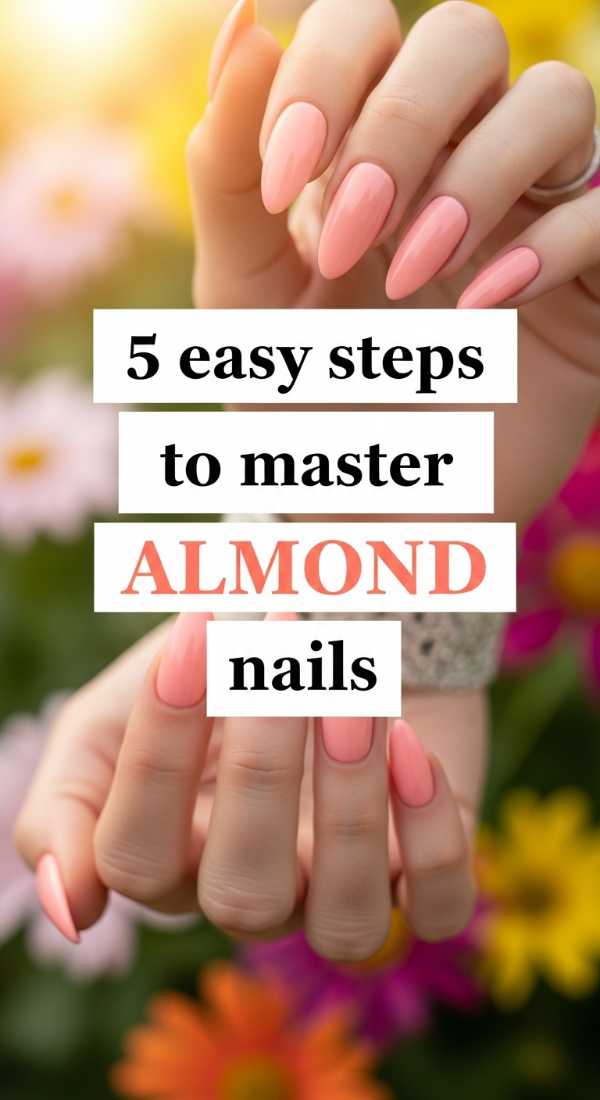
The Elegant Almond: 5 Steps to Master the Shape
Why to love these Nails:
The almond shape is like a soft hug for your fingers. It’s incredibly flattering, elongating the hand and providing a sophisticated, feminine silhouette that never goes out of style. It’s the ultimate choice for my loves who want a bit of everyday glamour without the sharpness of a stiletto.
Essential Items:
- 180-grit nail file
- Buffer block
- Glass file for finishing
- Cuticle oil
- Dusting brush
How to Prepare:
- Find the center point of your free edge to act as your ‘peak’ guide.
- File the sides at a 45-degree angle toward that center point.
- Taper the tip into a soft, rounded point—avoiding any flat edges.
- Smooth the transitions with your buffer to ensure a seamless curve.
- Finish with a glass file to seal the nail layers and prevent peeling.
Budget Range
- Basic File Set: $5 – $10 (Revlon/Sally Hansen)
- Pro Glass File: $12 – $18 (Mont Bleu)
- Nourishing Oil: $8 (CND SolarOil)
Mirror Magic: 4 Simple Hacks for Trendy Chrome Nails

Why to love these Nails:
There is something so ethereal about chrome nails; they catch the light like a morning dewdrop. They bring a futuristic, high-fashion energy to your fingertips while remaining surprisingly wearable when paired with soft, neutral base colors.
Essential Items:
- No-wipe gel top coat
- Chrome pigment powder
- Sponge applicator
- Soft fluffy brush
How to Prepare:
- Hack 1: Always apply over a perfectly smooth, no-wipe top coat that has been cured for exactly 30 seconds.
- Hack 2: Use a silicone tool or sponge to burnish the powder until it turns into a mirror finish.
- Hack 3: Gently brush away excess powder before sealing to avoid a ‘glittery’ look.
- Hack 4: Double-seal the free edge with a second layer of top coat to prevent chipping.
Budget Range
- Chrome Powder Pots: $3 – $7 (Amazon/Born Pretty)
- UV LED Lamp: $20 – $40 (SunUV)
- No-Wipe Top Coat: $10 (Kupa or Beetles)
The Perfect Blush: 6 Steps to Achieve Perfect Pink Nails

Why to love these Nails:
Pink is the color of a soft heart and a gentle spirit. Whether it’s a sheer petal hue or a bold magenta, pink nails offer a timeless cleanliness that makes your hands look healthy, youthful, and oh-so-delicate.
Essential Items:
- Sheer pink polish
- Opaque crème pink polish
- Base coat
- Glossy top coat
- Cleanup brush
- Acetone
How to Prepare:
- Apply a ridge-filling base coat to create a smooth canvas.
- Apply one very thin layer of opaque pink to neutralize the nail bed color.
- Layer two coats of your favorite sheer pink on top for a ‘jelly’ depth.
- Keep the polish away from the cuticle line, leaving a hair-thin gap.
- Use a cleanup brush dipped in acetone to perfect the curve around the base.
- Seal with a high-shine top coat for that ‘wet look’ finish.
Budget Range
- Drugstore Classics: $6 (Essie ‘Ballet Slippers’)
- Luxury Choice: $28 (Dior Abricot)
- Cleanup Brushes: $5 (Generic Kolinsky)
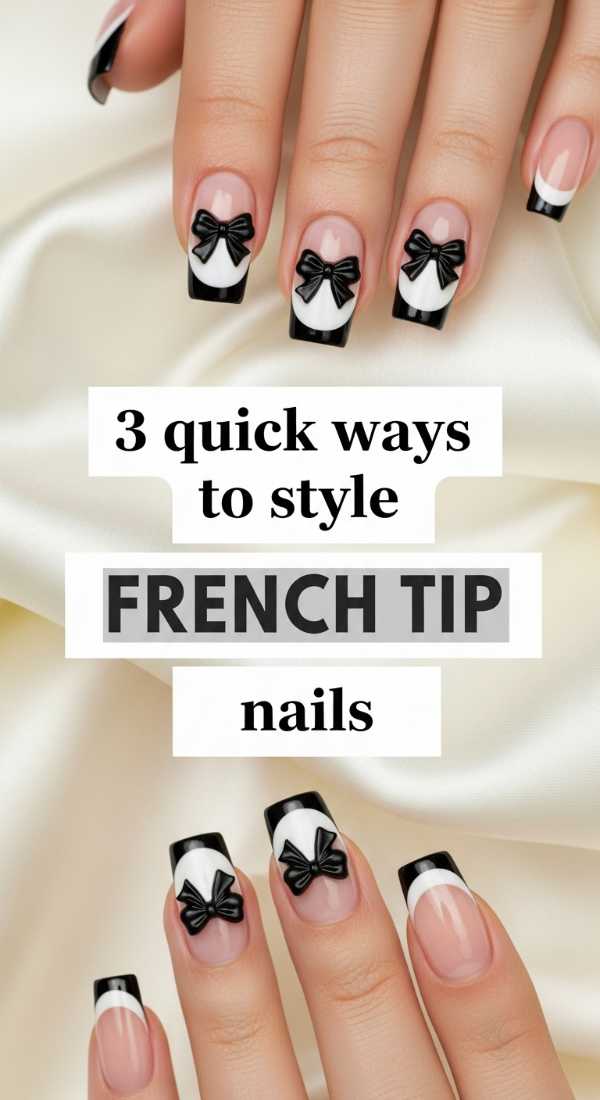
Timeless Chic: 3 Quick Ways to Style French Tip Nails
Why to love these Nails:
The French manicure is the ‘little black dress’ of the nail world. It’s clean, professional, and radiates a quiet luxury that says you’ve got your life together—even if you’re still working on it, just like the rest of us!
Essential Items:
- French white liner polish
- Silicone nail stamper
- Nude base color
How to Prepare:
- Way 1: Use a silicone stamper by painting a line of white on the pad and gently pressing your nail tip into it at an angle.
- Way 2: Use a long-haired liner brush to draw a ‘smile line’ from the sidewalls to the center.
- Way 3: Try a ‘micro-french’ by painting only the very edge of the nail for a modern, minimalist twist.
Budget Range
- French Tip Pen: $8 (Sally Hansen)
- Silicone Stamper: $5 (Maniology)
- Liner Brushes: $7 (Set of 3)
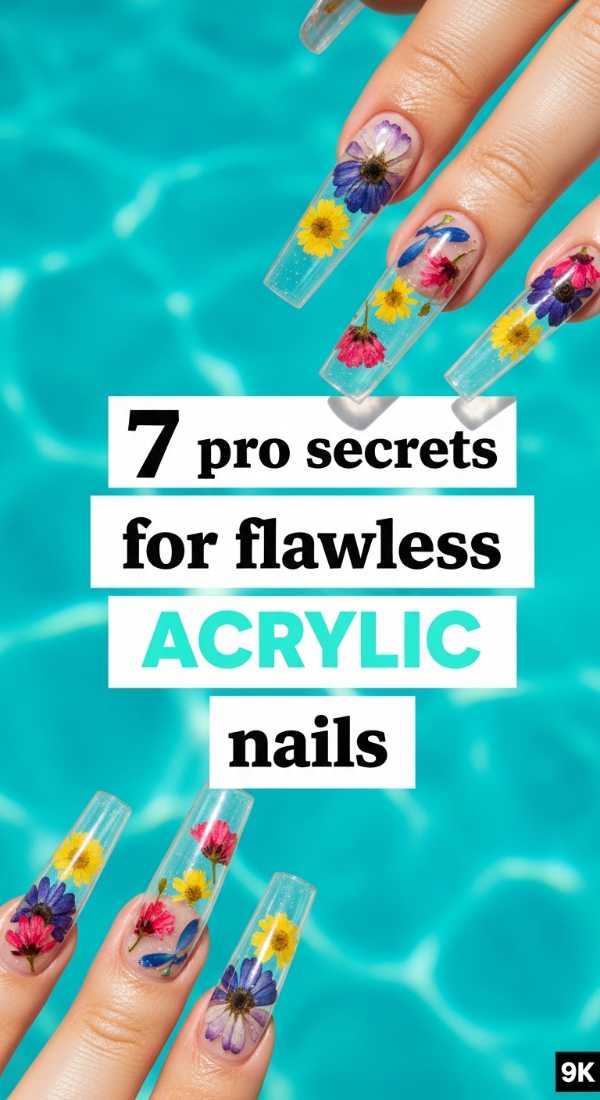
Structural Integrity: 7 Pro Secrets for Flawless Acrylic Nails
Why to love these Nails:
Acrylics are for my loves who want strength and length. They are the ultimate transformation, allowing you to create a uniform look even if your natural nails are prone to breaking. They are a statement of power and self-care.
Essential Items:
- Acrylic monomer
- Polymer powder
- Size 8 Kolinsky brush
- Nail primers
- Dappen dish
- Nail forms
- E-file or heavy-grit file
How to Prepare:
- Secret 1: Ensure the nail plate is completely dehydrated using a pH bonder.
- Secret 2: Use the ‘three-bead’ method—one for the free edge, one for the apex, and one for the cuticle.
- Secret 3: Keep your liquid-to-powder ratio perfect; the bead should look like a smooth pearl.
- Secret 4: Build a proper ‘apex’ (the highest point) to prevent snapping.
- Secret 5: Use ‘pinching’ tools while the acrylic is setting to create a slim C-curve.
- Secret 6: Finish-file the sidewalls perfectly straight for a professional look.
- Secret 7: Apply cuticle oil immediately after buffing to rehydrate the skin.
Budget Range
- Starter Kit: $30 – $50 (Mia Secret)
- Professional Brush: $40 – $100 (Alpha Brush)
- Monomer/Powder: $20 each (Young Nails)
Soft Whispers: 5 Easy Methods for Aesthetic Pastel Nails
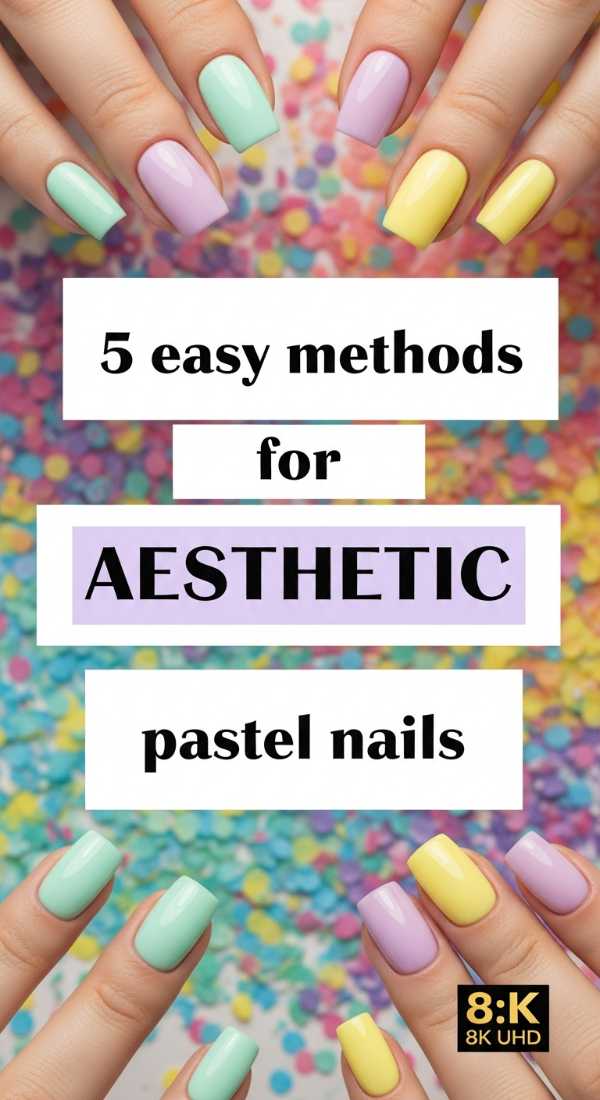
Why to love these Nails:
Pastels are like a breath of fresh spring air. Lavender, mint, and buttery yellow bring a sense of calm and playfulness to your routine. They are soft enough for the office but trendy enough for a weekend brunch with the girls.
Essential Items:
- Pastel polish set
- White base polish
- Matte top coat
- Makeup sponge
- Dotting tool
How to Prepare:
- Method 1: Apply a coat of white polish first to make the pastel colors ‘pop’ without needing five coats.
- Method 2: Create a gradient by sponging two pastels together for a ‘cloud’ effect.
- Method 3: Use a matte top coat to give pastels a modern, velvety feel.
- Method 4: Add simple white dots at the base of each nail for a dainty floral vibe.
- Method 5: Mix a drop of pastel with clear top coat to create a trendy ‘syrup’ nail look.
Budget Range
- Pastel Collection: $15 (Beetles Gel Polish Set)
- White Base: $9 (OPI Alpine Snow)
- Matte Top: $8 (Zoya)
The Big Day: 4 Steps to Create Elegant Bridal Nails
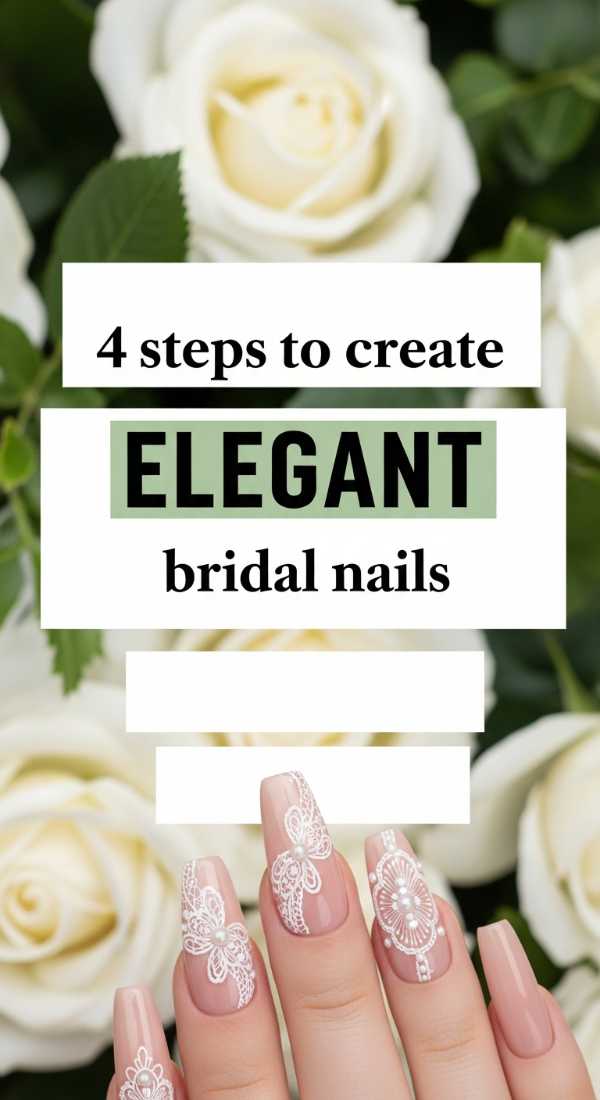
Why to love these Nails:
On your wedding day, your hands will be in focus more than ever. Bridal nails should be a soft accompaniment to your ring and gown—timeless, elegant, and glowing with love and joy.
Essential Items:
- Champagne shimmer polish
- Fine glitter top coat
- Buffer
- Hand mask
How to Prepare:
- Shape the nails into a soft oval or squoval to avoid snagging on delicate lace or tulle.
- Choose a color that matches the undertone of your dress (warm ivory vs. cool white).
- Add a ‘something blue’ hidden on the underside of the nail or as a tiny dot.
- Indulge in a paraffin wax treatment or hand mask the night before for photo-ready skin.
Budget Range
- Bridal Polish: $12 (Essie Gel Couture)
- Hand Mask: $4 (Aveeno)
- Buffer: $2 (Sally Beauty)
Starry Nights: 5 Simple Techniques for Glitter Nails
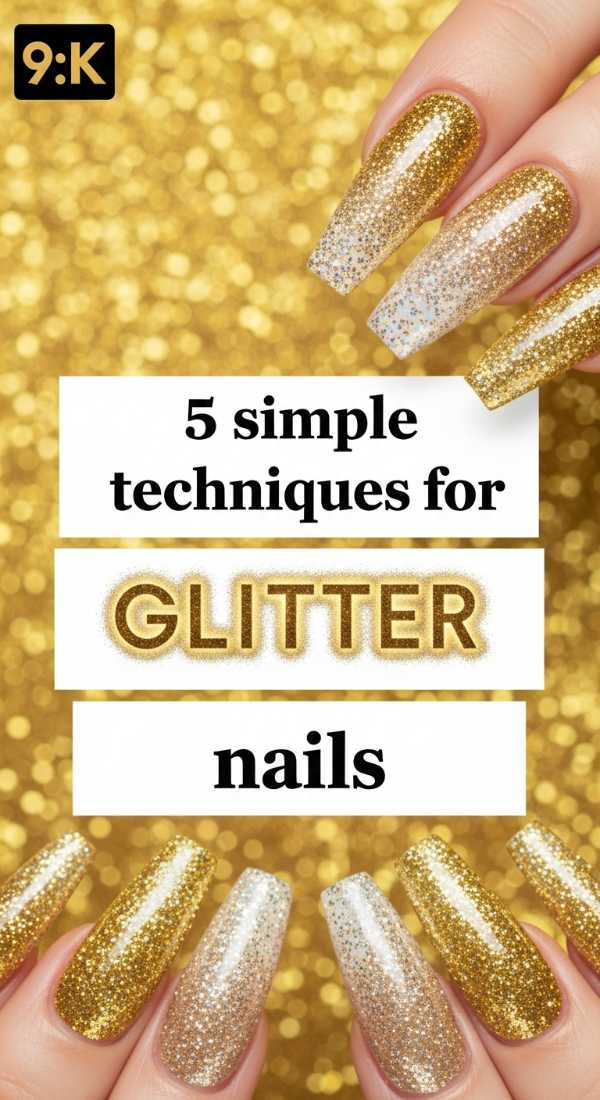
Why to love these Nails:
Glitter is pure joy in a bottle! It’s for the days when you need a little extra sparkle in your step. It’s festive, fun, and surprisingly versatile depending on how you apply it.
Essential Items:
- Loose glitter
- Glitter polish
- Makeup sponge
- Peel-off base coat
How to Prepare:
- Technique 1: Use a makeup sponge to ‘dab’ glitter polish on; the sponge absorbs the clear base, leaving a dense layer of glitter.
- Technique 2: Try a ‘glitter ombre’ by concentrating the sparkle at the tip and fading it toward the cuticle.
- Technique 3: Burnish fine holographic glitter into a tacky gel layer for a ‘sugar’ effect.
- Technique 4: Use a peel-off base coat to make removal a breeze (no more scrubbing!).
- Technique 5: Encapsulate chunky glitter under a thick layer of top coat for a smooth, glass-like finish.
Budget Range
- Loose Glitter: $5 (Craft store/Etsy)
- Glitter Polish: $10 (Holo Taco)
- Peel-off Base: $12 (UNT Ready for Takeoff)
Sun-Kissed: 3 Ways to Paint Cute Summer Nails
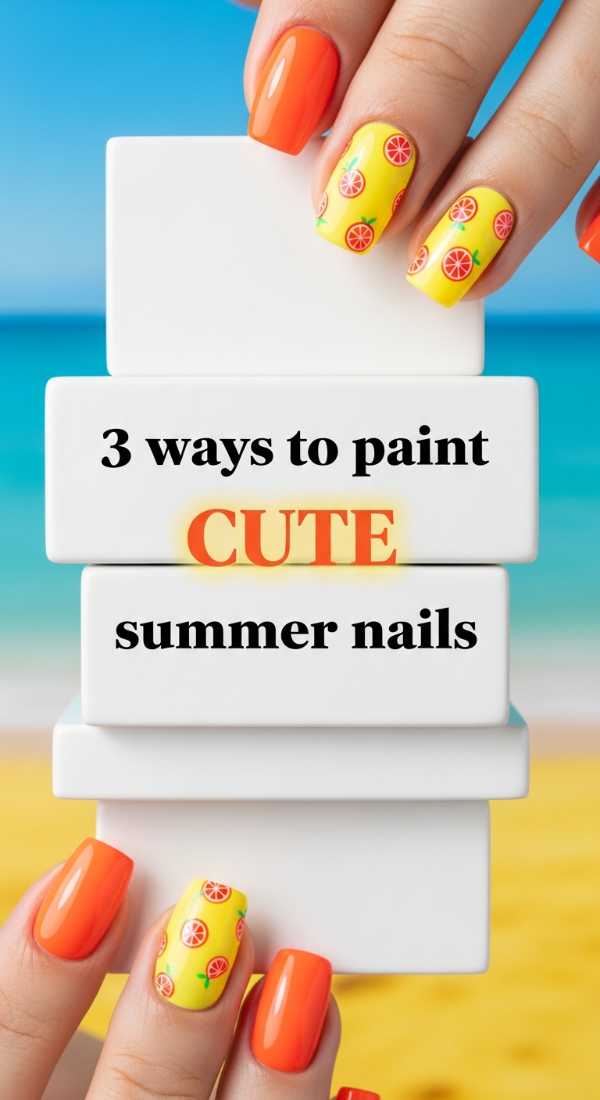
Why to love these Nails:
Summer nails are all about adventure! Bright corals, neon yellows, and playful patterns reflect the heat of the sun and the coolness of the pool. They are your best accessory for every beach day.
Essential Items:
- Neon polishes
- Fruit decals
- Glossy top coat
How to Prepare:
- Way 1: Go for ‘mismatched’ neons—each finger a different bright, sunny shade.
- Way 2: Apply tiny fruit decals (like lemons or strawberries) over a clear base for a fresh look.
- Way 3: Create ‘aura nails’ by blooming a bright color in the center of a neutral base using a sponge.
Budget Range
- Neon Set: $12 (Orly Mini Pack)
- Decals: $3 (Shein/Amazon)
- Top Coat: $7 (Seche Vite)
Quiet Luxury: 6 Steps for Professional Minimalist Nails
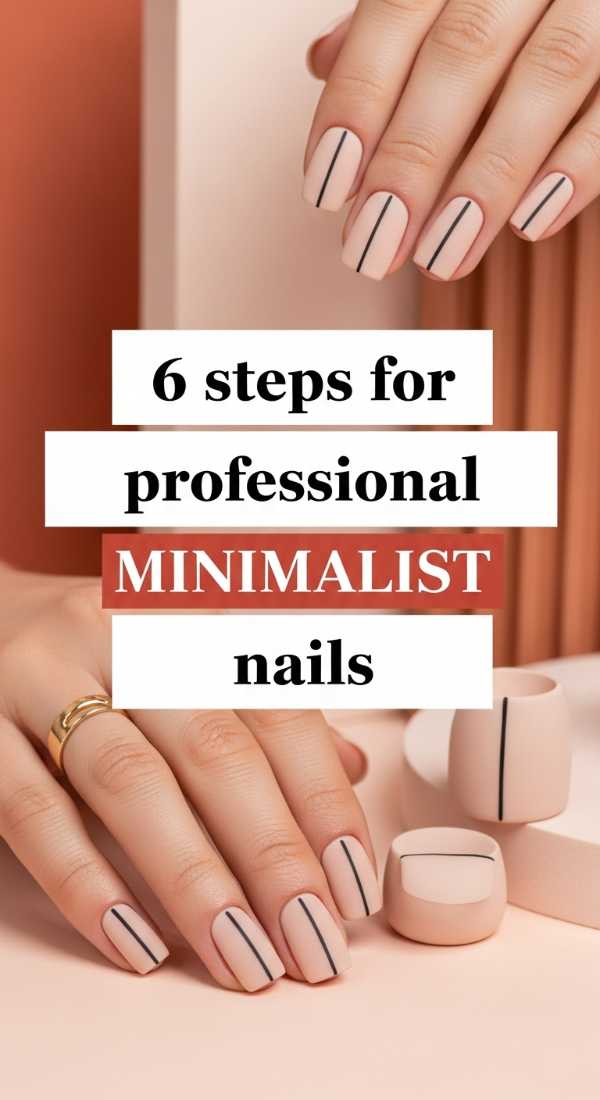
Why to love these Nails:
Minimalism is an art form in itself. It’s for the woman who finds beauty in the ‘less is more’ philosophy. It’s clean, intentional, and exudes an effortless confidence that is incredibly modern.
Essential Items:
- Beige or tan nude polish
- Matte top coat
- Striper brush
- Black polish
How to Prepare:
- Perfect the cuticle area with gentle pushing and trimming—this is the focus of minimalism.
- Apply two coats of a ‘your nails but better’ nude shade.
- Add a single, razor-thin vertical line down the center of the ring finger.
- Ensure the polish application is incredibly thin to avoid any bulk.
- Finish with a satin or matte top coat for an ‘editorial’ feel.
- Keep the nail length short and active for a practical yet chic aesthetic.
Budget Range
- Nude Polish: $10 (Olive & June)
- Striper Brush: $5 (Amazon)
- Matte Top Coat: $9 (Essie)
Embracing Your Inner Artist
My loves, I hope this masterclass has inspired you to pick up your files and polishes with a new sense of wonder. Remember, beauty isn’t about perfection; it’s about the time you carve out for yourself in this busy world. Each stroke of the brush is a reminder that you are worth the effort, the patience, and the glow. Whether you choose the quiet luxury of a minimalist look or the bold shine of chrome, wear it with your head held high. You are your own masterpiece! Until next time, stay beautiful and keep shining.